the JB3 pin out install - Burger Motorsports
the JB3 pin out install - Burger Motorsports
the JB3 pin out install - Burger Motorsports

You also want an ePaper? Increase the reach of your titles
YUMPU automatically turns print PDFs into web optimized ePapers that Google loves.
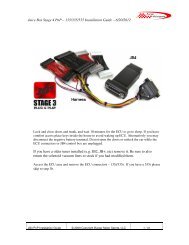
Juice Box Stage 3 Professional (Pin <strong>out</strong>) Installation Guide – 5/13/09<br />
<strong>JB3</strong> professional/<strong>pin</strong>-<strong>out</strong> is intended for experienced enthusiasts only. If this is your first<br />
<strong>install</strong> please have someone on hand who has performed an <strong>install</strong> before. You can also<br />
review <strong>the</strong> <strong>install</strong> video on our website ahead of time to prepare.<br />
The directions in this guide supersede <strong>the</strong> <strong>install</strong> video. Use <strong>the</strong> video for reference but follow<br />
this guide.<br />
1) Lock and close doors and trunk, and wait 10 minutes for <strong>the</strong> ECU to go to sleep. If you<br />
have comfort access place keys inside <strong>the</strong> house to avoid waking up ECU. Alternatively you<br />
may disconnect <strong>the</strong> negative battery terminal. Do not open <strong>the</strong> doors or unlock <strong>the</strong> car while<br />
<strong>the</strong> ECU connectors or <strong>JB3</strong> control box are unplugged.<br />
2) If you have a tuner <strong>install</strong>ed (e.g. JB2) remove it. Be sure to also return <strong>the</strong> solenoid<br />
vacuum lines to stock. If equipped with a downpipe fix or sim ensure <strong>the</strong> black wire<br />
(ground) is in <strong>the</strong> #23 spot on <strong>the</strong> small black subconnector and not shared with <strong>the</strong> <strong>JB3</strong>.<br />
3) Access <strong>the</strong> ECU area using <strong>the</strong> Stage 1 / Stage 2 <strong>install</strong> guide and remove both <strong>the</strong> left and<br />
right ECU connectors. Slide each of <strong>the</strong> subconnectors <strong>out</strong> one by one as you <strong>install</strong> <strong>the</strong> <strong>JB3</strong><br />
harness wires as indicated below. The small ECU connector requires you to remove <strong>the</strong> slider<br />
per <strong>the</strong> Stage 1 / Stage 2 <strong>install</strong> guide to access <strong>the</strong> small black and grey subconnectors.<br />
<strong>JB3</strong> Pin Out Installation Guide<br />
© 2009 Copyright <strong>Burger</strong> Motor Sports, LLC<br />
1 / 9
Juice Box Stage 3 Professional (Pin <strong>out</strong>) Installation Guide – 5/13/09<br />
Removing <strong>the</strong> slider from <strong>the</strong> smaller driver side subconnector:<br />
4) The harness is split in to four bundles, one for each subconnector. Take care to do one wire<br />
at a time as several ECU wires are <strong>the</strong> same color. Be careful to avoid mixing up <strong>the</strong> light red<br />
and dark red <strong>JB3</strong> wires, <strong>the</strong> dark red wires will be in <strong>the</strong>ir own small bundle. When securing<br />
<strong>the</strong> male and female <strong>pin</strong>s be sure to use a small (~1") piece of tape and fold it in half over <strong>the</strong><br />
connection. Inserting <strong>the</strong> male <strong>pin</strong> at an angle can provide a more secure connection. Pinch<br />
<strong>the</strong> tape secure while verifying <strong>the</strong> male <strong>pin</strong> is fully inserted. Always check <strong>the</strong> count after<br />
inserting <strong>the</strong> <strong>pin</strong> as <strong>the</strong> ECU has many blanks and it is easy to insert a JB wire in <strong>the</strong> wrong<br />
slot. Finally always check <strong>the</strong> wire color to ensure you have extracted <strong>the</strong> correct wire.<br />
<strong>JB3</strong> Pin Out Installation Guide<br />
© 2009 Copyright <strong>Burger</strong> Motor Sports, LLC<br />
2 / 9
Juice Box Stage 3 Professional (Pin <strong>out</strong>) Installation Guide – 5/13/09<br />
Large black subconnector:<br />
<strong>JB3</strong> yellow: slot 10 (boost, yellow wire)<br />
<strong>JB3</strong> light red: slot 11 (power, 5v reference, blue/yellow wire)<br />
<strong>JB3</strong> brown: slot 17 (air intake temperature, red/yellow wire)<br />
<strong>JB3</strong> white: slot 29 (crank position, yellow wire)<br />
<strong>JB3</strong> black: slot 32 (ground, red/black wire)<br />
White subconnector:<br />
<strong>JB3</strong> purple: slot 7 (boost solenoid 1, white/grey wire)<br />
<strong>JB3</strong> green: slot 14 (boost solenoid 2, white wire)<br />
<strong>JB3</strong> gray: slot 9 (fuel pressure, yellow/red wire, connect on all models)<br />
Small black subconnector:<br />
<strong>JB3</strong> orange: slot 6 (oxygen sensor 1, yellow/white wire with 525 stamped on insulation)<br />
<strong>JB3</strong> blue: slot 7 (oxygen sensor 2, yellow/white wire)<br />
Grey subconnector:<br />
<strong>JB3</strong> dark red: slot 7 (throttle position, yellow/white wire. May be blue/white on 535)<br />
<strong>JB3</strong> Pin Out Installation Guide<br />
© 2009 Copyright <strong>Burger</strong> Motor Sports, LLC<br />
3 / 9
Juice Box Stage 3 Professional (Pin <strong>out</strong>) Installation Guide – 5/13/09<br />
Photo of small black subconnector with <strong>JB3</strong> loom <strong>install</strong>ed:<br />
<strong>JB3</strong> Pin Out Installation Guide<br />
© 2009 Copyright <strong>Burger</strong> Motor Sports, LLC<br />
4 / 9
Juice Box Stage 3 Professional (Pin <strong>out</strong>) Installation Guide – 5/13/09<br />
5) Slide <strong>JB3</strong> box in to an empty shelf in <strong>the</strong> ECU box.<br />
6) If you disconnected <strong>the</strong> battery reconnect <strong>the</strong> negative battery terminal. Upon first<br />
starting <strong>the</strong> car you will have a clock warning (triangle with ! in <strong>the</strong> middle of it). All wheel<br />
drive (Xi) models may also have a DTS/DTC warning message, which will turn itself off<br />
after a short drive. It is also not uncommon to have to set <strong>the</strong> clock 2 or 3 times before it<br />
saves.<br />
7) Before re<strong>install</strong>ing cowl and covers start <strong>the</strong> car. If it fails to start, takes a long time to<br />
start, shows a picture of a half yellow engine in <strong>the</strong> dash (CEL), an orange service engine<br />
soon light (SES), or runs extremely rough, please refer to <strong>the</strong> troubleshooting guide below.<br />
Assuming all is well re<strong>install</strong> <strong>the</strong> ECU cover, factory cowl, and related parts.<br />
Congratulations, <strong>install</strong>ation is complete! It will take a day or two for <strong>the</strong> ECU to adapt to <strong>the</strong><br />
new tune, so drive as you normally would and <strong>the</strong> car will gradually pickup power as time<br />
passes. By default map 3 is selected.<br />
Remember to always use 91 octane (USA RM/2 standard) or higher grade fuel. The higher<br />
<strong>the</strong> octane, <strong>the</strong> more power you will make. 93 octane will make more power than 91 octane,<br />
and 100 octane or a mix will make more power than straight 93 octane. Never use leaded or<br />
low lead fuel as it will damage your o2 sensors and/or catalytic converters. For extended load<br />
use (e.g. road race course) mixing in higher octane fuel is suggested.<br />
*** DISCLAIMER ***<br />
Because of its intended usage, <strong>Burger</strong> <strong>Motorsports</strong>, LLC & Terry <strong>Burger</strong> make no warranties<br />
whatsoever, expressed or implied, written or oral, to purchasers of <strong>Burger</strong> <strong>Motorsports</strong><br />
products regarding performance, safety, fit, merchantability, length of service, or for any<br />
o<strong>the</strong>r criteria. Purchasers are responsible for selection of proper goods and must rely on <strong>the</strong>ir<br />
own skills and judgment that such goods are suitable for purchasers’ application.<br />
Use subject to terms and conditions posted at http://www.burgertuning.com/terms<br />
<strong>JB3</strong> Pin Out Installation Guide<br />
© 2009 Copyright <strong>Burger</strong> Motor Sports, LLC<br />
5 / 9
Juice Box Stage 3 Professional (Pin <strong>out</strong>) Installation Guide – 5/13/09<br />
Map switching directions:<br />
Insert keyfob and press start button to turn ignition on (lights on dash, but engine not<br />
running). Press and hold <strong>the</strong> gas pedal down to <strong>the</strong> floor for 4 or more seconds, and <strong>the</strong>n<br />
release pedal. This puts <strong>the</strong> <strong>JB3</strong> in to listen mode. If you start <strong>the</strong> engine at this point you will<br />
be on map 0. For performance maps press <strong>the</strong> gas pedal to <strong>the</strong> floor and quickly release one<br />
time for each map you would like to select. For example for map 3 press and release <strong>the</strong> gas 3<br />
times, and start <strong>the</strong> engine. Your map setting will be saved until changed. If you forget what<br />
map you are on, turn engine off and reset <strong>the</strong> map selection. When burning a chip map 3 is<br />
always selected by default.<br />
Map Guide for <strong>JB3</strong> software 1.3 and higher (ship<strong>pin</strong>g date 5/1/2009 or later). Refer to<br />
www.n54tech.com for previous software map selection guide. <strong>JB3</strong> software can be<br />
updated by download, refer to www.n54tech.com for details!<br />
Map 0: --Disables <strong>JB3</strong>, all signals pass through<br />
Map 1: --Low boost map, boost levels of 11-13psi depending on mods and wea<strong>the</strong>r --Self<br />
adapts to modifications like intake, downpipes, exhaust, etc --91 octane RM2 or higher<br />
required. The higher <strong>the</strong> octane, <strong>the</strong> more power.<br />
Map 2: --Performance map, boost levels of 12-14psi depending on mods and wea<strong>the</strong>r --Self<br />
adapts to modifications like intake, downpipes, exhaust, etc --91 octane RM2 or greater<br />
required. The higher <strong>the</strong> octane, <strong>the</strong> more power.<br />
Map 3: --Identical to map 2 with additional low end response (aka lagfix)<br />
Map 4: --Hotter Performance map, boost levels of 13-15psi depending on mods and wea<strong>the</strong>r -<br />
-Self adapts to modifications like intake, downpipes, exhaust, etc --93 octane RM2 or greater<br />
required. The higher <strong>the</strong> octane, <strong>the</strong> more power.<br />
Map 5: --Identical to map 4 with additional low end response (aka lagfix)<br />
Map 6: --Designed to optimize bolt on performance --93 octane RM2 or greater required. The<br />
higher <strong>the</strong> octane, <strong>the</strong> more power. --Richer midrange air/fuel ratios to sustain additional<br />
torque --May trigger hidden tuner detection codes. Purchase a Bavarian Technic cable from<br />
BMS to scan for and delete any hidden codes before service.<br />
Map 7: --Identical to map 6 with additional low end response (aka lagfix)<br />
<strong>JB3</strong> Pin Out Installation Guide<br />
© 2009 Copyright <strong>Burger</strong> Motor Sports, LLC<br />
6 / 9
Juice Box Stage 3 Professional (Pin <strong>out</strong>) Installation Guide – 5/13/09<br />
Map 8: --Race map --97 octane RM2 or greater required. The higher <strong>the</strong> octane, <strong>the</strong> more<br />
power. --Modifications like intake, downpipes, and intercooler strongly suggested --Lagfix<br />
enabled --May trigger tuner detection codes<br />
Map 9: --More aggressive race map --100 octane RM2 or greater required. The higher <strong>the</strong><br />
octane, <strong>the</strong> more power. --Intake, downpipes, and intercooler required --Lagfix enabled --<br />
May trigger tuner detection codes<br />
Map 10-14 (A-D): --For use with modified <strong>JB3</strong> boards only<br />
Map 15 (F): --For use with tuning gauge only<br />
Tuning gauge parameters for those of you with <strong>the</strong> BMS tuning gauge. Remember <strong>the</strong>se<br />
settings only take effect when you are on map 15(F).<br />
LB: Base boost level. Note: Map 6 is set to 11.<br />
HP: Additional boost above 4500rpm. Added on top of LB. Note: Map 7 is set to 5.<br />
AF: Air/fuel ratio. 0=stock levels, F=max rich. Note: Maps 6+ are set to F, 1-5 are set to 1.<br />
PD: Pedal Input / Boost Gain. Higher = faster boost build up, more chance for overshoot.<br />
Note: All maps set to 6.<br />
SD: Solenoid pre-spool (lagfix). Higher = more pre-spool, more chance for overshoot. Note:<br />
Map 7 is set to 6, map 6 set to 0.<br />
AD: Air intake temperature boost decay. Higher = more decay. Note: Map 7 is set to 8. Race<br />
maps set to 0.<br />
<strong>JB3</strong> Pin Out Installation Guide<br />
© 2009 Copyright <strong>Burger</strong> Motor Sports, LLC<br />
7 / 9
Juice Box Stage 3 Professional (Pin <strong>out</strong>) Installation Guide – 5/13/09<br />
Troubleshooting Guide<br />
Troubleshooting is broken in to two distinct groups. The first are issues that come up during<br />
<strong>install</strong>ation, like failure to start, yellow engine light (CEL) upon first start, etc. The second<br />
are issues that arise after <strong>the</strong> tuner has been <strong>install</strong>ed and working properly for some time.<br />
This guide deals only with <strong>install</strong>ation related issues. But should you ever experience a<br />
yellow engine light (CEL) or service engine soon code (SES), you should email BMS<br />
directly at terenceburger@gmail.com for technical advice. We have seen it all and can<br />
quickly help you determine whe<strong>the</strong>r or not <strong>the</strong> issue is related to <strong>the</strong> <strong>JB3</strong> and what to do next.<br />
We encourage customers NOT to make pleas for help on internet forums as more often than<br />
not <strong>the</strong>y receive incorrect or bad information. By purchasing a tuner from BMS you have<br />
paid for support, so feel free to use it!<br />
Common <strong>install</strong>ation problems:<br />
Engine cranks and cranks but will not start, or takes longer than normal to start:<br />
Cause 1) One or both ECU connectors are not fully seated. They can be tricky to get in but<br />
when done properly <strong>the</strong> connector will seat itself as you are pushing <strong>the</strong> slider in. Remove<br />
connectors and try again until you are positive <strong>the</strong>y are fully seated.<br />
Cause 2) One of <strong>the</strong> wires is <strong>install</strong>ed in <strong>the</strong> wrong slot or has become unplugged under <strong>the</strong><br />
tape. Recheck each carefully verifying <strong>the</strong> wire color and connector position.<br />
Cause 3) You forgot to plug <strong>the</strong> <strong>JB3</strong> control module in to <strong>the</strong> wiring harness.<br />
Engine starts but has a big yellow check engine light showing (CEL):<br />
Cause 1) <strong>JB3</strong> control box not plugged in.<br />
Cause 2) One of <strong>the</strong> wires is <strong>install</strong>ed in <strong>the</strong> wrong slot or has become unplugged under <strong>the</strong><br />
tape. Recheck each carefully verifying <strong>the</strong> wire color and connector position.<br />
Cause 3) Incompatibility issue with O2 simulator. This only effects customers with<br />
aftermarket O2 simulators/downpipes. Contact us for fur<strong>the</strong>r instruction.<br />
<strong>JB3</strong> Pin Out Installation Guide<br />
© 2009 Copyright <strong>Burger</strong> Motor Sports, LLC<br />
8 / 9
Juice Box Stage 3 Professional (Pin <strong>out</strong>) Installation Guide – 5/13/09<br />
Engine starts with no lights, but upon first drive a big yellow engine light (CEL)<br />
appears:<br />
Cause 1) Normal ECU adaptation. It takes <strong>the</strong> ECU a few cycles to fully adapt to <strong>the</strong> <strong>JB3</strong>,<br />
and in rare cases this can result in a CEL. Especially if pushing <strong>the</strong> car hard after <strong>the</strong> tuner is<br />
first <strong>install</strong>ed. Restart <strong>the</strong> car (<strong>the</strong> code will disappear) and continue driving. If <strong>the</strong> code does<br />
not reappear <strong>the</strong>n no fur<strong>the</strong>r action is needed.<br />
Cause 2) Map incompatibility. Although <strong>the</strong> <strong>JB3</strong> is designed to work for all vehicles, some<br />
ECU versions, fuels, and ambient conditions require special map<strong>pin</strong>g. Contact us for fur<strong>the</strong>r<br />
instruction.<br />
Engine starts but an orange "Service Engine Soon" (SES) light appears<br />
Cause 1) During <strong>the</strong> <strong>install</strong>ation process you had some issue that you have since corrected,<br />
but <strong>the</strong> SES light is still on. The code will turn itself off after a couple days of driving, but it<br />
is suggested you borrow or purchase a CAN BUS OBDII code reader from Autozone or a<br />
local auto parts store to read/delete <strong>the</strong> code. Always read/delete codes with <strong>the</strong> ignition on /<br />
engine off. If <strong>the</strong> code reappears contact us with <strong>the</strong> code number for fur<strong>the</strong>r instruction.<br />
Cause 2) One of <strong>the</strong> wires is <strong>install</strong>ed in <strong>the</strong> wrong slot or has become unplugged under <strong>the</strong><br />
tape. Recheck each carefully verifying <strong>the</strong> wire color and connector position.<br />
<strong>JB3</strong> Pin Out Installation Guide<br />
© 2009 Copyright <strong>Burger</strong> Motor Sports, LLC<br />
9 / 9