

Lorex Monitor Remote Access Setup Guide Dlink DI ... - Smarthome
Lorex Monitor Remote Access Setup Guide Dlink DI ... - Smarthome
Lorex Monitor Remote Access Setup Guide Dlink DI ... - Smarthome

You also want an ePaper? Increase the reach of your titles
YUMPU automatically turns print PDFs into web optimized ePapers that Google loves.
© 2005 Strategic Vista International Inc. p.1<br />
<strong>Lorex</strong> <strong>Monitor</strong> <strong>Remote</strong> <strong>Access</strong> <strong>Setup</strong> <strong>Guide</strong><br />
<strong>Dlink</strong> <strong>DI</strong>-624<br />
Date: 25 May 2005<br />
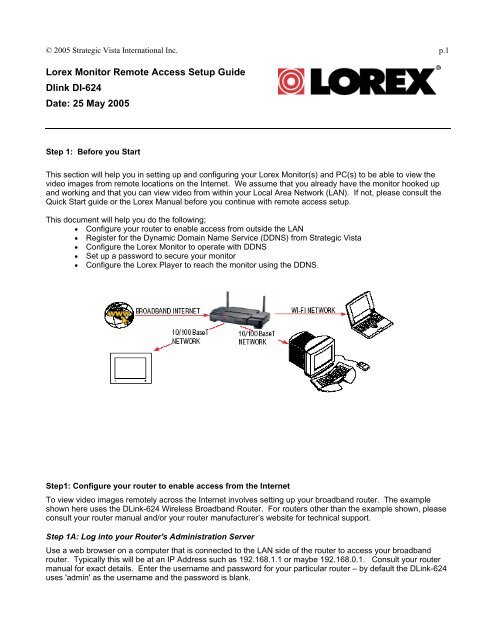
Step 1: Before you Start<br />
This section will help you in setting up and configuring your <strong>Lorex</strong> <strong>Monitor</strong>(s) and PC(s) to be able to view the<br />
video images from remote locations on the Internet. We assume that you already have the monitor hooked up<br />
and working and that you can view video from within your Local Area Network (LAN). If not, please consult the<br />
Quick Start guide or the <strong>Lorex</strong> Manual before you continue with remote access setup.<br />
This document will help you do the following;<br />
• Configure your router to enable access from outside the LAN<br />
• Register for the Dynamic Domain Name Service (DDNS) from Strategic Vista<br />
• Configure the <strong>Lorex</strong> <strong>Monitor</strong> to operate with DDNS<br />
• Set up a password to secure your monitor<br />
• Configure the <strong>Lorex</strong> Player to reach the monitor using the DDNS.<br />
Step1: Configure your router to enable access from the Internet<br />
To view video images remotely across the Internet involves setting up your broadband router. The example<br />
shown here uses the DLink-624 Wireless Broadband Router. For routers other than the example shown, please<br />
consult your router manual and/or your router manufacturer’s website for technical support.<br />
Step 1A: Log into your Router's Administration Server<br />
Use a web browser on a computer that is connected to the LAN side of the router to access your broadband<br />
router. Typically this will be at an IP Address such as 192.168.1.1 or maybe 192.168.0.1. Consult your router<br />
manual for exact details. Enter the username and password for your particular router – by default the DLink-624<br />
uses 'admin' as the username and the password is blank.
© 2005 Strategic Vista International Inc. p.2<br />
Select a screen display that provides device and/or network status. In the case of the DLink-624 it will appear as<br />
follows;<br />
The status and external IP Address of the router are clearly shown in the WAN section.<br />
Step1B: Set up the Static IP address<br />
Some routers, including the DLink-624, have the capability to fix the internal IP addresses that are distributed<br />
using DHCP. If your router supports this feature, you will want to set it up to ensure that the internal IP address<br />
never changes.<br />
In the case of the <strong>Dlink</strong>-624, click the 'DHCP' button and then click on the DHCP Server 'Enabled' radio button.<br />
From the DHCP client dropdown list select the entry that corresponds to the <strong>Lorex</strong> <strong>Monitor</strong> and click on the
© 2005 Strategic Vista International Inc. p.3<br />
'clone' button. Click on the Static DHCP 'Enabled' radio button. Then click on the 'Apply' button to save this<br />
configuration.<br />
If your router does not support the Static DHCP feature, then you will want to set the IP Address explicitly.<br />
Choose a new address value that is not already assigned and is outside of the range of the DHCP server to<br />
avoid address conflict. (i.e. does not fall within the Starting and Ending IP Address). Use the new address in the<br />
following setup. If you do re-assign the IP address, remember to also set it in the <strong>Lorex</strong> <strong>Monitor</strong> using the <strong>Lorex</strong><br />
Utility (see the manual on how to do this).<br />
Step 1C: Create a data path from the Internet to the <strong>Lorex</strong> <strong>Monitor</strong><br />
Most routers have a way of setting up forwarding rules to allow external Internet client applications to access<br />
devices on the LAN. In the case of the DLink-624 router select the 'Advanced' tab and you will see the following<br />
screen;
© 2005 Strategic Vista International Inc. p.4<br />
Create a path for your streaming video by entering values as shown;<br />
• Click the 'Enabled' radio button<br />
• Enter the Name (this is your choice)<br />
• Enter the Private IP. This must be the same IP address that appears in the LCD of the <strong>Lorex</strong> <strong>Monitor</strong><br />
and/or the static IP set in the previous step.<br />
• Set the Protocol Type to 'TCP',<br />
• Set the Private Port to '80'<br />
• Set the Public Port to '80'<br />
• Set the Schedule to 'Always'<br />
and select the 'Apply' button.<br />
This will create a data path that the <strong>Lorex</strong> Player will use to access the video stream and will allow you to view<br />
the video images. If you also want to access the <strong>Lorex</strong> <strong>Monitor</strong> using a web browser, no changes are required.<br />
Note to advanced users; Web servers are favourite targets of hackers and so using port '80' in this last step may<br />
make your <strong>Lorex</strong> <strong>Monitor</strong> a little less secure. Therefore, we recommend returning to this step once you are<br />
satisfied with the functionality and changing the settings to use a high port number (e.g. 9002). You will also<br />
have to change the <strong>Lorex</strong> Player and <strong>Lorex</strong> <strong>Monitor</strong> settings for this. Consult the respective manuals for details.<br />
Step 2: Register for the Dynamic Domain Name Service (DDNS)<br />
Unless you specifically obtain a static external IP address, your broadband Internet address, which is assigned<br />
by your service provider, is subject to change on a regular basis. Dynamic DNS is a service from StrategicVista<br />
included with your monitor whereby the <strong>Lorex</strong> <strong>Monitor</strong> registers the IP address of the router with the external<br />
DNS system. In order to be able to locate your home network, you must sign up to use the Dynamic DNS<br />
system.<br />
Note: You need only have one device registering the IP Address of the network. If you already have DDNS
© 2005 Strategic Vista International Inc. p.5<br />
support by a different means, you may not need to do this step.<br />
Using a web browser go to register.strategicvista.net, and click on the 'create account' link.<br />
You will be asked to provide the following information;<br />
• Your e-mail address<br />
• A secret password<br />
• Your name<br />
• Your Region ( state or province)<br />
• Your country<br />
• Your product license number – This is the same number you entered when installing your <strong>Lorex</strong><br />
Player. The license number is made up of;<br />
– 6 to 8-character product code that can be found on the packaging,<br />
– 12-character MAC number that is displayed when running the <strong>Lorex</strong> Utility program (see below). Do<br />
not include the separating colons (:)<br />
After you select 'Create New Account' you will receive a username and password confimation by e-mail, which<br />
you will use in the following steps. If you wish to change any of the parameters you may revisit the Registration<br />
page. However, you will be prompted for the existing secret password before you will be allowed access.<br />
Step 3: Configure the <strong>Lorex</strong> <strong>Monitor</strong> for DDNS and Password access<br />
Insert the CD into CD-reader of your Windows 2000 or Windows XP computer. Wait for the CD to autostart.<br />
Select the ‘<strong>Lorex</strong> IP Edit’ option from the screen. (If it does not autostart you can manually run the ipedit.exe<br />
program found in the <strong>Lorex</strong> Utility directory on the CD).<br />
This screen will display the IP address of the <strong>Lorex</strong> <strong>Monitor</strong>. Click on the item in the left-hand pane and the
© 2005 Strategic Vista International Inc. p.6<br />
details will be displayed to the right. To change any of the highlighted parameters, enter in the new values and<br />
click ‘Submit’. For example, to enable access port 9002, enter this in the HTTP Port2 field and click 'Submit'.<br />
In order to use the Strategic Vista DDNS service you must have signed up with the Strategic Vista network in<br />
step 2 above. You will have received an e-mail providing you with the parameters to enter in this part of the<br />
setup.<br />
The <strong>Lorex</strong> <strong>Monitor</strong> must be configured using a web browser. Double-click on the <strong>Monitor</strong> list item in the <strong>Lorex</strong><br />
Utility screen above to bring up the web browser. Alternatively, enter the module's IP address in the browser<br />
address bar. The Network Surveillance screen will appear, as shown below;
© 2005 Strategic Vista International Inc. p.7<br />
Step 3A: Set up the DDNS client<br />
Click on the Configuration link to bring up the configuration pane and then click on the DDNS link. The following<br />
screen will appear;<br />
The Dynamic DNS settings must be entered as described in the confirmation e-mail. When done, click on the<br />
'Submit' button at the bottom of the page.<br />
Note that IP Address updates do take a few minutes to propagate, so allow about 15 minutes after setting up the<br />
<strong>Lorex</strong> <strong>Monitor</strong>'s DDNS before expecting to use the system.
© 2005 Strategic Vista International Inc. p.8<br />
Step 3B: Set up a password to secure your module<br />
The connection that you currently have is suitable for use on a private Local Area Network. If you are concerned<br />
that others can get access to your <strong>Lorex</strong> <strong>Monitor</strong>, you must enable password protection as follows;<br />
In the left-hand panel, click on the 'User' option. The following screen will appear;<br />
Enter in a user name and password to create a new user and click on 'Set/change'. Also, click on the 'admin'<br />
name under the Current users list. Then enter in a new, secure, password for the administrator and click on the<br />
'Set/change' button. Make sure you know what the passwords are and be VERY careful not to enter them<br />
incorrectly! You will need these to access the module from now on. Note that these are different passwords<br />
from the one used in step 2 to register with DDNS.<br />
Under 'User authorization required', click on 'Yes' and then 'Set '.
© 2005 Strategic Vista International Inc. p.9<br />
Step 3C: Setting up an alternate port<br />
To set an additional port for accessing the <strong>Lorex</strong> <strong>Monitor</strong>, click on the 'System' link. The following screen will<br />
appear;<br />
Enter the alternate port into the 'Http port 2' field, select the 'Reboot' option and click on the 'Change' button.<br />
Step 4: Configure the <strong>Lorex</strong> Player<br />
The <strong>Lorex</strong> Player was previously configured for Local Area access by specifying the IP address directly. This<br />
section will show you how to set this up so that it can access the video from the Internet as well.<br />
Step 4A: Update the <strong>Lorex</strong> Player for the new password<br />
Run the <strong>Lorex</strong> Player as before. From the Servers/Cameras panel select the Camera Server and right-click on it<br />
with your mouse and choose 'Edit Camera Server'.
© 2005 Strategic Vista International Inc. p.10<br />
Select the 'User' tab and enter the same User Name and Password as you entered in the <strong>Lorex</strong> Utility (step3B)<br />
above. Select 'OK'.<br />
Start the video by double-clicking on the camera icon and you will be able to view the video as before.<br />
Step 4B: Setting up <strong>Remote</strong> access from the Internet<br />
Now that the camera is working across your LAN, you may want to consider viewing the video images over the<br />
Internet when you are in a different location. To do this you must set up a new camera location;<br />
In the camera/servers area, right click and select 'Add Camera Location';
© 2005 Strategic Vista International Inc. p.11<br />
Enter a name that indicates that this is for Internet access, and define the cameras exactly as before;<br />
In the address field, enter the URL as it is specified in the DDNS setup e-mail. Typically, this will be in the format<br />
.strategicvista.net. In the Port field enter '80'. Note if you are setting up an alternate port number (e.g.<br />
9002), then enter that instead;<br />
The User Name and Password will be the same as entered in step 3B above. After entering these click 'Next'.
© 2005 Strategic Vista International Inc. p.12<br />
Define the camera, as before, by clicking the 'New' button, and when done click the 'Finish' button.<br />
Start the video by double-clicking on the camera icon and you will be able to view the video as before from<br />
anywhere in the world.


