- Page 1 and 2:
Maintenance for the Avaya G250 and
- Page 3 and 4:
Contents About this book . . . . .
- Page 5 and 6:
Direct Inward Dialing (DID) in SLS
- Page 7 and 8:
ISDN-LNK (ISDN-PRI Signaling Link P
- Page 9 and 10:
Use Windows for PPP modem connectio
- Page 11 and 12:
About this book Overview This book
- Page 13 and 14:
Technical assistance Avaya provides
- Page 15 and 16:
Chapter 1: Maintenance overview Thi
- Page 17 and 18:
Media module maintenance Table 1 sh
- Page 19 and 20:
LEDs The general use of LEDs is to
- Page 21 and 22:
Avaya G250/G350 Media Gateway CLI U
- Page 23 and 24:
Chapter 2: G250/G350 component main
- Page 25 and 26:
G250/G350 component maintenance 6.
- Page 27 and 28:
G250/G350 component maintenance The
- Page 29 and 30:
Table 5: Equipment List: Media Modu
- Page 31 and 32:
Note: The G250/G350 component maint
- Page 33 and 34:
Figure 1: Inserting Media Modules i
- Page 35 and 36:
Facility test call Circuit range de
- Page 37 and 38:
Setting G350 synchronization If the
- Page 39 and 40:
If a secondary sync source is simil
- Page 41 and 42:
IP telephones IP telephones The Ava
- Page 43 and 44:
Table 16: IP Phone Problems and Sol
- Page 45 and 46:
Power cycle the phone IP telephones
- Page 47 and 48:
Chapter 3: Avaya Communication Mana
- Page 49 and 50:
Maintenance commands The following
- Page 51 and 52:
● Location - the location number
- Page 53 and 54:
Maintenance commands ● Serial No
- Page 55 and 56:
status media-gateway Maintenance co
- Page 57 and 58:
Maintenance commands - Time-window-
- Page 59 and 60:
Figure 11: System-Parameters MG-Rec
- Page 61 and 62:
Note: In Table 20: Disabled SAT Com
- Page 63 and 64:
System resets System resets There i
- Page 65 and 66:
Link Recovery, Connection Preservat
- Page 67 and 68:
General link recovery process Syste
- Page 69 and 70:
Call handling during recovery Syste
- Page 71 and 72:
Note: Avaya System resets Note: Com
- Page 73 and 74:
Note: SLS Note: (G250 only) adds a
- Page 75 and 76:
System resets Call features (such a
- Page 77 and 78:
Feature interactions and compatibil
- Page 79 and 80:
Table 26: H.248 Link Recovery featu
- Page 81 and 82:
Table 26: H.248 Link Recovery featu
- Page 83 and 84:
System resets The SAT commands list
- Page 85 and 86:
Note: Auto System resets 5. Upon th
- Page 87 and 88:
SLS overview SLS supports the follo
- Page 89 and 90:
Important: SLS System resets ! Impo
- Page 91 and 92:
System resets When the Link Recover
- Page 93 and 94:
Multiple call appearances in SLS mo
- Page 95 and 96:
System resets b. Hang up. Your phon
- Page 97 and 98:
System resets ● If the media gate
- Page 99 and 100:
System resets If SLS is disabled, t
- Page 101 and 102:
● A is the condition code. Possib
- Page 103 and 104:
Avaya G250/G350 Media Gateway MOs M
- Page 105 and 106:
Table 29: Media Module Tests (conti
- Page 107 and 108:
ALARM-PT (ALARM PORT) System techni
- Page 109 and 110:
ALARM-PT (ALARM PORT) Station Statu
- Page 111 and 112:
Table 36: Analog Line Error Log Ent
- Page 113 and 114:
Battery Feed Test (also called Port
- Page 115 and 116:
Table 38: TEST #35 Battery Feed Tes
- Page 117 and 118:
AN-LN-PT (Analog Line Port) Table 3
- Page 119 and 120:
Table 40: TEST #48 Station Present
- Page 121 and 122:
CO-DS1 (DS1 CO Trunk) The MM710 sup
- Page 123 and 124:
CO-DS1 (DS1 CO Trunk) ● (d) Error
- Page 125 and 126:
Table 45: TEST #36 Port Audit and U
- Page 127 and 128:
Incoming Call: Note: CO 1. CO Appli
- Page 129 and 130:
Table 47: CO Trunk Error Log Entrie
- Page 131 and 132:
Table 48: CO Trunk Errors with No T
- Page 133 and 134:
CO-TRK (Analog CO Trunk) System tec
- Page 135 and 136:
Table 50: Test #0 Dial Tone Test (c
- Page 137 and 138:
Table 50: Test #0 Dial Tone Test (c
- Page 139 and 140:
Table 51: TEST #3 CO Demand Diagnos
- Page 141 and 142:
Table 52: TEST #36 Port Audit Updat
- Page 143 and 144:
Table 54: DID-DS1 Trunk Error Log E
- Page 145 and 146:
Port Audit and Update Test (#36) DI
- Page 147 and 148:
DID-TRK (Direct Inward Dial Trunk)
- Page 149 and 150:
Table 58: DID Trunk Error Log Entri
- Page 151 and 152:
DID-TRK (Direct Inward Dial Trunk)
- Page 153 and 154:
Table 60: TEST #35 Port Diagnostic
- Page 155 and 156:
Table 61: TEST #36 Port Audit Updat
- Page 157 and 158:
Downloadable terminal parameters Th
- Page 159 and 160:
Port insertion Audits DIG-LINE (Dig
- Page 161 and 162:
Error log entries and test to clear
- Page 163 and 164:
DIG-LINE (Digital Line) ● (g) Wit
- Page 165 and 166:
Table 67: TEST#11 Digital Line Elec
- Page 167 and 168:
Table 68: TEST #16 DIG-LINE Station
- Page 169 and 170:
Table 69: TEST#17 Station (Digital)
- Page 171 and 172:
Error log entries and test to clear
- Page 173 and 174:
DIOD-TRK (DIOD Trunk) System techni
- Page 175 and 176:
ISDN-LNK (ISDN-PRI Signaling Link P
- Page 177 and 178:
ISDN-LNK (ISDN-PRI Signaling Link P
- Page 179 and 180:
ISDN-SGR (ISDN-PRI Signaling Group)
- Page 181 and 182:
Table 80: ISDN-PRI Signaling Group
- Page 183 and 184:
ISDN-SGR (ISDN-PRI Signaling Group)
- Page 185 and 186:
ISDN-SGR (ISDN-PRI Signaling Group)
- Page 187 and 188:
Table 83: Primary Signaling Link Ha
- Page 189 and 190:
Table 84: TEST #637 Remote Layer 3
- Page 191 and 192:
Layer 2 Status Test (#647) ISDN-SGR
- Page 193 and 194:
ISDN-TRK (DS1 ISDN Trunk) Note: Man
- Page 195 and 196:
ISDN-TRK (DS1 ISDN Trunk) As a port
- Page 197 and 198:
Table 88: Service States (continued
- Page 199 and 200:
ISDN-TRK (DS1 ISDN Trunk) ● (c) P
- Page 201 and 202:
ISDN-TRK (DS1 ISDN Trunk) System te
- Page 203 and 204:
Signaling Link State Check Test (#2
- Page 205 and 206:
Table 94: TEST #256 Service State A
- Page 207 and 208: Table 95: TEST #257 Call State Audi
- Page 209 and 210: TIE-DS1 (DS1 Tie Trunk) The DS1 tie
- Page 211 and 212: TIE-DS1 (DS1 Tie Trunk) If all admi
- Page 213 and 214: Port Audit and Update Test (#36) TI
- Page 215 and 216: TIE-DS1 (DS1 Tie Trunk) This second
- Page 217 and 218: Table 100: TEST #136 DS1 Tie Trunk
- Page 219 and 220: WAE-PORT (Wideband Access Endpoint
- Page 221 and 222: Table 104: TEST #36 Audit and Updat
- Page 223 and 224: XXX-BD Common Media Modules The fol
- Page 225 and 226: XXX-BD (Common Port Media Module)
- Page 227 and 228: Control Channel Looparound Test (#5
- Page 229 and 230: Chapter 4: License and authenticati
- Page 231 and 232: ● Serial number of the Avaya G250
- Page 233 and 234: Figure 18: License File Web Page Li
- Page 235 and 236: License files for different configu
- Page 237 and 238: No-License mode License and Options
- Page 239 and 240: Table 112: Type II and Type III Fea
- Page 241 and 242: Chapter 5: Access and login procedu
- Page 243 and 244: Tasks 1. Diagnosis of media gateway
- Page 245 and 246: Connecting the G250/G350 to the cus
- Page 247 and 248: Note: Record Connecting a laptop to
- Page 249 and 250: To disable/bypass proxy servers in
- Page 251 and 252: Connect laptop to the G250/G350 Con
- Page 253 and 254: Note: If 3. Select Dial-up to priva
- Page 255 and 256: To establish a LAN connection to th
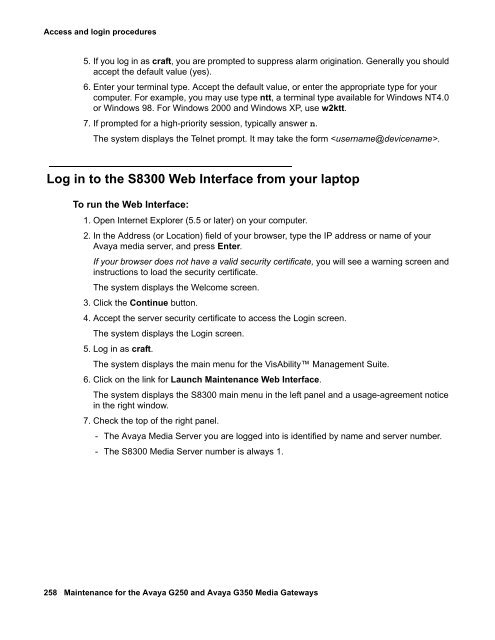
- Page 257: Log in methods 16. Type the phone n
- Page 261 and 262: Log in to the G250/G350 interface w
- Page 263 and 264: Navigational aid for CLI commands L
- Page 265 and 266: Terminal emulation function keys fo
- Page 267 and 268: Chapter 6: G250/G350 and media modu
- Page 269 and 270: The following figure shows the G250
- Page 271 and 272: Media module LEDs Media module LEDs
- Page 273 and 274: Media module LEDs Once steady, the
- Page 275 and 276: Table 122: Active (In Use) LED Acti
- Page 277 and 278: Media module LEDs The E1/T1 media m
- Page 279 and 280: Avaya MM314 Media Module LEDs The M
- Page 281 and 282: Chapter 7: Alarms This chapter prov
- Page 283 and 284: Table 126: Alarming Background Term
- Page 285 and 286: Alarm management Alarm management T
- Page 287 and 288: Alarm management ● SNMP Method -
- Page 289 and 290: Alarm management Refer to Table 128
- Page 291 and 292: Chapter 8: G250/G350 traps A trap i
- Page 293 and 294: Table 131: G250/G350 Traps and Reso
- Page 295 and 296: Table 131: G250/G350 Traps and Reso
- Page 297 and 298: Table 131: G250/G350 Traps and Reso
- Page 299 and 300: Table 131: G250/G350 Traps and Reso
- Page 301 and 302: Table 131: G250/G350 Traps and Reso
- Page 303 and 304: Table 131: G250/G350 Traps and Reso
- Page 305 and 306: Table 131: G250/G350 Traps and Reso
- Page 307 and 308: Table 131: G250/G350 Traps and Reso
- Page 309 and 310:
Chapter 9: Media Server alarms In t
- Page 311 and 312:
Alarming on an external Media Serve
- Page 313 and 314:
Index A Abort code 1412 . . . . . .
- Page 315 and 316:
Disabled SAT commands. . . . . . .
- Page 317 and 318:
M Maintenance arenas . . . . . . .
- Page 319 and 320:
SLS, (continued) preventing PIM upd


