Build your kids the sidewalk classic - Vintage Projects
Build your kids the sidewalk classic - Vintage Projects
Build your kids the sidewalk classic - Vintage Projects

You also want an ePaper? Increase the reach of your titles
YUMPU automatically turns print PDFs into web optimized ePapers that Google loves.
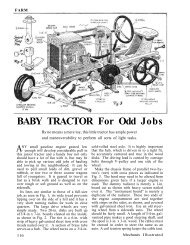
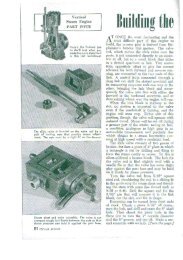
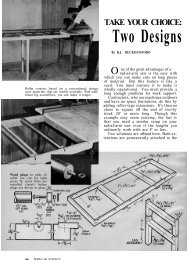
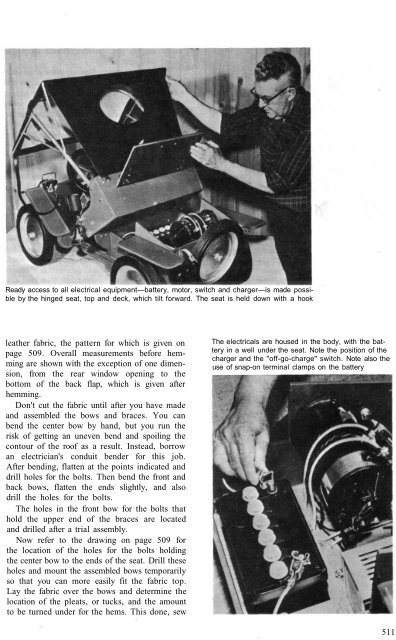
Ready access to all electrical equipment—battery, motor, switch and charger—is made possible<br />
by <strong>the</strong> hinged seat, top and deck, which tilt forward. The seat is held down with a hook<br />
lea<strong>the</strong>r fabric, <strong>the</strong> pattern for which is given on<br />
page 509. Overall measurements before hemming<br />
are shown with <strong>the</strong> exception of one dimension,<br />
from <strong>the</strong> rear window opening to <strong>the</strong><br />
bottom of <strong>the</strong> back flap, which is given after<br />
hemming.<br />
Don't cut <strong>the</strong> fabric until after you have made<br />
and assembled <strong>the</strong> bows and braces. You can<br />
bend <strong>the</strong> center bow by hand, but you run <strong>the</strong><br />
risk of getting an uneven bend and spoiling <strong>the</strong><br />
contour of <strong>the</strong> roof as a result. Instead, borrow<br />
an electrician's conduit bender for this job.<br />
After bending, flatten at <strong>the</strong> points indicated and<br />
drill holes for <strong>the</strong> bolts. Then bend <strong>the</strong> front and<br />
back bows, flatten <strong>the</strong> ends slightly, and also<br />
drill <strong>the</strong> holes for <strong>the</strong> bolts.<br />
The holes in <strong>the</strong> front bow for <strong>the</strong> bolts that<br />
hold <strong>the</strong> upper end of <strong>the</strong> braces are located<br />
and drilled after a trial assembly.<br />
Now refer to <strong>the</strong> drawing on page 509 for<br />
<strong>the</strong> location of <strong>the</strong> holes for <strong>the</strong> bolts holding<br />
<strong>the</strong> center bow to <strong>the</strong> ends of <strong>the</strong> seat. Drill <strong>the</strong>se<br />
holes and mount <strong>the</strong> assembled bows temporarily<br />
so that you can more easily fit <strong>the</strong> fabric top.<br />
Lay <strong>the</strong> fabric over <strong>the</strong> bows and determine <strong>the</strong><br />
location of <strong>the</strong> pleats, or tucks, and <strong>the</strong> amount<br />
to be turned under for <strong>the</strong> hems. This done, sew<br />
The electricals are housed in <strong>the</strong> body, with <strong>the</strong> battery<br />
in a well under <strong>the</strong> seat. Note <strong>the</strong> position of <strong>the</strong><br />
charger and <strong>the</strong> "off-go-charge" switch. Note also <strong>the</strong><br />
use of snap-on terminal clamps on <strong>the</strong> battery<br />
511