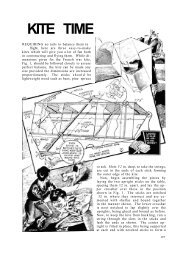
Build your kids the sidewalk classic - Vintage Projects
Build your kids the sidewalk classic - Vintage Projects
Build your kids the sidewalk classic - Vintage Projects

You also want an ePaper? Increase the reach of your titles
YUMPU automatically turns print PDFs into web optimized ePapers that Google loves.
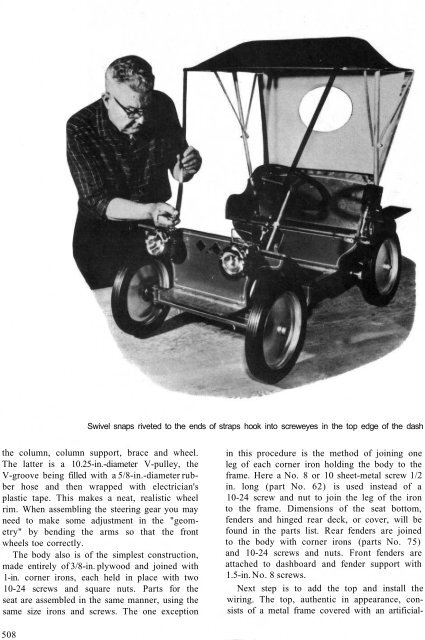
Swivel snaps riveted to <strong>the</strong> ends of straps hook into screweyes in <strong>the</strong> top edge of <strong>the</strong> dash<br />
<strong>the</strong> column, column support, brace and wheel.<br />
The latter is a 10.25-in.-diameter V-pulley, <strong>the</strong><br />
V-groove being filled with a 5/8-in.-diameter rubber<br />
hose and <strong>the</strong>n wrapped with electrician's<br />
plastic tape. This makes a neat, realistic wheel<br />
rim. When assembling <strong>the</strong> steering gear you may<br />
need to make some adjustment in <strong>the</strong> "geometry"<br />
by bending <strong>the</strong> arms so that <strong>the</strong> front<br />
wheels toe correctly.<br />
The body also is of <strong>the</strong> simplest construction,<br />
made entirely of 3/8-in. plywood and joined with<br />
1-in. corner irons, each held in place with two<br />
10-24 screws and square nuts. Parts for <strong>the</strong><br />
seat are assembled in <strong>the</strong> same manner, using <strong>the</strong><br />
same size irons and screws. The one exception<br />
508<br />
in this procedure is <strong>the</strong> method of joining one<br />
leg of each corner iron holding <strong>the</strong> body to <strong>the</strong><br />
frame. Here a No. 8 or 10 sheet-metal screw 1/2<br />
in. long (part No. 62) is used instead of a<br />
10-24 screw and nut to join <strong>the</strong> leg of <strong>the</strong> iron<br />
to <strong>the</strong> frame. Dimensions of <strong>the</strong> seat bottom,<br />
fenders and hinged rear deck, or cover, will be<br />
found in <strong>the</strong> parts list. Rear fenders are joined<br />
to <strong>the</strong> body with corner irons (parts No. 75)<br />
and 10-24 screws and nuts. Front fenders are<br />
attached to dashboard and fender support with<br />
1.5-in. No. 8 screws.<br />
Next step is to add <strong>the</strong> top and install <strong>the</strong><br />
wiring. The top, au<strong>the</strong>ntic in appearance, consists<br />
of a metal frame covered with an artificial-