PHILOS + PHILOS Long. - ShoulderDoc.co.uk
PHILOS + PHILOS Long. - ShoulderDoc.co.uk
PHILOS + PHILOS Long. - ShoulderDoc.co.uk

You also want an ePaper? Increase the reach of your titles
YUMPU automatically turns print PDFs into web optimized ePapers that Google loves.
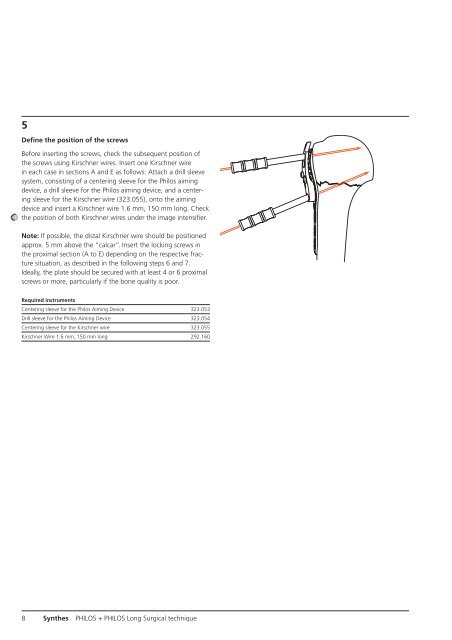
5<br />
Define the position of the screws<br />
Before inserting the screws, check the subsequent position of<br />
the screws using Kirschner wires. Insert one Kirschner wire<br />
in each case in sections A and E as follows: Attach a drill sleeve<br />
system, <strong>co</strong>nsisting of a centering sleeve for the Philos aiming<br />
device, a drill sleeve for the Philos aiming device, and a centering<br />
sleeve for the Kirschner wire (323.055), onto the aiming<br />
device and insert a Kirschner wire 1.6 mm, 150 mm long. Check<br />
the position of both Kirschner wires under the image intensifier.<br />
Note: If possible, the distal Kirschner wire should be positioned<br />
approx. 5 mm above the “calcar”. Insert the locking screws in<br />
the proximal section (A to E) depending on the respective fracture<br />
situation, as described in the following steps 6 and 7.<br />
Ideally, the plate should be secured with at least 4 or 6 proximal<br />
screws or more, particularly if the bone quality is poor.<br />
Required instruments<br />
Centering sleeve for the Philos Aiming Device 323.053<br />
Drill sleeve for the Philos Aiming Device 323.054<br />
Centering sleeve for the Kirschner wire 323.055<br />
Kirschner Wire 1.6 mm, 150 mm long 292.160<br />
8 Synthes <strong>PHILOS</strong> + <strong>PHILOS</strong> <strong>Long</strong> Surgical technique