Download - NS.sg
Download - NS.sg
Download - NS.sg

You also want an ePaper? Increase the reach of your titles
YUMPU automatically turns print PDFs into web optimized ePapers that Google loves.
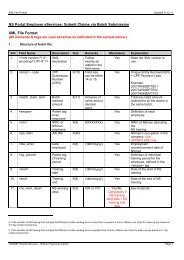
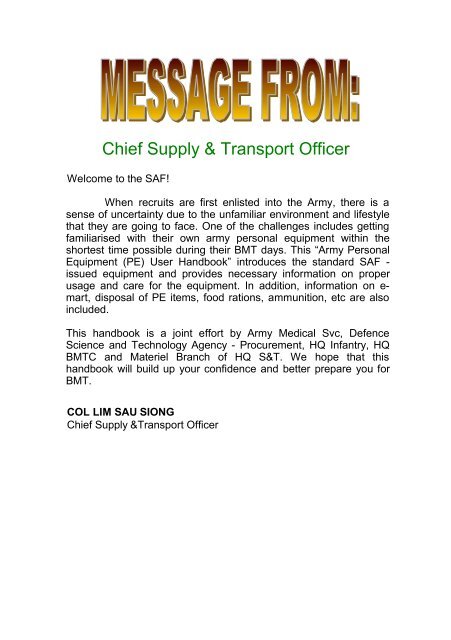
Chief Supply & Transport Officer<br />
Welcome to the SAF!<br />
When recruits are first enlisted into the Army, there is a<br />
sense of uncertainty due to the unfamiliar environment and lifestyle<br />
that they are going to face. One of the challenges includes getting<br />
familiarised with their own army personal equipment within the<br />
shortest time possible during their BMT days. This “Army Personal<br />
Equipment (PE) User Handbook” introduces the standard SAF -<br />
issued equipment and provides necessary information on proper<br />
usage and care for the equipment. In addition, information on emart,<br />
disposal of PE items, food rations, ammunition, etc are also<br />
included.<br />
This handbook is a joint effort by Army Medical Svc, Defence<br />
Science and Technology Agency - Procurement, HQ Infantry, HQ<br />
BMTC and Materiel Branch of HQ S&T. We hope that this<br />
handbook will build up your confidence and better prepare you for<br />
BMT.<br />
COL LIM SAU SIONG<br />
Chief Supply &Transport Officer
Section I<br />
PE 1<br />
PE 2<br />
PE 3<br />
PE 4<br />
PE 5<br />
PE 6<br />
PE 7<br />
PE 8<br />
PE 9<br />
PE 10<br />
Section I: COMBAT PERSONAL EQUIPMENT<br />
HELMET<br />
Parts of the Helmet<br />
Washing Instructions<br />
Adjusting the Suspension Assembly<br />
CAMOUFLAGE NET FOR HELMET<br />
Instructions on attaching the Camouflage Net to the Helmet<br />
CAMOUFLAGE CAP<br />
Guides for cleaning<br />
CAMOUFLAGE CREAM<br />
Instruction on Use<br />
EAR PLUGS<br />
NO.4 (CAMOUFLAGE) UNIFORM<br />
Methods of rolling-up the No.4 Uniform’s sleeves<br />
Skeleton Battle Order (SBO)<br />
Assembling the Water Bottle Pouches<br />
Proper way of wearing SBO<br />
Attaching the Bayonet to the SBO<br />
Attaching the ET Pouch to the SBO<br />
Attaching the Toggle Rope onto the SBO<br />
Guides for cleaning your SBO<br />
THE FIELD PACK<br />
Guide for cleaning your Field Pack<br />
THE DUFFEL BAG<br />
COMBAT BOOTS<br />
Wearing of combat boots<br />
Method of lacing your boots<br />
Guide for Care and Maintenance of Combat Boots<br />
Guide on sizes<br />
ARMY LOGISTICS 21<br />
A PILLAR OF CONFIDENCE<br />
01<br />
02<br />
02<br />
04<br />
05<br />
08<br />
08<br />
10<br />
11<br />
12<br />
12<br />
14<br />
15<br />
16<br />
18<br />
19<br />
21<br />
22<br />
29<br />
34<br />
35<br />
36<br />
37<br />
39<br />
40<br />
40<br />
40<br />
45<br />
45
PE 11<br />
PE 12<br />
PE 13<br />
PE 14<br />
Section II<br />
PE 15<br />
PE 16<br />
PE 17<br />
PE 18<br />
Section III<br />
PE 19<br />
PE 20<br />
PE 21<br />
PE 22<br />
PE 23<br />
PE 24<br />
Section IV<br />
PE 25<br />
PE 26<br />
PE 27<br />
PE 28<br />
PE 29<br />
GARTERS<br />
NO.4 SOCKS<br />
HALF-FINGER GLOVES<br />
NO.4 BELT<br />
Section II: PT and SPORTS PERSONAL EQUIPMENT<br />
PT ATTIRE<br />
RUNNING SHOES<br />
Foot Shape<br />
Shoe Care<br />
PT SOCKS<br />
SWIMMING TRUNKS<br />
Section III: ADMIN PERSONAL EQUIPMENT<br />
BERET<br />
Guide on sizes<br />
TOWEL<br />
I<strong>NS</strong>ECT REPELLENT<br />
SHOE POLISH<br />
GORETEX RAINCOAT<br />
MICROFLEECE JACKET<br />
Section IV: SUPPLIES RELATED INFORMATION<br />
PE ENTITLEMENT<br />
SAF E-MART<br />
Credit Allocation Policy<br />
Mode of Purchase<br />
Exchange Policy<br />
DISPOSAL OF PERSONAL EQUIPMENT<br />
EATING IN SAF<br />
AMMUNITION<br />
ARMY LOGISTICS 21<br />
3 A PILLAR OF CONFIDENCE<br />
46<br />
48<br />
49<br />
50<br />
51<br />
52<br />
54<br />
54<br />
56<br />
58<br />
59<br />
60<br />
61<br />
62<br />
63<br />
63<br />
64<br />
65<br />
66<br />
67<br />
68<br />
70<br />
70<br />
70<br />
71<br />
72<br />
73<br />
81
COMBAT PERSONAL EQUIPMENT<br />
These are basic Personal Equipment (PE) items<br />
issued to you during BMT. The items issued<br />
to you are dependent on the unit you are<br />
posted to.<br />
ARMY LOGISTICS 21<br />
A PILLAR OF CONFIDENCE
PE 1: HELMET<br />
The Helmet serves as the basic<br />
protection for a soldier’s head, ears<br />
and neck during combat. It<br />
protects his head against grenade<br />
and mortar shrapnel and other<br />
dangerous high-speed objects.<br />
Parts of the Helmet<br />
1) Suspension Assembly<br />
Combat Personal Equipment<br />
The suspension assembly consists of crown straps anchored at 5 points<br />
on the headband. It holds the neck supporting pads and Y-shaped quickrelease<br />
buckle. The Y-shaped quick-release buckle allows adjustment to<br />
be made to the rear. Adjustments to the front can be made using the two<br />
front ladderloc buckles.
Combat Personal Equipment<br />
2) Head band, Brow and Back Cushioning Pads and Mesh Crown<br />
The head band is made of a polypropylene strap anchored at 5 points to<br />
the helmet shell. The head band can be adjusted by using the fastener<br />
tape hidden in the back cushioning pad.<br />
The brow cushioning pad, back cushioning pad and mesh crown makes<br />
the helmet more comfortable. They are held by fastener tapes and can<br />
be removed for washing, if necessary.<br />
3) Chinstrap<br />
The plastic chin-cup is held by a polypropylene webbing strap attached to<br />
a plastic side release buckle at one end.<br />
The chinstraps can be adjusted to allow a better fit of the chin-cup.
Washing Instructions<br />
Combat Personal Equipment<br />
The brow and back cushioning pads, mesh crown and chin-cup can be<br />
removed, washed with mild soap and warm water and air-dried.<br />
Last but not least, take care of your Helmet.<br />
a) Do not sit on it<br />
b) Do not boil water with it<br />
c) Do not hammer with it<br />
d) Do not dig with it<br />
e) Do not throw it<br />
Please refer to the “Instruction Booklet on Ballistics Helmet” for more<br />
details.
Adjusting the Suspension Assembly<br />
Combat Personal Equipment<br />
An “Instruction Booklet on Ballistic Helmet” is provided with each helmet.<br />
Please refer to the booklet on details of adjusting the suspension<br />
assembly for better fit and comfort.<br />
When fitted and worn properly, there should be approximately 12mm<br />
between the mesh crown and the helmet for good ventilation.<br />
Your helmet should also rest on your head comfortably and firmly. It<br />
should not slide to the back, front or side of your head when you are<br />
performing combat related activities such as bayonet fighting or during<br />
Standard Obstacle Course (SOC) training.<br />
*Note: Hair should not protrude out in front of the helmet.<br />
The pictures on the following pages show some common mistakes made<br />
by soldiers when they wear their helmet that was wrongly adjusted. The<br />
correct way of wearing the helmet is also shown.
Wrong<br />
This soldier is wearing his helmet<br />
too high. He should adjust the<br />
mesh crown (refer to the<br />
“Instruction Booklet on Ballistic<br />
Helmet”) so that the helmet is able<br />
to sit lower on his head.<br />
Combat Personal Equipment<br />
Wrong<br />
This soldier has obviously not<br />
adjusted his helmet properly. It is<br />
too loose. He should adjust the<br />
suspension assembly so that the<br />
helmet rests firmly on his head. He<br />
should also adjust the chinstrap so<br />
that his chin rests on the chin-cup<br />
properly.
Wrong<br />
His helmet is very loose. The<br />
suspension assembly should be<br />
adjusted to prevent the helmet<br />
from sliding backwards. He should<br />
also tighten the chinstrap.<br />
Combat Personal Equipment<br />
Correct<br />
This is the correct way of wearing<br />
the helmet. The front of the helmet<br />
just reaches his eyebrows, thus<br />
providing maximum protection to<br />
his forehead without obstructing<br />
his view. His chinstrap is correctly<br />
adjusted and this allows the helmet<br />
to fit him better. His helmet is<br />
unlikely to slide around when he<br />
performs combat-related activities.
Combat Personal Equipment<br />
PE 2: CAMOUFLAGE NET FOR HELMET<br />
The camouflage net serves to<br />
break the outline of the helmet for<br />
better camouflaging. The<br />
camouflage net replaces the old<br />
method of binding vegetation,<br />
found in the field, to the helmet<br />
with retainer bands.<br />
To use, simply wrap the net over<br />
the helmet shell and use the cord<br />
attached to tighten the net to the<br />
insides of the helmet.<br />
Instructions on attaching the Camouflage Net to the<br />
Helmet<br />
Step 1:<br />
a) Open the camouflage net and with the opening facing up. Place the<br />
helmet into the camouflage net as shown.
Step 2:<br />
Combat Personal Equipment<br />
b) Take one end of the cord and tie it securely around one side of the<br />
headband.<br />
c) Then, use the cord to tie the camouflage net to the helmet by<br />
passing the cord through the camouflage net and under the<br />
headband.<br />
d) When the whole net is securely attached to the helmet, tie the two<br />
ends of the cord together to secure the camouflage net in place.
PE 3: CAMOUFLAGE CAP<br />
Combat Personal Equipment<br />
The No.4 Camouflage Cap is commonly known as the “Jockey Cap”. To<br />
maintain the shape of the cap, a layer of stiffener has been added to the<br />
cap. When crumples and wrinkles develop after washing, simply use a<br />
normal household iron to iron it.<br />
For the general guide on headdress sizes, please refer to the table on<br />
page 73.
Combat Personal Equipment<br />
The correct way of wearing your camouflage cap is shown in the three<br />
pictures on the previous page. It is important to ensure that the top of<br />
your camouflage cap is flat and not rounded. Also, the front of your cap<br />
should be at be levelled at your eyebrows.<br />
*Note: Hair should not protrude out in front of the camouflage cap.<br />
Guides for cleaning<br />
a) Hand wash with normal soap and water. Do not use washing<br />
machine and bleach.<br />
b) Use a cleaning cloth to clean any dirty spots on the cap and air-dry it.<br />
c) Iron if necessary.
Combat Personal Equipment<br />
PE 4: CAMOUFLAGE CREAM<br />
For concealment purposes, the individual soldier is required to blend<br />
himself in with the vegetation. To conceal their exposed skin, our<br />
soldiers are issued 1 tube of leaf green colour camouflage cream and 1<br />
tube of flat black colour camouflage cream.<br />
Instruction on Use<br />
2 colours of Camouflage Cream<br />
Apply the flat black and the leaf green colour so that the symmetry of the<br />
face is broken.<br />
Step 1<br />
1) Apply the leaf green colour to all the “low” parts of your face, such as<br />
the area around the eyes. (Left picture)<br />
2) Then when this is done, apply the flat black colour to all the “high”<br />
features such as the nose, lips and cheeks.<br />
3) Remember to apply camouflage cream on your ears and neck.
Step 2<br />
a) Pull down your sleeves. Then<br />
apply camouflage cream to the<br />
parts your sleeves cannot cover.<br />
b) Remember to apply camouflage<br />
cream to your fingernails as well.<br />
Combat Personal Equipment<br />
Completed camouflage
PE 5: EAR PLUGS<br />
The earplug is an essential item for protecting<br />
our eardrums against the possible damage<br />
caused by the high decibel sounds from gunfire<br />
when the soldiers attend their Basic or<br />
Advanced Train-Fire Package, which they will<br />
have to clear each year.<br />
To ensure personal hygiene, soldiers should<br />
clean their earplugs with soap and water<br />
regularly.<br />
Combat Personal Equipment<br />
Ear Plugs<br />
A good way of carrying<br />
your earplugs is to tie<br />
your earplugs-case to<br />
one of the “D” rings on<br />
your SBO and secure<br />
it with a black rubber<br />
band.
Combat Personal Equipment<br />
PE 6: NO.4 (CAMOUFLAGE) UNIFORM<br />
No.4 uniform (Short Sleeves) No.4 uniform (Long Sleeves)<br />
The No.4 uniform is made from Cotton (50%) and Nylon (50%). Cotton<br />
enhances the level of air permeability and comfort of the material<br />
whereas nylon provides the uniform with resistance to wear and tear.<br />
The No.4 uniform can have its sleeves folded up (short sleeves) or<br />
released (long sleeves). A similar camouflage pattern is sewn on the<br />
reverse of the sleeves so that there will not be any difference in colour<br />
when we roll-up the sleeves.<br />
WASHING I<strong>NS</strong>TRUCTIO<strong>NS</strong><br />
a) Machine Wash in water not exceeding 40°C.<br />
b) Tumble dry low when necessary. (Turn the uniform inside out.)<br />
c) No bleach is to applied.
Combat Personal Equipment<br />
Methods of folding up the sleeves on the No.4 uniform<br />
The instructions for two methods of folding up the No.4 uniform sleeves<br />
are shown below. Most soldiers prefer the 1 st method of folding the<br />
sleeves, as it makes the uniform looks smarter.<br />
Method 1<br />
a) First, fold up the sleeve inwards, in the reverse manner as shown in<br />
the right picture above.<br />
b) Take the end of the folded-up sleeve and fold it in further, as shown<br />
in the left picture below.<br />
c) Then, flip the edge of the sleeve over the fold, as shown in the right<br />
picture above.
Method 2<br />
Combat Personal Equipment<br />
This method is very simple. Just roll up the sleeves in the same way as<br />
you fold up any long sleeve shirt. As mentioned earlier, the No. 4 uniform<br />
has the camouflage pattern on the inside of the sleeves, so, when you<br />
use method 2 to fold your sleeves, there will not be any difference in<br />
colour.<br />
Note: If no rank insignia is worn on the sleeve, the gap between the<br />
shoulder seam and the fold should be 4 finger-widths apart as shown in<br />
the picture above. If a rank insignia is worn, the sleeves should not cover<br />
it.
Combat Personal Equipment<br />
PE 7: Skeleton Battle Order (SBO)<br />
The SBO, or more commonly known as the webbing, is made up of 3<br />
main detachable parts.<br />
The middle section consists of a general-purpose pouch.<br />
The left side consists of 2 magazine pouches and 1 smoke grenade<br />
pouch.<br />
The right side consists of 2 magazine pouches and 2 hand grenade<br />
pouches. Each magazine pouch can contain 2 magazines.
Combat Personal Equipment<br />
Assembling the Water Bottle Pouches<br />
To attach the water bottle pouches, detach the left and right side parts<br />
from the middle part. You will see 3 straps, with the longest one in the<br />
middle, as shown in the picture on the following page.<br />
Step 1<br />
a) Take the two shorter straps and pass them through the two loops at<br />
the back of the water bottle pouch.<br />
b) Then, fasten the bottom strap to the bottom buckle on the side of the<br />
centrepiece of the SBO and tighten it. Also, fasten the top strap to<br />
the top buckle and tighten it.
Combat Personal Equipment<br />
Proper way of wearing SBO<br />
The length of the shoulder straps should be adjusted such that the SBO<br />
fits comfortably around the body and rests on the hips.<br />
SBO resting on hips
Combat Personal Equipment<br />
The standard items that is carried on the SBO<br />
(excluding magazines) are as follows:<br />
S/No Item Description Wt (Kg)<br />
1 Webbing 1.30<br />
2 2 x Water bottles + Pouches 2.30<br />
3 Entrenching tool 1.30<br />
4 Jack Knife 0.10<br />
5 Rifle Cleaning kit 0.21<br />
6 Toggle Rope 0.61<br />
7 Torchlight 0.20<br />
8 Insect repellent 0.03<br />
9 Camouflage Stick 0.04<br />
Total Weight 6.09<br />
Attaching the Bayonet to the SBO<br />
On one side of the SBO, you will find a flap with two holes. This flap is<br />
meant for attaching the bayonet to your SBO.
The Bayonet<br />
Combat Personal Equipment<br />
On the bayonet sheath, you will<br />
find a hook as shown in the picture<br />
above. The hook is for you to<br />
attach the bayonet to the bayonet<br />
holder.
Step 1<br />
Combat Personal Equipment<br />
a) Take one end of the bayonet hook and insert it into one of the holes<br />
found on the bayonet holder flap. (See pictures above)<br />
Step 2<br />
b) Once that is done, take the<br />
other end and insert it into the<br />
other hole on the flap as shown<br />
in the left picture.
Combat Personal Equipment<br />
c) Finally, use the<br />
Velcro strap to<br />
secure the bayonet<br />
to the SBO firmly.<br />
The 2 pictures above show the bayonet when it is properly attached to<br />
the SBO.
Combat Personal Equipment<br />
The Entrenching Tool<br />
The Entrenching Tool (ET) consists of a wooden stick and a metal blade.<br />
The ET is mainly used to dig trenches.<br />
Like the bayonet, the ET is also to be carried by the SBO. In order to do<br />
this, the ET Pouch must first be attached to the SBO, and then the ET<br />
will be put inside the ET Pouch.<br />
Parts of the Entrenching Tool
Assembling the Entrenching Tool<br />
Step 1<br />
Combat Personal Equipment<br />
The ET Stick has ends that are of the different size and shape. Take the<br />
smaller end of the ET Stick and insert it into the hole of the ET Blade as<br />
shown in the left picture.<br />
Step 2<br />
Then, push the ET Blade all the<br />
way towards the bigger end.<br />
Make sure that the Blade is<br />
secured firmly to the stick.
The ET Pouch<br />
Attaching the ET Pouch to the SBO<br />
Combat Personal Equipment<br />
On the back of the ET pouch<br />
you will be able to find a hook<br />
(See left picture). This hook is<br />
to be used to attach the ET<br />
Pouch to the SBO so that you<br />
can carry the Entrenching Tool<br />
on your SBO.
Step 1<br />
Combat Personal Equipment<br />
a) On your SBO, at the part joining the two main straps, you will find a<br />
flap with two holes similar to the Bayonet Holder Flap. (See page 32)<br />
b) Take the ET Pouch and insert one side of the hook into one of the<br />
holes found on the ET Pouch holder. The method of attaching is<br />
similar to the method used to attach the bayonet onto the SBO (See<br />
page 34)
Step 2<br />
Combat Personal Equipment<br />
c) Then, insert the other end of the hook into the other hole on the ET<br />
Pouch holder.<br />
The picture on the left shows how<br />
the ET is carried on the SBO. For<br />
safety reasons, the ET Blade is<br />
kept inside the ET Pouch when not<br />
in use.
The Toggle Rope<br />
Tying up the Toggle Rope<br />
Step 1<br />
Combat Personal Equipment<br />
a) Hold the toggle rope in your hand as shown in the left picture.<br />
b) Then make a loop over the black handle as shown in the right<br />
picture.
Step 2<br />
Combat Personal Equipment<br />
c) Make another 2 more loops around the black handle as shown in the<br />
2 pictures above.<br />
Step 3<br />
d) When this is done, take the rest of the rope and wind it around the 3<br />
loops you have made.
Step 4<br />
Combat Personal Equipment<br />
e) Keep winding the rope around the 3 loops until as shown in the left<br />
picture.<br />
f) Then take the end of the toggle rope and insert it into the small hole<br />
as seen in the right picture.<br />
(c) Step 5<br />
g) In the left picture, you can see<br />
the end of the rope being<br />
inserted into the hole.<br />
h) Finally, pull the end of the rope<br />
tightly until it is as shown in the<br />
above picture.<br />
i) You now have a neatly tied up<br />
toggle rope.
Attaching the Toggle Rope onto the SBO<br />
Step 1<br />
Combat Personal Equipment<br />
a) On top of the general-purpose pouch on the SBO, you will find 2<br />
Velcro straps. Open them.<br />
Step 2<br />
b) Place the toggle rope on top of the general-purpose pouch as shown<br />
in the left picture.<br />
c) Then use the Velcro straps to secure the toggle rope firmly onto the<br />
SBO.
Combat Personal Equipment<br />
d) The above picture shows what it should look like after you have<br />
secured both the Velcro straps around the toggle rope.<br />
The SBO will get dirty when soldiers go for field exercises or training as<br />
the soldiers will most probably get in contact with mud, sand, rain etc.<br />
Therefore, cleaning must be done to it.<br />
Guides for cleaning your SBO<br />
If your SBO is only covered lightly in sand, use a damp cloth to wipe<br />
away the sand and dust. If your SBO is very dirty and is covered with<br />
mud, then<br />
a) Remove any item kept in the pouches to prevent them from<br />
becoming wet.<br />
b) Use water and a brush to scrub the soiled part until the mud comes<br />
off.<br />
c) If the stains do not come off, apply washing powder to dirty area.<br />
d) After washing, dry your SBO under the sun.
PE 8: THE FIELD PACK<br />
Combat Personal Equipment<br />
The Field Pack<br />
The field pack has been designed to carry load that will not affect the<br />
general weight distribution of a soldier. As a guide, the total maximum<br />
weight that a soldier should carry is about 30% of his body weight. The<br />
total weight includes the weight of the field pack, helmet, SBO,<br />
ammunition/magazines, water bottles, rifle etc.<br />
Based on a study done by HQ Medical Service – Soldier Performance<br />
Centre, the average SAF soldier should only carry a maximum of 18kg.<br />
Thus, the permitted weight of a fully packed field pack is derived by<br />
deducting the weight of the helmet, SBO ammunition/ magazines, water<br />
bottles, rifle etc from the total recommended maximum load.
Combat Personal Equipment<br />
Standard Items carried in the Field Pack<br />
S/No Item Description Wt (Kg)<br />
1 Field pack 1.15<br />
2 Ground sheet 0.77<br />
3 Goretex Raincoat 0.70<br />
4 1 x set of Uniform 1.25<br />
5 PT kit 0.32<br />
6 PT shoes 0.62<br />
7 1 x Bottle of Foot powder 0.30<br />
8 Toiletries Pack 0.10<br />
9 Underwear, 2 x Pair of Socks, Towel 0.30<br />
10 Shoe Polish + Brush 0.14<br />
11 Sewing kit 0.04<br />
12 Candles + Matches 0.09<br />
13 Mess Tins + Fork/Spoon 0.41<br />
14 Solid fuel 0.30<br />
Total Weight 6.49<br />
The field pack is subjected to mud and soil when soldiers go through<br />
field exercises and training. Therefore, cleaning must be done to it.<br />
Guide for cleaning your Field Pack<br />
If your Field Pack is only covered lightly with sand, use a damp cloth to<br />
wipe away the sand and dust.<br />
If your Field Pack is very dirty and covered with mud, then it needs to be<br />
washed. Remove any item kept in the pouches to prevent them from<br />
becoming wet.<br />
Use water and a brush to scrub the soiled part until the mud comes off.<br />
If the stains do not come off, apply washing powder to the dirty area.<br />
After washing, dry your Field Pack in the sun.
Combat Personal Equipment<br />
Side view Back view
PE 9: THE DUFFEL BAG<br />
Combat Personal Equipment<br />
Duffel Bag<br />
The duffel bag is used to contain the SBO, Field Pack (loaded), helmet,<br />
boots and etc when soldiers are posted to a different camp or going for<br />
overseas training.<br />
The duffel bag has rollers to allow you to wheel the bag, if it gets too<br />
heavy. It has a wide opening on top for quick and easy packing, retrieval<br />
and access of items. It also has side pockets to keep small items.<br />
For care and maintenance, you should observe the following points:<br />
o do not overload the bag (max. 20 kg)<br />
o do not throw the bag to avoid damages to the rollers<br />
o for any damages, refer to your unit’s QM/S4/Log Officer for follow-up
PE 10: COMBAT BOOTS<br />
Combat Personal Equipment<br />
The combat boots is a very important PE item as it protects our feet<br />
during training. They help to prevent sprains, abrasion and other foot<br />
injuries when the soldiers do their Standard Obstacle Course (SOC),<br />
field training and etc. The boots come with detachable insoles to provide<br />
better comfort and arch support.<br />
Wearing of combat boots<br />
First, you need to select the right size for your boots, with some<br />
allowance for the socks. Please note that our feet tend to expand after<br />
walking or exercising, hence you should choose a pair of boots slightly<br />
larger than your feet.<br />
Method of lacing your boots<br />
Step 1<br />
a) First, take the ends of the lace and make sure they are of equal<br />
length (Left picture). Then, take one end and pass it through the<br />
opposite eyelet as shown in picture on the right.
Step 2<br />
Combat Personal Equipment<br />
b) Continue to pull the lace through the eyelet.<br />
c) Then take the other end of the lace and pass it through the opposite<br />
eyelet as shown in the picture on the right.<br />
Step 3<br />
d) Tighten the lacing by pulling both ends of the lace. By now, you<br />
should have a “criss-cross” as shown in the picture on the left.<br />
e) Continue to lace your boots by passing the lace through the eyelets.<br />
(Picture on the right)
Step 4<br />
Combat Personal Equipment<br />
f) Tighten your lacing by pulling both ends of your lace every time you<br />
make a “criss-cross”.<br />
Step 5<br />
g) Take one of the ball clips and press it.<br />
h) A small hole should be seen when you press the spring down.<br />
Step 6<br />
i) Then simply insert both ends of the lace into the hole and push the<br />
ball clip all the way to the top of the boots, as shown in the picture on<br />
the right.
Tying the “Lazy Chain”<br />
Step 1<br />
Combat Personal Equipment<br />
a) Take the lace and make a loop as seen in the pictures above.<br />
Step 2 a)<br />
b)<br />
b) Then make another loop with the rest of the lace and pass this loop<br />
into the first loop.
Step 3 (d)<br />
a) Tighten the first loop around the second loop.<br />
Combat Personal Equipment<br />
b) Make another loop with the rest of the lace and pass it through the<br />
second loop.<br />
Step 4 a)<br />
c) Continue to make a loop with the rest of the lace and pass it through<br />
the previous loop. (As shown in the 2 pictures above)<br />
d) Do so until you have no more lace left to loop.<br />
e) To release the “Lazy Chain”, simply pull at the end of the lace.
Combat Personal Equipment<br />
Guide for Care and Maintenance of Combat Boots<br />
a) Wash the boots immediately after field training.<br />
b) Apply, by brushing, a coat of shoe polish occasionally over the<br />
leather parts of the boots to nourish the leather. (So that it is flexible<br />
and water repellent)<br />
c) Clean the fabric membrane with mild soap and water and brush off<br />
any stains and dirt.<br />
d) Wash and dry the insoles regularly. When the insoles are wet, air-dry<br />
them as soon as it is possible.<br />
e) Maintain proper feet hygiene by having short toenails and applying<br />
medicated foot powder before wearing your socks.<br />
f) Change and wash the socks regularly.<br />
g) During field training, empty water accumulated in the boots.<br />
Guide on sizes<br />
Properly worn combat boots<br />
The SAF provisions a total of 13 sizes of combat boots (from size 3 to size<br />
15) to best fit the needs of servicemen/women. The cutting of the boots is<br />
based on Asian sizing. For those whose boots size is not of the standard<br />
sizes, a made-to-measure service through the unit’s QM is also available.
PE 11: GARTERS<br />
Combat Personal Equipment<br />
The garters, shown in the picture below, are used to hold the ends of the<br />
trousers around the boots.<br />
Step 1<br />
Garters<br />
a) First, secure the garters around your calf.<br />
b) If your No.4 Trousers are too long, fold them up as shown.
Step 2<br />
Combat Personal Equipment<br />
c) Then simply tuck the folded part of your No.4 Trousers over the<br />
garter as shown in the 2 pictures above.<br />
Step 3<br />
d) Then put the “lazy chain” under the garter as well. Pull down the<br />
tucked in part over the garter and the ball clip as shown.
PE 12: NO.4 SOCKS<br />
Combat Personal Equipment<br />
No. 4 Socks<br />
All enlisted personnel are issued with 5 pairs of No. 4 socks. The No.4<br />
socks are dark green in colour and are worn together with the combat<br />
boots. The socks are designed to be calf-length to prevent abrasion<br />
between the boots and the calf.
Combat Personal Equipment<br />
PE 13: HALF FINGER GLOVES<br />
The half finger gloves comes in 4 sizes (S, M, L, XL) to better cater to<br />
different soldiers to allow them to have a better grip on weapons and<br />
handholds. The gloves provide protection for the palms field<br />
movement and when getting down to prone. The holes on the back of<br />
the gloves provide ventilation.<br />
For personal hygiene, soldiers should wash their soiled gloves and<br />
air-dry them properly after use.
Combat Personal Equipment<br />
PE 14: NO.4 BELT<br />
The No. 4 Belt is to be worn with the No. 4 trousers and is<br />
meant to hold up of the No. 4 trousers. It comes in 2 sizes<br />
(Regular/Large) to suit different waist lengths. Each belt also<br />
comes with an adjustment buckle to allow for further<br />
adjustments.<br />
No.4 Belt<br />
Proper wearing of No.4 belt
Combat Personal Equipment<br />
PT and SPORTS PERSONAL EQUIPMENT
PE 15: PT ATTIRE<br />
PT and Sports Personal Equipment<br />
PT Shorts PT Vest PT Singlet<br />
The PT Singlet and PT Vest are in grey and made of cotton (100%). The<br />
PT shorts are in black and made of cotton (100%).<br />
PT Attire combination No 1: PT Vest and PT Shorts<br />
The PT Vest and Shorts are normally worn after dinner, when there will<br />
not be any more training, lessons or etc.<br />
PT Attire combination No 2: PT Singlet and PT Shorts<br />
The PT Singlet and Shorts are worn together for physical training such as<br />
runs and weight training lessons.<br />
Sizes available: S, M, L, XL and XXL.<br />
Guide for cleaning the PT kit:<br />
- Normal wash (Hand or Machine wash)
PT Kit Combination 1<br />
PT and Sports Personal Equipment<br />
PT Kit Combination 2
PE 16: RUNNING SHOES<br />
PT and Sports Personal Equipment<br />
There are 2 types of running shoes available. It is critical that the<br />
correct running shoe is matched to your foot type, to avoid injuries as<br />
well as to maximize your performance.<br />
New Balance 380 Running<br />
Shoes<br />
Foot Shape<br />
Due to the way you run, there is a certain amount of pronation. Soldiers<br />
with flat arched foot tend to pronate more than soldiers with normal and<br />
high arched foot. To determine you foot shape, simply wet the soles of<br />
your feet with water, take a few steps, and look at the footprints of your<br />
feet.<br />
Flat<br />
Arch<br />
Foot<br />
Print<br />
Brooks Maximus<br />
Running Shoes<br />
STRAIGHT<br />
If you have flat arched feet, then the New Balance 380, which is a pair of<br />
straight last shoes, is suitable
High<br />
arch<br />
Foot<br />
Print<br />
Normal<br />
arch<br />
Foot<br />
Print<br />
PT and Sports Personal Equipment<br />
If you have normal or high arched feet, then the Brooks Maximus, which is a pair of<br />
semi-curved last shoes, are suitable.<br />
Forefoot Width<br />
Both Brooks and New Balance shoes have two different width sizing for you<br />
to choose from. Try wearing both types of width sizing to gauge which one<br />
has a better fit that is, neither too tight nor too loose at the sides of your forefoot.<br />
Width Sizing indication<br />
on the shoe<br />
2E – normal fit<br />
4E – wide fit<br />
SEMI-CURVED<br />
Foot Sole Length<br />
The running shoe comes in different lengths/sizes. As a general rule in<br />
choosing the right size for your Running Shoe, you should allow at least a<br />
1-2 cm gap or a space the size of your thumb between your toe and front<br />
of the shoe.
SHOE EXCHANGE SERVICE<br />
PT and Sports Personal Equipment<br />
A shoe exchange service is available for those who have not been<br />
provided with the correct type of running shoes, as mentioned in<br />
earlier paragraphs. Please bring your shoes to your unit’s e-mart to<br />
carry out the exchange.<br />
SHOE CARE<br />
It is important that good shoe care practices are observed in order to prolong<br />
the lifespan of your SAF Running shoes. Please follow the following advices.<br />
a) Never step and flatten the back of the shoe that cups your heel.<br />
Flattening this will decrease the amount of support your shoe<br />
provides to your foot.<br />
b) Air-dry your shoes between wearing to reduce odour from<br />
perspiration and also to prevent fungus growth.<br />
c) Do not place your shoes over or next to a heat source such as a<br />
car radiator, stove or any other heating element.<br />
After about 600km of running, a shoe would have lost about a third to half<br />
of its shock absorption properties. You should consider replacing the shoes<br />
after 600 – 800km of running.<br />
OTHER KEY FEATURES OF THE RUNNING SHOES<br />
Medial Post – The running shoes come with Medial Post support,<br />
which is a wedge of denser midsole material located at the inside<br />
of the shoe extending from the heel to the ball of the foot. It helps to<br />
support the arch of the feet when walking and running.<br />
NB 380 medial post Brooks Maximus medial post
PT and Sports Personal Equipment<br />
Cushioning System – The shock absorption material used in the<br />
heel and forefoot of the shoes is designed to dynamically disperse<br />
impact forces horizontally and vertically, and provide protection<br />
from impact-related injury. This material also enables a rebounding<br />
effect during push-off when running.<br />
NB 380 Absorb cushion<br />
Brooks Maximus Hydroflow cushion<br />
Stability System – At the waist of the shoe, there is a thermoplastic<br />
structure that provides control of undesirable twisting thus ensuring<br />
efficient energy transfer with every step.<br />
NB 380 stability web<br />
Brooks Maximus stability web
Admin Personal Equipment<br />
PE 17: PT SOCKS<br />
All enlisted personnel are issued with 2 pairs of PT Socks. The PT<br />
Socks are white in colour and are worn together with the PT Shoes<br />
during PT training. It comes in 2 sizes. (Regular/Small)<br />
Guides on Feet Hygiene<br />
Trim your toe nails short.<br />
Change your socks everyday.<br />
Socks that are old, dirty, wet or worn-off can scratch your skin and cause<br />
blisters.<br />
Sweaty feet are common due to field training and the climate. As such, it<br />
is important to change and wash your socks with soap and water<br />
regularly. The feet should be dusted lightly with the medicated foot<br />
powder supplied.<br />
Keep the feet dry.
PT and Sports Personal Equipment<br />
PE 18: SWIMMING TRUNKS<br />
Swimming Trunks<br />
The SAF issues a standard black swimming trunk to every soldier upon<br />
his enlistment. Swimming lessons are conducted during BMT. After each<br />
swimming lesson, the soldiers are advised to wash their swimming<br />
trunks with clean water and to be dried before keeping in it in their<br />
cupboard.<br />
Sizes available: S, M, L, XL, XXL
Admin Personal Equipment<br />
Admin Personal Equipment
PE 19: BERET<br />
The SAF beret is made from wool<br />
and nylon. A new beret will need<br />
some “seasoning” before it looks<br />
good on the wearer.<br />
Admin Personal Equipment<br />
The beret must be conditioned by folding in the two sides of the beret<br />
and pressing on it until it achieves the desired shape when worn<br />
correctly.<br />
When worn, the Singapura Crest will be at the left forehead and the beret<br />
will rest on the right side of the head. The ribbon can be adjusted and<br />
tightened to provide a good and comfortable fit.<br />
About ½<br />
inch<br />
About 1 inch or<br />
2 fingers from<br />
left eyebrow<br />
Ribbon concealed<br />
within beret
Side View<br />
A properly-worn beret<br />
Admin Personal Equipment<br />
Side View<br />
*Note: Hair should not protrude out from the front of the beret.<br />
Guide on sizes<br />
For the best fit, you are required to determine your hat size first. To find<br />
out your hat size, place a measuring tape around your head. Then,<br />
convert your measurement in inches or centimetres into the proper hat<br />
size from the table below.<br />
Head<br />
Circumference (cm)<br />
Beret and<br />
Camouflage<br />
Cap Size<br />
Helmet Size 1) Rem<br />
arks<br />
51-52 6 ½ Small Odd sizes<br />
53-54 6 ¾ Small Common sizes<br />
55-56 7 Small Common sizes<br />
57-58 7 ¼ Medium Common sizes<br />
59-60 7 ½ Medium Common sizes<br />
61-62 7 ¾ Large Odd sizes
PE 20: TOWEL<br />
Admin Personal Equipment<br />
SAF Towel<br />
The SAF towel should be air-dried daily after usage.<br />
PE 21: I<strong>NS</strong>ECT REPELLENT<br />
Insect repellant is used to protect<br />
against insect bites during field<br />
training.<br />
How to use:<br />
Apply directly on exposed skin.<br />
When applying to face, avoid contact to the eyes, nose and mouth.<br />
Caution<br />
If repellent touches your eyes, use water to wash it off.<br />
Avoid contact with plastics and synthetic fabrics.
PE 22: SHOE POLISH KIT<br />
Supplies Related Information<br />
Shoe Polish and brush<br />
Shoe polish is issued every quarterly to all soldiers. The boots should be<br />
polished frequently to keep them shiny and waterproof.<br />
Polishing your combat boots<br />
Using your shoe brush, dab a little shoe polish.<br />
Then, brush your boots in a swift, light and horizontal strokes in a to and<br />
fro motion until it shines.<br />
Apply more shoe polish if necessary.
Admin Personal Equipment<br />
PE PE 24: 23: MICROFLEECE GORETEX RAINCOAT JACKET JACKET<br />
Overseas The Gore-tex training in temperate raincoat<br />
countries, jacket such is as to New provide Zealand,<br />
can protection be very cold, for especially the soldier when<br />
there against are chilly rain & winds. wind Soldiers in the are<br />
to field. wear the microfleece jackets<br />
underneath The helmet the is raincoat worn over jacket the to<br />
provide hood. additional The SBO thermal is worn<br />
protection. outside of The the jacket raincoat is lightweight to<br />
and facilitate has a windstopper retrieval membrance. of<br />
The ammunition microfleece magazines jackets areor<br />
provided other items as a central from the loan SBO pool item.<br />
Units pouches. are to submit their loan<br />
request to HQ S&T for processing.<br />
Soldiers should maintain the<br />
jacket by washing it with<br />
water and properly airdrying<br />
it before packing or<br />
storing.<br />
For any damage or tear that<br />
is less than 50mm, use the<br />
repair kit to carry out repairs<br />
yourself. (Follow the<br />
instructions given in the<br />
Repair Kit).<br />
In addition, Goretex<br />
Trousers is provided as a<br />
loan pool item for use<br />
during overseas training or<br />
extreme wet weather<br />
conditions.<br />
Goretex Raincoat Jacket<br />
For other forms of repair, the soldier<br />
should report the matter to his unit<br />
QM/S4 for further instructions.
Supplies Related Information<br />
SUPPLIES RELATED INFORMATION
Supplies Related Information<br />
PE 25: PE ENTITLEMENT<br />
Section 0.1 The table below is the general guide for the PE entitlement<br />
of a soldier.<br />
Item description Entitlement<br />
PLUG, EAR 01 PR<br />
BOOT COMBAT RUBBER SOLE 02 PR<br />
BAG DUFFEL: CANVAS CLOTH 01 EA<br />
BELT INDIVIDUAL EQUIPMENT 01 EA<br />
BELT, TROUSERS F/NO.4 01 EA<br />
BRUSH SHOE & STOVE 01 EA<br />
CANTEEN WATER PLASTIC 02 EA<br />
CAP CAMOUFLAGE PATTERN 01 EA<br />
COVER WATER CANTEEN 02 EA<br />
BATTERY 1.5V “AA” SIZE 04 EA<br />
CUP WATER CANTEEN 01 EA<br />
FIELD PACK F/MILITARY PERSONNEL 01 EA<br />
FORK TABLE: STAINLESS STEEL 01 EA<br />
GARTERS: ELASTIC 02 EA<br />
GLOVES: HALF-FINGER, LEATHER BLACK 01 PR<br />
HELMET GROUND TROOPS DBG 01 EA<br />
KIT TOILETRIES: 6 PCs 01 EA<br />
KNIFE POCKET: 2 BLADES 01 EA<br />
LIGHT PEN TYPE: 01 EA<br />
NET HELMET: CAMOUFLAGE 01 EA<br />
PAN MESS KIT: ALUMINIUM 01 SE<br />
POCKET AMMUNITION MAGAZINE 02 EA<br />
ROPE TOGGLE: 9MM ROPE 01 EA<br />
SEWING KIT DISP: 15 COMP 01 EA
Supplies Related Information<br />
SOCKS : WHITE 02 PR<br />
SOCKS UNIVERSAL SIZE: OLIVE GREEN 05 PR<br />
SPOON TABLE: STAINLESS STEEL 01 EA<br />
SUSPENDER: SBO 01 EA<br />
SUSPENDER INDIVIDUAL. EQUIPMENT 01 EA<br />
SHIRT MAN F/NO.4 05 EA<br />
TAG IDENTIFICATION PERSONNEL F/NO.4 05 EA<br />
TOWEL, BATH: GREEN 02 EA<br />
TURBAN GREEN (For Sikhs) 02 EA<br />
TROUSERS MAN F/NO.4 05 PR<br />
TRUNKS , SWIMMER BLACK 01 PR<br />
TRUNKS GENERAL PURPOSE BLACK 02 PR<br />
SHOES GYMNASIUM 01 EA<br />
SHIRT UTILITY HEATHER GREY<br />
02 EA<br />
PADLOCK 01 EA<br />
THERMOMETER, ELECTRONIC 01 EA<br />
MANUAL, ARMY USER HANDBOOK 01 BK<br />
VEST MAN F/PTI TRAINING 02 EA<br />
Remember<br />
A PE item that is well taken care will not only prolong the usage life<br />
span of the equipment, but more importantly, will enhance comfort and<br />
personal hygiene.<br />
The correct usage and application of PE items are also necessary to<br />
realise the full effectiveness of the equipment.<br />
Note:<br />
The design and model of the Personal Equipment as stated herein may<br />
vary from time to time.
PE 26: SAF e-mart<br />
Supplies Related Information<br />
Soldiers can obtain replacement for their PE items from the SAF e-mart.<br />
The concept of SAF e-mart is to empower each serviceman with a sum<br />
of credits for him to purchase from an approved list of personal<br />
equipment and expandable items when the need arises at his own time<br />
and convenience.<br />
CREDIT ALLOCATION POLICY<br />
The quantum of eMart credits allocated is carefully worked out based on<br />
the lifespan of 16 main kit exchange items. Through economy of scale<br />
and improved lifespan of items, we will constantly create capacity to<br />
cater to different user’s requirement and to provide better care of our<br />
servicemen.<br />
Active Combat Vocations 226 credits every year<br />
Active Service Vocations 169 credits every year<br />
<strong>NS</strong>men 113 credits every 2 years<br />
Unused credits can be carried over for 1 cycle to avoid forced<br />
spending.<br />
Personnel changing their service status will be allocated fresh<br />
credits.<br />
Credits will be pro rated prior to ORD if serviceman has less than a<br />
year of service left.<br />
New enlistees will receive an advancement of 56 credits over 3<br />
months, after which the difference will be allocated accordingly to<br />
their service status.
MODE OF PURCHASE<br />
Supplies Related Information<br />
Walk-in-Purchase at any physical outlets situated in camp<br />
complexes, using SAF Smart Card (11B) for identification before<br />
purchase. Serviceman must acknowledge the transaction by<br />
keying in their MIW PIN.<br />
eOrder can be done online via miw.com.<strong>sg</strong>. Serviceman can<br />
choose to collect their items at a e-mart outlet of their choice or<br />
have the items delivered to their homes at a nominal charge.<br />
Other useful information such as credit allocation dates is also<br />
available online.<br />
EXCHANGE POLICY<br />
Soldiers can exchange items if the item they bought does not suit<br />
them or is defective. The item must not be used and the original<br />
packaging must be kept for the exchange.<br />
Most of the items are provided with warranties. Soldiers are to check<br />
the items before purchase and exchange any defective items.<br />
Please keep the receipt for one year for exchanging with any e-mart.<br />
If you have problems logging in or with the MIW PIN, please call<br />
eMindef at<br />
1800 3646333 (eMindef) email: msc@miw.com.<strong>sg</strong><br />
If you have feedback or questions regarding e-mart operations,<br />
please call ST Logistics at 63896292
Supplies Related Information<br />
PE 27: Disposal of Personal Equipment<br />
1. Servicemen are able to dispose of items that are unserviceable, due to wear and<br />
tear, in a manner that prevents unauthorised usage of the equipment. For bulky or<br />
recyclable items, you may refer to your unit QM/Log officer for instructions.<br />
2. The personal kit is supposed to support the <strong>NS</strong>man till he completes his full<br />
National Service responsibility at the age of 40 (for warrant officers/specialists) or<br />
at the age of 50 (for officers). Thus there is no requirement for <strong>NS</strong>men to return<br />
their personal issued items. By the time the <strong>NS</strong>man discharges his responsibility,<br />
the majority of the items will have a limited remaining service life. Besides, there<br />
are hygiene issues to consider. Hence, the <strong>NS</strong>men can choose to dispose the<br />
items themselves, bearing in mind that the disposed items should not end up in<br />
unauthorised usage. Alternatively, the <strong>NS</strong>men can return the items to the Army<br />
Logistics Base (ALB). Depending on the nature and condition of these returned<br />
items, ALB may recycle or dispose the items.<br />
3. The addresses and contact are as follows.<br />
Receipt Centre – Army Logistics Base<br />
601, Old Chua Chu Kang Rd<br />
Singapore 699817<br />
Tel: 63896335 / 63896336<br />
National Servicemen Services Center<br />
Blk 1, CMPB, Depot Road<br />
Singapore 109681<br />
Tel: 63731677 / 63731678
PE 28: EATING IN SAF<br />
Cookhouse<br />
Supplies Related Information<br />
The food served at the cookhouse is planned to provide adequate energy and nutrition<br />
to the servicemen to ensure optimum performance. The cookhouse serves Breakfast,<br />
Lunch, Dinner & Nightsnack that are suitable for the Muslim, Non-Muslim and<br />
Vegetarian.<br />
Energy Intake and Nutrition<br />
The scale is flexible enough to meet the varying energy demands of the soldier. The<br />
breakfast, lunch and dinner will provide a baseline of 2,500kcal for the day. When there<br />
is night training, nightsnacks with an additional 500kcal will be served. For soldier with<br />
strenuous training stretching late into the night, a 2 nd round of nightsnacks will be<br />
served, bringing the total energy intake to 3,500kcal.<br />
Besides fulfilling the daily energy requirement, food served at the cookhouse also<br />
provides sufficient nutrients, such as carbohydrates, fats, proteins, vitamins, minerals<br />
as well as dietary fibre. The energy intake and nutritional requirements are established<br />
with reference to the Ministry of Health (MOH) guidelines.<br />
Nutrients Recommended Daily Dietary Allowance<br />
Energy Intake 2500 – 3500kcal<br />
Carbohydrate 375 – 625 g<br />
Protein 94 ± 2.5 g<br />
Fat Up to 70g<br />
Cholesterol Not more than 300 mg<br />
Calcium 700 mg<br />
Iron 10 mg<br />
Vitamin A 1000 g<br />
Vit Vitamin B1 1.5 mg<br />
Vitamin B2 1.77 mg<br />
Vitamin C 60 mg<br />
Fibre 30 to 40 g<br />
Salt Up to 4600 mg<br />
Entitlement<br />
An example of a soldier’s entitlement is as follows:<br />
Breakfast or Nightsnack
Supplies Related Information<br />
Each soldier is entitled to 1 breakfast / nightsnack meal with 1 hot beverage.<br />
There will be free-flow of plain water.<br />
Lunch or Dinner<br />
Each soldier is entitled to rice, 3 protein dishes and 1 vegetable dish, 1 soup dish,<br />
1 fruit, cordial drink and free-flow of plain water. Some cookhouses may opt for 2<br />
protein dishes and 2 vegetable dishes with the portion adjusted accordingly to<br />
provide the same level of energy and nutrition requirement. To provide variety, the<br />
cookhouse will also plan for western set meals or hawker fare, eg; chicken rice<br />
set, hor fun set etc.<br />
Menu Planning Considerations<br />
The SAF encourages and promotes healthy eating habits. The food served at the<br />
cookhouse is planned in accordance with the Healthy Diet Pyramid promulgated by<br />
Ministry of Health (MOH).
Eat<br />
Most<br />
Supplies Related Information<br />
Healthy Diet Pyramid<br />
Eat<br />
Least<br />
Healthy eating habits considerations include:<br />
Fats, oils, sugar & salt<br />
Use in small amounts<br />
Meat & alternatives<br />
2-3 servings<br />
Fruit Vegetables<br />
2 servings 2 servings<br />
Rice & alternatives<br />
5-7 servings<br />
- Moderate the serving frequency of dishes with higher fat content.<br />
- Moderate the serving of egg to not more than 5 times per man per week.<br />
- Serve dishes that are cooked using healthier cooking methods e.g. steaming,<br />
boiling, stir frying, oven baking etc.<br />
Accounting of Eating Strength<br />
Soldiers eating at the cookhouse have to account for their strength by dropping a chip<br />
into the chip-deposit box before collecting their food. For units that have been<br />
implemented with the electronic system, soldiers will scan their SAF Card at the Pointof-Sales<br />
terminal. The accounting of eating strength is essential to facilitate accurate<br />
payment to the caterer. So, do not help your friend to drop his chip or scan his SAF<br />
Card, if he is not eating at the cookhouse.<br />
Receptivity Surveys<br />
Weekly receptivity survey will be conducted for all the meals served at the cookhouse.<br />
The receptivity survey serves as a form of performance measurement on the caterers.<br />
If the caterers did not meet the minimum standard set, liquidated damages (penalty)<br />
will be imposed on them.<br />
During the survey, you will be requested to reflect the quality of the food for the past<br />
week in a simple 3-point survey. (with scales of “Great”, “OK” and “Lousy”).
Supplies Related Information<br />
The weekly receptivity survey is a simple tool for you to feedback to the cookhouse.<br />
You are required to participate in the survey and be objective in the grading.<br />
Food Wastage<br />
MINDEF pays the caterer based on the number of people eating each meal and its<br />
receptivity survey performance. Therefore, you should not help your friend to drop a<br />
chip (or scan his SAF Card) if he is not eating at the cookhouse. Such action<br />
contributes to food wastage, as MINDEF will end up paying for meals that are not<br />
consumed by soldiers.<br />
At the individual level, it is always a good to not waste food. You are advised to<br />
consume your meal at the cookhouse if your unit has indented rations for you.<br />
Feedback and Suggestion<br />
If you have any feedback or suggestion, please email to:<br />
Defence Science & Technology Agency (DSTA)<br />
Defence Procurement<br />
Procurement Executive (Nutritionist)<br />
Email: tpecksee@dsta.gov.<strong>sg</strong><br />
Tel:63736220 Fax:62732985<br />
Alternatively, servicemen can fill-up the feedback forms that are available at each<br />
cookhouse or send their suggestion via unit OA system to:<br />
HQ Supply and Transport<br />
Customer Feedback<br />
Tel:68702333 Fax:68702342<br />
Field Ration<br />
Field Ration is designed as the primary source of energy and nutrition to soldiers in<br />
battlefield conditions. As part of the training requirement, Field Ration will be issued to<br />
soldiers when they are undergoing field training.<br />
Packaging<br />
A complete pack of Field Ration provides adequate energy and nutrition to sustain a<br />
soldier for 24 hours. It consists of a ‘main’ pack and an ‘accessory’ pack. The ‘main’<br />
pack consists of 2 entrees (rice or pasta) and a dessert. The ‘accessory’ pack
Supplies Related Information<br />
consists of biscuits, fruit bars, isotonic drink, cold and hot beverage mix, sweets, solid<br />
fuel, tissue paper and instant noodle.<br />
Basic Pack + Accessory Pack + Components found in a complete<br />
Instant Noodle Field Rations Pack<br />
Nutrition Information<br />
The 1-man-24hr Field Ration pack provides approximately 3350kcal per day. All the<br />
food components should be consumed within a day to give you the energy and<br />
nutrients.<br />
Variety<br />
Nutrients Content<br />
Energy Intake Up to 3,500 kcal<br />
Carbohydrate 60% - 65%<br />
Protein 10% - 15%<br />
Fat 20% - 25%<br />
Fibre 25g – 30g<br />
All Field Rations supplied in the SAF are HALAL. There are, altogether, 13 menus.<br />
Depending on the recipe and the style of cooking, these Field Rations are grouped into<br />
Muslim menu, Non-Muslim menu and Vegetarian menu. These menus will be<br />
reviewed regularly to phase out the less popular ones and introduce new menus.<br />
If you are issued with more than 1 pack of Field Rations for your training, please make<br />
sure you are given different menus to prevent ‘menu fatigue’ and increase the variety.<br />
For occasions whereby the field training is less than 24hrs, unit will arrange for 2 – 3<br />
men to share a packet of Field Rations. Unit will not indent for cooked food if Field<br />
Rations have been planned for. There will be no double indenting of rations.
Supplies Related Information<br />
The rice grain in the Field Ration entrees will crystallise (or harden) upon storage.<br />
However, they are thoroughly cooked and can be eaten as per condition. When<br />
situation permits, you are advised to reheat the entrée dish, as a hot meal will taste<br />
better.<br />
How to Prepare a Hot Meal<br />
The Field Ration is designed for soldiers to consume it either cold or heated. Soldiers<br />
can eat the rations unheated and on the move. All food components (except coffee<br />
mix, cereal mix, ovaltine mix and any drink mix) can be consumed directly from the<br />
package without any further preparation. However, when situation permits, a hot meal<br />
can be prepared using the hexamine solid fuel provided.<br />
The instruction to reheat the entrees is as follows:<br />
Method 1<br />
a. Pour the entrée dish to be heated into the mess tin over the fire.<br />
b. Stir constantly to prevent excessive heating. Warm for about 5 minutes.<br />
Method 2<br />
a. Bring the water to boil (one-quarter of the mess tin)<br />
b. Place entrée pouches in boiling water. (You will need to fold the<br />
pouch to fit the mess tin)<br />
c. Leave to boil for 10 minutes. Turn the pouch for even heating,<br />
if necessary.
Method 3<br />
Supplies Related Information<br />
a. Place the entrée pouches onto hot engine for 10 minutes or under the hot sun for<br />
about 30 minutes.<br />
What to do with un-consumed Field Ration?<br />
If you are unable to consume all the items issued to you, please do not dispose them<br />
in the field. Please bring them back to your unit for proper disposal.<br />
Feedback and Suggestion?<br />
You can pen down your comment / suggestion, in the feedback forms provided in the<br />
main pack, and send to Defence Science & Technology Agency (DSTA)<br />
The address is:<br />
Defence Science & Technology Agency – Defence Procurement<br />
Defence Technology Tower A<br />
# 03-01J, 1 Depot Road, Singapore 109676<br />
Alternatively, you can send your suggestion via unit OA system to:
HQ Supply and Transport<br />
Customer Feedback<br />
Tel : 68702333 Fax: 68702342<br />
Supplies Related Information
PE 29: AMMUNITION<br />
Ammunition Safety<br />
Supplies Related Information<br />
1. Comply with safety procedures and correct operating drill when handling<br />
ammunition.<br />
2. Surrender all contraband when handling ammunition.<br />
3. Do not drag, throw or meddle with ammunition items.<br />
4. Do not improvise or temper with ammunition items.<br />
5. Do not stop on the way for unauthorised activities when transporting ammunition.<br />
6. Protect ammunition from rain and direct sunlight.<br />
7. Do not mix live ammunition with training aids.<br />
8. When in doubt about ammunition, always clarify.<br />
9. Do not use ammunition with dent, scratch, crack or any damage.<br />
10. On discovery of ammunition or unidentified object in live firing area/ranges:<br />
Do not touch or move the ammunition/object<br />
Mark the location of ammunition/object<br />
Report to superior
Ammunition Accountability<br />
Supplies Related Information<br />
1. Always check that correct type and quantity of ammunition is received.<br />
2. Any unused ammunition shall be returned to Ammunition Point.<br />
3. Unauthorised possession of ammunition is a serious offence.<br />
4. On discovery of short/surplus ammunition from original packaging:<br />
a. Keep the evidence (affected ammunition and packaging materials)<br />
b. Report to superior
Supplies Related Information<br />
Prepared and Edited by<br />
Materiel Management Section<br />
HQ Supply and Transport<br />
With Guidance from<br />
Chairman and Members of the<br />
Army PE Committee<br />
HQ S&T ARMOUR ARTILLERY COMMANDO<br />
COMBAT<br />
ENGINNERS<br />
GUARDS INFANTRY<br />
ARMY<br />
MEDICAL<br />
SERVICES