

HQ Studio Frame Manual for HQ Avante 08-09-11 ... - Handi Quilter
HQ Studio Frame Manual for HQ Avante 08-09-11 ... - Handi Quilter
HQ Studio Frame Manual for HQ Avante 08-09-11 ... - Handi Quilter

You also want an ePaper? Increase the reach of your titles
YUMPU automatically turns print PDFs into web optimized ePapers that Google loves.
Fig. 9-2<br />
Fig. 9-5<br />
9-5: Slide one pole end into the<br />
end of one 12-foot pole assembly, as<br />
shown in Fig. 9-5. Check that the pole<br />
end is inserted completely into the<br />
pole assembly.<br />
9-6: Completely tighten the nut,<br />
using the 13/17mm wrench, while<br />
holding the pole end assembly tightly<br />
into the open end of the pole. This will<br />
expand the outer pole end, ensuring a<br />
tight fit in the pole.<br />
NOTE: A regular nut is provided as an<br />
assembly aid tool if you have difficulty<br />
holding the pole end assembly while<br />
tightening.<br />
9-7: Repeat steps 9-5 and 9-6 to add<br />
one pole end to the remaining four 12foot<br />
pole assemblies.<br />
9-8: Repeat steps 9-5 and 9-6 to add<br />
remaining two pole ends to the open<br />
ends of two 12-foot pole assemblies<br />
(see bottom pole in Fig. 9-8).<br />
Fig. 9-7<br />
Visit http://www.The<strong>Quilter</strong>sAcademy.com<br />
Fig. 9-1<br />
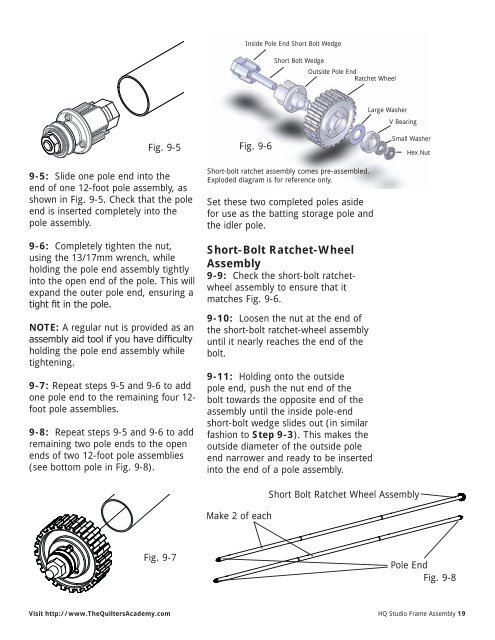
Inside Pole End Short Bolt Wedge<br />
Fig. 9-6<br />
Short Bolt Wedge<br />
Outside Pole End<br />
Ratchet Wheel<br />
Short-bolt ratchet assembly comes pre-assembled.<br />
Exploded diagram is <strong>for</strong> reference only.<br />
Set these two completed poles aside<br />
<strong>for</strong> use as the batting storage pole and<br />
the idler pole.<br />
Short-Bolt Ratchet-Wheel<br />
Assembly<br />
9-9: Check the short-bolt ratchetwheel<br />
assembly to ensure that it<br />
matches Fig. 9-6.<br />
9-10: Loosen the nut at the end of<br />
the short-bolt ratchet-wheel assembly<br />
until it nearly reaches the end of the<br />
bolt.<br />
9-<strong>11</strong>: Holding onto the outside<br />
pole end, push the nut end of the<br />
bolt towards the opposite end of the<br />
assembly until the inside pole-end<br />
short-bolt wedge slides out (in similar<br />
fashion to Step 9-3). This makes the<br />
outside diameter of the outside pole<br />
end narrower and ready to be inserted<br />
into the end of a pole assembly.<br />
Make 2 of each<br />
Fig. 9-6<br />
Large Washer<br />
V Bearing<br />
Small Washer<br />
Hex Nut<br />
Short Bolt Ratchet Wheel Assembly<br />
Fig. 9-4<br />
Pole End<br />
Fig. 9-8<br />
<strong>HQ</strong> <strong>Studio</strong> <strong>Frame</strong> Assembly 19


