

HQ Studio Frame Manual for HQ Avante 08-09-11 ... - Handi Quilter
HQ Studio Frame Manual for HQ Avante 08-09-11 ... - Handi Quilter
HQ Studio Frame Manual for HQ Avante 08-09-11 ... - Handi Quilter

You also want an ePaper? Increase the reach of your titles
YUMPU automatically turns print PDFs into web optimized ePapers that Google loves.
Pole End<br />
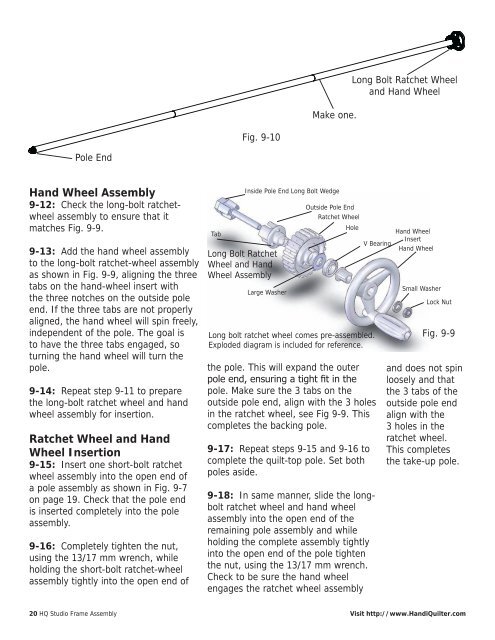
Hand Wheel Assembly<br />
9-12: Check the long-bolt ratchetwheel<br />
assembly to ensure that it<br />
matches Fig. 9-9.<br />
9-13: Add the hand wheel assembly<br />
to the long-bolt ratchet-wheel assembly<br />
as shown in Fig. 9-9, aligning the three<br />
tabs on the hand-wheel insert with<br />
the three notches on the outside pole<br />
end. If the three tabs are not properly<br />
aligned, the hand wheel will spin freely,<br />
independent of the pole. The goal is<br />
to have the three tabs engaged, so<br />
turning the hand wheel will turn the<br />
pole.<br />
9-14: Repeat step 9-<strong>11</strong> to prepare<br />
the long-bolt ratchet wheel and hand<br />
wheel assembly <strong>for</strong> insertion.<br />
Ratchet Wheel and Hand<br />
Wheel Insertion<br />
9-15: Insert one short-bolt ratchet<br />
wheel assembly into the open end of<br />
a pole assembly as shown in Fig. 9-7<br />
on page 19. Check that the pole end<br />
is inserted completely into the pole<br />
assembly.<br />
9-16: Completely tighten the nut,<br />
using the 13/17 mm wrench, while<br />
holding the short-bolt ratchet-wheel<br />
assembly tightly into the open end of<br />
Tab<br />
Fig. 9-10<br />
Long Bolt Ratchet<br />
Wheel and Hand<br />
Wheel Assembly<br />
Inside Pole End Long Bolt Wedge<br />
Large Washer<br />
Make one.<br />
Long Bolt Ratchet Wheel<br />
and Hand Wheel<br />
Outside Pole End<br />
Ratchet Wheel<br />
Hole<br />
Hand Wheel<br />
Insert<br />
V Bearing<br />
Hand Wheel<br />
Long bolt ratchet wheel comes pre-assembled.<br />
Exploded diagram is included <strong>for</strong> reference.<br />
the pole. This will expand the outer<br />
pole end, ensuring a tight fit in the<br />
pole. Make sure the 3 tabs on the<br />
outside pole end, align with the 3 holes<br />
in the ratchet wheel, see Fig 9-9. This<br />
completes the backing pole.<br />
9-17: Repeat steps 9-15 and 9-16 to<br />
complete the quilt-top pole. Set both<br />
poles aside.<br />
9-18: In same manner, slide the longbolt<br />
ratchet wheel and hand wheel<br />
assembly into the open end of the<br />
remaining pole assembly and while<br />
holding the complete assembly tightly<br />
into the open end of the pole tighten<br />
the nut, using the 13/17 mm wrench.<br />
Check to be sure the hand wheel<br />
engages the ratchet wheel assembly<br />
Small Washer<br />
Lock Nut<br />
Fig. 9-9<br />
and does not spin<br />
loosely and that<br />
the 3 tabs of the<br />
outside pole end<br />
align with the<br />
3 holes in the<br />
ratchet wheel.<br />
This completes<br />
the take-up pole.<br />
20 <strong>HQ</strong> <strong>Studio</strong> <strong>Frame</strong> Assembly Visit http://www.<strong>Handi</strong><strong>Quilter</strong>.com


