

HQ Studio Frame Manual for HQ Avante 08-09-11 ... - Handi Quilter
HQ Studio Frame Manual for HQ Avante 08-09-11 ... - Handi Quilter
HQ Studio Frame Manual for HQ Avante 08-09-11 ... - Handi Quilter

You also want an ePaper? Increase the reach of your titles
YUMPU automatically turns print PDFs into web optimized ePapers that Google loves.
F<strong>09</strong>318-106<br />
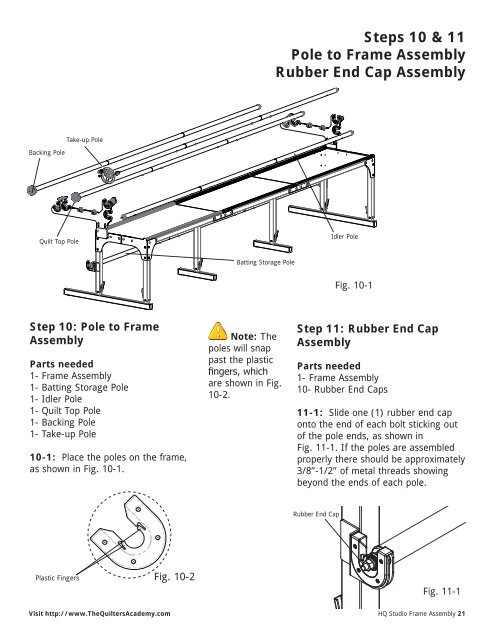
Backing Pole<br />
ARING SNAP COVER<br />
Quilt Top Pole<br />
Take-up Pole<br />
Step 10: Pole to <strong>Frame</strong><br />
Assembly<br />
Parts needed<br />
1- <strong>Frame</strong> Assembly<br />
1- Batting Storage Pole<br />
1- Idler Pole<br />
1- Quilt Top Pole<br />
1- Backing Pole<br />
1- Take-up Pole<br />
QF<strong>09</strong>318-205<br />
10-1: RATCHET Place STOP the HOLDER poles on the frame,<br />
as shown in Fig. 10-1.<br />
Plastic Fingers Fig. 10-2<br />
QF<strong>09</strong>318-105<br />
Fig. 10-2<br />
Visit http://www.The<strong>Quilter</strong>sAcademy.com<br />
Batting Storage Pole<br />
Note: The<br />
poles will snap<br />
past the plastic<br />
fingers, which<br />
are shown in Fig.<br />
10-2.<br />
Steps 10 & <strong>11</strong><br />
Pole to <strong>Frame</strong> Assembly<br />
Rubber End Cap Assembly<br />
Fig. 10-1<br />
Step <strong>11</strong>: Rubber End Cap<br />
Assembly<br />
Parts needed<br />
1- <strong>Frame</strong> Assembly<br />
10- Rubber End Caps<br />
<strong>11</strong>-1: Slide one (1) rubber end cap<br />
onto the end of each bolt sticking out<br />
of the pole ends, as shown in<br />
Fig. <strong>11</strong>-1. If the poles are assembled<br />
properly there should be approximately<br />
3/8”-1/2” of metal threads showing<br />
beyond the ends of each pole.<br />
Rubber End Cap<br />
Idler Pole<br />
Fig. <strong>11</strong>-1<br />
<strong>HQ</strong> <strong>Studio</strong> <strong>Frame</strong> Assembly 21


