Vail Premium Vent-Free Fireplace Manual - White Mountain Hearth
Vail Premium Vent-Free Fireplace Manual - White Mountain Hearth
Vail Premium Vent-Free Fireplace Manual - White Mountain Hearth

You also want an ePaper? Increase the reach of your titles
YUMPU automatically turns print PDFs into web optimized ePapers that Google loves.
Page 18<br />
VFp(32,36)Bp(20,21) LIGHTING INSTRUCTIONS<br />
FOR YOUR SAFETY READ BEFORE LIGHTING<br />
WARNING: If you do not follow these instructions exactly, a fire or explosion may<br />
result causing property damage, personal injury or loss of life.<br />
A. This appliance has a pilot which must be lighted by<br />
hand. When lighting the pilot, follow these instructions<br />
exactly.<br />
B. BEFORE LIGHTING smell all around the appliance area<br />
for gas. Be sure to smell next to the floor because some<br />
gas is heavier than air and will settle on the floor.<br />
WHAT TO DO IF YOU SMELL GAS<br />
• Do not try to light any appliance.<br />
• Do not touch any electrical switch;<br />
Do not use any phone in your building.<br />
• Immediately call your gas supplier from a neighbor's<br />
phone. Follow the gas supplier's instructions.<br />
1. STOP! Read the safety information above.<br />
2. Set thermostat (gas control knob) to lowest setting.<br />
3. Turn off all electric power to the appliance (if applicable).<br />
4. Push in gas control knob slightly and turn clockwise<br />
to "OFF". Do not force.<br />
5. Wait ten (10) minutes to clear out any gas. Then smell<br />
for gas, including near the floor. If you smell gas, STOP!<br />
Follow "B" in the safety information above. If you don't<br />
smell gas, go to the next step.<br />
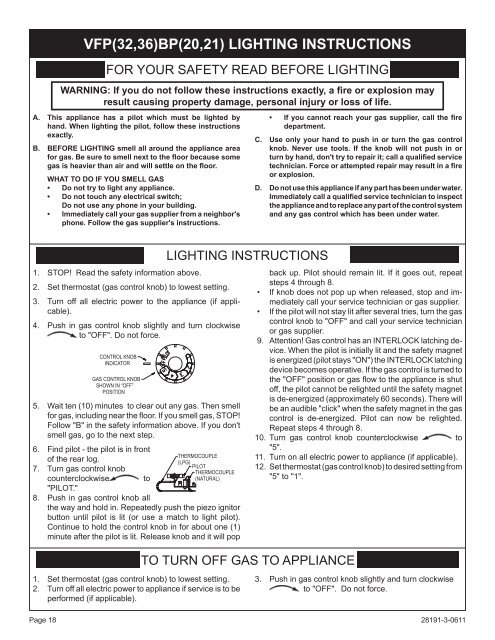
6. Find pilot - the pilot is in front<br />
of the rear log.<br />
7. Turn gas control knob<br />
counterclockwise to<br />
"PILOT."<br />
8. Push in gas control knob all<br />
the way and hold in. Repeatedly push the piezo ignitor<br />
button until pilot is lit (or use a match to light pilot).<br />
Continue to hold the control knob in for about one (1)<br />
minute after the pilot is lit. Release knob and it will pop<br />
1. Set thermostat (gas control knob) to lowest setting.<br />
2. Turn off all electric power to appliance if service is to be<br />
performed (if applicable).<br />
LIGHTING INSTRUCTIONS<br />
TO TURN OFF GAS TO APPLIANCE<br />
• If you cannot reach your gas supplier, call the fire<br />
department.<br />
C. Use only your hand to push in or turn the gas control<br />
knob. Never use tools. If the knob will not push in or<br />
turn by hand, don't try to repair it; call a qualified service<br />
technician. Force or attempted repair may result in a fire<br />
or explosion.<br />
D. Do not use this appliance if any part has been under water.<br />
Immediately call a qualified service technician to inspect<br />
the appliance and to replace any part of the control system<br />
and any gas control which has been under water.<br />
back up. Pilot should remain lit. If it goes out, repeat<br />
steps 4 through 8.<br />
• If knob does not pop up when released, stop and immediately<br />
call your service technician or gas supplier.<br />
• If the pilot will not stay lit after several tries, turn the gas<br />
control knob to "OFF" and call your service technician<br />
or gas supplier.<br />
9. Attention! Gas control has an INTERLOCK latching device.<br />
When the pilot is initially lit and the safety magnet<br />
is energized (pilot stays "ON") the INTERLOCK latching<br />
device becomes operative. If the gas control is turned to<br />
the "OFF" position or gas flow to the appliance is shut<br />
off, the pilot cannot be relighted until the safety magnet<br />
is de-energized (approximately 60 seconds). There will<br />
be an audible "click" when the safety magnet in the gas<br />
control is de-energized. Pilot can now be relighted.<br />
Repeat steps 4 through 8.<br />
10. Turn gas control knob counterclockwise to<br />
"5".<br />
11. Turn on all electric power to appliance (if applicable).<br />
12. Set thermostat (gas control knob) to desired setting from<br />
"5" to "1".<br />
3. Push in gas control knob slightly and turn clockwise<br />
to "OFF". Do not force.<br />
28191-3-0611