Vail Premium Vent-Free Fireplace Manual - White Mountain Hearth
Vail Premium Vent-Free Fireplace Manual - White Mountain Hearth
Vail Premium Vent-Free Fireplace Manual - White Mountain Hearth

You also want an ePaper? Increase the reach of your titles
YUMPU automatically turns print PDFs into web optimized ePapers that Google loves.
Page 26<br />
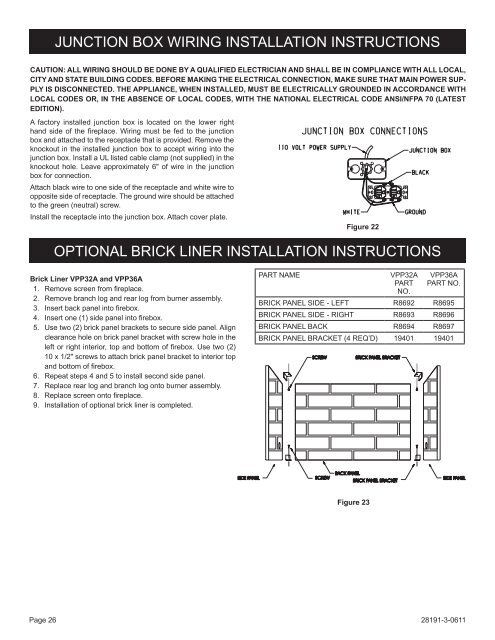
JUNCTION BOX WIRING INSTALLATION INSTRUCTIONS<br />
CAUTION: ALL WIRING SHOULD BE DONE BY A qUALIFIED ELECTRICIAN AND SHALL BE IN COMpLIANCE WITH ALL LOCAL,<br />
CITy AND STATE BUILDING CODES. BEFORE MAKING ThE ELECTRICAL CONNECTION, MAKE SURE ThAT MAIN POWER SUP-<br />
PLy IS DISCONNECTED. ThE APPLIANCE, WhEN INSTALLED, MUST BE ELECTRICALLy GROUNDED IN ACCORDANCE WITh<br />
LOCAL CODES OR, IN ThE ABSENCE OF LOCAL CODES, WITh ThE NATIONAL ELECTRICAL CODE ANSI/NFPA 70 (LATEST<br />
EDITION).<br />
A factory installed junction box is located on the lower right<br />
hand side of the fireplace. Wiring must be fed to the junction<br />
box and attached to the receptacle that is provided. Remove the<br />
knockout in the installed junction box to accept wiring into the<br />
junction box. Install a UL listed cable clamp (not supplied) in the<br />
knockout hole. Leave approximately 6" of wire in the junction<br />
box for connection.<br />
Attach black wire to one side of the receptacle and white wire to<br />
opposite side of receptacle. The ground wire should be attached<br />
to the green (neutral) screw.<br />
Install the receptacle into the junction box. Attach cover plate.<br />
Brick Liner VPP32A and VPP36A<br />
1. Remove screen from fireplace.<br />
2. Remove branch log and rear log from burner assembly.<br />
3. Insert back panel into firebox.<br />
4. Insert one (1) side panel into firebox.<br />
5. Use two (2) brick panel brackets to secure side panel. Align<br />
clearance hole on brick panel bracket with screw hole in the<br />
left or right interior, top and bottom of firebox. Use two (2)<br />
10 x 1/2" screws to attach brick panel bracket to interior top<br />
and bottom of firebox.<br />
6. Repeat steps 4 and 5 to install second side panel.<br />
7. Replace rear log and branch log onto burner assembly.<br />
8. Replace screen onto fireplace.<br />
9. Installation of optional brick liner is completed.<br />
Figure 22<br />
OPTIONAL BRICK LINER INSTALLATION INSTRUCTIONS<br />
PART NAME VPP32A<br />
PART<br />
NO.<br />
Figure 23<br />
VPP36A<br />
PART NO.<br />
BRICK PANEL SIDE - LEFT R8692 R8695<br />
BRICK PANEL SIDE - RIGHT R8693 R8696<br />
BRICK PANEL BACK R8694 R8697<br />
BRICK PANEL BRACKET (4 REQ’D) 19401 19401<br />
28191-3-0611