Pathfinder instructions - The WoodRat
Pathfinder instructions - The WoodRat
Pathfinder instructions - The WoodRat

You also want an ePaper? Increase the reach of your titles
YUMPU automatically turns print PDFs into web optimized ePapers that Google loves.
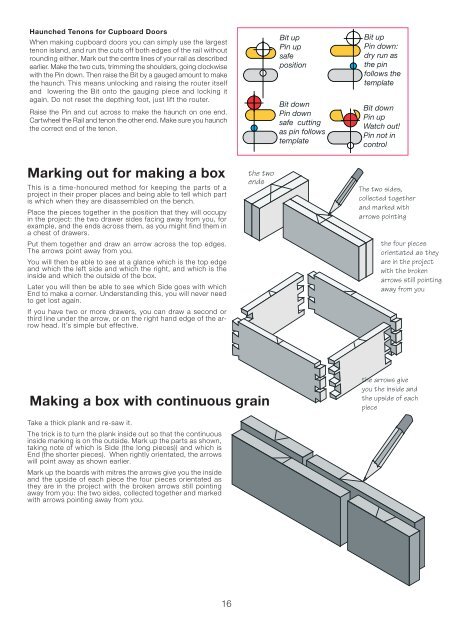
Haunched Tenons for Cupboard Doors<br />
When making cupboard doors you can simply use the largest<br />
tenon island, and run the cuts off both edges of the rail without<br />
rounding either. Mark out the centre lines of your rail as described<br />
earlier. Make the two cuts, trimming the shoulders, going clockwise<br />
with the Pin down. <strong>The</strong>n raise the Bit by a gauged amount to make<br />
the haunch. This means unlocking and raising the router itself<br />
and lowering the Bit onto the gauging piece and locking it<br />
again. Do not reset the depthing foot, just lift the router.<br />
Raise the Pin and cut across to make the haunch on one end.<br />
Cartwheel the Rail and tenon the other end. Make sure you haunch<br />
the correct end of the tenon.<br />
Marking out for making a box<br />
This is a time-honoured method for keeping the parts of a<br />
project in their proper places and being able to tell which part<br />
is which when they are disassembled on the bench.<br />
Place the pieces together in the position that they will occupy<br />
in the project: the two drawer sides facing away from you, for<br />
example, and the ends across them, as you might find them in<br />
a chest of drawers.<br />
Put them together and draw an arrow across the top edges.<br />
<strong>The</strong> arrows point away from you.<br />
You will then be able to see at a glance which is the top edge<br />
and which the left side and which the right, and which is the<br />
inside and which the outside of the box.<br />
Later you will then be able to see which Side goes with which<br />
End to make a corner. Understanding this, you will never need<br />
to get lost again.<br />
If you have two or more drawers, you can draw a second or<br />
third line under the arrow, or on the right hand edge of the arrow<br />
head. It’s simple but effective.<br />
Making a box with continuous grain<br />
Take a thick plank and re-saw it.<br />
<strong>The</strong> trick is to turn the plank inside out so that the continuous<br />
inside marking is on the outside. Mark up the parts as shown,<br />
taking note of which is Side (the long pieces)) and which is<br />
End (the shorter pieces). When rightly orientated, the arrows<br />
will point away as shown earlier.<br />
Mark up the boards with mitres the arrows give you the inside<br />
and the upside of each piece the four pieces orientated as<br />
they are in the project with the broken arrows still pointing<br />
away from you: the two sides, collected together and marked<br />
with arrows pointing away from you.<br />
16<br />
Bit up<br />
Pin up<br />
safe<br />
position<br />
Bit down<br />
Pin down<br />
safe cutting<br />
as pin follows<br />
template<br />
Bit up<br />
Pin down:<br />
dry run as<br />
the pin<br />
follows the<br />
template<br />
Bit down<br />
Pin up<br />
Watch out!<br />
Pin not in<br />
control<br />
<strong>The</strong> two sides,<br />
collected together<br />
and marked with<br />
arrows pointing<br />
the four pieces<br />
orientated as they<br />
are in the project<br />
with the broken<br />
arrows still pointing<br />
away from you<br />
the arrows give<br />
you the inside and<br />
the upside of each<br />
piece