Pathfinder instructions - The WoodRat
Pathfinder instructions - The WoodRat
Pathfinder instructions - The WoodRat

Create successful ePaper yourself
Turn your PDF publications into a flip-book with our unique Google optimized e-Paper software.
of the drawer (two sides and one front) need to be as far as<br />
possible the same width. <strong>The</strong> drawer Back should be made<br />
at the same time to the same thickness and cut down only<br />
after it is jointed.<br />
<strong>The</strong> Drop-pin is placed in the router plate and anchored with<br />
the Locking Screws. Loosen the plate to change the position<br />
of the Pin, forward and back, relative to the Bit. <strong>The</strong>re are three<br />
pairs of holes for the M6 Locking Keys.<br />
<strong>The</strong> Drop-Pin runs around the tail islands and then the pin<br />
pocket recesses in the Template in the same pass as the Bit<br />
is cutting the drawer sides, and then the pin pockets, all at<br />
the same depth. This makes it a simple operation, once it is<br />
set up.<br />
You may need to design the drawers to accommodate the<br />
template to some extent, but each template has two different<br />
pitches, for the same dovetail size, so it should not be hard to<br />
find a pitch that’s very close to the height of drawer front you<br />
need. <strong>The</strong> full-size diagram of the possible dovetail runs at the<br />
end of this section should help with the layout.<br />
2. Getting to work<br />
Unless you are doing asymmetrical work like for cock beaded<br />
drawers you can ensure that you make a perfectly symmetrical<br />
arrangement. Take the centre of the board, and match it with<br />
either the centre of the run, or exactly between two pins.<br />
Use the Template and put it the right way round to give you<br />
pitch A or the larger B as right for your design.<br />
Place a piece for tails (a Side) with the inner face against the<br />
face of the <strong>WoodRat</strong> and the corresponding Drawer Front horizontal,<br />
up under the plates, with the inner face facing up.<br />
<strong>The</strong> CNC-cut, Half-Blind Template allied to exactly machined<br />
dovetail bits gives a close fit of pin to tail, that is when the<br />
depth of the bit is just less than the full depth by 0.5mm or<br />
less. Adjusting the depth gives just enough leeway in the fit,<br />
provided that you use a <strong>WoodRat</strong> 1in7 dovetail bit.<br />
<strong>The</strong> template gives exact alignment of pins to sockets, so that<br />
the boards marry up exactly.<br />
This only leaves the depth of the Side, after it has been cut<br />
with tails, to the depth of the pin pocket. And this needs careful<br />
setting, so that there is a minimum of final cleaning up.<br />
<strong>The</strong> Half-blind Layout<br />
Mark the centre line of your board and note whether the pins<br />
will be odd or even in number, and camlock the board in vertically<br />
with the inner face against the machine face.<br />
Fit the Template with its two Locking keys in ready, and slide<br />
it into the Bracket. Don’t tighten yet.<br />
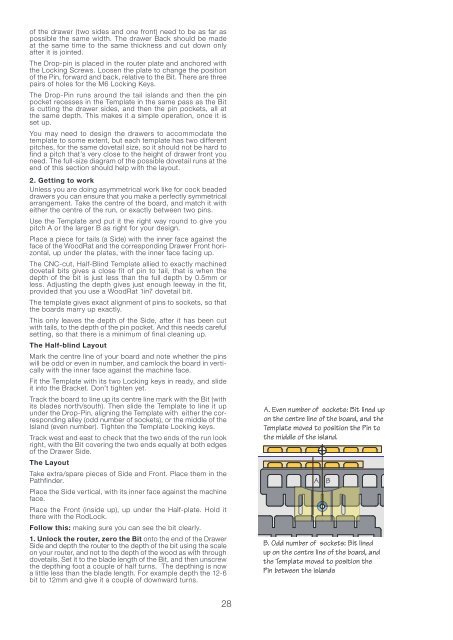
Track the board to line up its centre line mark with the Bit (with<br />
its blades north/south). <strong>The</strong>n slide the Template to line it up<br />
under the Drop-Pin, aligning the Template with either the corresponding<br />
alley (odd number of sockets), or the middle of the<br />
Island (even number). Tighten the Template Locking keys.<br />
Track west and east to check that the two ends of the run look<br />
right, with the Bit covering the two ends equally at both edges<br />
of the Drawer Side.<br />
<strong>The</strong> Layout<br />
Take extra/spare pieces of Side and Front. Place them in the<br />
<strong>Pathfinder</strong>.<br />
Place the Side vertical, with its inner face against the machine<br />
face.<br />
Place the Front (inside up), up under the Half-plate. Hold it<br />
there with the RodLock.<br />
Follow this: making sure you can see the bit clearly.<br />
1. Unlock the router, zero the Bit onto the end of the Drawer<br />
Side and depth the router to the depth of the bit using the scale<br />
on your router, and not to the depth of the wood as with through<br />
dovetails. Set it to the blade length of the Bit, and then unscrew<br />
the depthing foot a couple of half turns. <strong>The</strong> depthing is now<br />
a little less than the blade length. For example depth the 12-6<br />
bit to 12mm and give it a couple of downward turns.<br />
28<br />
A. Even number of sockets: Bit lined up<br />
on the centre line of the board, and the<br />
Template moved to position the Pin to<br />
the middle of the island.<br />
A<br />
B. Odd number of sockets: Bit lined<br />
up on the centre line of the board, and<br />
the Template moved to position the<br />
Pin between the islands<br />
B