Pathfinder instructions - The WoodRat
Pathfinder instructions - The WoodRat
Pathfinder instructions - The WoodRat

Create successful ePaper yourself
Turn your PDF publications into a flip-book with our unique Google optimized e-Paper software.
Using the MitreBox<br />
<strong>The</strong> full MitreBox will allow you to cut accurate 45° angles across the ends of the four pieces<br />
of a box, as well as hold work at any required angle.<br />
Mark out the work with a sharp pencil or knife. Arrange the Box<br />
with the two Cheeks held apart with the Rod Clamp and the<br />
Spreader Rod so that the workpiece can slide between them.<br />
Use a 45° set square to check the angle, and then tighten the<br />
CamClamp to hold the work square and firm.<br />
Like this, a variety of mitred joints can be cut, but for Secret<br />
Dovetails we need to mitre the Set up the MB3 as for Half-<br />
Blind dovetails. You will need a 45° bevel or, better, a<br />
45° triangle set square.<br />
Place the work inside up, with the 45° set to make the angle<br />
between workpiece and the underside of the plates.<br />
<strong>The</strong> HB Template you use will determine the bit needed,<br />
as each Half-blind Template is designed to work with its<br />
own <strong>WoodRat</strong> bit.<br />
Using that dovetail bit, cut the mitres at each edge, and along<br />
the back edge. Repeat for each of the other seven board<br />
ends.<br />
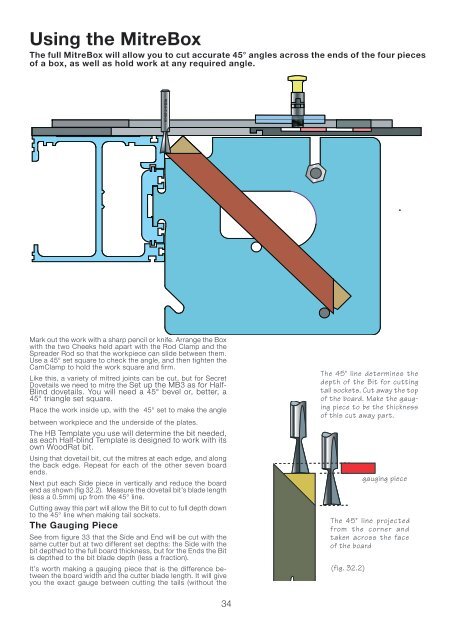
Next put each Side piece in vertically and reduce the board<br />
end as shown (fig 32.2). Measure the dovetail bit’s blade length<br />
(less a 0.5mm) up from the 45° line.<br />
Cutting away this part will allow the Bit to cut to full depth down<br />
to the 45° line when making tail sockets.<br />
<strong>The</strong> Gauging Piece<br />
See from figure 33 that the Side and End will be cut with the<br />
same cutter but at two different set depths: the Side with the<br />
bit depthed to the full board thickness, but for the Ends the Bit<br />
is depthed to the bit blade depth (less a fraction).<br />
It’s worth making a gauging piece that is the difference between<br />
the board width and the cutter blade length. It will give<br />
you the exact gauge between cutting the tails (without the<br />
WR-8-7-20-10<br />
34<br />
<strong>The</strong> 45° line determines the<br />
depth of the Bit for cutting<br />
tail sockets. Cut away the top<br />
of the board. Make the gauging<br />
piece to be the thickness<br />
of this cut away part.<br />
<strong>The</strong> 45° line projected<br />
from the corner and<br />
taken across the face<br />
of the board<br />
(fig. 32.2)<br />
gauging piece