Pathfinder instructions - The WoodRat
Pathfinder instructions - The WoodRat
Pathfinder instructions - The WoodRat

You also want an ePaper? Increase the reach of your titles
YUMPU automatically turns print PDFs into web optimized ePapers that Google loves.
and then repeat for the top right corner.<br />
Remember:<br />
1. Put them together and flip the front board. and cut both<br />
rows together.<br />
2. Cartwheel them both together and cut the other two. and<br />
that’s the Tails done.<br />
Making the Test Pins<br />
DO NOT FORGET TO DO THIS...<br />
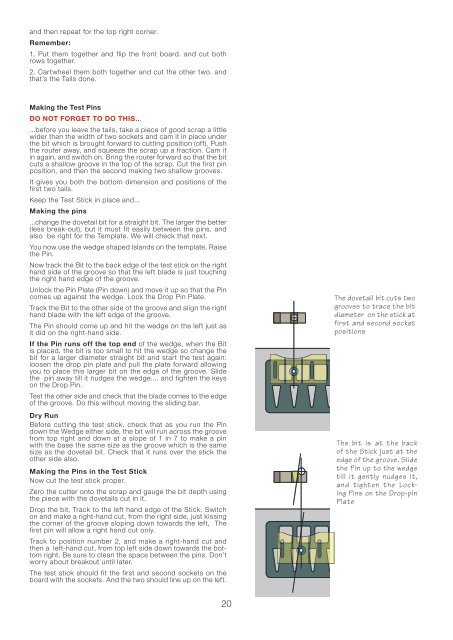
...before you leave the tails, take a piece of good scrap a little<br />
wider than the width of two sockets and cam it in place under<br />
the bit which is brought forward to cutting position (off). Push<br />
the router away, and squeeze the scrap up a fraction. Cam it<br />
in again, and switch on. Bring the router forward so that the bit<br />
cuts a shallow groove in the top of the scrap. Cut the first pin<br />
position, and then the second making two shallow grooves.<br />
It gives you both the bottom dimension and positions of the<br />
first two tails.<br />
Keep the Test Stick in place and...<br />
Making the pins<br />
...change the dovetail bit for a straight bit. <strong>The</strong> larger the better<br />
(less break-out), but it must fit easily between the pins, and<br />
also be right for the Template. We will check that next.<br />
You now use the wedge shaped Islands on the template, Raise<br />
the Pin.<br />
Now track the Bit to the back edge of the test stick on the right<br />
hand side of the groove so that the left blade is just touching<br />
the right hand edge of the groove.<br />
Unlock the Pin Plate (Pin down) and move it up so that the Pin<br />
comes up against the wedge. Lock the Drop Pin Plate.<br />
Track the Bit to the other side of the groove and align the right<br />
hand blade with the left edge of the groove.<br />
<strong>The</strong> Pin should come up and hit the wedge on the left just as<br />
it did on the right-hand side.<br />
If the Pin runs off the top end of the wedge, when the Bit<br />
is placed, the bit is too small to hit the wedge so change the<br />
bit for a larger diameter straight bit and start the test again:<br />
loosen the drop pin plate and pull the plate forward allowing<br />
you to place this larger bit on the edge of the groove. Slide<br />
the pin away till it nudges the wedge.... and tighten the keys<br />
on the Drop Pin.<br />
Test the other side and check that the blade comes to the edge<br />
of the groove. Do this without moving the sliding bar.<br />
Dry Run<br />
Before cutting the test stick, check that as you run the Pin<br />
down the Wedge either side, the bit will run across the groove<br />
from top right and down at a slope of 1 in 7 to make a pin<br />
with the base the same size as the groove which is the same<br />
size as the dovetail bit. Check that it runs over the stick the<br />
other side also.<br />
Making the Pins in the Test Stick<br />
Now cut the test stick proper.<br />
Zero the cutter onto the scrap and gauge the bit depth using<br />
the piece with the dovetails cut in it.<br />
Drop the bit, Track to the left hand edge of the Stick. Switch<br />
on and make a right-hand cut, from the right side, just kissing<br />
the corner of the groove sloping down towards the left, <strong>The</strong><br />
first pin will allow a right hand cut only.<br />
Track to position number 2, and make a right-hand cut and<br />
then a left-hand cut, from top left side down towards the bottom<br />
right. Be sure to clean the space between the pins. Don’t<br />
worry about breakout until later.<br />
<strong>The</strong> test stick should fit the first and second sockets on the<br />
board with the sockets. And the two should line up on the left.<br />
20<br />
<strong>The</strong> dovetail bit cuts two<br />
grooves to trace the bit<br />
diameter on the stick at<br />
first and second socket<br />
positions<br />
<strong>The</strong> bit is at the back<br />
of the Stick just at the<br />
edge of the groove. Slide<br />
the Pin up to the wedge<br />
till it gently nudges it,<br />
and tighten the Locking<br />
Pins on the Drop-pin<br />
Plate