Liberty Wood Stove - Lopi
Liberty Wood Stove - Lopi
Liberty Wood Stove - Lopi

You also want an ePaper? Increase the reach of your titles
YUMPU automatically turns print PDFs into web optimized ePapers that Google loves.
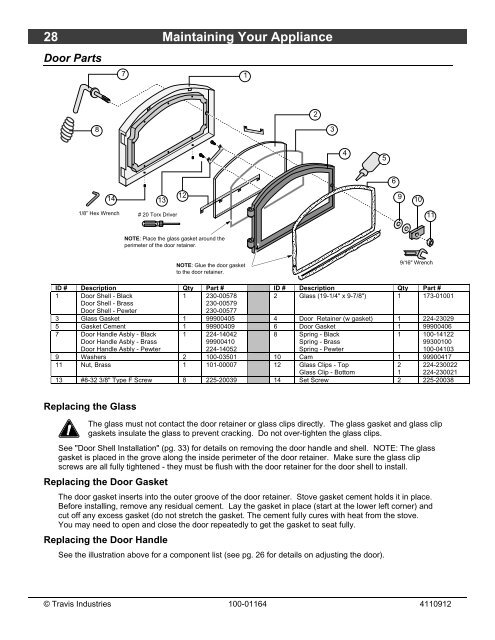
28 Maintaining Your Appliance<br />
Door Parts<br />
ID # Description Qty Part # ID # Description Qty Part #<br />
1 Door Shell - Black<br />
1 230-00578<br />
2 Glass (19-1/4" x 9-7/8") 1 173-01001<br />
Door Shell - Brass<br />
230-00579<br />
Door Shell - Pewter<br />
230-00577<br />
3 Glass Gasket 1 99900405 4 Door Retainer (w gasket) 1 224-23029<br />
5 Gasket Cement 1 99900409 6 Door Gasket 1 99900406<br />
7 Door Handle Asbly - Black 1 224-14042<br />
8 Spring - Black<br />
1 100-14122<br />
Door Handle Asbly - Brass<br />
99900410<br />
Spring - Brass<br />
99300100<br />
Door Handle Asbly - Pewter<br />
224-14052<br />
Spring - Pewter<br />
100-04103<br />
9 Washers 2 100-03501 10 Cam 1 99900417<br />
11 Nut, Brass 1 101-00007 12 Glass Clips - Top<br />
2 224-230022<br />
Glass Clip - Bottom<br />
1 224-230021<br />
13 #8-32 3/8" Type F Screw 8 225-20039 14 Set Screw 2 225-20038<br />
Replacing the Glass<br />
8<br />
14<br />
1/8” Hex Wrench<br />
The glass must not contact the door retainer or glass clips directly. The glass gasket and glass clip<br />
gaskets insulate the glass to prevent cracking. Do not over-tighten the glass clips.<br />
See "Door Shell Installation" (pg. 33) for details on removing the door handle and shell. NOTE: The glass<br />
gasket is placed in the grove along the inside perimeter of the door retainer. Make sure the glass clip<br />
screws are all fully tightened - they must be flush with the door retainer for the door shell to install.<br />
Replacing the Door Gasket<br />
The door gasket inserts into the outer groove of the door retainer. <strong>Stove</strong> gasket cement holds it in place.<br />
Before installing, remove any residual cement. Lay the gasket in place (start at the lower left corner) and<br />
cut off any excess gasket (do not stretch the gasket. The cement fully cures with heat from the stove.<br />
You may need to open and close the door repeatedly to get the gasket to seat fully.<br />
Replacing the Door Handle<br />
7<br />
13<br />
# 20 Torx Driver<br />
12<br />
NOTE: Place the glass gasket around the<br />
perimeter of the door retainer.<br />
NOTE: Glue the door gasket<br />
to the door retainer.<br />
See the illustration above for a component list (see pg. 26 for details on adjusting the door).<br />
1<br />
9/16" Wrench<br />
© Travis Industries 100-01164 4110912<br />
2<br />
3<br />
<br />
<br />
<br />
<br />
<br />
<br />
<br />
<br />
<br />
<br />
<br />
<br />
4<br />
5<br />
6<br />
9<br />
10<br />
11