Liberty Wood Stove - Lopi
Liberty Wood Stove - Lopi
Liberty Wood Stove - Lopi
Create successful ePaper yourself
Turn your PDF publications into a flip-book with our unique Google optimized e-Paper software.
38 Optional Equipment<br />
Outside Air Boot Installation (Part number 99200134)<br />
The outside air boot routes outside air to the stove for combustion. Refer to the section "Outside Air<br />
Requirements" for installation concerns. The directions below detail installation.<br />
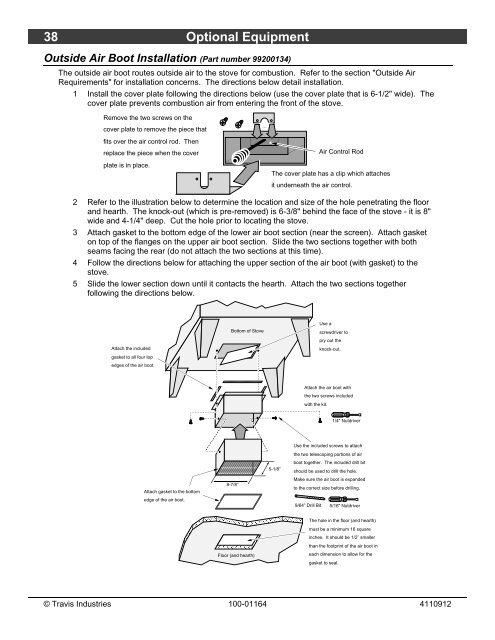
1 Install the cover plate following the directions below (use the cover plate that is 6-1/2" wide). The<br />
cover plate prevents combustion air from entering the front of the stove.<br />
Remove the two screws on the<br />
cover plate to remove the piece that<br />
fits over the air control rod. Then<br />
replace the piece when the cover<br />
plate is in place.<br />
Air Control Rod<br />
The cover plate has a clip which attaches<br />
it underneath the air control.<br />
2 Refer to the illustration below to determine the location and size of the hole penetrating the floor<br />
and hearth. The knock-out (which is pre-removed) is 6-3/8" behind the face of the stove - it is 8"<br />
wide and 4-1/4" deep. Cut the hole prior to locating the stove.<br />
3 Attach gasket to the bottom edge of the lower air boot section (near the screen). Attach gasket<br />
on top of the flanges on the upper air boot section. Slide the two sections together with both<br />
seams facing the rear (do not attach the two sections at this time).<br />
4 Follow the directions below for attaching the upper section of the air boot (with gasket) to the<br />
stove.<br />
5 Slide the lower section down until it contacts the hearth. Attach the two sections together<br />
following the directions below.<br />
Attach the included<br />
gasket to all four top<br />
edges of the air boot.<br />
Attach gasket to the bottom<br />
edge of the air boot.<br />
Bottom of <strong>Stove</strong><br />
<br />
<br />
<br />
8-7/8”<br />
© Travis Industries 100-01164 4110912<br />
5-1/8”<br />
Attach the air boot with<br />
the two screws included<br />
with the kit.<br />
1/4" Nutdriver<br />
Use the included screws to attach<br />
the two telescoping portions of air<br />
boot together. The included drill bit<br />
should be used to drill the hole.<br />
Make sure the air boot is expanded<br />
to the correct size before drilling.<br />
9/64” Drill Bit<br />
<br />
<br />
<br />
<br />
<br />
<br />
Floor (and hearth)<br />
<br />
Use a<br />
screwdriver to<br />
pry out the<br />
knock-out.<br />
5/16" Nutdriver<br />
The hole in the floor (and hearth)<br />
must be a minimum 16 square<br />
inches. It should be 1/2” smaller<br />
than the footprint of the air boot in<br />
each dimension to allow for the<br />
gasket to seal.


