

OCTO KIT – IR Repeater system - Smarthome
OCTO KIT – IR Repeater system - Smarthome
OCTO KIT – IR Repeater system - Smarthome

You also want an ePaper? Increase the reach of your titles
YUMPU automatically turns print PDFs into web optimized ePapers that Google loves.
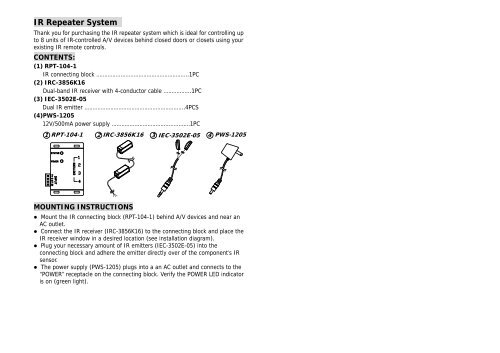
<strong>IR</strong> <strong>Repeater</strong> System<br />
Thank you for purchasing the <strong>IR</strong> repeater <strong>system</strong> which is ideal for controlling up<br />
to 8 units of <strong>IR</strong>-controlled A/V devices behind closed doors or closets using your<br />
existing <strong>IR</strong> remote controls.<br />
CONTENTS:<br />
(1) RPT-104-1<br />
<strong>IR</strong> connecting block …………….…………………………………..1PC<br />
(2) <strong>IR</strong>C-3856K16<br />
Dual-band <strong>IR</strong> receiver with 4-conductor cable ……………..1PC<br />
(3) IEC-3502E-05<br />
Dual <strong>IR</strong> emitter ……………………………………………………..4PCS<br />
(4)PWS-1205<br />
12V/500mA power supply …………….……………….…….……1PC<br />
1 RPT-104-1 2 <strong>IR</strong>C-3856K16 3 IEC-3502E-05 4 PWS-1205<br />
MOUNTING INSTRUCTIONS<br />
Mount the <strong>IR</strong> connecting block (RPT-104-1) behind A/V devices and near an<br />
AC outlet.<br />
Connect the <strong>IR</strong> receiver (<strong>IR</strong>C-3856K16) to the connecting block and place the<br />
<strong>IR</strong> receiver window in a desired location (see installation diagram).<br />
Plug your necessary amount of <strong>IR</strong> emitters (IEC-3502E-05) into the<br />
connecting block and adhere the emitter directly over of the component’s <strong>IR</strong><br />
sensor.<br />
The power supply (PWS-1205) plugs into a an AC outlet and connects to the<br />
“POWER” receptacle on the connecting block. Verify the POWER LED indicator<br />
is on (green light).
INSTALLATION DIAGRAM & MOUNTING INSTRUCTIONS:<br />
INSTALLATION DIAGRAM<br />
4<br />
DC 12V<br />
PWS<br />
NOTES:<br />
4 IEC<br />
CD PLAYER 1<br />
CD PLAYER 2 DVD PLAYER 1<br />
4<br />
1<br />
IEC<br />
RPT<br />
1<br />
2<br />
3<br />
TERMINAL BLOCK<br />
<strong>IR</strong><br />
ST<br />
G<br />
V+<br />
Power Am plifier<br />
L<br />
R<br />
<strong>IR</strong> OUT LED(Red)<br />
SPEAKERS<br />
<strong>IR</strong> WINDOW<br />
REMOTE<br />
2<br />
<strong>IR</strong>C<br />
STATUS POWER LED(Blue)<br />
<strong>IR</strong>:YELLOW<br />
ST:PURPLE<br />
G:BLUE<br />
V+ :ORANGE<br />
The status power receptacle at the RTP-104-1 connecting block remains<br />
vacant without working as the status power adaptor is not included in this kit.<br />
The more details of each element can be referred below:<br />
Installation<br />
(1) RPT-104-1 <strong>IR</strong> CONNECTING BLOCK<br />
Four emitter output connections<br />
Power receptacle with LED indicator<br />
Status power receptacle with LED indicator<br />
Removable wire harness connector<br />
Power:<br />
Connect a 12V DC 550mA power supply to the power jack.<br />
2.1mm + Tip <strong>–</strong> sleeve. The green LED will be illuminated when powered. This will<br />
power all of the <strong>IR</strong> components connected to the <strong>system</strong>.<br />
Status Power:<br />
12VDC 200mA 2.1mm + tip <strong>–</strong>sleeve. Connecting a power supply to this<br />
connection will power the status connection. The green LED will be illuminated<br />
when powered. This can be from a 12 volt trigger output or from a wall type<br />
power supply plugged into a switched outlet of a stereo receiver.<br />
System Connection:<br />
Connect the <strong>IR</strong> <strong>system</strong> to the detachable connector printed V+ (12VDC), G<br />
(Ground), and <strong>IR</strong> (Signal).<br />
Emitter Outputs:<br />
Choosing compatible parts such as IEC-3501E or IEC-3502E (single or dual <strong>IR</strong><br />
emitter), connect up to 4 emitters as max. to the emitter jacks marked 1-4.<br />
Place the emitters directly onto the source equipment’s <strong>IR</strong> sensors, up to 8 units.<br />
Mounting:<br />
Mount /adhere RPT-104-1 near the source equipment that the emitters are<br />
attached to.<br />
(2) <strong>IR</strong>C-3856K16 DUAL-BAND <strong>IR</strong> RECEIVER<br />
SPECIFICATION & FEATURES:<br />
Carrier Frequency: 38K + 2K and 56K + 2K Hz.<br />
Control Range: 38KHz up to 50 feet and 56KHz up to 30 feet indoor on axis,<br />
depending on remote strength and ambient interference and 15 to 20 feet in<br />
direct sunlight.<br />
Reception Angle: Up to 20 feet distance for + / <strong>–</strong> 45 degree off axis.<br />
LED display:<br />
Activity LED: When <strong>IR</strong> received the signal form remote controller the Red LED<br />
indicates <strong>IR</strong> signal activity a completed circuit with a terminator or an Emitter.
Status LED: The Blue LED for System On/Off indication.<br />
<strong>IR</strong> Lens: reject visible light interference.<br />
Room to Room Wire Recommendation: Using 4 - conductor (min.) 24 gauge<br />
unshielded solid or stranded copper wire up to 1000 feet ( 300M ) length.<br />
Power Requirement: DC 12V, (500~1200mA), Using a regulated adaptor is<br />
always recommended.<br />
Dimension: 32(L) x 13(W) x 12(H) mm.
CODES COMPATIBILITY:<br />
NEC Code ◆◆<br />
RC5 Code ◆◆<br />
RC6 Code ◆◆<br />
RCMM Code ◆◆<br />
r-step code ◆◆<br />
RCS-80 Code ◆◆<br />
R-2000 Code ◆◆<br />
RCA Code ◆◆<br />
Sharp Code ◆◆<br />
Sony 12-bit Code ◆◆<br />
Sony 15-bit Code ◆◆<br />
Sony 20-bit Code ◆◆<br />
Zenith Code ◆◆<br />
High Data Rate Code ◆◆<br />
Disturbance Suppression ◆◆<br />
NOTE:<br />
XMP code ◆◆<br />
◆◆ Best for this application<br />
(3) IEC-3502E-05 DUAL <strong>IR</strong> EMITTER<br />
SPECIFICATION & FEATURES:<br />
Oval shape, with elegant & compact size<br />
Infrared is built in transparent housing<br />
Non-blinking version with peak wavelength 940nm<br />
With 10 feet cable length<br />
With 3.5mm mono standard plug<br />
With self-adhesive tape for quick and easy fixing on any hard, clean & dry<br />
surface<br />
NOTES:<br />
Make sure mounting surface must be clean and dry for well fixing.<br />
Can not be connecting <strong>IR</strong> emitter directly to power supply or battery.<br />
(4) PWS-1205 12V/500mA Switching power<br />
PWS-1205 is a 12VDC 500mA power supply for powering <strong>IR</strong> components.


