Importing And Vectorizing A Bitmap Image - Gravograph
Importing And Vectorizing A Bitmap Image - Gravograph
Importing And Vectorizing A Bitmap Image - Gravograph

You also want an ePaper? Increase the reach of your titles
YUMPU automatically turns print PDFs into web optimized ePapers that Google loves.
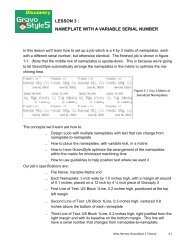
LESSON 7:<br />
In this lesson we’ll learn how to import a bitmap logo, transform it into a vector and perform<br />
some editing on the vector to clean it up.<br />
The concepts we’ll learn are how to:<br />
IMPORTING AND VECTORIZING A BITMAP IMAGE<br />
Import a bitmap image<br />
Transform the bitmap image<br />
into a vector image. (The<br />
process is called “vectorize”.<br />
Edit the vector image<br />
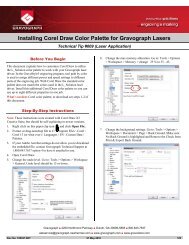
View the vector image in<br />
GravoStyle’s filled viewing<br />
mode (Figure 7-1)<br />
Correct problems which<br />
cause an improper fill.<br />
Our job’s design specifications are:<br />
Job Filename: Finished Colt Logo.gnh<br />
Logo Filename: Colt Logo.bmp<br />
Plate: 8 inches by 8 inches with a ¼ inch margin<br />
STEP 1: OPEN A NEW JOB AND SET THE MATERIAL DIMENSIONS<br />
We’ll open a new job and set the material size to 8 inches by 8 inches and give it a ¼ inch<br />
margin all around. We’ll make sure the our viewing mode is set to “Wire contours”.<br />
STEP 2: IMPORT THE BITMAPPED<br />
LOGO<br />
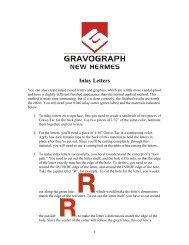
We’ll click on “File” and then on “Import”. We’ll<br />
then see GravoStyle’s file import dialog window.<br />
Figure 7-2 shows this window after we’ve<br />
navigated to the folder containing our logo (Colt<br />
Logo.bmp. We’ll click on “Open” and the bit-<br />
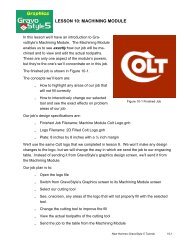
Figure 7-1 Finished Vectorized Logo<br />
Figure 7-2 File Import Dialog Window<br />
New Hermes GravoStyle 5 Tutorial 7-1
map will appear on our work area (Figure 7-3).<br />
STEP 3: VECTORIZE THE BITMAP<br />
We’ll locate the “Vectorize bitmap” tool on the left toolbar<br />
(Figure 7-4) and click on it. GravoStyle’s “Vectorize” dialog<br />
window will pop up (Figure 7-5).<br />
Figure 7-4<br />
Vectorize Tool<br />
The three slider controls at the top tell GravoStyle how faithfully we want the contours of the<br />
vector images to follow the outlines of the bitmap, how to handle small departures from the<br />
original path of the outlines and how rounded or angular to make the vector paths.<br />
Our experience is that setting these parameters, as shown, at 0.3, 2 and -1 consistently<br />
gives the best results. We’ll use these values for this job.<br />
The button on the lower left tells GravoStyle how we want to handle thick outlines. Should we<br />
just make a single vector line down the center of the outline (button down), or should we<br />
make vectors that reproduce the entire width of the outline (button up). We’ll keep the button<br />
up for this job. The dialog window at the lower right lets us tell GravoStyle to ignore any discrete<br />
parts of the bitmap which are smaller than our specified size. We’ll enter 0.020 inches;<br />
New Hermes GravoStyle 5 Tutorial 7-2<br />
Figure 7-5 Vectorize Dialog Window<br />
Figure 7-3 bitmap imported
anything smaller will be considered to be unwanted noise.<br />
We’ll click “OK”, and yet another dialog<br />
window, labeled “Color reduction”<br />
will pop up. We’ll ignore this<br />
window for now and click on “OK” to<br />
proceed.<br />
GravoStyle will now perform the vectorization<br />
and we’ll see its result in<br />
Figure 7-7.<br />
Figure 7-7 Vectorization Complete<br />
STEP 4: TROUBLESHOOT THE LOGO<br />
What we’re looking at in Figure 7-7 is two objects superimposed.<br />
They are the vector contours and the original bitmap<br />
image. Which one is on top? It doesn’t matter. We’ll simply<br />
grab the center handle of the shown selection and move it<br />
away to separate the vectors from the bitmap (Figure 7-8).<br />
We’ll then make sure that the bitmap is selected and we’ll<br />
delete it - we have no further use for it.<br />
(In Figure 7-8, we can see that it was the vector image that<br />
we dragged - we’ll merely unselect it, then select the bitmap<br />
and delete the bitmap.)<br />
If we look closely at our vectorized image (we can zoom in<br />
with the right mouse button for a closer look) we’ll that there<br />
is an unexpected and unwanted border all around it.<br />
Figure 7-6 Color Reduction Window<br />
Figure 7-8 Vector and <strong>Bitmap</strong> <strong>Image</strong>s<br />
Separated<br />
New Hermes GravoStyle 5 Tutorial 7-3
We’ll explore this:<br />
First, we’ll ungroup the logo.<br />
Next, we’ll click on each<br />
segment of the outside border<br />
in turn and drag them<br />
away from the rest of the<br />
logo. Figure 7-9 shows our<br />
job after we’ve dragged the<br />
last border segment away.<br />
Next, we’ll select the three<br />
segments and delete them.<br />
Obviously GravoStyle’s saw them as real objects to be vectorized!<br />
When we’re done, we’ll select all of what’s left by pressing “Control-L” on the keyboard.<br />
(Control-L is preferred to dragging a selection rectangle all around the logo at this point; we<br />
want to make really sure that we’ve selected everything.) We’ll proceed as follows:<br />
Let’s change to the “Filled contours” view now.<br />
Figure 7-10 Logo Ungrouped,<br />
Filled Contours Viewing mode<br />
Next, we’ll ungroup<br />
our selection. This is a matter of good practice; we want to make sure that<br />
we start off cleanly for the next step. Our logo will look as it appears in Figure 7-10,<br />
with everything filled, including the inside of the letter “O”.<br />
Next, we’ll group the selection and see the result in Figure 7-11. There’s a prob-<br />
New Hermes GravoStyle 5 Tutorial 7-4<br />
Figure 7-9 Segments of Outside Border Dragged Away<br />
Figure 7-11 Logo Grouped,<br />
Filled Contours Viewing mode
lem. Only the “C” is filled!<br />
We’ve previously learned that ungrouping and then regrouping a logo causes GravoStyle to<br />
order contours so that they fill correctly. What happened? Let’s investigate.<br />
First, we’ll once again ungroup the entire<br />
logo so that we can deal with individual<br />
vector contours.<br />
We’ll next click on the letter “T” and drag<br />
it away. When we do, we’ll find that<br />
there were two of them (Figure 7-12).<br />
We’ll delete the one we dragged.<br />
We’ll next drag the letter “L” away, and<br />
we’ll find the same thing. We’ll delete<br />
the extra “L”.<br />
We have one more to go. We’ll select<br />
the letter “O” and drag and delete it too.<br />
(Don’t forget - these letters are not<br />
text - they’re really a collection of<br />
curves and lines that happen to look<br />
like text. The outside and the inside<br />
circles of the “O” are ungrouped, and<br />
therefore separate, contours. We’ll<br />
have to select both of them.)<br />
We’ll now select everything (Control-L), ungroup<br />
and then group the logo. The logo is now correctly<br />
filled, as shown<br />
in Figure 7-15.<br />
Figure 7-15 Logo Ungrouped Then<br />
Grouped<br />
Figure 7-12 Ungrouped Letter “T” Dragged Away<br />
Figure 7-13 Ungrouped Letter “L” Dragged Away<br />
Figure 7-14 Ungrouped Letter “O” Dragged Away<br />
New Hermes GravoStyle 5 Tutorial 7-5
Look Further<br />
When GravoStyle groups a vector object, the program sorts the contours for filling purposes. It<br />
starts with the outermost one and marks it for fill until the next inner contour is reached. The fill<br />
stops until the next inner contour is reached and then filling resumes. This goes on until all of the<br />
object’s contours are similarly sorted.<br />
What went wrong with our logo? When GravoStyle does its sorting, it doesn’t know how we want it<br />
to treat contours that are identical and that are exactly on top of each other.<br />
They’re certainly two separate contours, but there isn’t any space between<br />
them to fill.<br />
We can check this, if we want, by clicking on GravoStyle’s “Geometrical<br />
shapes” tool and selecting, say, the “circle” tool from the pallet that then<br />
opens. Draw a circle by clicking anywhere on the work area of the screen and drag the mouse with<br />
the left mouse button still held down. When we’re through, we can copy the circle and paste it in<br />
place by clicking the top toolbar’s “Paste” icon. We’ll now have two identical circles on top of<br />
each other. We can then select both of them group them and view them in GravoStyle’s filled contours<br />
mode to see if they’ll fill.<br />
They won’t!<br />
STEP 5: EDIT THE LOGO<br />
Now we’ll look critically at<br />
the logo, and we’ll do this<br />
in wire view mode.<br />
The letters “C” and “O”<br />
look like they need some<br />
work. The two contours<br />
of the “O” are not smooth<br />
circles and the left side of<br />
the “C” is flattened.<br />
These two letters are<br />
shown in a zoomed-in<br />
view in Figure 7-16.<br />
New Hermes GravoStyle 5 Tutorial 7-6<br />
Figure 7-16 Enlarged view of the Letters “C” and “O”
We’ll edit the letter “O” first:<br />
We’ll select one of the contours of the “O”. (We’ll start with the inner one, but it<br />
doesn’t really matter which one we do first.)<br />
We’ll next click on the “Special effects tools” icon on the left<br />
toolbar (Figure 7-17), and the “Special effects” tool pallet will<br />
open.<br />
We’ll click on the<br />
tool whose tool tip<br />
reads “Convert to<br />
Circle/Ellipse/<br />
Rectangle” (Figure<br />
7-18).<br />
A new dialog window<br />
titled “Convert<br />
to a shape” will<br />
open and it will let<br />
us convert the selected<br />
contour to<br />
either a circle, an<br />
ellipse or a rectangle. We’ll<br />
choose the circle by clicking on<br />
it’s button, and then we’ll click<br />
“OK” (Figure 7-19).<br />
Figure 7-17<br />
Look Further<br />
Notice that the “Special effects” tool is one of nine tools on the left toolbar that have a small<br />
blue triangle at the lower right corner of their icons. The triangles signal that a tool pallet will<br />
open when these tool icons are clicked.<br />
Figure 7-18 “Convert to Circle/Ellipse/Rectangle” Tool<br />
Figure 7-19 “Convert to a shape” Window<br />
New Hermes GravoStyle 5 Tutorial 7-7
The inside of the “O” will now be converted to a perfect circle as shown in Figure 20!<br />
We’ll similarly convert the outer contour of the “O” and the completed letter is shown in Figure<br />
21.<br />
Figure 20 Inside of “O” Converted to Perfect Circle<br />
We’ll now correct the flattened left side of the “C” (Figure 7-22):<br />
Figure 22 Left Side of “C” Flattened<br />
New Hermes GravoStyle 5 Tutorial 7-8<br />
Figure 21 Outside of “O” Converted to Perfect Circle<br />
We’ll make sure that our logo is entirely<br />
ungrouped and select the “C”.<br />
Next, we’ll click on the “Point mode” tool<br />
(Figure 7-23) and open its pallet.<br />
Figure 7-23
Figure 7-24 shows the point editing tool pallet<br />
opened. Note that the selected contour (the “C”) is<br />
now shown with the points that define its contours<br />
and lines.<br />
The point editing pallet has no less than 25 powerful<br />
tools that let us edit vector contours in many<br />
ways. We’ll just use two of them on this job.<br />
The first tool that we’ll use is the one whose tool tip<br />
reads “Convert to arc” (Figure 7-24). This tool lets<br />
us select two points on a contour and convert the<br />
segment between them to a perfect arc of a circle.<br />
Here’s how it works:<br />
First, we’ll click on the “C’s” contour near<br />
one side of the flattened area (Figure 7-<br />
25). Notice that the cursor shape has<br />
changed, indicating that we’re in point<br />
edit mode, and that the cursor now has a<br />
small graphic added near its bottom to<br />
indicate the function of the tool that we’re<br />
now using.<br />
Next, we’ll click on the other side of the flattened part of the contour (Figure 7-26).<br />
We’ll notice that an arc now appears<br />
between the two points.<br />
We can change the arc’s radius<br />
by dragging the mouse cursor<br />
along the path of the arc. If we<br />
go too far, the arc will reverse to<br />
the other side of the contour.<br />
When the arc looks OK, we’ll let<br />
go of the mouse button.<br />
Figure 7-25<br />
Convert To Arc Tool<br />
First Point Placed<br />
Figure 7-24 Point Editing Tool Pallet<br />
Figure 7-26<br />
Convert To Arc Tool<br />
Second Point Placed<br />
New Hermes GravoStyle 5 Tutorial 7-9
We’ll click on the selection<br />
tool’s arrow to exit the point<br />
edit mode so that we can<br />
see the result more clearly,<br />
and our logo will look as it<br />
appears in Figure 7-27.<br />
New Hermes GravoStyle 5 Tutorial 7-10<br />
Figure 7-27 Letter “C” Corrected<br />
Look Further<br />
There is a special case which may occur when we use the “Convert<br />
to arc” tool. In the figure to the right, the cursor is near a point on<br />
the contour on the bottom of the “C”. This particular point is different<br />
from any of the other points on the contour. It has a small rectangle<br />
inside a larger rectangle. This point is called the “Start Point” and it’s literally the place on<br />
the contour where our cutting tool will begin (and end) the machining of this outline.<br />
The “Convert to arc” and several other point editing tools work with the rule that they will not include<br />
the start point in any segment that they are modifying. If we select our two anchor points<br />
for these tools so that they bridge the start point, the tool will do its work in an unexpected way.<br />
Instead of modifying the smaller segment that we think we chose, the larger length of the contour<br />
that does not include the start point will be modified.<br />
How then to apply these tools to a segment that contains the start point? Just hold down the<br />
shift key on the keyboard while we select the two points. A red dot will appear in the center of the<br />
start point to indicate that all is OK and we can release the shift key when we’ve selected the second<br />
point. When the edit is completed, the start point will be seen to be moved to one side of the<br />
modified segment.
We’ll now look at the letters “L” and “T”. Their corners are<br />
slightly rounded, but these corners in the original logo are<br />
square. We’ll use one of the point editing tools to quickly<br />
correct the left corner of the bottom of the “T” (Figure 7-<br />
28). Here’s how:<br />
We’ll zoom in on the bottom-left corner of the “T”<br />
and select the contour.<br />
We’ll re-enter the point edit mode by clicking on<br />
its icon on the left toolbar.<br />
Next, we’ll select the tool whose tool tip reads<br />
“Convert to angle” (Figure 7-29).<br />
In similar fashion to the “Convert to arc” tool, we’ll select<br />
two points. Any two near the corner will do (Figure 7-<br />
30).<br />
We’ll drag the mouse cursor until we see the<br />
corner we want (Figure 7-31) and release the<br />
mouse button.<br />
Our completed squared corner is shown in<br />
Figure 7-32. We can similarly square the remaining<br />
corners of the “T” and the “L”.<br />
Look Further<br />
We can move points on a contour directly<br />
with the point edit mode cursor. We have<br />
only to grab a point with this cursor and<br />
drag it to wherever we want. This is a simple<br />
way to edit if our contour has only a few<br />
errant points that require changing.<br />
Figure 7-29 Figure 7-30<br />
Convert to Angle Tool<br />
Figure 7-31<br />
Corner Squared Off<br />
Figure 7-28 Bottom Left<br />
Corner of the “T”<br />
Figure 7-32<br />
Completed Square Corner<br />
New Hermes GravoStyle 5 Tutorial 7-11
We’re now finished and our logo will look and fill as it’s shown in Figure 7-1.<br />
REMEMBER TO SAVE YOUR WORK!<br />
Look Further - The following is a reproduction of GravoStyle’s help screen for point editing:<br />
New Hermes GravoStyle 5 Tutorial 7-12
WHAT WE’VE LEARNED<br />
In this job we’ve learned:<br />
How to import a bitmap graphic<br />
How to vectorize a bitmap graphic<br />
Some steps to troubleshoot a vectorized image<br />
How to enter the point edit mode<br />
How to use some of the point edit mode tools<br />
How to use one of the special effects tools<br />
New Hermes GravoStyle 5 Tutorial 7-13