Implementing PLL Reconfiguration in Cyclone III Devices - Altera
Implementing PLL Reconfiguration in Cyclone III Devices - Altera
Implementing PLL Reconfiguration in Cyclone III Devices - Altera

Create successful ePaper yourself
Turn your PDF publications into a flip-book with our unique Google optimized e-Paper software.
AN507-2.0 Application Note<br />
Overview<br />
101 Innovation Drive<br />
San Jose, CA 95134<br />
www.altera.com<br />
September 2011 <strong>Altera</strong> Corporation<br />
<strong>Implement<strong>in</strong>g</strong> <strong>PLL</strong> <strong>Reconfiguration</strong> <strong>in</strong><br />
<strong>Cyclone</strong> <strong>III</strong> <strong>Devices</strong><br />
This application note describes the flow for implement<strong>in</strong>g phase-locked loop (<strong>PLL</strong>)<br />
reconfiguration <strong>in</strong> <strong>Cyclone</strong> ® <strong>III</strong> devices and how to use the <strong>PLL</strong> reconfiguration<br />
feature. Use this application note <strong>in</strong> conjunction with the follow<strong>in</strong>g literature:<br />
■ Clock Networks and <strong>PLL</strong>s <strong>in</strong> <strong>Cyclone</strong> <strong>III</strong> <strong>Devices</strong> chapter <strong>in</strong> volume 1 of the <strong>Cyclone</strong> <strong>III</strong><br />
Device Handbook<br />
■ Phase-Locked Loop (ALT<strong>PLL</strong>) Megafunction User Guide<br />
■ Phase-Locked Loop <strong>Reconfiguration</strong> (ALT<strong>PLL</strong>_RECONFIG) Megafunction user guide<br />
This application note discusses the follow<strong>in</strong>g topics:<br />
■ Overview of <strong>PLL</strong> reconfiguration <strong>in</strong> <strong>Cyclone</strong> <strong>III</strong> devices<br />
■ Complete flow on implement<strong>in</strong>g real-time <strong>PLL</strong> reconfiguration feature <strong>in</strong> a<br />
frequency prescaler application<br />
■ Complete flow on implement<strong>in</strong>g dynamic phase-shift<strong>in</strong>g feature<br />
■ Design considerations that you must consider when select<strong>in</strong>g <strong>PLL</strong> parameters for<br />
reconfiguration<br />
<strong>PLL</strong>s use several divide counters and different voltage-controlled oscillator taps to<br />
perform frequency synthesis and phase shifts. In <strong>Cyclone</strong> <strong>III</strong> <strong>PLL</strong>s, you can<br />
reconfigure the counter sett<strong>in</strong>gs and dynamically shift the phase of the <strong>PLL</strong> output<br />
clock. You can also change the charge pump and loop filter components, which<br />
dynamically affect the <strong>PLL</strong> bandwidth. You can use these <strong>PLL</strong> components to update<br />
the clock frequency, <strong>PLL</strong> bandwidth, and phase shift <strong>in</strong> real time, without<br />
reconfigur<strong>in</strong>g the entire FPGA.<br />
Applications that operate at multiple frequencies can benefit from <strong>PLL</strong><br />
reconfiguration <strong>in</strong> real time. <strong>PLL</strong> reconfiguration is also beneficial <strong>in</strong> prototyp<strong>in</strong>g<br />
environments, allow<strong>in</strong>g you to sweep <strong>PLL</strong> output frequencies and adjust the clock<br />
output phase at any stage of the design. For example, a system generat<strong>in</strong>g test<br />
patterns is required to generate and transmit patterns at 50 or 100 MHz, depend<strong>in</strong>g on<br />
the device under test. Reconfigur<strong>in</strong>g the <strong>PLL</strong> components <strong>in</strong> real time for this example<br />
allows you to switch between the two output frequencies with<strong>in</strong> a few microseconds.<br />
You can also use reconfiguration to adjust clock-to-out (t CO) delays <strong>in</strong> real time by<br />
shift<strong>in</strong>g the phase of the output clock. This approach elim<strong>in</strong>ates the need to regenerate<br />
a configuration file with the new <strong>PLL</strong> sett<strong>in</strong>gs.<br />
© 2011 <strong>Altera</strong> Corporation. All rights reserved. ALTERA, ARRIA, CYCLONE, HARDCOPY, MAX, MEGACORE, NIOS,<br />
QUARTUS and STRATIX words and logos are trademarks of <strong>Altera</strong> Corporation and registered <strong>in</strong> the U.S. Patent and Trademark<br />
Office and <strong>in</strong> other countries. All other words and logos identified as trademarks or service marks are the property of their<br />
respective holders as described at www.altera.com/common/legal.html. <strong>Altera</strong> warrants performance of its semiconductor<br />
products to current specifications <strong>in</strong> accordance with <strong>Altera</strong>'s standard warranty, but reserves the right to make changes to any<br />
products and services at any time without notice. <strong>Altera</strong> assumes no responsibility or liability aris<strong>in</strong>g out of the application or use<br />
of any <strong>in</strong>formation, product, or service described here<strong>in</strong> except as expressly agreed to <strong>in</strong> writ<strong>in</strong>g by <strong>Altera</strong>. <strong>Altera</strong> customers are<br />
advised to obta<strong>in</strong> the latest version of device specifications before rely<strong>in</strong>g on any published <strong>in</strong>formation and before plac<strong>in</strong>g orders<br />
for products or services.<br />
ISO<br />
9001:2008<br />
Registered<br />
Subscribe
Page 2 Overview<br />
The follow<strong>in</strong>g <strong>PLL</strong> components are reconfigurable <strong>in</strong> real time:<br />
■ Prescale counter (N)<br />
■ Feedback counter (M)<br />
■ Post-scale counters (C0-C4)<br />
■ Post-divider (K)<br />
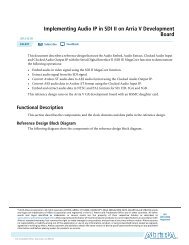
Figure 1. <strong>PLL</strong> <strong>Reconfiguration</strong> Scan Cha<strong>in</strong><br />
scandata<br />
scanclkena<br />
configupdate<br />
<strong>in</strong>clk<br />
scandataout<br />
scandone<br />
scanclk<br />
Note to Figure 1:<br />
■ Charge pump current (I CP) and loop filter components (R, C)<br />
Figure 1 shows how <strong>PLL</strong> counter sett<strong>in</strong>gs can be adjusted dynamically by shift<strong>in</strong>g<br />
their new sett<strong>in</strong>gs <strong>in</strong>to a serial shift-register cha<strong>in</strong> or scan cha<strong>in</strong>. Serial data is fed <strong>in</strong>to<br />
the scan cha<strong>in</strong> via the scandata port and the shift registers are clocked by the scanclk<br />
port. Serial data is shifted through the scan cha<strong>in</strong> as long as the scanclkena signal<br />
stays asserted. After the last bit of data is clocked, assert<strong>in</strong>g the reconfiguration state<br />
mach<strong>in</strong>e signal, configupdate, for at least one scanclk cycle causes the <strong>PLL</strong><br />
configuration bits to be synchronously updated with the data <strong>in</strong> the scan registers.<br />
The scan cha<strong>in</strong> can also be <strong>in</strong>itialized or changed us<strong>in</strong>g a memory <strong>in</strong>itialization file <strong>in</strong><br />
the hexadecimal (.hex) file or memory <strong>in</strong>itialization file (.mif) format. Refer to “<strong>PLL</strong><br />
<strong>Reconfiguration</strong> Scan Register Bitmap” on page 7 for details on memory <strong>in</strong>itialization<br />
file sett<strong>in</strong>gs.<br />
from M counter<br />
from N counter<br />
PFD LF/K/CP (1)<br />
VCO<br />
/C4 /C3 /C2 /C1 /C0 /M /N<br />
(1) This figure shows the correspond<strong>in</strong>g scan register for the K counter <strong>in</strong> between the scan registers for the charge pump and loop filter. The K<br />
counter is physically located after the voltage-controlled oscillator (VCO).<br />
f For more <strong>in</strong>formation about hardware and software implementation, refer to the Clock<br />
Networks and <strong>PLL</strong>s <strong>in</strong> <strong>Cyclone</strong> <strong>III</strong> <strong>Devices</strong> chapter <strong>in</strong> volume 1 of the <strong>Cyclone</strong> <strong>III</strong> Device<br />
Handbook and the Phase-Locked Loop (ALT<strong>PLL</strong>) Megafunction User Guide, respectively.<br />
<strong>Implement<strong>in</strong>g</strong> <strong>PLL</strong> <strong>Reconfiguration</strong> <strong>in</strong> <strong>Cyclone</strong> <strong>III</strong> <strong>Devices</strong> September 2011 <strong>Altera</strong> Corporation
<strong>Implement<strong>in</strong>g</strong> <strong>PLL</strong> <strong>Reconfiguration</strong> us<strong>in</strong>g Quartus II Software Page 3<br />
<strong>Implement<strong>in</strong>g</strong> <strong>PLL</strong> <strong>Reconfiguration</strong> us<strong>in</strong>g Quartus II Software<br />
September 2011 <strong>Altera</strong> Corporation<br />
You can use the Quartus ® II ALT<strong>PLL</strong> MegaWizard ® Plug-<strong>in</strong> Manager to enable the<br />
reconfiguration circuitry <strong>in</strong> the ALT<strong>PLL</strong> megafunction <strong>in</strong>stantiation <strong>in</strong> your design.<br />
The ALT<strong>PLL</strong>_RECONFIG megafunction simplifies the process of reconfigur<strong>in</strong>g<br />
<strong>Cyclone</strong> <strong>III</strong> <strong>PLL</strong>s.<br />
f For more <strong>in</strong>formation, refer to the Phase-Locked Loop <strong>Reconfiguration</strong><br />
(ALT<strong>PLL</strong>_RECONFIG) Megafunction user guide and the Phase-Locked Loop (ALT<strong>PLL</strong>)<br />
Megafunction User Guide.<br />
The follow<strong>in</strong>g two methods describe how <strong>PLL</strong>s can be reconfigured with the<br />
ALT<strong>PLL</strong>_RECONFIG megafunction. Either method may be used for reconfiguration.<br />
■ Method 1 is used to reconfigure a specific <strong>PLL</strong> counter without affect<strong>in</strong>g other <strong>PLL</strong><br />
sett<strong>in</strong>gs. This method is used when one or a few <strong>PLL</strong> sett<strong>in</strong>gs need to be modified<br />
at a time.<br />
■ Method 2 is used to reconfigure all the <strong>PLL</strong> counter sett<strong>in</strong>gs us<strong>in</strong>g a memory<br />
<strong>in</strong>itialization file. The scan cha<strong>in</strong> is updated with the memory <strong>in</strong>itialization file <strong>in</strong><br />
.mif or .hex file format and the <strong>PLL</strong> counters are updated with the content of the<br />
scan cha<strong>in</strong>.<br />
<strong>PLL</strong> <strong>Reconfiguration</strong>: Method 1<br />
To reconfigure a specific <strong>PLL</strong> counter, shift <strong>in</strong> specific counter_type, counter_param,<br />
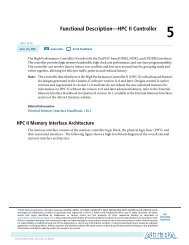
and data_<strong>in</strong> to the ALT<strong>PLL</strong>_RECONFIG megafunction. Figure 2 shows the<br />
connections between the ALT<strong>PLL</strong> megafunction and the ALT<strong>PLL</strong>_RECONFIG<br />
megafunction.<br />
Figure 2. ALT<strong>PLL</strong>_RECONFIG and ALT<strong>PLL</strong> Megafunctions <strong>in</strong> the Quartus II Software<br />
The follow<strong>in</strong>g steps describe <strong>PLL</strong> reconfiguration us<strong>in</strong>g Method 1:<br />
1. With the 4-bit counter_type port, specify a counter type (C0-C4, M, N, CP/LF, VCO).<br />
2. With the 3-bit counter_param port, specify which parameter should be updated for<br />
the counter type <strong>in</strong> step 1.<br />
<strong>Implement<strong>in</strong>g</strong> <strong>PLL</strong> <strong>Reconfiguration</strong> <strong>in</strong> <strong>Cyclone</strong> <strong>III</strong> <strong>Devices</strong>
Page 4 <strong>Implement<strong>in</strong>g</strong> <strong>PLL</strong> <strong>Reconfiguration</strong> us<strong>in</strong>g Quartus II Software<br />
f For valid counter_type and counter_param sett<strong>in</strong>gs, refer to the<br />
Phase-Locked Loop <strong>Reconfiguration</strong> (ALT<strong>PLL</strong>_RECONFIG) Megafunction user<br />
guide.<br />
3. With the 9-bit data_<strong>in</strong> port, specify a value for the counter_param <strong>in</strong> step 2.<br />
4. Assert the write_param signal for one scanclk cycle to allow the <strong>in</strong>puts from steps<br />
1 through 3 to be written to the scan cha<strong>in</strong>.<br />
5. The busy signal is asserted as soon as the write_param signal is asserted. The busy<br />
signal rema<strong>in</strong>s asserted while the parameter is be<strong>in</strong>g written. The time for which<br />
the busy signal is asserted varies depend<strong>in</strong>g on the data shifted <strong>in</strong>to the scan cha<strong>in</strong>.<br />
6. When the busy signal is deasserted, you can write a different counter_type <strong>in</strong>to<br />
the scan cha<strong>in</strong> follow<strong>in</strong>g steps 1 through 5.<br />
7. When all data is shifted <strong>in</strong>to the scan cha<strong>in</strong>, assert the reconfig signal after the<br />
busy signal is deasserted to reconfigure the <strong>PLL</strong> with the content of the scan cha<strong>in</strong>.<br />
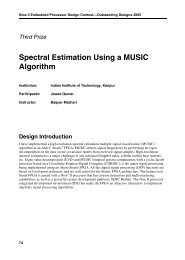
The tim<strong>in</strong>g diagram shown <strong>in</strong> Figure 3 illustrates the relationship between the<br />
counter_type, counter_param, data<strong>in</strong>, reconfig, and busy signals to achieve <strong>PLL</strong><br />
reconfiguration through the ALT<strong>PLL</strong>_RECONFIG megafunction.<br />
Figure 3. Tim<strong>in</strong>g Diagram for <strong>PLL</strong> <strong>Reconfiguration</strong> Us<strong>in</strong>g Method 1<br />
scanclk<br />
counter_type[3:0]<br />
counter_param[2:0]<br />
data_<strong>in</strong>[9:0]<br />
write_param<br />
busy<br />
reconfig<br />
configupdate<br />
scandone<br />
<strong>PLL</strong> <strong>Reconfiguration</strong>: Method 2<br />
busy rema<strong>in</strong>s high when <strong>in</strong>put data<br />
is shifted <strong>in</strong>to the scan cha<strong>in</strong><br />
configupdate asserted after<br />
last dataout bit is shifted out<br />
busy rema<strong>in</strong>s high<br />
dur<strong>in</strong>g reconfiguration<br />
scandone is asserted one clock<br />
cycle after configupdate is asserted<br />
Initialize the ALT<strong>PLL</strong>_RECONFIG megafunction with a memory <strong>in</strong>itialization file <strong>in</strong><br />
.mif or .hex file format. The memory <strong>in</strong>itialization file is a bitmap of the <strong>PLL</strong><br />
reconfiguration scan cha<strong>in</strong>. Pulse the reconfig signal to update the ALT<strong>PLL</strong><br />
megafunction with the content of the memory <strong>in</strong>itialization file.<br />
<strong>Implement<strong>in</strong>g</strong> <strong>PLL</strong> <strong>Reconfiguration</strong> <strong>in</strong> <strong>Cyclone</strong> <strong>III</strong> <strong>Devices</strong> September 2011 <strong>Altera</strong> Corporation
<strong>Implement<strong>in</strong>g</strong> <strong>PLL</strong> <strong>Reconfiguration</strong> us<strong>in</strong>g Quartus II Software Page 5<br />
September 2011 <strong>Altera</strong> Corporation<br />
The design set-up is similar to Method 1, except that the counter_type,<br />
counter_param, and data<strong>in</strong> ports are unused <strong>in</strong> this example. It is possible to use<br />
Method 1 and Method 2 <strong>in</strong> the same design provided the control signals are asserted<br />
properly.<br />
To make sure the .mif or .hex file has valid sett<strong>in</strong>gs, create a separate ALT<strong>PLL</strong><br />
megafunction <strong>in</strong>stantiation with the new <strong>in</strong>put and output sett<strong>in</strong>gs for your <strong>PLL</strong> after<br />
reconfiguration and select Generate a Configuration File <strong>in</strong> the ALT<strong>PLL</strong><br />
MegaWizard. Use the generated .mif or .hex file for reconfiguration <strong>in</strong> your design.<br />
For <strong>Cyclone</strong> <strong>III</strong> devices, multiple reconfigurations are possible us<strong>in</strong>g multiple .mif or<br />
.hex files. You can create multiple .mif or .hex files with the MegaWizard without<br />
hav<strong>in</strong>g to recompile your design. Refer to “Application Example 1” on page 10 for<br />
details.<br />
The follow<strong>in</strong>g steps describe <strong>PLL</strong> reconfiguration us<strong>in</strong>g Method 2:<br />
1. Create the .mif or .hex file for the new configuration sett<strong>in</strong>gs.<br />
2. Associate the ALT<strong>PLL</strong>_RECONFIG megafunction with the .mif or .hex file.<br />
3. Assert the reconfig signal to update the scan cha<strong>in</strong> and the <strong>PLL</strong> counters with the<br />
contents of the .mif or .hex file.<br />
Figure 4 shows the tim<strong>in</strong>g diagram for reconfiguration us<strong>in</strong>g a .mif or .hex file <strong>in</strong> the<br />
ALT<strong>PLL</strong>_RECONFIG megafunction.<br />
Figure 4. Tim<strong>in</strong>g Diagram for <strong>Reconfiguration</strong> Us<strong>in</strong>g a .mif or .hex File <strong>in</strong> the ALT<strong>PLL</strong>_RECONFIG<br />
Megafunction<br />
scanclk<br />
busy<br />
reconfig<br />
configupdate<br />
scandone<br />
<strong>Reconfiguration</strong> Signals<br />
configupdate asserted after<br />
last dataout bit is shifted out<br />
busy rema<strong>in</strong>s high<br />
dur<strong>in</strong>g reconfiguration<br />
scandone is asserted after<br />
configupdate is deasserted<br />
■ The write_param signal is sampled at the ris<strong>in</strong>g edge of scanclk. The write_param<br />
signal needs to be asserted for only one scanclk cycle to prevent the parameter<br />
from be<strong>in</strong>g accidentally rewritten on any subsequent clock cycle.<br />
■ The reconfig signal is sampled at the ris<strong>in</strong>g edge of scanclk. The reconfig signal<br />
needs to be asserted only for one scanclk cycle to prevent the <strong>PLL</strong> counters from<br />
be<strong>in</strong>g reloaded after reconfiguration.<br />
<strong>Implement<strong>in</strong>g</strong> <strong>PLL</strong> <strong>Reconfiguration</strong> <strong>in</strong> <strong>Cyclone</strong> <strong>III</strong> <strong>Devices</strong>
Page 6 <strong>Implement<strong>in</strong>g</strong> <strong>PLL</strong> Dynamic Phase Shift<strong>in</strong>g <strong>in</strong> the Quartus II Software<br />
■ When the read_param signal is asserted, it <strong>in</strong>dicates that the content of the scan<br />
cha<strong>in</strong> should be read and shifted out through the scandataout port. The bit<br />
locations and number of bits read out are dependent on the comb<strong>in</strong>ation of<br />
counter_type and counter_param. The read_param signal is sampled on the ris<strong>in</strong>g<br />
edge of scanclk. The read_param signal must be asserted for only one clock cycle<br />
to prevent the parameter from be<strong>in</strong>g re-read <strong>in</strong> subsequent clock cycles. A copy of<br />
the scan cha<strong>in</strong> content is read out. The scan cha<strong>in</strong> content rema<strong>in</strong>s <strong>in</strong>tact after a<br />
read_param operation.<br />
■ The busy signal is asserted when the read_param, write_param, or reconfig<br />
operation is asserted and rema<strong>in</strong>s high until the specific operation is complete.<br />
While this signal is asserted, all scan cha<strong>in</strong> <strong>in</strong>puts are ignored and the content of<br />
the scan cha<strong>in</strong> cannot be altered until it is deasserted.<br />
f For functional descriptions of the ALT<strong>PLL</strong>_RECONFIG megafunction ports, refer to<br />
the Phase-Locked Loop <strong>Reconfiguration</strong> (ALT<strong>PLL</strong>_RECONFIG) Megafunction user guide.<br />
The content of the scan cha<strong>in</strong> rema<strong>in</strong>s unchanged after reconfiguration. This allows<br />
for multiple reconfigurations while selectively modify<strong>in</strong>g one parameter dur<strong>in</strong>g each<br />
configuration because all other parameters reta<strong>in</strong> their previous values.<br />
<strong>Implement<strong>in</strong>g</strong> <strong>PLL</strong> Dynamic Phase Shift<strong>in</strong>g <strong>in</strong> the Quartus II Software<br />
The dynamic phase-shift<strong>in</strong>g feature allows the output phases of <strong>in</strong>dividual <strong>PLL</strong><br />
outputs to be dynamically adjusted relative to each other and to the reference clock<br />
without hav<strong>in</strong>g to load the scan cha<strong>in</strong> of the <strong>PLL</strong>. The phase is shifted by 1/8th of the<br />
period of the voltage-controlled oscillator (VCO) at a time. The output clocks are<br />
active dur<strong>in</strong>g this dynamic phase-shift process.<br />
Use the ALT<strong>PLL</strong> MegaWizard Plug-In Manager to enable dynamic phase-shift<strong>in</strong>g<br />
circuitry <strong>in</strong> the ALT<strong>PLL</strong> megafunction <strong>in</strong>stantiation <strong>in</strong> your design, as shown <strong>in</strong><br />
Figure 5.<br />
Figure 5. ALT<strong>PLL</strong> Megafunction with Dynamic Phase Shift<strong>in</strong>g Enabled<br />
To perform one dynamic phase-shift, follow these steps:<br />
1. Set PHASEUPDOWN and PHASECOUNTERSELECT as required.<br />
2. Assert PHASESTEP for at least two SCANCLK cycles. Each PHASESTEP pulse allows one<br />
phase shift.<br />
<strong>Implement<strong>in</strong>g</strong> <strong>PLL</strong> <strong>Reconfiguration</strong> <strong>in</strong> <strong>Cyclone</strong> <strong>III</strong> <strong>Devices</strong> September 2011 <strong>Altera</strong> Corporation
<strong>Implement<strong>in</strong>g</strong> <strong>PLL</strong> Dynamic Phase Shift<strong>in</strong>g <strong>in</strong> the Quartus II Software Page 7<br />
September 2011 <strong>Altera</strong> Corporation<br />
3. Deassert PHASESTEP after PHASEDONE goes low.<br />
4. Wait for PHASEDONE to go high.<br />
5. Repeat steps 1 through 4 as many times as required to perform multiple phaseshifts.<br />
PHASEUPDOWN and PHASECOUNTERSELECT signals are synchronous to SCANCLK and must<br />
meet the t su and t h requirements with respect to the SCANCLK edges.<br />
1 You can repeat dynamic phase-shift<strong>in</strong>g <strong>in</strong>def<strong>in</strong>itely. For example, <strong>in</strong> a design where<br />
the VCO frequency is set to 1,000 MHz and the output clock frequency is set to<br />
100 MHz, perform<strong>in</strong>g 40 dynamic phase shifts (each one yields 125 ps phase shift)<br />
results <strong>in</strong> shift<strong>in</strong>g the output clock by 180°, <strong>in</strong> other words, a phase shift of 5 ns.<br />
Figure 6 shows the dynamic phase shift<strong>in</strong>g waveform.<br />
Figure 6. Tim<strong>in</strong>g Diagram for Dynamic Phase Shift<br />
SCANCLK<br />
PHASESTEP<br />
PHASEUPDOWN<br />
PHASECOUNTERSELECT<br />
PHASEDONE<br />
a b c d<br />
PHASEDONE goes low<br />
synchronous with SCANCLK<br />
The PHASESTEP signal is latched on the negative edge of SCANCLK (a,c) and must rema<strong>in</strong><br />
asserted for at least two SCANCLK cycles. Deassert PHASESTEP after PHASEDONE goes low.<br />
On the second SCANCLK ris<strong>in</strong>g edge (b,d) after PHASESTEP is latched, the values of<br />
PHASEUPDOWN and PHASECOUNTERSELECT are latched and the <strong>PLL</strong> starts dynamic<br />
phase-shift<strong>in</strong>g for the specified counters, and <strong>in</strong> the <strong>in</strong>dicated direction. PHASEDONE is<br />
deasserted synchronous to SCANCLK at the second ris<strong>in</strong>g edge (b,d) and rema<strong>in</strong>s low<br />
until the <strong>PLL</strong> f<strong>in</strong>ishes dynamic phase-shift<strong>in</strong>g. Depend<strong>in</strong>g on the VCO and SCANCLK<br />
frequencies, PHASEDONE low time may be greater than or less than one SCANCLK cycle.<br />
You can perform another dynamic phase-shift after the PHASEDONE signal goes from<br />
low to high. Each PHASESTEP pulse enables one phase shift. PHASESTEP pulses must be<br />
at least one SCANCLK cycle apart.<br />
<strong>PLL</strong> <strong>Reconfiguration</strong> Scan Register Bitmap<br />
Advanced <strong>PLL</strong> users can manually select the counter and phase-shift sett<strong>in</strong>gs based<br />
on the <strong>in</strong>formation found <strong>in</strong> the Clock Networks and <strong>PLL</strong>s <strong>in</strong> <strong>Cyclone</strong> <strong>III</strong> <strong>Devices</strong> chapter<br />
<strong>in</strong> volume 1 of the <strong>Cyclone</strong> <strong>III</strong> Device Handbook. After determ<strong>in</strong><strong>in</strong>g <strong>in</strong>dividual<br />
configuration bit sett<strong>in</strong>gs for the different counters, and loop filter and charge pump<br />
sett<strong>in</strong>gs, arrange the bits as shown <strong>in</strong> the bitmap <strong>in</strong> Table 2 on page 9.<br />
<strong>Implement<strong>in</strong>g</strong> <strong>PLL</strong> <strong>Reconfiguration</strong> <strong>in</strong> <strong>Cyclone</strong> <strong>III</strong> <strong>Devices</strong>
Page 8 <strong>Implement<strong>in</strong>g</strong> <strong>PLL</strong> Dynamic Phase Shift<strong>in</strong>g <strong>in</strong> the Quartus II Software<br />
Table 1. Duty Cycle Sett<strong>in</strong>gs for Counters<br />
Table 2 on page 9 provides a bitmap for the <strong>PLL</strong> scan cha<strong>in</strong> registers. The last bit<br />
shifted <strong>in</strong>to the scan cha<strong>in</strong> is Bit0. Bit143 is the first bit shifted <strong>in</strong>. The duty cycle for<br />
each counter can be set us<strong>in</strong>g the high_count and low_count bits.<br />
The duty cycle for each counter can be set us<strong>in</strong>g the high_count and low_count bits, as<br />
listed <strong>in</strong> Table 1.<br />
Condition Counter Bit Sett<strong>in</strong>gs<br />
To generate duty cycle of 50% and an odd C counter<br />
To generate duty cycle of 50% and an even C counter<br />
To generate duty cycle of 50% and a C counter value of 5<br />
Even nom<strong>in</strong>al count is used to reconfigure M or N<br />
counters—counter bits are automatically set<br />
Odd nom<strong>in</strong>al count (except 1) is used to reconfigure M or N<br />
counters—counter bits are automatically set<br />
Nom<strong>in</strong>al count of 1 is used to reconfigure M or N<br />
counters—counter bits are automatically set<br />
■ high_count = (CounterValue + 1) / 2<br />
■ low_count = CounterValue − high_count<br />
■ Odd/even division bit = 1<br />
■ high_count = CounterValue /2<br />
■ low_count = CounterValue /2<br />
■ Odd/even division bit = 0<br />
■ high_count = 3<br />
■ low_count = 2<br />
■ Odd/even division bit = 1<br />
■ high_count = Nom<strong>in</strong>alcount / 2<br />
■ low_count = Nom<strong>in</strong>alcount / 2<br />
■ high_count = (Nom<strong>in</strong>alcount + 1) / 2<br />
■ low_count = Nom<strong>in</strong>alcount − high_count<br />
■ Odd/even division bit = 1<br />
Bypass bit = 1<br />
<strong>Implement<strong>in</strong>g</strong> <strong>PLL</strong> <strong>Reconfiguration</strong> <strong>in</strong> <strong>Cyclone</strong> <strong>III</strong> <strong>Devices</strong> September 2011 <strong>Altera</strong> Corporation
September 2011 <strong>Altera</strong> Corporation <strong>Implement<strong>in</strong>g</strong> <strong>PLL</strong> <strong>Reconfiguration</strong> <strong>in</strong> <strong>Cyclone</strong> <strong>III</strong> <strong>Devices</strong><br />
Table 2. <strong>PLL</strong> <strong>Reconfiguration</strong> Scan Cha<strong>in</strong> Bitmap<br />
Bits <strong>PLL</strong> Scan Cha<strong>in</strong> Bitmap<br />
Bit135-Bit143 C4_mode_odd/even C4_low_7 C4_low_6 C4_low_5 C4_low_4 C4_low_3 C4_low_2 C4_low_1 C4_low_0<br />
Bit126-Bit134 C4_mode_bypass C4_high_7 C4_high_6 C4_high_5 C4_high_4 C4_high_3 C4_high_2 C4_high_1 C4_high_0<br />
Bit117-Bit125 C3_mode_odd/even C3_low_7 C3_low_6 C3_low_5 C3_low_4 C3_low_3 C3_low_2 C3_low_1 C3_low_0<br />
Bit108-Bit116 C3_mode_bypass C3_high_7 C3_high_6 C3_high_5 C3_high_4 C3_high_3 C3_high_2 C3_high_1 C3_high_0<br />
Bit99-Bit107 C2_mode_odd/even C2_low_7 C2_low_6 C2_low_5 C2_low_4 C2_low_3 C2_low_2 C2_low_1 C2_low_0<br />
Bit90-Bit98 C2_mode_bypass C2_high_7 C2_high_6 C2_high_5 C2_high_4 C2_high_3 C2_high_2 C2_high_1 C2_high_0<br />
Bit81-Bit89 C1_mode_odd/even C1_low_7 C1_low_6 C1_low_5 C1_low_4 C1_low_3 C1_low_2 C1_low_1 C1_low_0<br />
Bit72-Bit80 C1_mode_bypass C1_high_7 C1_high_6 C1_high_5 C1_high_4 C1_high_3 C1_high_2 C1_high_1 C1_high_0<br />
Bit63-Bit71 C0_mode_odd/even C0_low_7 C0_low_6 C0_low_5 C0_low_4 C0_low_3 C0_low_2 C0_low_1 C0_low_0<br />
Bit54-Bit62 C0_mode_bypass C0_high_7 C0_high_6 C0_high_5 C0_high_4 C0_high_3 C0_high_2 C0_high_1 C0_high_0<br />
Bit45-Bit53 M_mode_odd/even M_low_7 M_low_6 M_low_5 M_low_4 M_low_3 M_low_2 M_low_1 M_low_0<br />
Bit36-Bit44 M_mode_bypass M_high_7 M_high_6 M_high_5 M_high_4 M_high_3 M_high_2 M_high_1 M_high_0<br />
Bit27-Bit35 N_mode_odd/even N_low_7 N_low_6 N_low_5 N_low_4 N_low_3 N_low_2 N_low_1 N_low_0<br />
Bit18-Bit26 N_mode_bypass N_high_7 N_high_6 N_high_5 N_high_4 N_high_3 N_high_2 N_high_1 N_high_0<br />
Bit15-Bit17 CP_2 CP_1 CP_0 — — — — — —<br />
Bit10-Bit14 Reserved_0 Reserved_1 Reserved_2 Reserved_3 Reserved_4 — — — —<br />
Bit9 VCO_postscale_0 — — — — — — — —<br />
Bit4-Bit8 LF_R_0 LF_R_1 LF_R_2 LF_R_3 LF_R_4 — — — —<br />
Bit2-Bit3 LF_C_0 LF_C_1 — — — — — — —<br />
Bit0-Bit1 Reserved_5 Reserved_6 — — — — — — —<br />
<strong>Implement<strong>in</strong>g</strong> <strong>PLL</strong> Dynamic Phase Shift<strong>in</strong>g <strong>in</strong> the Quartus II Software Page 9
Page 10 Application Example 1<br />
Application Example 1<br />
This section and the follow<strong>in</strong>g one describe two applications where the <strong>PLL</strong> is<br />
reconfigured us<strong>in</strong>g multiple .mif files and <strong>PLL</strong> dynamic phase shift<strong>in</strong>g. The design<br />
examples provided show the implementation details. You can download the design<br />
examples from the Application Notes web page at<br />
www.altera.com/literature/lit-an.jsp.<br />
<strong>PLL</strong> <strong>Reconfiguration</strong> <strong>in</strong> a Display Application<br />
In a display application, the <strong>Cyclone</strong> <strong>III</strong> <strong>PLL</strong> must lock to multiple frequencies to<br />
support multiple refresh rates. The multiple refresh rates can be achieved through the<br />
reconfiguration feature of the <strong>Cyclone</strong> <strong>III</strong> <strong>PLL</strong>. Every time the application needs to<br />
generate a new refresh rate, the <strong>PLL</strong> is reconfigured to the new <strong>in</strong>put and output clock<br />
relationship.<br />
Design Example 1<br />
This design example uses multiple .mif files to reconfigure the <strong>PLL</strong>. Perform the steps<br />
described <strong>in</strong> “<strong>PLL</strong> <strong>Reconfiguration</strong>: Method 2” on page 4 to achieve <strong>PLL</strong><br />
reconfiguration.<br />
The design uses the ALT<strong>PLL</strong> and ALT<strong>PLL</strong>_RECONFIG megafunctions, three ROMs<br />
hold<strong>in</strong>g three .mif files correspond<strong>in</strong>g to the three different <strong>in</strong>put frequencies, and a<br />
state mach<strong>in</strong>e that selects the appropriate .mif file and generates the appropriate<br />
control signals to achieve dynamic reconfiguration every time the control signal to the<br />
state mach<strong>in</strong>e changes. The logic <strong>in</strong> the state mach<strong>in</strong>e automatically generates the<br />
signals necessary to achieve constant output frequency.<br />
Block Diagram<br />
Figure 7 on page 11 shows the design example <strong>in</strong> the Quartus II software. The<br />
ALT<strong>PLL</strong> megafunction is generated with dynamic reconfiguration enabled and with<br />
ports to write from an external ROM (paged .mif file).The ports are connected as<br />
shown <strong>in</strong> Figure 7 on page 11.<br />
<strong>Implement<strong>in</strong>g</strong> <strong>PLL</strong> <strong>Reconfiguration</strong> <strong>in</strong> <strong>Cyclone</strong> <strong>III</strong> <strong>Devices</strong> September 2011 <strong>Altera</strong> Corporation
September 2011 <strong>Altera</strong> Corporation <strong>Implement<strong>in</strong>g</strong> <strong>PLL</strong> <strong>Reconfiguration</strong> <strong>in</strong> <strong>Cyclone</strong> <strong>III</strong> <strong>Devices</strong><br />
Figure 7. <strong>PLL</strong> <strong>Reconfiguration</strong> Us<strong>in</strong>g Paged .mif File Capability of the ALT<strong>PLL</strong>_RECONFIG Megafunction<br />
Application Example 1 Page 11
Page 12 Application Example 1<br />
Procedure<br />
The follow<strong>in</strong>g steps describe the design flow for “Design Example 1”:<br />
1. Instantiate the ALT<strong>PLL</strong> megafunction with dynamic reconfiguration enabled.<br />
Configure the <strong>PLL</strong> with one of the three data rates (which, <strong>in</strong> this case, is 100 MHz<br />
of <strong>PLL</strong> <strong>in</strong>put frequency and 100 MHz of output frequency). Pick the <strong>PLL</strong> counter<br />
output you require for your design. This design example uses the C0 counter<br />
output. Do not quit the MegaWizard.<br />
2. Generate a .mif file for this configuration of the <strong>PLL</strong> us<strong>in</strong>g the Generate a<br />
Configuration File button on page 5 of the MegaWizard.<br />
3. Change the <strong>PLL</strong> counter output to 200 MHz <strong>in</strong> the MegaWizard and generate a<br />
.mif file aga<strong>in</strong>. Choose a different file name to avoid overwrit<strong>in</strong>g the file generated<br />
<strong>in</strong> step 2.<br />
4. Change the <strong>PLL</strong> counter output to 300 MHz <strong>in</strong> the MegaWizard and generate a<br />
.mif file aga<strong>in</strong>. Choose a different file name to avoid overwrit<strong>in</strong>g the file generated<br />
<strong>in</strong> step 3. You have now generated three .mif files for the three different <strong>in</strong>put data<br />
rates of the display application.<br />
5. Save the <strong>PLL</strong> sett<strong>in</strong>gs <strong>in</strong> the MegaWizard. The <strong>PLL</strong> is now configured for an <strong>in</strong>put<br />
frequency of 100 MHz and output frequency of 300 MHz.<br />
6. Instantiate the ALT<strong>PLL</strong>_RECONFIG megafunction. Select add ports to write to the<br />
scan cha<strong>in</strong> from external ROM dur<strong>in</strong>g run-time to enable multiple .mif capability.<br />
Connect the ports to the ALT<strong>PLL</strong> megafunction, as shown <strong>in</strong> Figure 7 on page 11.<br />
7. Instantiate three ROMs with a 1-bit wide data bus and an 8-bit wide address bus.<br />
Create read enable (rden) ports for all ROMs. Initialize the three ROMs with the<br />
three .mif files created <strong>in</strong> steps 1 through 4 above.<br />
f For more <strong>in</strong>formation about ROM <strong>in</strong>stantiation, refer to the Internal Memory<br />
(RAM and ROM) User Guide.<br />
8. Instantiate a three-<strong>in</strong>put lpm_mux and connect the ports, as shown <strong>in</strong> Figure 7 on<br />
page 11.<br />
9. Create a simple state mach<strong>in</strong>e that picks the appropriate ROM when the <strong>in</strong>put to<br />
the mifselect port changes. Connect the ports, as shown <strong>in</strong> Figure 7 on page 11.<br />
To achieve reconfiguration, the state mach<strong>in</strong>e chooses the ROM us<strong>in</strong>g select<br />
signals to the multiplexer and generates the appropriate control signals to the<br />
ALT<strong>PLL</strong>_RECONFIG megafunction. <strong>Reconfiguration</strong> is possible only when the<br />
busy signal is deasserted. Any changes to mifselect when the busy signal is high<br />
are ignored. Table 3 shows the <strong>in</strong>put signals and their effects on the outputs of the<br />
state mach<strong>in</strong>e.<br />
Table 3. Design Example 1: State Mach<strong>in</strong>e Input and Output Signals<br />
mifselect Input-Output Frequency Counters Affected<br />
00 100 - 100 MHz C0<br />
01 100 - 200 MHz C0<br />
10 100 - 300 MHz C0<br />
11 No Change None<br />
<strong>Implement<strong>in</strong>g</strong> <strong>PLL</strong> <strong>Reconfiguration</strong> <strong>in</strong> <strong>Cyclone</strong> <strong>III</strong> <strong>Devices</strong> September 2011 <strong>Altera</strong> Corporation
Application Example 2 Page 13<br />
September 2011 <strong>Altera</strong> Corporation<br />
10. Compile and simulate the design, apply<strong>in</strong>g different <strong>in</strong>puts to mifselect. Every<br />
time mifselect changes, a different .mif file from an external ROM is loaded <strong>in</strong>to<br />
the scan cha<strong>in</strong> and the <strong>PLL</strong> is reconfigured with the content of the scan cha<strong>in</strong>.<br />
Figure 8 shows the simulation waveforms.<br />
Figure 8. Design Example 1: Simulation Waveforms<br />
Application Example 2<br />
Dynamic Phase Shift<strong>in</strong>g Us<strong>in</strong>g ALT<strong>PLL</strong> Megafunction<br />
The ALTMEMPHY megafunction allows for the rapid creation of a physical layer<br />
<strong>in</strong>terface (PHY) <strong>in</strong> <strong>Cyclone</strong> <strong>III</strong> devices. The PHY safely transfers data between the<br />
external memory and user logic. The <strong>Cyclone</strong> <strong>III</strong> ALTMEMPHY megafunction<br />
supports an <strong>in</strong>itial calibration sequence to remove process variations <strong>in</strong> the FPGA and<br />
external memory device. The calibration process centers the resynchronization clock<br />
phase <strong>in</strong>to the middle of the valid data w<strong>in</strong>dow to maximize the set-up and hold<br />
marg<strong>in</strong>.<br />
f For more <strong>in</strong>formation, refer to the External Memory PHY Interface (ALTMEMPHY)<br />
(nonAFI) Megafunction User Guide.<br />
<strong>Implement<strong>in</strong>g</strong> <strong>PLL</strong> <strong>Reconfiguration</strong> <strong>in</strong> <strong>Cyclone</strong> <strong>III</strong> <strong>Devices</strong>
Page 14 Application Example 2<br />
The autocalibration controller, which resides <strong>in</strong> the ALTMEMPHY megafunction, uses<br />
the dynamic phase shift<strong>in</strong>g of the clock to determ<strong>in</strong>e a valid data capture w<strong>in</strong>dow.<br />
The autocalibration controller has a data stream and clock for <strong>in</strong>puts. This clock is fed<br />
<strong>in</strong>to a reconfigurable <strong>PLL</strong> and phase-shifted <strong>in</strong> steps of 1/8th of the VCO period. The<br />
controller uses the phase-shifted clock to sample the data, which is compared to the<br />
expected data. The controller shifts the phase of the clock until a valid data capture<br />
w<strong>in</strong>dow is determ<strong>in</strong>ed.<br />
Design Example 2<br />
The application described here uses dynamic phase shift<strong>in</strong>g to shift the clock edge.<br />
The design example consists of a simple state mach<strong>in</strong>e with <strong>in</strong>put signals dyn_phase<br />
and counter, and the ALT<strong>PLL</strong> megafunction. The counter signal is the <strong>in</strong>put to<br />
phasecounterselect of the <strong>PLL</strong>. You can shift the counter output either a phase<br />
forward or backward depend<strong>in</strong>g on dyn_phase.The logic <strong>in</strong> the state mach<strong>in</strong>e<br />
automatically generates the signals that are necessary to achieve phase shifts.<br />
f For phasecounterselect sett<strong>in</strong>gs, refer to the Clock Networks and <strong>PLL</strong>s <strong>in</strong> <strong>Cyclone</strong> <strong>III</strong><br />
<strong>Devices</strong> chapter <strong>in</strong> volume 1 of the <strong>Cyclone</strong> <strong>III</strong> Device Handbook.<br />
Block Diagram<br />
Figure 9. <strong>Cyclone</strong> <strong>III</strong> Dynamic Phase Shift<br />
Figure 9 on page 14 shows the design example <strong>in</strong> the Quartus II software. The<br />
ALT<strong>PLL</strong> megafunction is generated with dynamic phase-shift reconfiguration<br />
enabled. The dynamic phase-shift control ports are connected to the state mach<strong>in</strong>e, as<br />
shown <strong>in</strong> Figure 9 on page 14. This example targets all counters of the <strong>PLL</strong>.<br />
<strong>Implement<strong>in</strong>g</strong> <strong>PLL</strong> <strong>Reconfiguration</strong> <strong>in</strong> <strong>Cyclone</strong> <strong>III</strong> <strong>Devices</strong> September 2011 <strong>Altera</strong> Corporation
Application Example 2 Page 15<br />
Procedure<br />
September 2011 <strong>Altera</strong> Corporation<br />
The follow<strong>in</strong>g steps describe the design flow for “Design Example 2”:<br />
1. Instantiate the ALT<strong>PLL</strong> megafunction with dynamic phase shift<strong>in</strong>g enabled.<br />
Configure the <strong>PLL</strong> with the desired <strong>in</strong>put and output frequencies us<strong>in</strong>g the<br />
megafunction.<br />
2. Create the state mach<strong>in</strong>e with <strong>in</strong>puts and outputs, as shown <strong>in</strong> Figure 9 on<br />
page 14. Refer to Table 4 for details on <strong>in</strong>put signals and their effects on the<br />
outputs of the state mach<strong>in</strong>e. When dyn_phase is 10, the state mach<strong>in</strong>e generates<br />
the appropriate output signals to shift the phase forward. When dyn_phase is 11,<br />
the state mach<strong>in</strong>e generates the appropriate output signals to shift the phase<br />
backward. For details on how to set up these output signals, refer to the tim<strong>in</strong>g<br />
diagram <strong>in</strong> Figure 6 on page 7.<br />
Table 4 details the <strong>in</strong>put signals and their effects on the outputs of the state<br />
mach<strong>in</strong>e.<br />
Table 4. Design Example 2: State Mach<strong>in</strong>e Input Ports and Effects on Output<br />
Counter dyn_phase Phase Counters Affected<br />
0 10 1 step forward All <strong>PLL</strong> counters<br />
0 11 1 step backward All <strong>PLL</strong> counters<br />
0 00 No change None<br />
0 01 No change None<br />
3. Compile and simulate the design, apply<strong>in</strong>g <strong>in</strong>puts to counter and dyn_phase. Any<br />
change to dyn_phase should be made only when phasedone is asserted. All<br />
changes to dyn_phase when phasedone is low are ignored. Figure 10 shows the<br />
simulation waveforms.<br />
Figure 10. Design Example 2: Dynamic Phase-Shift Simulation Output<br />
4. <strong>PLL</strong> counter C0 is shown <strong>in</strong> this design example, but the counter <strong>in</strong>put to the state<br />
mach<strong>in</strong>e targets all <strong>PLL</strong> output counters. You may change the counter <strong>in</strong>put to the<br />
state mach<strong>in</strong>e to affect specific <strong>PLL</strong> output counters.<br />
f For phasecounterselect sett<strong>in</strong>gs, refer to the Clock Networks and <strong>PLL</strong>s <strong>in</strong><br />
<strong>Cyclone</strong> <strong>III</strong> <strong>Devices</strong> chapter <strong>in</strong> volume 1 of the <strong>Cyclone</strong> <strong>III</strong> Device Handbook.<br />
<strong>Implement<strong>in</strong>g</strong> <strong>PLL</strong> <strong>Reconfiguration</strong> <strong>in</strong> <strong>Cyclone</strong> <strong>III</strong> <strong>Devices</strong>
Page 16 Design Considerations<br />
Design Considerations<br />
Dynamic phase shift<strong>in</strong>g is also useful <strong>in</strong> Nios ® II applications. When the Nios II<br />
processor is used, off-chip memory <strong>in</strong>terfac<strong>in</strong>g is necessary for most applications.<br />
Improper clock<strong>in</strong>g of memory devices can cause issues such as not be<strong>in</strong>g able to run<br />
code or perform back-to-back transactions <strong>in</strong> memory. You can use dynamic phase<br />
shift<strong>in</strong>g to tune the <strong>PLL</strong> to determ<strong>in</strong>e the valid signal w<strong>in</strong>dow for access<strong>in</strong>g the<br />
memory device. The hardware can be created <strong>in</strong> the SOPC builder to <strong>in</strong>clude the<br />
necessary peripherals to read <strong>PLL</strong> parameters from the ALT<strong>PLL</strong> megafunction. The<br />
software part of the design can be created as a Nios IDE project, written <strong>in</strong> the C<br />
language, to shift the off-chip memory clock output of the <strong>PLL</strong>, test the SDRAM<br />
memory, and calculate the boundaries and center of the valid signal w<strong>in</strong>dow for the<br />
SDRAM.<br />
You must consider the follow<strong>in</strong>g <strong>in</strong>formation when reconfigur<strong>in</strong>g the <strong>PLL</strong>:<br />
■ Chang<strong>in</strong>g the prescale and feedback counter sett<strong>in</strong>gs (M, N), charge pump<br />
sett<strong>in</strong>gs, or loop filter sett<strong>in</strong>gs affects the <strong>PLL</strong> VCO frequency, which might require<br />
the <strong>PLL</strong> to relock to the reference clock.<br />
■ Chang<strong>in</strong>g the M counter phase-shift sett<strong>in</strong>g changes the phase relationship of the<br />
output clocks with respect to the reference clock, which also requires the <strong>PLL</strong> to<br />
relock. Although the exact effect of chang<strong>in</strong>g prescale and feedback counter<br />
sett<strong>in</strong>gs (M, N) depends on what sett<strong>in</strong>g is changed, any change typically requires<br />
relock<strong>in</strong>g.<br />
■ If you choose not to use a .mif file to specify the <strong>in</strong>itial contents of the scan cha<strong>in</strong>,<br />
the scan cha<strong>in</strong> is blank when the device enters user mode. The <strong>PLL</strong> is configured to<br />
its <strong>in</strong>itial state based on the programmed sett<strong>in</strong>gs <strong>in</strong> the programmer object file<br />
(.pof).<br />
■ When mak<strong>in</strong>g changes to the loop elements (M, N, M counter phase, I CP, R, C),<br />
<strong>Altera</strong> recommends disabl<strong>in</strong>g <strong>PLL</strong> outputs to the logic array us<strong>in</strong>g the clkena<br />
signals available on the altclkctrl megafunction. This elim<strong>in</strong>ates the possibility of<br />
an overfrequency condition affect<strong>in</strong>g the system logic while <strong>PLL</strong> is rega<strong>in</strong><strong>in</strong>g lock.<br />
■ Changes to post-scale counters (C) and phase do not affect the <strong>PLL</strong> lock status or<br />
VCO frequency. The resolution of a phase shift is always a function of the VCO<br />
frequency, with the smallest <strong>in</strong>cremental step equall<strong>in</strong>g 1/8th of the VCO period.<br />
■ When the phase relationship between output clocks is important, <strong>Altera</strong><br />
recommends resynchroniz<strong>in</strong>g the <strong>PLL</strong> us<strong>in</strong>g the areset signal. This resets all<br />
<strong>in</strong>ternal <strong>PLL</strong> counters and re-<strong>in</strong>itiates the lock<strong>in</strong>g process.<br />
■ The <strong>Cyclone</strong> <strong>III</strong> <strong>PLL</strong> scan cha<strong>in</strong> supports a free-runn<strong>in</strong>g scanclk, so there is no<br />
need to precisely control the start and stop of the clock.<br />
■ Changes to the M or N counter values affect all the output clock frequencies.<br />
Output counters can also be <strong>in</strong>dividually reconfigured.<br />
■ The scandone signal is synchronous with the positive edge of scanclk and is<br />
asserted for at least one clock cycle by the ALT<strong>PLL</strong> megafunction once<br />
reconfiguration is complete.<br />
<strong>Implement<strong>in</strong>g</strong> <strong>PLL</strong> <strong>Reconfiguration</strong> <strong>in</strong> <strong>Cyclone</strong> <strong>III</strong> <strong>Devices</strong> September 2011 <strong>Altera</strong> Corporation
Design Examples Page 17<br />
Design Examples<br />
Conclusion<br />
September 2011 <strong>Altera</strong> Corporation<br />
You can download the design examples from the Application Notes web page at<br />
www.altera.com/literature/lit-an.jsp. The follow<strong>in</strong>g sections show how you can<br />
download and use the design examples.<br />
Design Example 1: <strong>PLL</strong> <strong>Reconfiguration</strong> <strong>in</strong> a Display Application<br />
Unzip Design Example 1 (an507_display_de1.zip) and compile it <strong>in</strong> the Quartus II<br />
software. The three .mif files have been set up with the example. Run a tim<strong>in</strong>g<br />
simulation us<strong>in</strong>g the Vector Waveform File (.vwf) provided with the example. After<br />
mifselect changes, the <strong>PLL</strong> may lose lock after reconfiguration. Once it rega<strong>in</strong>s lock,<br />
the <strong>PLL</strong> output frequency changes accord<strong>in</strong>g to the .mif file that is selected for<br />
reconfiguration.<br />
Design Example 2: Dynamic Phase Shift<strong>in</strong>g Us<strong>in</strong>g the ALT<strong>PLL</strong> Megafunction<br />
Referenced Documents<br />
Unzip Design Example 2 (an507_altpll_dynphase_de2.zip) and compile it <strong>in</strong> the<br />
Quartus II software. Run a tim<strong>in</strong>g simulation us<strong>in</strong>g the .vwf file provided with the<br />
example. The example is configured to step up the phase by two times. You can<br />
observe the change <strong>in</strong> the <strong>PLL</strong> counter output. The edge gets shifted forward by 1/8th<br />
VCO period after the first phase shift and by 1/4th VCO period after the second phase<br />
shift.<br />
<strong>PLL</strong> reconfiguration is a powerful feature that you can use to vary the <strong>PLL</strong> clock<br />
output frequency and to shift the phase at any stage. Important considerations, such<br />
as loss of lock, glitches, and output-phase relationships might affect your selections of<br />
the <strong>PLL</strong> counter and phase-shift sett<strong>in</strong>gs. The flexibility offered by the <strong>Cyclone</strong> <strong>III</strong> <strong>PLL</strong><br />
makes it a superior clock management system.<br />
This application note references the follow<strong>in</strong>g documents:<br />
■ Clock Networks and <strong>PLL</strong>s <strong>in</strong> <strong>Cyclone</strong> <strong>III</strong> <strong>Devices</strong> chapter <strong>in</strong> volume 1 of the <strong>Cyclone</strong> <strong>III</strong><br />
Device Handbook<br />
■ Phase-Locked Loop (ALT<strong>PLL</strong>) Megafunction User Guide<br />
■ Phase-Locked Loop <strong>Reconfiguration</strong> (ALT<strong>PLL</strong>_RECONFIG) Megafunction user guide<br />
■ Internal Memory (RAM and ROM) User Guide<br />
■ External Memory PHY Interface (ALTMEMPHY) (nonAFI) Megafunction User Guide<br />
<strong>Implement<strong>in</strong>g</strong> <strong>PLL</strong> <strong>Reconfiguration</strong> <strong>in</strong> <strong>Cyclone</strong> <strong>III</strong> <strong>Devices</strong>
Page 18 Document Revision History<br />
Document Revision History<br />
Table 5. Document Revision History<br />
Table 5 lists the revision history for this document.<br />
Date Version Changes<br />
September 2011 2.0<br />
■ Added steps to perform dynamic phase-shift to “<strong>Implement<strong>in</strong>g</strong> <strong>PLL</strong> Dynamic Phase<br />
Shift<strong>in</strong>g <strong>in</strong> the Quartus II Software”<br />
■ Updated Figure 6<br />
■ Replaced text <strong>in</strong> “<strong>PLL</strong> <strong>Reconfiguration</strong> Scan Register Bitmap” with Table 1<br />
January 2008 1.0 Initial release.<br />
<strong>Implement<strong>in</strong>g</strong> <strong>PLL</strong> <strong>Reconfiguration</strong> <strong>in</strong> <strong>Cyclone</strong> <strong>III</strong> <strong>Devices</strong> September 2011 <strong>Altera</strong> Corporation