Silver Efex Pro - User Guide - Nik Software
Silver Efex Pro - User Guide - Nik Software
Silver Efex Pro - User Guide - Nik Software

You also want an ePaper? Increase the reach of your titles
YUMPU automatically turns print PDFs into web optimized ePapers that Google loves.
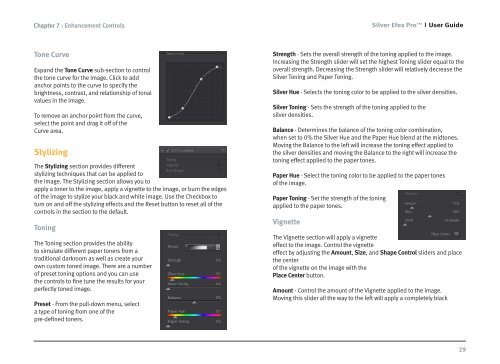
Chapter 7 : Enhancement Controls<br />
Tone Curve<br />
Expand the Tone Curve sub-section to control<br />
the tone curve for the image. Click to add<br />
anchor points to the curve to specify the<br />
brightness, contrast, and relationship of tonal<br />
values in the image.<br />
To remove an anchor point from the curve,<br />
select the point and drag it off of the<br />
Curve area.<br />
Stylizing<br />
The Stylizing section provides different<br />
stylizing techniques that can be applied to<br />
the image. The Stylizing section allows you to<br />
apply a toner to the image, apply a vignette to the image, or burn the edges<br />
of the image to stylize your black and white image. Use the Checkbox to<br />
turn on and off the stylizing effects and the Reset button to reset all of the<br />
controls in the section to the default.<br />
Toning<br />
The Toning section provides the ability<br />
to simulate different paper toners from a<br />
traditional darkroom as well as create your<br />
own custom toned image. There are a number<br />
of preset toning options and you can use<br />
the controls to fine tune the results for your<br />
perfectly toned image.<br />
Preset - From the pull-down menu, select<br />
a type of toning from one of the<br />
pre-defined toners.<br />
<strong>Silver</strong> <strong>Efex</strong> <strong>Pro</strong> <strong>User</strong> <strong>Guide</strong><br />
Strength - Sets the overall strength of the toning applied to the image.<br />
Increasing the Strength slider will set the highest Toning slider equal to the<br />
overall strength. Decreasing the Strength slider will relatively decrease the<br />
<strong>Silver</strong> Toning and Paper Toning.<br />
<strong>Silver</strong> Hue - Selects the toning color to be applied to the silver densities.<br />
<strong>Silver</strong> Toning - Sets the strength of the toning applied to the<br />
silver densities.<br />
Balance - Determines the balance of the toning color combination,<br />
when set to 0% the <strong>Silver</strong> Hue and the Paper Hue blend at the midtones.<br />
Moving the Balance to the left will increase the toning effect applied to<br />
the silver densities and moving the Balance to the right will increase the<br />
toning effect applied to the paper tones.<br />
Paper Hue - Select the toning color to be applied to the paper tones<br />
of the image.<br />
Paper Toning - Set the strength of the toning<br />
applied to the paper tones.<br />
Vignette<br />
The Vignette section will apply a vignette<br />
effect to the image. Control the vignette<br />
effect by adjusting the Amount, Size, and Shape Control sliders and place<br />
the center<br />
of the vignette on the image with the<br />
Place Center button.<br />
Amount - Control the amount of the Vignette applied to the image.<br />
Moving this slider all the way to the left will apply a completely black<br />
29