Silver Efex Pro - User Guide - Nik Software
Silver Efex Pro - User Guide - Nik Software
Silver Efex Pro - User Guide - Nik Software

You also want an ePaper? Increase the reach of your titles
YUMPU automatically turns print PDFs into web optimized ePapers that Google loves.
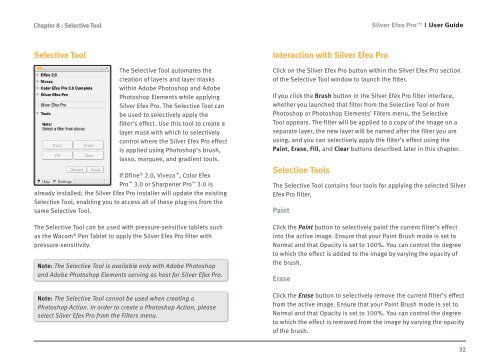
Chapter 8 : Selective Tool<br />
Selective Tool<br />
The Selective Tool automates the<br />
creation of layers and layer masks<br />
within Adobe Photoshop and Adobe<br />
Photoshop Elements while applying<br />
<strong>Silver</strong> <strong>Efex</strong> <strong>Pro</strong>. The Selective Tool can<br />
be used to selectively apply the<br />
filter’s effect. Use this tool to create a<br />
layer mask with which to selectively<br />
control where the <strong>Silver</strong> <strong>Efex</strong> <strong>Pro</strong> effect<br />
is applied using Photoshop’s brush,<br />
lasso, marquee, and gradient tools.<br />
If Dfine ® 2.0, Viveza , Color <strong>Efex</strong><br />
<strong>Pro</strong> 3.0 or Sharpener <strong>Pro</strong> 3.0 is<br />
already installed; the <strong>Silver</strong> <strong>Efex</strong> <strong>Pro</strong> installer will update the existing<br />
Selective Tool, enabling you to access all of these plug-ins from the<br />
same Selective Tool.<br />
The Selective Tool can be used with pressure-sensitive tablets such<br />
as the Wacom ® Pen Tablet to apply the <strong>Silver</strong> <strong>Efex</strong> <strong>Pro</strong> filter with<br />
pressure-sensitivity.<br />
Note: The Selective Tool is available only with Adobe Photoshop<br />
and Adobe Photoshop Elements serving as host for <strong>Silver</strong> <strong>Efex</strong> <strong>Pro</strong>.<br />
Note: The Selective Tool cannot be used when creating a<br />
Photoshop Action. In order to create a Photoshop Action, please<br />
select <strong>Silver</strong> <strong>Efex</strong> <strong>Pro</strong> from the Filters menu.<br />
Interaction with <strong>Silver</strong> <strong>Efex</strong> <strong>Pro</strong><br />
<strong>Silver</strong> <strong>Efex</strong> <strong>Pro</strong> <strong>User</strong> <strong>Guide</strong><br />
Click on the <strong>Silver</strong> <strong>Efex</strong> <strong>Pro</strong> button within the <strong>Silver</strong> <strong>Efex</strong> <strong>Pro</strong> section<br />
of the Selective Tool window to launch the filter.<br />
If you click the Brush button in the <strong>Silver</strong> <strong>Efex</strong> <strong>Pro</strong> filter interface,<br />
whether you launched that filter from the Selective Tool or from<br />
Photoshop or Photoshop Elements’ Filters menu, the Selective<br />
Tool appears. The filter will be applied to a copy of the image on a<br />
separate layer, the new layer will be named after the filter you are<br />
using, and you can selectively apply the filter’s effect using the<br />
Paint, Erase, Fill, and Clear buttons described later in this chapter.<br />
Selection Tools<br />
The Selective Tool contains four tools for applying the selected <strong>Silver</strong><br />
<strong>Efex</strong> <strong>Pro</strong> filter.<br />
Paint<br />
Click the Paint button to selectively paint the current filter’s effect<br />
into the active image. Ensure that your Paint Brush mode is set to<br />
Normal and that Opacity is set to 100%. You can control the degree<br />
to which the effect is added to the image by varying the opacity of<br />
the brush.<br />
Erase<br />
Click the Erase button to selectively remove the current filter’s effect<br />
from the active image. Ensure that your Paint Brush mode is set to<br />
Normal and that Opacity is set to 100%. You can control the degree<br />
to which the effect is removed from the image by varying the opacity<br />
of the brush.<br />
32