Silver Efex Pro - User Guide - Nik Software
Silver Efex Pro - User Guide - Nik Software
Silver Efex Pro - User Guide - Nik Software

You also want an ePaper? Increase the reach of your titles
YUMPU automatically turns print PDFs into web optimized ePapers that Google loves.
Chapter 10 : Selective Tool Settings<br />
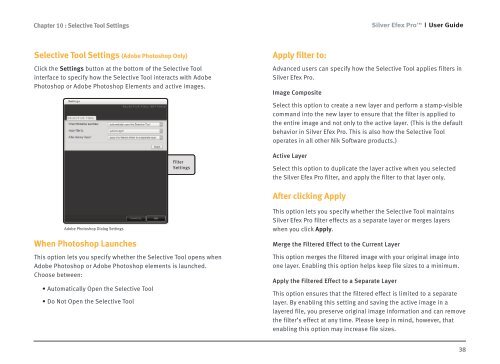
Selective Tool Settings (Adobe Photoshop Only)<br />
Click the Settings button at the bottom of the Selective Tool<br />
interface to specify how the Selective Tool interacts with Adobe<br />
Photoshop or Adobe Photoshop Elements and active images.<br />
Adobe Photoshop Dialog Settings<br />
When Photoshop Launches<br />
Filter<br />
Settings<br />
This option lets you specify whether the Selective Tool opens when<br />
Adobe Photoshop or Adobe Photoshop elements is launched.<br />
Choose between:<br />
• Automatically Open the Selective Tool<br />
• Do Not Open the Selective Tool<br />
Apply filter to:<br />
<strong>Silver</strong> <strong>Efex</strong> <strong>Pro</strong> <strong>User</strong> <strong>Guide</strong><br />
Advanced users can specify how the Selective Tool applies filters in<br />
<strong>Silver</strong> <strong>Efex</strong> <strong>Pro</strong>.<br />
Image Composite<br />
Select this option to create a new layer and perform a stamp-visible<br />
command into the new layer to ensure that the filter is applied to<br />
the entire image and not only to the active layer. (This is the default<br />
behavior in <strong>Silver</strong> <strong>Efex</strong> <strong>Pro</strong>. This is also how the Selective Tool<br />
operates in all other <strong>Nik</strong> <strong>Software</strong> products.)<br />
Active Layer<br />
Select this option to duplicate the layer active when you selected<br />
the <strong>Silver</strong> <strong>Efex</strong> <strong>Pro</strong> filter, and apply the filter to that layer only.<br />
After clicking Apply<br />
This option lets you specify whether the Selective Tool maintains<br />
<strong>Silver</strong> <strong>Efex</strong> <strong>Pro</strong> filter effects as a separate layer or merges layers<br />
when you click Apply.<br />
Merge the Filtered Effect to the Current Layer<br />
This option merges the filtered image with your original image into<br />
one layer. Enabling this option helps keep file sizes to a minimum.<br />
Apply the Filtered Effect to a Separate Layer<br />
This option ensures that the filtered effect is limited to a separate<br />
layer. By enabling this setting and saving the active image in a<br />
layered file, you preserve original image information and can remove<br />
the filter’s effect at any time. Please keep in mind, however, that<br />
enabling this option may increase file sizes.<br />
38