
You also want an ePaper? Increase the reach of your titles
YUMPU automatically turns print PDFs into web optimized ePapers that Google loves.
www.kennametal.com<br />
<strong>Technical</strong> <strong>Information</strong><br />
The Correct Spindle Connection and Application Guide . . . . . . . . . . . . . . . . . . . . . . . . . . . . . . . . . . . . . . . . . . .M2<br />
Shank Tools . . . . . . . . . . . . . . . . . . . . . . . . . . . . . . . . . . . . . . . . . . . . . . . . . . . . . . . . . . . . . . . . . . . . . . . . . . . .M3–M6<br />
Spindle Connections . . . . . . . . . . . . . . . . . . . . . . . . . . . . . . . . . . . . . . . . . . . . . . . . . . . . . . . . . . . . . . . . . . .M8–M19<br />
KM4X . . . . . . . . . . . . . . . . . . . . . . . . . . . . . . . . . . . . . . . . . . . . . . . . . . . . . . . . . . . . . . . . . . . . . . . . .M9–M11<br />
KM . . . . . . . . . . . . . . . . . . . . . . . . . . . . . . . . . . . . . . . . . . . . . . . . . . . . . . . . . . . . . . . . . . . . . . . . . . .M12–M13<br />
HSK . . . . . . . . . . . . . . . . . . . . . . . . . . . . . . . . . . . . . . . . . . . . . . . . . . . . . . . . . . . . . . . . . . . . . . . . . .M14–M15<br />
7/24 Face Contact . . . . . . . . . . . . . . . . . . . . . . . . . . . . . . . . . . . . . . . . . . . . . . . . . . . . . . . . . . . . . . .M16–M17<br />
7/24 ISO Taper . . . . . . . . . . . . . . . . . . . . . . . . . . . . . . . . . . . . . . . . . . . . . . . . . . . . . . . . . . . . . . . . .M18–M19<br />
Clamping Systems . . . . . . . . . . . . . . . . . . . . . . . . . . . . . . . . . . . . . . . . . . . . . . . . . . . . . . . . . . . . . . . . . . . .M20–M35<br />
KM Introduction . . . . . . . . . . . . . . . . . . . . . . . . . . . . . . . . . . . . . . . . . . . . . . . . . . . . . . . . . . . . . . . . .M20–M21<br />
KM Manual . . . . . . . . . . . . . . . . . . . . . . . . . . . . . . . . . . . . . . . . . . . . . . . . . . . . . . . . . . . . . . . . . . . .M22–M29<br />
KM-LOC . . . . . . . . . . . . . . . . . . . . . . . . . . . . . . . . . . . . . . . . . . . . . . . . . . . . . . . . . . . . . . . . . . . . . .M30–M31<br />
KM-LOC II . . . . . . . . . . . . . . . . . . . . . . . . . . . . . . . . . . . . . . . . . . . . . . . . . . . . . . . . . . . . . . . . . . . . .M32–M33<br />
KM Rapid/Rapid Plus . . . . . . . . . . . . . . . . . . . . . . . . . . . . . . . . . . . . . . . . . . . . . . . . . . . . . . . . . . . . . . . . .M34<br />
KM Automatic . . . . . . . . . . . . . . . . . . . . . . . . . . . . . . . . . . . . . . . . . . . . . . . . . . . . . . . . . . . . . . . . . . . . . . .M35<br />
KM ATC Configurations . . . . . . . . . . . . . . . . . . . . . . . . . . . . . . . . . . . . . . . . . . . . . . . . . . . . . . . . . . . . . . . . . . . . .M36<br />
KM XMZ Configurations . . . . . . . . . . . . . . . . . . . . . . . . . . . . . . . . . . . . . . . . . . . . . . . . . . . . . . . . . . . . . . . . . . . .M37<br />
KM Application Data . . . . . . . . . . . . . . . . . . . . . . . . . . . . . . . . . . . . . . . . . . . . . . . . . . . . . . . . . . . . . . . . . . .M38–M51<br />
KM Tooling Mounting Dimensions . . . . . . . . . . . . . . . . . . . . . . . . . . . . . . . . . . . . . . . . . . . . . . . . . . . . . . .M52–M61<br />
KM Micro/KM Mini . . . . . . . . . . . . . . . . . . . . . . . . . . . . . . . . . . . . . . . . . . . . . . . . . . . . . . . . . . . . . . . . . . . .M62–M72<br />
Clamping Systems . . . . . . . . . . . . . . . . . . . . . . . . . . . . . . . . . . . . . . . . . . . . . . . . . . . . . . . . . . . . . . .M62–M69<br />
Mounting Dimensions . . . . . . . . . . . . . . . . . . . . . . . . . . . . . . . . . . . . . . . . . . . . . . . . . . . . . . . . . . . .M70–M72<br />
Balancing . . . . . . . . . . . . . . . . . . . . . . . . . . . . . . . . . . . . . . . . . . . . . . . . . . . . . . . . . . . . . . . . . . . . . . . . . . . .M74–M77<br />
Shrink Fit . . . . . . . . . . . . . . . . . . . . . . . . . . . . . . . . . . . . . . . . . . . . . . . . . . . . . . . . . . . . . . . . . . . . . . . . . . . .M78–M81<br />
SAFE-LOCK . . . . . . . . . . . . . . . . . . . . . . . . . . . . . . . . . . . . . . . . . . . . . . . . . . . . . . . . . . . . . . . . . . . . . . . . . . . . . .M82<br />
Hydraulic Chucks . . . . . . . . . . . . . . . . . . . . . . . . . . . . . . . . . . . . . . . . . . . . . . . . . . . . . . . . . . . . . . . . . . . . .M84–M87<br />
HPMC System . . . . . . . . . . . . . . . . . . . . . . . . . . . . . . . . . . . . . . . . . . . . . . . . . . . . . . . . . . . . . . . . . . . . . . . .M88–M89<br />
Tunable Tooling System (TTS) . . . . . . . . . . . . . . . . . . . . . . . . . . . . . . . . . . . . . . . . . . . . . . . . . . . . . . . . . . .M90–M91<br />
Tunable Milling . . . . . . . . . . . . . . . . . . . . . . . . . . . . . . . . . . . . . . . . . . . . . . . . . . . . . . . . . . . . . . . . . . . . . . . . . . . .M92<br />
Tunable Boring Bars . . . . . . . . . . . . . . . . . . . . . . . . . . . . . . . . . . . . . . . . . . . . . . . . . . . . . . . . . . . . . . . . . . .M93–M95<br />
Screw-On Adapters . . . . . . . . . . . . . . . . . . . . . . . . . . . . . . . . . . . . . . . . . . . . . . . . . . . . . . . . . . . . . . . . . . . . . . . .M96<br />
Through-Coolant Shell Mill Adapters . . . . . . . . . . . . . . . . . . . . . . . . . . . . . . . . . . . . . . . . . . . . . . . . . . . . . . . . . .M97<br />
Collet Chuck Styles . . . . . . . . . . . . . . . . . . . . . . . . . . . . . . . . . . . . . . . . . . . . . . . . . . . . . . . . . . . . . . . . . . .M98–M99<br />
Collets . . . . . . . . . . . . . . . . . . . . . . . . . . . . . . . . . . . . . . . . . . . . . . . . . . . . . . . . . . . . . . . . . . . . . . . . . . . .M100–M103<br />
Gripping Strength Comparison Chart . . . . . . . . . . . . . . . . . . . . . . . . . . . . . . . . . . . . . . . . . . . . . . . . . . .M104–M105<br />
M1
<strong>Technical</strong> <strong>Information</strong><br />
<strong>Technical</strong> <strong>Information</strong><br />
Spindle Connection<br />
The Correct Spindle Connection<br />
and Application Guide<br />
The Spindle Connection<br />
Several different types of spindle connection have been developed or<br />
optimized over the last few decades. The 7/24 ISO taper became one of<br />
the most popular systems in the market. It has been successfully used in<br />
many applications, but its accuracy and high-speed limitations prevent it<br />
from growing further due to only having one surface of contact around<br />
the gage diameter/uppermost cone. The recent combination of face<br />
contact with 7/24 solid taper provides higher accuracy in the Z-axis<br />
direction, but this also presents some disadvantages, namely the loss in<br />
stiffness at higher speeds or high side loads. Most of these tools on the<br />
market are solid and the spindles have relatively low clamping force.<br />
7/24 ISO Taper<br />
7/24 Taper<br />
Face Contact<br />
PSC<br />
In 1985, WIDIA (Krupp WIDIA) and Kennametal initiated a joint<br />
program to further develop the concept of taper and face contact<br />
interface and a universal quick-change system — now known as<br />
KM and recently standardized as ISO 26622. The KM system has<br />
a very strong design, utilizing three surfaces of contact, the flange face,<br />
and lower as well as upper ring of contact of the cone. The polygonal<br />
taper-face connection, known as PSC, is now also standardized as<br />
ISO 26623, and in the early 1990s, the HSK system started being<br />
employed on machines in Europe and later became DIN 69893 and<br />
later ISO 12164 with two rings of contact. KM4X is the next generation<br />
of KM targeted at heavy-duty machining due to the combination of high<br />
interference and high clamping forces.<br />
M2 www.kennametal.com<br />
HSK<br />
KM<br />
KM4X
Taper Specifications<br />
KM Micro and KM Mini<br />
KM12<br />
KM1612<br />
KM16<br />
KM2016<br />
KM20<br />
KM2520<br />
KM25<br />
KM3225<br />
Taper Specifications<br />
KM — ISO 26622-1<br />
www.kennametal.com<br />
<strong>Technical</strong> <strong>Information</strong><br />
Shank Controls<br />
D D2 B1 L2 L5<br />
12,0 10,0 4,2 6,7 13,0<br />
.427 .394 .167 .264 .512<br />
16,0 10,0 4,2 6,7 13,0<br />
.630 .394 .167 .264 .512<br />
16,0 12,0 4,9 7,11 14,3<br />
.630 .472 .193 .280 .562<br />
20,0 12,0 4,9 7,1 14,3<br />
.787 .472 .193 .280 .562<br />
20,0 16,0 6,6 10,0 18,0<br />
.787 .630 .260 .394 .709<br />
25,0 16,0 6,6 10,0 18,0<br />
.984 .630 .260 .394 .709<br />
25,0 20,0 8,0 10,0 20,0<br />
.984 .787 .314 .394 .787<br />
32,0 20,0 8,0 10,0 20,0<br />
1.260 .787 .314 .394 .787<br />
D D2 D3 D4 D5 L5 L2 L3 L4 B1<br />
KM32TS<br />
32,0<br />
1.260<br />
24,0<br />
.945<br />
29,0<br />
1.142<br />
36,45<br />
1.435<br />
3,5<br />
0.138<br />
20,0<br />
0.787<br />
8,0<br />
1.102<br />
4,9<br />
0.193<br />
10,0<br />
0.394<br />
9,0<br />
0.354<br />
KM40TS<br />
40,0<br />
1.575<br />
30,0<br />
1.181<br />
37,0<br />
1.457<br />
44,45<br />
1.750<br />
3,5<br />
0.138<br />
25,0<br />
0.984<br />
11,0<br />
0.433<br />
5,89<br />
0.232<br />
12,0<br />
0.472<br />
10,1<br />
0.398<br />
KM50TS<br />
50,0<br />
1.969<br />
40,0<br />
1.575<br />
42,7<br />
1.681<br />
59,4<br />
2.339<br />
7,0<br />
0.276<br />
32,0<br />
1.260<br />
12,0<br />
0.472<br />
8,9<br />
0.350<br />
16,0<br />
.0630<br />
14,1<br />
0.555<br />
KM63TS<br />
63,0<br />
2.480<br />
50,0<br />
1.969<br />
55,7<br />
2.193<br />
72,4<br />
2.850<br />
7,0<br />
0.276<br />
40,0<br />
1.575<br />
18,0<br />
0.709<br />
9,9<br />
0.390<br />
18,0<br />
0.709<br />
16,1<br />
0.634<br />
KM80TS<br />
80,0<br />
3.150<br />
64,0<br />
2.520<br />
72,7<br />
2.862<br />
89,4<br />
3.520<br />
7,0<br />
.0276<br />
45,0<br />
1.772<br />
18,5<br />
0.728<br />
11,0<br />
0.433<br />
22,0<br />
0.866<br />
20,1<br />
0.791<br />
NOTE: Valid for all KM styles including XMZ and ATC.<br />
Taper Specifications<br />
KM4X <br />
D D2 D3 D4 D5 D10 (max) F2 (min) L2 L3 L4 L5<br />
KM4X63<br />
63,0<br />
2.480<br />
48,0<br />
1.890<br />
55,0<br />
2.165<br />
72,2<br />
2.843<br />
7,0<br />
.276<br />
53,0<br />
2.087<br />
42,0<br />
1.654<br />
6,3<br />
.248<br />
18,0<br />
.709<br />
26,0<br />
1.024<br />
32,0<br />
1.260<br />
KM4X100<br />
100,0<br />
3.937<br />
75,0<br />
2.953<br />
92,0<br />
3.622<br />
109,7<br />
4.319<br />
7,0<br />
.276<br />
85,0<br />
3.346<br />
45,0<br />
1.772<br />
10,0<br />
.394<br />
20,0<br />
.787<br />
29,0<br />
1.142<br />
50,0<br />
1.969<br />
NOTE: Valid for all KM styles including XMZ and ATC.<br />
M3<br />
<strong>Technical</strong> <strong>Information</strong>
<strong>Technical</strong> <strong>Information</strong><br />
<strong>Technical</strong> <strong>Information</strong><br />
Shank Controls<br />
Taper Specifications<br />
HSK — DIN 69893 Part 1, Form A<br />
D1<br />
mm<br />
(h10)<br />
D2<br />
mm<br />
(ref)<br />
D5<br />
mm<br />
(h11)<br />
D10<br />
mm<br />
(max)<br />
L1<br />
mm<br />
(-0,2)<br />
L6<br />
mm<br />
(js10)<br />
B1<br />
mm<br />
(±0,04)<br />
F1<br />
mm<br />
(-0,1)<br />
F2<br />
mm<br />
(min)<br />
40A 40 30 25,50 34 20 11,42 8,05 20 35<br />
50A 50 38 32 42 25 14,13 10,53 26 42<br />
63A 63 48 40 53 32 18,13 12,54 26 42<br />
80A 80 60 50 67 40 22,85 16,04 26 42<br />
100A 100 75 63 85 50 28,56 20,02 29 45<br />
D1<br />
mm<br />
(h10)<br />
D2 mm D5 mm<br />
(ref) (h11)<br />
D10<br />
mm<br />
(max)<br />
L1 mm L6 mm F1 mm F2 mm<br />
(-0,2) (js10) (-0,1) (min)<br />
40E 40 30 25,5 34 20 11,42 20 35<br />
50E 50 38 32 42 25 14,13 26 42<br />
40 44,45<br />
(1.750)<br />
50 69,85<br />
(2.750)<br />
D1 D6 L1 F3 A G<br />
63,00<br />
(2.480)<br />
100,00<br />
(3.937)<br />
65,40<br />
(2.575)<br />
101,80<br />
(4.008)<br />
27,00<br />
(1.063)<br />
38,00<br />
(1.496)<br />
1,00<br />
(.039)<br />
1,50<br />
(.059)<br />
M16<br />
thread<br />
M24<br />
thread<br />
HSK — DIN 69893 Part 1, Form C<br />
D1 mm<br />
(h10)<br />
D2 mm<br />
(ref)<br />
D5 mm<br />
(h11)<br />
L1 mm<br />
(-0,2)<br />
L6 mm<br />
(js10)<br />
B1 mm<br />
(±0,04)<br />
F1 mm<br />
(-0,1)<br />
32C 32 24 21 16 8,92 7,05 10<br />
40C 40 30 25,50 20 11,42 8,05 10<br />
50C 50 38 32 25 14,13 10,53 12,5<br />
63C 63 48 40 32 18,13 12,54 12,5<br />
HSK — DIN 69893 Part 5, Form E HSK — DIN 69893 Part 1, Form F (with Pin)<br />
BTKV — Taper Face CVKV — Taper Face<br />
D1 mm<br />
(h10)<br />
D2 mm<br />
(ref)<br />
D5 mm<br />
(h11)<br />
L1 mm<br />
(-0,2)<br />
L6 mm<br />
(js10)<br />
F1 mm<br />
(-0,1)<br />
63F (pin) 63 38 32 25 14,13 26<br />
80F (pin) 80 48 40 32 18,13 26<br />
40 44,45<br />
(1.750)<br />
50 69,85<br />
(2.750)<br />
D1 D6 D8 L1 F2 F3 A G<br />
M4 www.kennametal.com<br />
63,05<br />
(2.500)<br />
98,41<br />
(3.875)<br />
44,45<br />
(1.750)<br />
69,85<br />
(2.750)<br />
68,25<br />
(2.687)<br />
101,60<br />
(4.000)<br />
35,00<br />
(1.375)<br />
35,00<br />
(1.375)<br />
19,05<br />
(.750)<br />
35,00<br />
(1.375)<br />
1,00<br />
(.039) 5/8-11<br />
thread<br />
1,50<br />
(.059)<br />
1-8<br />
thread
Taper Specifications<br />
BT — JIS B6339 CAT (CV) — ANSI B5.50<br />
30 31,75<br />
(1.250)<br />
35 38,10<br />
(1.500)<br />
40 44,45<br />
(1.750)<br />
45 57,15<br />
(2.250)<br />
50 69,85<br />
(2.750)<br />
D1 D6<br />
D8<br />
max L1<br />
F2<br />
min F3 A G<br />
30 31,75<br />
(1.250) 46,03<br />
(1.812)<br />
35,05<br />
(1.380)<br />
68,33<br />
(2.690) 19,81<br />
(.780) 10,69<br />
(.421) 1,96<br />
(.077)<br />
1/2" - 13<br />
UNC - 2B<br />
40 44,45<br />
(1.750) 63,50<br />
(2.500)<br />
50 69,85<br />
(2.750) 88,90<br />
(3.500)<br />
www.kennametal.com<br />
D1 D6 L1 F3 A G<br />
46,00<br />
(1.811)<br />
53,00<br />
(2.087)<br />
63,00<br />
(2.480)<br />
85,00<br />
(3.346)<br />
100,00<br />
(3.937)<br />
50,80<br />
(2.000)<br />
48,40<br />
(1.906)<br />
56,50<br />
(2.224)<br />
65,40<br />
(2.575)<br />
82,80<br />
(3.260)<br />
101,80<br />
(4.008)<br />
22,00<br />
(.866)<br />
24,00<br />
(.945)<br />
27,00<br />
(1.063)<br />
33,00<br />
(1.299)<br />
38,00<br />
(1.496)<br />
93,73<br />
(3.690) 20,83<br />
(.820)<br />
2,00<br />
(.079)<br />
2,00<br />
(.079)<br />
2,00<br />
(.079)<br />
3,00<br />
(.118)<br />
3,00<br />
(.118)<br />
9,88<br />
(.389) 1,93<br />
(.076)<br />
73,66<br />
(2.900) 127,00<br />
(5.000) 30,73<br />
(1.210) 15,09<br />
(.594) 3,58<br />
(.141)<br />
M12<br />
thread<br />
M12<br />
thread<br />
M16<br />
thread<br />
M20<br />
thread<br />
M24<br />
thread<br />
5/8" - 11<br />
UNC - 2B<br />
1" - 8<br />
UNC - 2B<br />
30 31,75<br />
(1.250)<br />
40 44,45<br />
(1.750)<br />
45 57,15<br />
(2.250)<br />
50 69,85<br />
(2.750)<br />
<strong>Technical</strong> <strong>Information</strong><br />
Shank Controls<br />
D1 D6 D8 L1 F2 F3 A G<br />
46,02<br />
(1.812)<br />
63,05<br />
(2.500)<br />
82,50<br />
(3.250)<br />
98,41<br />
(3.875)<br />
60 107,95<br />
(4.250) 139,70<br />
(5.500)<br />
31,75<br />
(1.250)<br />
44,45<br />
(1.750)<br />
57,15<br />
(2.250)<br />
69,85<br />
(2.750)<br />
107,95<br />
(4.250)<br />
DV — DIN 69871 Form B — Flange Coolant Entry Ports<br />
30 31,75<br />
(1.250)<br />
40 44,45<br />
(1.750)<br />
45 57,15<br />
(2.250)<br />
50 69,85<br />
(2.750)<br />
D1 D6<br />
49,95<br />
(1.967)<br />
63,00<br />
(2.480)<br />
82,00<br />
(3.228)<br />
97,45<br />
(3.827)<br />
D8<br />
max L1<br />
45,00<br />
(1.772)<br />
47,65<br />
(1.876)<br />
50,00<br />
(1.969)<br />
63,00<br />
(2.480)<br />
80,00<br />
(3.150)<br />
68,25<br />
(2.687)<br />
82,55<br />
(3.250)<br />
101,60<br />
(4.000)<br />
F2<br />
min F3 A G<br />
35,00<br />
(1.378) 19,05<br />
(.750)<br />
3,20<br />
(.126) M12<br />
thread<br />
35,00<br />
(1.378) 19,05<br />
(.750)<br />
35,00<br />
(1.378) 19,05<br />
(.750)<br />
35,00<br />
(1.378) 19,05<br />
(.750)<br />
3,20<br />
(.126) M16<br />
thread<br />
3,20<br />
(.126) M20<br />
thread<br />
3,20<br />
(.126) M24<br />
thread<br />
section AA<br />
QC — ERICKSON Quick Change R8 — Bridgeport<br />
D<br />
30 4,00<br />
(.157)<br />
40 4,00<br />
(.157)<br />
45 5,00<br />
(.197)<br />
50 6,00<br />
(.236)<br />
47,63<br />
(1.875)<br />
68,25<br />
(2.687)<br />
82,55<br />
(3.250)<br />
101,60<br />
(4.000)<br />
161,93<br />
(6.375)<br />
35,00<br />
(1.375)<br />
35,00<br />
(1.375)<br />
35,00<br />
(1.375)<br />
35,00<br />
(1.375)<br />
38,10<br />
(1.500)<br />
19,05<br />
(.750)<br />
19,05<br />
(.750)<br />
19,05<br />
(.750)<br />
19,05<br />
(.750)<br />
19,05<br />
(.750)<br />
3,18<br />
(.125) 1/2-13<br />
thread<br />
3,18<br />
(.125) 5/8-11<br />
thread<br />
3,18<br />
(.125) 3/4-10<br />
thread<br />
3,18<br />
(.125)<br />
3,18<br />
(.125)<br />
F4<br />
±0.004<br />
21,00<br />
(.827)<br />
27,00<br />
(1.063)<br />
35,00<br />
(1.378)<br />
42,00<br />
(1.654)<br />
1-8<br />
thread<br />
1 1/-7<br />
thread<br />
D1 D2 L1 L2 L3 S1 G<br />
R8 .469 1.241 4.000 .938 2.750 .157 7/16-20 UNF - 2B<br />
M5<br />
<strong>Technical</strong> <strong>Information</strong>
<strong>Technical</strong> <strong>Information</strong><br />
<strong>Technical</strong> <strong>Information</strong><br />
Shank Controls<br />
Shank Specifications<br />
VDI — DIN 69880<br />
30<br />
40<br />
50<br />
60<br />
D1 D2 D3 L1 L2 L3 L4 L5 L6 H2 R1<br />
30,00 14,00 68,00 55,00 29,70 40,00 2,00 7,00 20,00 27,00 25,00<br />
1.181 0.551 2.677 2.165 1.169 1.575 0.079 0.276 0.787 1.063 0.984<br />
40,00 14,00 83,00 63,00 29,70 40,00 3,00 7,00 20,00 36,00 32,00<br />
1.575 0.551 3.268 2.480 1.169 1.575 0.118 0.276 0.787 1.417 1.260<br />
50,00 16,00 98,00 78,00 35,70 48,00 3,00 8,00 24,00 45,00 37,00<br />
1.969 0.630 3.858 3.071 1.406 1.890 0.118 0.315 0.945 1.772 1.457<br />
60,00 16,00 123,00 94,00 43,70 56,00 4,00 10,00 28,00 55,00 48,00<br />
2.362 0.630 4.843 3.701 1.720 2.205 0.157 0.394 1.102 2.165 1.890<br />
M6 www.kennametal.com
KM4X<br />
The Latest Innovation in Spindle Interface Technology!<br />
Dramatically increase your metal removal rates when machining<br />
high-temperature alloys!<br />
• Run jobs at significantly faster feeds and speeds than is achievable with other spindle interfaces.<br />
• Unique use of clamping force and interference level increases clamping capability 2 to 3 times.<br />
• You experience lower cost of ownership, increased throughput, and superior results.<br />
deflection (m) @ 150mm<br />
0.20<br />
0.18<br />
0.16<br />
0.14<br />
0.12<br />
0.10<br />
0.08<br />
0.06<br />
0.04<br />
0.02<br />
0.00<br />
0 600 1200 1800 2400 3000 3600 4200 4800 5400 6000<br />
bending moment (Nm)<br />
www.kennametal.com<br />
Load-Deflection chart<br />
7/24 Taper — Size 50<br />
7/24 Taper — Size 50<br />
with Face Contact<br />
7/24 Taper — Size 60<br />
KM4X100<br />
HSK125A<br />
KM4X125<br />
HSK100A<br />
To learn more, scan here.<br />
For instructions on how to scan, please see page xxxiii.<br />
Visit www.kennametal.com or contact your local Authorized Kennametal Distributor.
<strong>Technical</strong> <strong>Information</strong><br />
<strong>Technical</strong> <strong>Information</strong><br />
Spindle Connections<br />
The Importance of a Strong Connection<br />
Many component materials are switching to lighter, high-strength materials,<br />
like titanium, to increase fuel efficiency. To save time and money, machinists are<br />
challenged to maximize metal removal rates at low cutting speeds and<br />
considerably higher cutting forces. Machine tool builders must also provide<br />
greater stiffness and damping in their spindles to minimize undesirable vibrations<br />
that deteriorate tool life and part quality.<br />
Though these advances contribute to greater productivity, the weakest point is<br />
often the spindle connection itself, which needs high torque and must overcome<br />
high-bending applications.<br />
Current Spindle Connections<br />
To fulfill the increasing demand for high productivity, an important element to<br />
consider is the tool/spindle connection. This interface must be able to withstand<br />
high loads and maintain rigidity throughout the machining process. In most cases,<br />
the connection determines how much material can be removed on a given<br />
operation until high tool deflection or chatter result.<br />
High-performance machining is accomplished using high feeds and depths of cut.<br />
Because of advances in cutting tools, there is a need for spindle connections that<br />
utilize available power.<br />
Several different types of spindle connections were developed and/or optimized<br />
over the last few decades. Due to its strong cost/benefit position, the 7/24 ISO<br />
taper became one of the most popular systems on the market. It has been<br />
successfully used in many applications, but its accuracy and high-speed<br />
limitations prevent it from becoming a more advanced and productive system.<br />
Choosing What’s Right<br />
With more materials that are tougher to machine and require considerably higher<br />
cutting forces from the machine tool, choosing the spindle interface wisely to<br />
maximize cutting edge performance is key to success.<br />
• One surface contact.<br />
• Relatively low stiffness.<br />
• Possible runout due<br />
to taper fitment.<br />
• Low axial accuracy.<br />
• Two surface contact.<br />
• Higher static and<br />
dynamic stiffness.<br />
• Higher axial and<br />
radial accuracy.<br />
• Rigid system.<br />
• Two surface contact.<br />
• Higher axial and<br />
radial accuracy.<br />
• Less mass — faster quick<br />
change and higher speeds.<br />
• Higher stiffness than<br />
7/24 tapers.<br />
Our response to this traditionally weak point has been the proven KM system,<br />
and now we are introducing the next generation KM4X . The combination of the<br />
KM4X’s high clamping force and interference level lead to a robust connection<br />
and extremely high stiffness and bending load capacity for unmatched<br />
performance in titanium machining.<br />
The advent of face contact represented a major step over the standard 7/24<br />
taper. Combining face contact with a 7/24 solid taper provides higher accuracy.<br />
However, this also presents some disadvantages. Loss of stiffness at higher<br />
speeds or high side loads are some of the major flaws apparent in this system.<br />
Most of these tools are solid, and the spindles have relatively low clamping force.<br />
This results in limited connection stiffness, as radial interference needs to be<br />
minimal. The required tolerances to achieve consistent face contact are thus<br />
very tight, leading to high manufacturing costs.<br />
The KM spindle connections greatly outperform the conventional 7/24 steep<br />
taper and its face taper contact derivatives HSK and PSC systems. KM4X<br />
is the best large, heavy-duty spindle connection for rigidity because it has<br />
superb balance between bending and torsion capabilities from the machine tool.<br />
7/24 ISO Taper 7/24 Taper Face Contact HSK KMTS (ISO) KM4X<br />
• Three surface contact.<br />
• Superior static and<br />
dynamic stiffness.<br />
• Static and rotating<br />
applications.<br />
• Higher speed.<br />
• Higher stiffness than HSK<br />
and 7/24 tapers.<br />
• Three surface contact.<br />
• Superior static and<br />
dynamic stiffness.<br />
• Static and rotating<br />
applications.<br />
• Highest maximum speed.<br />
• ISO (HSK) Gripper.<br />
M8 www.kennametal.com
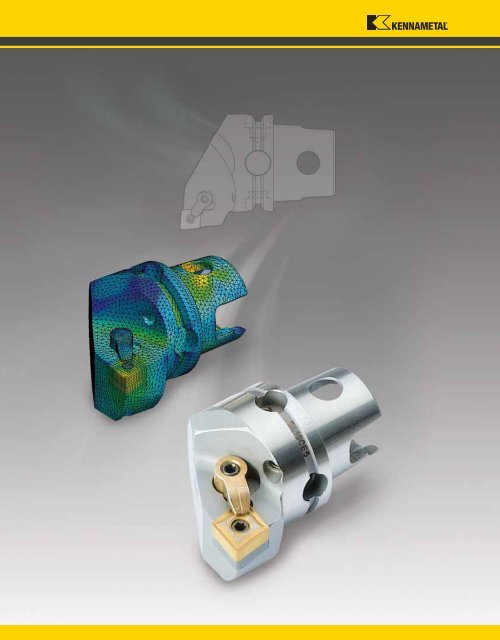
KM4X — The Next Generation Spindle Connection System<br />
As a global tooling supplier and a true customer support partner, we recognize<br />
the need to offer tooling products for all spindle interfaces and make available<br />
solutions to provide the best cutting edges to gain maximum productivity at the<br />
spindle system connection.<br />
KM4X is the latest version of the KM spindle interface targeted at heavy-duty<br />
machining operations and is a top choice for machining large, structural<br />
tough-to-machine materials like titanium for the aerospace industry.<br />
The Latest Innovation in Spindle Interface Technology<br />
• KM4X offers the most rigid connection able to withstand extremely high<br />
bending due to a combination of high interference and high clamping forces.<br />
• KM4X provides 3x more bending capacity than comparable face<br />
contact systems.<br />
• KM is the only connection that maintains stiffness at elevated rotational speeds<br />
and is suitable for a range of applications from low speeds with high torque<br />
to very high spindle speeds with low torque.<br />
• KM4X maintains a better balance between bending and torsion capabilities.<br />
• The ability to retrofit KM4X to an existing machine tool offers the added<br />
advantage of increasing throughput.<br />
• Heavy-duty, rigid configuration with evenly distributed clamping force.<br />
• Simple design enables front-loaded spindle configuration.<br />
• Balanced-by-design for high spindle speed capacity.<br />
www.kennametal.com<br />
KM4X three-surface contact for improved stability and accuracy.<br />
Optimized clamping force distribution and interference fit provides higher stiffness.<br />
<strong>Technical</strong> <strong>Information</strong><br />
KM4X Spindle Connection<br />
M9<br />
<strong>Technical</strong> <strong>Information</strong>
<strong>Technical</strong> <strong>Information</strong><br />
<strong>Technical</strong> <strong>Information</strong><br />
KM4X Spindle Connection<br />
Why Bending Load Capacity Is Important<br />
When machining tough materials like titanium, cutting speeds are relatively low<br />
due to thermal effects on cutting tools. Over the years, machine tool builders<br />
responded to this issue by improving stiffness and damping on spindles and<br />
machine structures. Spindles have been designed with abundant torque<br />
at low rotational speeds. Nevertheless, the spindle connection has remained<br />
the weak link in the system.<br />
The spindle connection must provide torque and bending load capacity<br />
compatible with the machine tool specifications and the requirements for higher<br />
productivity. It becomes obvious that in end-milling applications where the<br />
projection lengths are typically greater, the limiting factor is the bending load<br />
capacity of the spindle interface.<br />
The lines on the chart to the right represent the load capacity of HSK, PSC,<br />
and KM4X. The shaded areas represent the typical requirements for heavy-duty<br />
applications in various machining processes. KM4X is the only system that can<br />
deliver the torque and bending capacity required for achieving high-performance<br />
machining. Some systems may be able to transmit a considerable amounts of<br />
torque, but the cutting forces also generate bending moments that exceed the<br />
interface’s limits before torque limits are exceeded.<br />
deflection (m) @ 150mm<br />
M10 www.kennametal.com<br />
torque<br />
Drilling<br />
Face Milling<br />
SK-F (7/24 Taper with Face Contact)<br />
SK (7/24 Taper)<br />
HSK<br />
bending moment<br />
Turning<br />
End Milling<br />
0.20<br />
0.18<br />
0.16<br />
0.14<br />
0.12<br />
0.10<br />
0.08<br />
0.06<br />
0.04<br />
0.02<br />
0.00<br />
0 600 1200 1800 2400 3000 3600 4200 4800 5400 6000<br />
bending moment (Nm)<br />
7/24 Taper — Size 50<br />
KM4X100<br />
7/24 Taper — Size 50<br />
with Face Contact<br />
HSK125A<br />
7/24 Taper — Size 60<br />
KM4X125<br />
PSC<br />
TS (KM)<br />
IMPORTANT<br />
<strong>Information</strong> shown on the following charts was developed exclusively for use with KM tooling in static conditions. Do not use for any other tooling<br />
system because the results will not apply. To account for cutting force fluctuations in dynamic conditions, a reduction of 20–30% should be applied<br />
to the loads shown in charts.<br />
Chart shows load-deflection comparison of steep taper with and without face contact — HSK and KM4X.<br />
HSK100A<br />
KM4X<br />
Deep Boring<br />
150mm<br />
F<br />
deflection
F<br />
(mm)<br />
400<br />
350<br />
300<br />
250<br />
200<br />
150<br />
100<br />
50<br />
0<br />
www.kennametal.com<br />
67kN<br />
45kN<br />
35kN<br />
Maximum Tangential Load for KM4X100<br />
25kN<br />
18kN<br />
L1 (mm)<br />
<strong>Technical</strong> <strong>Information</strong><br />
KM4X Spindle Connection<br />
0 50 100 150 200 250 300 350 400 450<br />
The KM4X system is the best large, heavy-duty connection. A weak connection can fail to deliver the desired cutting edge performance.<br />
KM4X superior rigidity equals maximum productivity.<br />
IMPORTANT<br />
<strong>Information</strong> shown on the following charts was developed exclusively for use with KM tooling in static conditions. Do not use for any other tooling<br />
system because the results will not apply. To account for cutting force fluctuations in dynamic conditions, a reduction of 20–30% should be applied<br />
to the loads shown in charts.<br />
15kN<br />
M11<br />
<strong>Technical</strong> <strong>Information</strong>
<strong>Technical</strong> <strong>Information</strong><br />
<strong>Technical</strong> <strong>Information</strong><br />
KM Spindle Connection<br />
The KM Coupling<br />
The KM Quick Change Clamping System is the first step in achieving maximum<br />
machine output. Please refer to the Kennametal Machine Utilization Strategy for<br />
more information on how we can help you increase your machine throughput.<br />
The KM joint achieves rigidity and stiffness by combining unique design<br />
elements in both the shank of the tool and the clamping mechanism. The KM<br />
joint was developed as a system and takes full advantage of both the tool<br />
shank and the mechanism to obtain maximum benefits from the space utilized.<br />
Face and Taper Contact<br />
Three Surface Contact<br />
KM tooling is designed to have simultaneous taper and face contact. Previous<br />
efforts to achieve this were concentrated on steep taper applications. However,<br />
due to the relatively large angle of the taper, extremely tight tolerances are<br />
required on the gage diameters of both the tool and receptacle. The KM taper<br />
was designed to avoid these tight tolerances by selecting shallower taper<br />
angles that enable elastic deformation of both the taper shank and receptacle<br />
during clamping. It also permits larger interference levels* to be used while still<br />
achieving taper and face contact during clamping. These interference levels,<br />
when combined with the proper clamping force, provide superior static and<br />
dynamic stiffness. The system’s interference capability enables the use of lower<br />
tolerance levels for gage diameters.<br />
The taper and face contact feature provides a radial and axial repeatability of<br />
±2,5 μm (±.0001") for a specific cutting unit in a specific clamping unit. When<br />
more than one unit is utilized, the manufacturing and component tolerances of<br />
each must be considered. Pre-gaging cutting units before they are used<br />
enables the deviations of each tool tip location to be recorded. These deviations<br />
can be compensated for by the machine tool control offsets. Checking for<br />
deviations prior to use means the first part manufactured will be a good part.<br />
*The difference between the gage diameters of the receptacle and the taper shank.<br />
Rigidity<br />
All KM tooling is designed around a short 10:1 tapered shank. Extensive<br />
testing of many different lengths, angles, and interference levels provided<br />
the optimum combination of dimensions with regard to maximum stiffness.<br />
The taper is self-centering, promoting easy tool loading in both manual<br />
and automatic applications.<br />
The three-zone contact and the ball track clamping mechanism produces<br />
a coupling that closely approaches the ultimate rigidity of a solid piece.<br />
Clamping Mechanism<br />
The KM clamping mechanism is housed inside of the taper shank, which<br />
contains two angled holes that function as ball tracks. A cylindrical ball<br />
canister fits inside of the taper shank, where wedge shaped forms on a central<br />
lock rod force two hardened steel balls outward. The steel balls interact with<br />
the angled holes in the tapered shank to produce clamping force. The<br />
combination of the angle in the taper shank, the angle of the canister holes,<br />
and the lock rod angle produce a measured mechanical advantage that varies<br />
between 3.5:1–7:1. The standard manual side activation mechanism has a<br />
mechanical advantage of 3.5:1 and fits into the system size diameter.<br />
Locking Sequence<br />
The clamping sequence starts by inserting the cutting unit into the female<br />
taper of the clamping unit. The cutting unit first makes contact at a standoff<br />
from the face of approximately 0,25mm (.010"). The cutting unit advances<br />
until the gage face makes contact with the clamping unit face, where a small<br />
amount of elastic deformation takes place at the front of the female taper as<br />
locking force is applied. The final amount of torque applied enables the tail of<br />
the cutting unit to clamp securely between the steel balls and the clamping<br />
unit inside diameter.<br />
M12 www.kennametal.com
Sealed Coolant<br />
Sealed through-the-tool coolant is offered on all standard KM tooling and<br />
clamping units. The coolant is sealed using O-rings in both the cutting units and<br />
clamping units. This feature ensures that coolant is directed as close as possible<br />
to the cutting edge while preventing contaminants from entering the clamping<br />
mechanism. Standard Viton ® O-rings are utilized on KM.<br />
Fail-Safe Tool Orientation<br />
A unique feature of KM clamping is the ability to ensure that the KM cutting unit<br />
can only be installed in one orientation. The direction of this orientation feature<br />
can be changed within the clamping unit. To allow greater flexibility, standard KM<br />
clamping units are shipped without this feature installed. For more details on this<br />
feature, refer to the KM operating instructions section.<br />
Metric Slotted Pins:<br />
• KM32TS — 2,5mm x 4mm Long<br />
• KM40TS — 3mm x 6mm Long<br />
• KM50TS — 4mm x 8mm Long<br />
• KM63TS — 5mm x 10mm Long<br />
• KM80TS — 5mm x 10mm Long<br />
• KM63XMZ — 5mm x 10mm Long<br />
• KM80ATC — 5mm x 10mm Long<br />
Accuracy and Repeatability<br />
Accuracy and repeatability of the coupling are shown in the table below.<br />
Accuracy is measured over a gage insert in different cutting units changed<br />
in and out of a clamping unit. Accuracy will decrease with inserts of varying<br />
tolerances and nose radii. Station-to-station accuracy on a turret requires<br />
that all clamping units be set in the same position on the machine tool<br />
mechanically or that variations are recorded as offsets in the machine control.<br />
Repeatability is measured over the nose radius of a cutting unit through many<br />
cycles of changing the cutting unit in and out of a clamping unit.<br />
Summary<br />
KM coupling offers a very rigid joint with a high degree of repeatability while<br />
maintaining a compact envelope. This permits a high degree of versatility<br />
without sacrificing cutting performance.<br />
www.kennametal.com<br />
axial<br />
radial<br />
cutting<br />
edge height<br />
<strong>Technical</strong> <strong>Information</strong><br />
KM Spindle Connection<br />
orientation notch orientation pin<br />
accuracy repeatability<br />
0,13mm<br />
(+/- .005")<br />
0,13mm<br />
(+/- .005")<br />
0,4mm<br />
(+/- .016")<br />
0,0025mm<br />
(+/- .0001")<br />
0,0025mm<br />
(+/- .0001")<br />
0,025mm<br />
(+/- .001")<br />
M13<br />
<strong>Technical</strong> <strong>Information</strong>
<strong>Technical</strong> <strong>Information</strong><br />
<strong>Technical</strong> <strong>Information</strong><br />
HSK Spindle Connection<br />
HSK Quick-Reference Identification<br />
HSK hollow-stub taper shanks are a widely used DIN standard for machine tools.<br />
HSK tools have a simultaneous 1:10 taper, which generates two surface contact<br />
areas: face and taper. Compared with traditional steep-taper shanks, HSK shanks<br />
are shorter, hollow, and clamp from the inside. They also incorporate drive keys<br />
that engage milled key-slots in machine spindles and offer higher static and<br />
dynamic stiffness than standard steep taper tooling.<br />
HSK tooling includes seven toolholder shank forms: A, B, C, D, E, F, and T. Various<br />
machine-spindle receivers are available for each. However, the choice of form<br />
depends on application requirements such as torque and spindle speed.<br />
HSK-A<br />
for general-machining service<br />
Form A<br />
Form A for automatic tool change is the most common shank, typically used on<br />
new machining centers and for general service. Form A has a drive slot in the<br />
small end of the tapered shank and features coolant through the center, using a<br />
coolant tube thread mount inside the shank cavity. In many applications, wrench<br />
access holes are provided through the taper as an option for manual clamping<br />
and automatic tool change shanks. Form A shanks have mounting holes for an<br />
electronic chip.<br />
There are eight different sizes of form A ranging from 32–160mm<br />
(1.260–6.299") flange diameter.<br />
HSK-C<br />
similar to form A but for manual tool<br />
change applications<br />
Forms C and D<br />
Forms C and D for manual tool changes are variations of forms A and B, but the<br />
gripper groove and chip holes are eliminated. These two forms always have their<br />
access holes through the taper for manual clamping. These manual forms are<br />
typically used on transfer lines and non-rotating applications for NC lathes.<br />
HSK-B<br />
greater flange support than form A<br />
for heavier work<br />
Form B<br />
Form B is also for automatic tool change. It is similar in appearance to form A<br />
but dimensionally different. Form B provides greater flange support for heavy<br />
machining, even though its taper shank size is smaller than form A. This style of<br />
shanks have drive slots in the flange and drive keys in the taper. Coolant for form<br />
B is fed through ports in the flange. Mounting holes for an electronic chip are also<br />
a feature of form B.<br />
For form B there are seven different shank sizes from 40–160mm<br />
(1.575–6.299") flange diameter.<br />
HSK-D<br />
similar to form B but for manual tool<br />
change applications<br />
There are six different shank sizes for form C ranging from 32–100mm<br />
(1.260–3.937") flange diameter. Form D has five different shank sizes from<br />
40–100mm (1.575–3.937") flange diameter.<br />
(continued)<br />
M14 www.kennametal.com
HSK Quick-Reference Identification (continued)<br />
Forms E and F<br />
Forms E and F with automatic tool change are also variations of forms A and B.<br />
These forms are intended for high-speed machining. Design features, such as<br />
drive slots, the orientation notch, and chip holes, have been removed to help<br />
eliminate imbalance. As a result, these forms are driven by the locking taper and<br />
are suitable only for light machining applications such as high-speed metalcutting<br />
and woodworking machines.<br />
Form E offers five different shank sizes ranging from 25–63mm (.984–2.480")<br />
flange diameter. There are three shank sizes for form F from 50–80mm<br />
(1.969–3.150") diameter on the flange.<br />
HSK Primary Offering<br />
www.kennametal.com<br />
HSK-E<br />
balanced-by-design for higher speeds<br />
HSK-F<br />
balanced-by-design with greater flange<br />
support for higher speeds<br />
<strong>Technical</strong> <strong>Information</strong><br />
HSK Spindle Connection<br />
HSK-T<br />
Form T<br />
Form T shanks are similar to form A, but with tighter key ways for turning.<br />
This gives form T improved repeatability over form A. These shanks have new<br />
centerline technology for variance and high productivity. They are also available<br />
in a wide range of standard toolholders.<br />
flange diameter D<br />
forms<br />
A and T form B form C form D form E form F<br />
D2<br />
mm<br />
D4<br />
mm<br />
LS<br />
mm<br />
L2<br />
mm<br />
L7<br />
mm<br />
- - - - 25 - 19 14 13 2,5 6<br />
32 40 32 40 32 - 24 17 16 3,2 8<br />
40 50 40 50 40 50 30 21 20 4 8<br />
50 63 50 63 50 63 38 26 25 5 10<br />
63 80 63 80 63 80 48 34 32 6,3 10<br />
80 100 80 100 - - 60 42 40 8 12,5<br />
100 125 100 - - - 75 53 50 10 12,5<br />
125 160 - - - - 95 67 63 12,5 16<br />
160 - - - - - 120 85 80 16 16<br />
Kennametal primary offering Secondary styles available upon request<br />
M15<br />
<strong>Technical</strong> <strong>Information</strong>
<strong>Technical</strong> <strong>Information</strong><br />
<strong>Technical</strong> <strong>Information</strong><br />
7/24 Taper Face Contact Spindle Connection<br />
7/24 Taper Face Contact V-Flange — Tooling to Fit the BIG-PLUS Spindle<br />
The 7/24 Taper Face Contact Spindle Interface, is being found on machining<br />
centers and multitasking machines. The basic principle of this system takes the<br />
standard 7/24 steep-taper tool and adds material to the back face of the<br />
toolholder flange as well as to the front face of the spindle. This is controlled so<br />
that the two parts have both face and taper contact when locked into position.<br />
The distinctive features of the system are the lead-in chamfers on the drive slots<br />
and ground back V-flange. The surface contact creates a system with higher<br />
static and dynamic stiffness compared to a regular 7/24 taper and increased<br />
axial and radial accuracy.<br />
Technology<br />
With the Taper Face System, toolholders are axially supported on the taper and<br />
flange face, which brings about higher rigidity and precision than a conventional<br />
7/24 toolholder. The system utilizes elastic deformation of the machine spindle<br />
to achieve simultaneous fitting of both the taper and flange face. Although the<br />
tapers are fit prior to clamping the mechanism, the faces are not yet secured<br />
because of a small amount of clearance between them. When the toolholder<br />
is pulled in by the drawbar mechanism, the machine spindle expands by elastic<br />
deformation and the faces are fit, completing the simultaneous fit between both<br />
taper and face. This synchronized fit prevents additional axial displacement of<br />
the taper providing high accuracy and superior surface finish in operations such<br />
as face milling, compared to the industry standard 7/24 V-flange.<br />
Offering<br />
Kennametal supports both the CAT (CV) ANSI B5.50 and BT JIS B6339<br />
versions in 40 and 50 taper sizes:<br />
• Two surface contact.<br />
• Higher static and dynamic stiffness.<br />
• Higher axial and radial accuracy.<br />
• Rigid system.<br />
Capable of being utilized in a variety of machining applications ranging from<br />
low-speed, heavy milling applications to high speeds greater than 20,000 RPM.<br />
The systems accuracy, repeatability, and stability should be equal or greater<br />
to the performance of current equivalent Taper Face tooling on the market<br />
in all applications.<br />
Taper face tool’s axial position is maintained<br />
even at high rotational speed.<br />
• CVKV40<br />
• CVKV50<br />
• BTKV40<br />
• BTKV50<br />
M16 www.kennametal.com
Clamping Mechanism<br />
In some cases, standard 7/24 steep-taper tooling can be used in a face contact<br />
7/24 taper spindle. However, the combination does not offer the same stability or<br />
advantages of face contact. As a caution, some spindles have a safety switch that<br />
shuts the spindle down if face contact is not achieved. In these cases, tools will<br />
need taper face contact for the spindle to operate.<br />
Locking Principle<br />
www.kennametal.com<br />
toolholder being loaded<br />
just before clamping<br />
taper contact and face<br />
clearance 0,020mm (.0008")<br />
<strong>Technical</strong> <strong>Information</strong><br />
7/24 Taper Face Contact Spindle Connection<br />
Similar to all interfaces with face contact, special care should be taken regarding<br />
the cleanliness of the mating faces as high contact pressures are present.<br />
Adequate filtration systems for coolant must be used.<br />
totally clamped<br />
locked taper and face contact<br />
M17<br />
<strong>Technical</strong> <strong>Information</strong>
<strong>Technical</strong> <strong>Information</strong><br />
<strong>Technical</strong> <strong>Information</strong><br />
7/24 ISO Taper Spindle Connection<br />
Steep Taper V-Flange<br />
Taper Size<br />
Taper size should be chosen with realistic considerations. When selecting cutting<br />
parameters, keep in mind that a machine with a 30 taper spindle will not achieve<br />
the same heavy cuts or use cutters as large those on a 50 taper machine.<br />
Pull-Back System<br />
When troubleshooting a problem, assume that the toolholder is at fault is not<br />
the correct course of action. The spring pack, drawbar, gripper, and retention<br />
knob are major components for the successful operation of a machine tool<br />
because wear or breakage of these parts is a major concern.<br />
• Spring pack — Can become weak or out of adjustment. This can cause<br />
chatter during a milling operation, which causes damage to the adapter taper,<br />
spindle taper, cutter, or workpiece.<br />
• Gripper fingers — If worn, they may not grip the retention knob correctly,<br />
enabling the adapter to move, resulting in chatter and damage to the adapter.<br />
• Retention knob — A worn or incorrect retention knob will not enable proper<br />
gripping for pull back on the taper. This is a very serious safety hazard due to<br />
the movement of the adapter. Using an improper knob may result in a lack of<br />
any detectable gripping force.<br />
Steep taper Form B coolant<br />
Form B Coolant<br />
Spindles are now running at higher rates — quickly burning seals, making it<br />
difficult to seal coolant as it passes through the drawbar. One option is to direct<br />
the coolant around the spindle bearings and enter through the spindle face<br />
and toolholder flange.<br />
M18 www.kennametal.com
coolant stop<br />
screw<br />
Kennametal toolholders are positioned in the AD coolant form with<br />
self-sealing, nylon-coated screws. The coolant screws are designed to<br />
completely seal the tool and prevent coolant leakage under pressures<br />
up to 1500 psi. However, if form B coolant is desired, the coolant stop<br />
screws must be backed out into the form B position.<br />
www.kennametal.com<br />
coolant through<br />
flange form B blocked<br />
Form AD Form B<br />
coolant through spindle<br />
option form AD<br />
IMPORTANT<br />
When choosing a desired coolant form, the correct retention knob should<br />
be used in conjunction with the coolant form applied.<br />
Form AD<br />
(through-coolant hole)<br />
coolant stop<br />
screw<br />
<strong>Technical</strong> <strong>Information</strong><br />
7/24 ISO Taper Spindle Connection<br />
coolant through<br />
flange form B<br />
coolant through spindle<br />
option form AD blocked<br />
Form B toolholders can be converted back through the drawbar form AD by<br />
simply threading the coolant stop screw and stopping below the flange coolant<br />
entry hole. Changing coolant form can be achieved many times before it is<br />
necessary to replace the coolant stop screw.<br />
All form B capable tooling is supplied with a label designating the required<br />
screw components for each steep taper size and information necessary for<br />
selecting a wrench to adjust the coolant stop screws.<br />
Form B<br />
(no hole through or half hole)<br />
M19<br />
<strong>Technical</strong> <strong>Information</strong>
<strong>Technical</strong> <strong>Information</strong><br />
<strong>Technical</strong> <strong>Information</strong><br />
KM Clamping Systems<br />
Manual Clamping System<br />
Characteristics<br />
• KM Manual Quick Change tooling is the most economical way to reduce<br />
downtime for setup and tool change and is an important first step toward<br />
further automation. The machine tool builder or the customer can easily<br />
install KM Manual Quick Change tooling.<br />
• All KM manual clamping units require approximately three turns of the<br />
activation screw and a specified amount of torque to lock the cutting tool.<br />
• The KM Manual Quick Change clamping mechanism is rigid and compact,<br />
with an easily accessible activation screw. The high mechanical advantage<br />
of the ball track makes it simple to apply the required locking force.<br />
• All KM Manual Quick Change clamping units accept external and internal<br />
cutting tools. Right- or left-hand tooling can be used interchangeably, and<br />
cutting tools can be inverted if required. KM Manual Quick Change clamping<br />
units support through-the-tool coolant.<br />
KM-LOC Clamping System<br />
KM-LOC is an evolutionary step from the conventional KM manual clamping<br />
system, the KM-LOC device employs a cam and a pre-loaded disk spring pack<br />
to provide positive, stop-to-stop locking and unlocking in only 140º of movement.<br />
The spring pack supplies the correct clamping force while the cam permits quick<br />
and easy clamping/unclamping in less than one turn, and without using a torque<br />
wrench. The KM-LOC clamping device is compact to adapt to a wide variety of<br />
machine tool mounting configurations, including flange mounts, square, round,<br />
and VDI shanks. The new KM-LOC clamping device offers all the features and<br />
benefits of our industry-proven modular KM Quick Change Tooling System and<br />
reduces the time required for manual tool changes.<br />
KM-LOC II Clamping System<br />
The KM-LOC II clamping device is the latest addition to the Kennametal KM<br />
modular quick-change tooling family. An evolutionary step from the conventional<br />
KM manual clamping system, the KM-LOC II employs a cam and a preloaded disc<br />
spring pack to provide positive, stop-to-stop locking and unlocking in only 145°<br />
of movement.<br />
The spring pack supplies the correct clamping force without using a torque<br />
wrench, while the cam permits quick and easy clamping/unclamping in less than<br />
one half of a turn. The KM-LOC II clamping device is compact to adapt to a wide<br />
variety of machine tool mounting configurations including flange mounts, square,<br />
round, and VDI shanks.<br />
The KM-LOC II is capable of handling through-the-tool coolant pressure of<br />
100 bar (1500 psi), and the design permits lubrication of internal components<br />
without disassembly. The design also enables the external installation of an<br />
orientation screw that restricts the cutting tool to a single orientation.<br />
• The KM Manual Quick Change clamping mechanism can adapt to a wide<br />
variety of machine tool mounting configurations including flange mounts,<br />
square, round, and VDI shanks.<br />
The latest KM-LOC II clamping device offers all of the features and benefits of our<br />
industry-proven modular KM Quick Change Tooling System and reduces the time<br />
required for manual tool changes.<br />
M20 www.kennametal.com
Rapid Clamping System<br />
Characteristics<br />
KM Rapid is a compact quick-change clamping system providing outstanding<br />
repeatability while, at the same time, allowing fast manual locking and unlocking.<br />
KM cutting units are locked and unlocked with only a 115º turn of the actuation<br />
cam with no torque wrench required for clamping and unclamping. A stop pin<br />
limits the angle of rotation, and actuation is available from the side only.<br />
The KM Rapid, with internal through-the-tool coolant capabilities, is best used<br />
in stationary applications on turning centers in high-volume production.<br />
KM Rapid permits the external installation of an orientation screw to restrict<br />
the clamping unit to accept the cutting unit in only one orientation.<br />
Rapid Plus Clamping System<br />
Characteristics<br />
The KM Rapid Plus clamping system provides approximately 20% more locating<br />
face force versus the KM Rapid. It is designed for retrofitting in dedicated<br />
applications enabling cutting units to be locked and unlocked with only a 180º<br />
turn of the actuation cam. Actuation is available from the top only.<br />
The Rapid Plus cartridge design allows use in smaller but slightly longer<br />
receivers, such as Multifix and Parat adapters.<br />
Automatic Clamping System • Spring-Pack Activated<br />
Characteristics<br />
Automatic KM clamping systems enable tools to be locked or unlocked with<br />
the push of a button by the machine operator or changed automatically by the<br />
machine tool. These units also allow tools to be changed quickly and provide<br />
a high level of automation at a moderate cost.<br />
Operation<br />
The pull on the lock rod for the automatic KM clamping unit is provided by disc<br />
springs that are an integral part of the clamping unit. Release is accomplished by<br />
pushing on the back of the clamping unit with a hydraulic cylinder mounted on<br />
the turret assembly. Many machine tool builders design and build the turrets for<br />
their machines to be equipped with the KM Automatic Clamping Units.<br />
www.kennametal.com<br />
<strong>Technical</strong> <strong>Information</strong><br />
KM Clamping Systems<br />
KM Rapid offers two main standard styles:<br />
• Flange mount holders, fastening with four socket head cap screws and an<br />
additional orientation pin, can be used on turrets axially or radially.<br />
• VDI shank tool holders, according to DIN 69880, in axial and right-angle styles<br />
for I.D. and O.D. turning applications.<br />
M21<br />
<strong>Technical</strong> <strong>Information</strong>
<strong>Technical</strong> <strong>Information</strong><br />
<strong>Technical</strong> <strong>Information</strong><br />
KM Manual Clamping System<br />
KM Manual Clamping Units<br />
KM Manual clamping units require a torque wrench to operate. Using the proper<br />
torque wrench value is critical. Tighter is not better because over tightening can<br />
cause damage.<br />
The specific operating torque of the KM manual clamping units is listed<br />
on each unit.<br />
The KM connection must be kept clean and free from nicks and burrs.<br />
KM plugs are available to ensure cleanliness when a cutting unit is not<br />
engaged in the clamping unit.<br />
KM Manual Clamping System • Single-Pin Design<br />
8<br />
8<br />
KM Manual Clamping Components • Functional Definitions<br />
1. Clamping Unit Body<br />
• Primary component of the clamping unit assembly,<br />
less additional hardware.<br />
2. Canister Pin<br />
• Secures ball canister to clamping unit body.<br />
3. Pin Canister<br />
• Main component of KM clamping mechanism holds and locates<br />
the locking balls and bump-off pin.<br />
4. Torque Screw<br />
• Rotation moves the lockrod:<br />
a. Clockwise rotation advances lockrod, securing<br />
cutting unit (not shown).<br />
b. Counterclockwise rotation retracts lockrod, releasing<br />
cutting unit (not shown).<br />
7<br />
6<br />
6<br />
When a KM head is unlocked, the head will bump-off. KM’s 10:1 taper is selflocking,<br />
and therefore, requires a mechanical release. This is accomplished within<br />
the design of the KM System and does not require operator intervention.<br />
After the head has been released, you will need to turn the torque screw another<br />
3/4–1-1/2 turns. This rotation will feel free of resistance. When the free turning<br />
motion stops, the head can be pulled from the clamping unit. Do not turn the<br />
torque screw further, as damage can occur to the lockrod and/or bump-off pin.<br />
5<br />
3 4<br />
5. Lockrod<br />
• Dual function:<br />
a. Acts as a wedge when advanced between locking balls,<br />
causing them to move outward in the ball canister and pushing<br />
the locking balls into the ball tracks of the cutting unit (not shown).<br />
b. Acts as a wedge when retracted using a raised, tapered key to<br />
force the bump-off pin against the cutting unit (not shown).<br />
6. Locking Balls (2)<br />
• Precision, chrome alloy-steel hardened balls used to transmit<br />
pull-back force to the cutting unit.<br />
7. Bump-Off Pin<br />
• Dual function:<br />
a. Releases cutting unit from the clamping mechanism.<br />
b. Prevents lockrod from rotating.<br />
8. Bump-Off Pin Retention Screws (2)<br />
• Secures bump-off pin in ball canister.<br />
M22 www.kennametal.com<br />
2<br />
1
KM Manual Clamping System • Four-Pin Design<br />
KM Manual Clamping Components • Functional Definitions<br />
1. Clamping Unit Body<br />
• Primary component of the clamping unit assembly,<br />
less additional hardware.<br />
www.kennametal.com<br />
9<br />
9<br />
2. Canister Screw<br />
• Secures screw canister to clamping unit body.<br />
3. Screw Canister<br />
• Main component of KM clamping mechanism holds and locates<br />
the locking balls and bump-off pin.<br />
4. Canister Pins (4)<br />
• Prevents canister from rotating.<br />
8<br />
5. Torque Screw<br />
• Rotation moves the lockrod:<br />
a. Clockwise rotation advances lockrod, securing<br />
cutting unit (not shown).<br />
b. Counterclockwise rotation retracts lockrod, releasing<br />
cutting unit (not shown).<br />
7<br />
7<br />
3<br />
4<br />
2<br />
6<br />
<strong>Technical</strong> <strong>Information</strong><br />
KM Manual Clamping System<br />
6. Lockrod<br />
• Dual function:<br />
a. Acts as a wedge when advanced between locking balls,<br />
causing them to move outward in the ball canister and pushing<br />
the locking balls into the ball tracks of the cutting unit (not shown).<br />
b. Acts as a wedge when retracted using a raised, tapered key to<br />
force the bump-off pin against the cutting unit (not shown).<br />
7. Locking Balls (2)<br />
• Precision, chrome alloy-steel hardened balls used to transmit<br />
pull-back force to the cutting unit.<br />
8. Bump-Off Pin<br />
• Dual function:<br />
a. Releases cutting unit from the clamping mechanism.<br />
b. Prevents lockrod from rotating.<br />
9. Bump-Off Pin Retention Screws (2)<br />
• Secures bump-off pin in ball canister.<br />
5<br />
1<br />
M23<br />
<strong>Technical</strong> <strong>Information</strong>
<strong>Technical</strong> <strong>Information</strong><br />
<strong>Technical</strong> <strong>Information</strong><br />
KM Manual Clamping System<br />
KM Manual Clamping Operating Instructions (KM32–KM80)<br />
Locking<br />
Before inserting the KM cutting unit into the clamping mechanism (Figure 1),<br />
clean the contact face and taper.<br />
KM Manual clamping units require a torque wrench for proper operation. Turning<br />
the torque screw clockwise locks the cutting unit in position. For maximum safety,<br />
tighten the torque screw to the specified torque. Using a torque wrench ensures<br />
that the proper clamping forces are exerted.<br />
KM Manual Clamping System • Operating Torque<br />
KM<br />
size<br />
torque<br />
(ft. lbs.)<br />
torque<br />
(Nm)<br />
Operating Position<br />
With the balls locked in position, and the face and self-locking taper<br />
fully engaged, the cutting unit and clamping unit are rigidly secured<br />
together (Figure 2).<br />
Unlocking<br />
Rotate the torque screw counterclockwise until initial resistance is felt. In this<br />
position, the locking balls are free of the cutting unit, but the taper interference is<br />
still holding the KM unit in the clamping unit. At this point, the bump-off pin is in<br />
position to free the cutting unit from the interference fit.<br />
Continue to rotate the torque screw slowly until the cutting unit is no longer<br />
making face contact (Figure 3) and is released from the taper. The torque screw<br />
will stop rotating and more resistance will be felt. Do not turn the torque screw<br />
any further.<br />
CAUTION<br />
Continuing to rotate the torque screw may damage<br />
the clamping components.<br />
actuation<br />
drive size<br />
KM32 7–9 10–12 5mm<br />
KM40 9–12 12–16 6mm<br />
KM50 20–25 27–34 10mm<br />
KM63 35–40 47–54 12mm<br />
KM80 58–63 79–85 14mm<br />
Figure 1<br />
Contact Face<br />
Taper Clockwise<br />
for Locking<br />
CAUTION<br />
Over tightening can cause damage to the clamping mechanism.<br />
Figure 2<br />
Figure 3<br />
Counterclockwise<br />
for Unlocking<br />
M24 www.kennametal.com
KM Manual Repair Package Components (KM32–KM80)<br />
KM Manual Repair Package Components • Functional Definitions<br />
1. Torque Screw<br />
2. Lockrod<br />
3. Locking Balls (2x)<br />
4. Bump-Off Pin<br />
5. O-Ring<br />
6. Bump-Off Pin Retention Screws (2x)<br />
Operator Maintenance:<br />
All KM Clamping Units showing damage must be replaced or rebuilt.<br />
Burrs and nicks should be removed by stoning and/or polishing.<br />
• Use KM Plugs to protect clamping units when not in use.<br />
• Use KM spindle wipers to clean clamping units.<br />
www.kennametal.com<br />
3<br />
5<br />
4<br />
1<br />
2<br />
6<br />
KM Manual Repair Packages<br />
<strong>Technical</strong> <strong>Information</strong><br />
KM Manual Clamping System<br />
catalog<br />
number<br />
3S order<br />
number<br />
3L order<br />
number<br />
KM32-PKG 3S or 3L 1023697 1023698<br />
KM40-PKG 3S or 3L 1023699 1023700<br />
KM50-PKG 3S or 3L 1023726 1023725<br />
KM63-PKG 3S or 3L 1013701 1013702<br />
KM80-PKG 3S or 3L. 1144980 1023701<br />
M25<br />
<strong>Technical</strong> <strong>Information</strong>
<strong>Technical</strong> <strong>Information</strong><br />
<strong>Technical</strong> <strong>Information</strong><br />
KM Manual Clamping System<br />
KM Manual Clamping Unit • Disassembly Procedures<br />
1. Remove the two socket-head cap screws that retain the bump-off pin<br />
(see Frame 1).<br />
2. Grip the exposed end of the bump-off pin with pliers and pull straight out.<br />
Some resistance may be felt due to the O-ring seal around the bump-off pin<br />
(see Frame 2).<br />
3. Using the appropriate metric hex wrench, remove the torque screw.<br />
The lockrod should come out with the torque screw. Separate the torque<br />
screw from the lockrod, remembering the lockrod has left-hand threads<br />
(see Frame 3 on next page).<br />
4. Remove the locking balls from within the canister. Grease can cause them<br />
to stick inside. Pushing the balls one at a time towards the center of the<br />
canister then turning the clamping unit upside down and tapping it against<br />
your palm will usually dislodge them. If you must hit the clamping unit harder,<br />
be certain you do not damage the gage or locking face of the unit. A small<br />
magnetic screwdriver also works well (see Frame 4 on next page).<br />
5. Normally, no further disassembly should be attempted. If the clamping unit<br />
body or canister has been damaged, it should be replaced with a new unit.<br />
You can also contact your Kennametal Sales office for instructions on how<br />
to send the unit to a Kennametal Repair facility.<br />
KM<br />
size<br />
hex<br />
size<br />
KM32 2mm<br />
KM40 2,5mm<br />
KM50 3mm<br />
KM63 5mm<br />
KM80 5mm<br />
Frame 1 Frame 2<br />
Tools Required<br />
• Hex wrenches.<br />
• Pliers.<br />
• Kennametal recommends and uses GLEITMO 805.<br />
• Clean towels or shop rags.<br />
• Solvent or degreaser that does not leave residue (used to clean inside the taper<br />
and canister). Should the unit become contaminated, you can use a degreasing<br />
agent or something similar to clean the surfaces.<br />
CAUTION<br />
DO NOT USE silicone cleaner or WD-40 -type lubricants.<br />
order<br />
lubricant<br />
number size<br />
GLEITMO 805 grease 1567575 500g cartridge<br />
GLEITMO 805 grease 1567577 1000g tin<br />
(continued)<br />
M26 www.kennametal.com
KM Manual Clamping Unit • Disassembly Procedures (continued)<br />
6. Clean locking balls, torque screw, lockrod, and bump-off pin of all<br />
grease and inspect for wear, burrs, or obvious damage. If rebuilding the<br />
unit with a repair parts package, we recommend using all new components<br />
contained in the kit. If you are not using the repair package, but are retiming<br />
or adjusting the unit, inspect the external threads on the torque screw and<br />
lockrod, the locking ball contact surfaces on the lockrod, and the mating<br />
surfaces between the lockrod and bump-off pin. Discard any components<br />
of questionable condition and replace with new ones. Note the condition<br />
of the raised taper key on the lockrod as you will need this later.<br />
www.kennametal.com<br />
<strong>Technical</strong> <strong>Information</strong><br />
KM Manual Clamping System<br />
7. Inspect inside the KM taper for damage and/or contamination. Clean the taper<br />
and canister with solvent. Allow the unit to dry before reassembling. Inspect the<br />
torque screw threads in the body for damage.<br />
8. If the unit is equipped for through-coolant capability, you may want to verify<br />
that the coolant passages are clear. Clean if required.<br />
KM<br />
torque screw<br />
size<br />
hex size<br />
KM32 5mm<br />
KM40 6mm<br />
KM50 10mm<br />
<strong>Information</strong><br />
KM63 12mm<br />
KM80 14mm<br />
Frame 3 Frame 4 <strong>Technical</strong><br />
M27
<strong>Technical</strong> <strong>Information</strong><br />
<strong>Technical</strong> <strong>Information</strong><br />
KM Manual Clamping System<br />
KM Manual Clamping Unit • Assembly/Timing Procedures<br />
1. Place a small amount of GLEITMO 805 grease into the canister where the<br />
locking balls make contact, paying particular attention to the inner top surface<br />
of the locking ball bores.<br />
2. Lightly coat both locking balls with grease. Insert the balls, one at a time,<br />
into the canister’s central bore until it bottoms, then move the ball outward<br />
into the locking ball bores, not the torque screw hole (see Frame 5).<br />
3. Lightly coat the threads of the lockrod and torque screw with grease and<br />
thread them together finger tight (left-hand threads). The torque screw and<br />
lockrod must remain tightly together during the reassembly procedure and<br />
rotated as one piece throughout (see Frame 6).<br />
4. Make sure the balls are pushed radially into the bores. Using the metric<br />
Allen or T-handle wrench, thread the torque screw lockrod assembly into<br />
the body until it makes soft contact with the balls. Be certain the torque<br />
screw and lockrod rotate together by looking down into the canister as<br />
you thread them. If the lockrod and torque screw become unthreaded,<br />
you should remove them, re-tighten, and start Step 4 again.<br />
5. Look into the canister through the bump-off pin bore and note the raised<br />
key on the lockrod. Position the key facing outward through the bump-off<br />
pin bore, centering it in the bore by backing out the torque screw only<br />
enough to properly align the key.<br />
6. Place a KM cutting unit into the clamping unit. If cutting unit does not<br />
drop into place, go to Step 7. If the cutting unit drops into place, remove<br />
it, push the balls radially back out into the ball bores, and turn the torque<br />
screw/lockrod assembly inward a full turn (360°). Repeat Step 6 as<br />
many times as necessary until the unit does not drop into the taper.<br />
Frame 5 Frame 6<br />
Tools Required<br />
• Hex wrenches.<br />
• Pliers.<br />
• Kennametal recommends and uses GLEITMO 805.<br />
• Clean towels or shop rags.<br />
CAUTION<br />
DO NOT USE silicone cleaner or WD-40 -type lubricants.<br />
order<br />
lubricant<br />
number size<br />
GLEITMO 805 grease 1567575 500g cartridge<br />
GLEITMO 805 grease 1567577 1000g tin<br />
(continued)<br />
M28 www.kennametal.com<br />
KM<br />
size<br />
torque screw<br />
hex size<br />
KM32 5mm<br />
KM40 6mm<br />
KM50 10mm<br />
KM63 12mm<br />
KM80 14mm
KM Manual Clamping Unit • Assembly/Timing Procedures (continued)<br />
7. Thread the torque screw/lockrod assembly outward one full turn (360°),<br />
making sure the raised key faces outward. Place a KM cutting unit into<br />
the clamping unit. It should drop into the taper easily. If it does not,<br />
repeat Step 7.<br />
8. Insert the bump-off pin without its O-ring into the bore, being certain the<br />
angled surface of the bump-off pin will ride on the angled surface of the<br />
lockrod (see Frame 7).<br />
9. When the bump-off pin is properly seated, its largest diameter should<br />
be below the end of the canister — it should not rotate. The pin is<br />
rotationally restrained by the lockrod key, in the bump-off pin keyway.<br />
10. If all is correct, remove the bump-off pin, install its O-ring, lightly coat with<br />
grease paying particular attention to the slot, and reinstall into the bore.<br />
www.kennametal.com<br />
<strong>Technical</strong> <strong>Information</strong><br />
KM Manual Clamping System<br />
11. Reinstall the socket-head cap screws that retain the bump-off pin<br />
(see Frame 8). Check for proper operation of the unit by pushing down<br />
on the end of the bump-off pin with your finger while tightening and<br />
loosening the torque screw through its full travel. You should feel the<br />
bump-off pin move in and out as the direction of the torque screw changes.<br />
12. As a final check, rotate the torque screw outward until it stops. Install a<br />
KM cutting unit and tighten the torque screw to the proper torque required<br />
for locking. Ensure that there is no air gap between the locking faces of<br />
the cutting unit and the clamping unit. Loosen the torque screw. Initially,<br />
resistance will be felt while loosening the screw, and again when bumping<br />
off the tool from the taper. Only use light force to loosen the screw after<br />
the tool has been bumped off. Do not force the torque screw loose after<br />
tool bump-off or damage may result. Remove the cutting unit and install<br />
protective plastic or steel plug.<br />
KM<br />
hex<br />
size<br />
size<br />
KM32 2mm<br />
KM40 2,5mm<br />
KM50 3mm<br />
<strong>Information</strong><br />
KM63 5mm<br />
KM80 5mm<br />
Frame 7 Frame 8 <strong>Technical</strong><br />
M29
<strong>Technical</strong> <strong>Information</strong><br />
<strong>Technical</strong> <strong>Information</strong><br />
KM-LOC Clamping System<br />
KM-LOC Clamping Units<br />
Operating Instructions<br />
All KM-LOC Clamping Units utilize disk springs to develop the correct clamping<br />
force. This clamping system does not require a torque wrench to achieve proper<br />
clamping force. The KM-LOC System provides consistent clamping forces<br />
designed to last 50,000 cycles.<br />
KM-LOC Locking Sequence<br />
Always ensure that the KM cutting unit and clamping unit are free of dirt and<br />
contaminants. When installing the cutting head into the clamping unit, note<br />
the key relations of the male and female tapers. The flange face will have<br />
about 1mm (.040") standoff from the gage face before lock up. If the amount<br />
of standoff is greater than this, the unit is either error proofed or the tapers<br />
are contaminated. Rotate the head 180° for correct, free-state standoff.<br />
Next, insert a wrench with the properly sized metric bit into the cam socket.<br />
Rotating the cam socket clockwise 140° (where it will stop) locks the head<br />
into the clamping unit. The dimples on both the cam and clamping unit body<br />
are aligned when a positive stop is reached.<br />
KM-LOC Unlocking Sequence<br />
Remove chips or foreign material from around the cutting unit flange and<br />
clamping body. Insert the metric bit into the cam and rotate counterclockwise to<br />
unlock the unit. During this procedure, the lockrod will make contact with the<br />
inside of the cutting unit (this could feel like a positive stop), continue the<br />
counterclockwise turn until the head moves apart from the gage face.<br />
When unlocked, a KM head will bump off. The KM System utilizes a 10:1<br />
self-locking taper that requires a mechanical release.<br />
orientation notch<br />
KM-LOC Activation Drive Size<br />
KM<br />
system size<br />
activation cam<br />
error proofing<br />
(continued)<br />
M30 www.kennametal.com<br />
drive<br />
size<br />
KM32 6mm<br />
KM40 8mm<br />
KM50 10mm<br />
KM63 10mm
KM-LOC Clamping Units (continued)<br />
The KM-LOC<br />
Under normal use, the KM-LOC unit is designed to last 50,000 cycles.<br />
The KM-LOC units are greased at the factory during assembly. To keep the<br />
unit functioning properly, it should be periodically greased and, if operating<br />
under normal conditions, done regularly every six months.<br />
How to Grease the KM-LOC<br />
Remove the M6 sealing screw from the front face of the lockrod and thread the<br />
grease fitting into the tapped hole. A grease fitting is in the spare parts package<br />
included with every KM-LOC clamping unit.<br />
Approximate grease amounts are as follows:<br />
KM32 ..............0.2–0.3 fl. oz<br />
KM40 ..............0.3–0.4 fl. oz.<br />
KM50 ..............0.5–0.6 fl .oz.<br />
KM63 ..............0.5–0.6 fl. oz.<br />
Kennametal uses and recommends GLEITMO 805, a white,<br />
high-performance grease paste.<br />
KM-LOC Mounting Wedges • Tightening Torque<br />
NOTE: Use a hex bit socket.<br />
www.kennametal.com<br />
<strong>Technical</strong> <strong>Information</strong><br />
KM-LOC Clamping System<br />
order<br />
lubricant<br />
number size<br />
GLEITMO 805 grease 1567575 500g cartridge<br />
GLEITMO 805 grease 1567577 1000g tin<br />
catalog<br />
number<br />
wedge screw<br />
hex size ft. lbs. Nm<br />
KM32CLSR/L2050K 4mm 10–14 14–18<br />
KM32CLSR/L1250B 4mm 10–14 14–18<br />
KM32CLSR/L1250C 4mm 10–14 14–18<br />
KM32CLSR/L1650C 4mm 10–14 14–18<br />
M31<br />
<strong>Technical</strong> <strong>Information</strong>
<strong>Technical</strong> <strong>Information</strong><br />
<strong>Technical</strong> <strong>Information</strong><br />
KM-LOC II Clamping System<br />
KM-LOC II Clamping Units<br />
Operating Instructions<br />
The KM-LOC II clamping system employs a cam and a pre-loaded disk spring<br />
pack to provide positive, stop-to-stop locking/unlocking in only 145º of<br />
movement. This clamping system does not require a torque wrench to achieve<br />
proper clamping force. The KM-LOC II clamping system provides consistent<br />
clamping forces designed to last 50,000 cycles.<br />
KM-LOC II Locking Sequence<br />
Always ensure that the KM cutting unit and clamping unit are free of dirt and<br />
contaminants. When installing the cutting head into the clamping unit, note<br />
the key relations of the male and female tapers. The flange face will have<br />
about 1mm (.040") standoff from the gage face before lock up. If the amount<br />
of standoff is greater than this, the unit is either error proofed or the tapers<br />
are contaminated. Rotate the head 180° for correct, free-state standoff.<br />
Next, insert a wrench with the properly sized metric bit into the cam socket.<br />
Rotating the cam socket clockwise 145° (where it will stop) locks the head<br />
into the clamping unit. The dimples on both the cam and clamping unit body<br />
are aligned when a positive stop is reached.<br />
KM-LOC II Unlocking Sequence<br />
Remove chips or foreign material from around the cutting unit flange and<br />
clamping body. Insert the metric bit into the cam and rotate counterclockwise to<br />
unlock the unit. During this procedure, the lockrod will make contact with the<br />
inside of the cutting unit (this could feel like a positive stop), continue the<br />
counterclockwise turn until the head moves apart from the gage face.<br />
When unlocked, a KM head will bump off. The KM System utilizes a 10:1<br />
self-locking taper that requires a mechanical release.<br />
orientation notch<br />
KM-LOC II Activation Drive Size<br />
KM<br />
system size<br />
activation cam<br />
error proofing<br />
(continued)<br />
M32 www.kennametal.com<br />
drive<br />
size<br />
KM32 6mm<br />
KM40 8mm<br />
KM50 10mm<br />
KM63 10mm
KM-LOC II Clamping Units (continued)<br />
The KM-LOC II<br />
Under normal use, the KM-LOC II unit is designed to last 50,000 cycles.<br />
The KM-LOC II units are greased at the factory during assembly. To keep the<br />
unit functioning properly, it should be periodically greased and, if operating<br />
under normal conditions, done regularly every six months.<br />
How to Grease the KM-LOC II<br />
Remove the standard M4 socket-set screw from the bottom of the cam hex,<br />
and thread the grease assembly into the tapped hole. An assembled grease fitting<br />
and adapter are in the spare parts package included with every clamping unit.<br />
Approximate grease amounts are as follows:<br />
KM32 ..............0.2–0.3 fl. oz<br />
KM40 ..............0.3–0.4 fl. oz.<br />
KM50 ..............0.5–0.6 fl .oz.<br />
KM63 ..............0.5–0.6 fl. oz.<br />
Kennametal uses and recommends GLEITMO 805, a white,<br />
high-performance grease paste.<br />
KM-LOC II Mounting Wedges • Tightening Torque<br />
NOTE: Use a six-point socket.<br />
www.kennametal.com<br />
<strong>Technical</strong> <strong>Information</strong><br />
KM-LOC II Clamping System<br />
order<br />
lubricant<br />
number size<br />
GLEITMO 805 grease 1567575 500g cartridge<br />
GLEITMO 805 grease 1567577 1000g tin<br />
catalog<br />
number<br />
wedge screw<br />
hex size ft. lbs. Nm<br />
KM40 CL2SR/L 1260B 6 30–34 41–46<br />
KM40 CL2SR/L 1660C 7 43–47 58–64<br />
KM40 CL2SR/L 1660D 7 43–47 58–64<br />
KM40 CL2SR/L 2060D 7 43–47 58–64<br />
KM40 CL2SR/L 2560M 7 43–47 58–64<br />
KM40 CL2SR/L 3260P 7 43–47 58–64<br />
KM50 CL2SR/L 1675D 7 43–47 58–64<br />
KM50 CL2SR/L 2075D 8 58–62 79–84<br />
KM50 CL2SR/L 2575M 7 43–47 58–64<br />
KM50 CL2SR/L 2575P 7 43–47 58–64<br />
KM63 CL2SR/L 2090E 8 58–62 79–84<br />
KM63 CL2SR/L 3290P 8 58–62 79–84<br />
M33<br />
<strong>Technical</strong> <strong>Information</strong>
<strong>Technical</strong> <strong>Information</strong><br />
<strong>Technical</strong> <strong>Information</strong><br />
KM Rapid Clamping System<br />
KM Rapid Clamping Units<br />
Operating Instructions<br />
The KM Rapid clamping system is a compact quick-change tooling system that<br />
does not require a torque wrench to achieve proper clamping force. The KM<br />
Rapid clamping unit spring pack supplies the correct clamping force while the<br />
cam permits quick and easy locking/unlocking of the KM cutting unit.<br />
KM Rapid Plus Clamping Units<br />
Operating Instructions<br />
The KM Rapid Plus clamping system is a compact cartridge quick-change tooling<br />
system that does not require a torque wrench to achieve proper clamping force.<br />
The KM Rapid Plus clamping unit spring pack supplies the correct clamping force<br />
while the cam permits quick and easy locking/unlocking of the KM cutting unit.<br />
KM Rapid Locking Sequence<br />
At the “unlock” position, which is marked on the housing, the cutting unit can be<br />
removed or fitted in the clamping unit. By moving the cam clockwise, the locking<br />
balls are pushed outwards and the face stand-off gets closed. Moving the cam<br />
further pushes the locking balls further outward and generates clamping force<br />
at the locating face. The handling force moves past the maximum position, then<br />
slightly back, to reach the “lock” position.<br />
KM Rapid Unlocking Sequence<br />
To unlock the cutting unit, turn the cam counterclockwise. In this position, the<br />
locking balls are free of the cutting unit, but the taper interference is still holding<br />
the KM cutting unit in the clamping unit. By turning the cam further to overcome<br />
the interference, the cutting unit will be released and can be removed. In any<br />
case, do not try to push too hard against the unlocking point because it will<br />
result in damage to the locating pin and the cam.<br />
The entire locking and unlocking sequence takes a few seconds.<br />
KM Rapid Plus Locking Sequence<br />
At the “unlock” position, the cutting head can be removed or fitted in the<br />
clamping unit. By moving the eccentric shaft clockwise, the axial lockrod is<br />
moving, the clamping balls are pushed outward, and the face stand-off is closed.<br />
Moving the eccentric shaft further pushes the locking ball over the axial lockrod<br />
further outward and generates clamping force at the locating face. The handling<br />
force moves past the maximum position, then slightly back, to reach the “lock”<br />
position. Do not move the cam further at this position.<br />
KM Rapid Plus Unlocking Sequence<br />
To unlock the cutting unit, turn the eccentric shaft counterclockwise. In this<br />
position, the locking balls are free of the clamping unit, but the taper interfence<br />
is still holding the cutting unit in the clamping unit. By turning the eccentric shaft<br />
further to overcome the interference, the cutting head will be released and can<br />
be removed.<br />
The entire locking and unlocking sequence takes a few seconds.<br />
M34 www.kennametal.com
Automatic Clamping System<br />
Operating Instructions<br />
The KM automatic clamping system uses a disk spring package to supply force<br />
to the lock rod — driving the locking balls and providing clamping force to the<br />
cutting unit. The mechanical advantage of the clamping mechanism is designed<br />
specifically for a given spring force to supply proper clamping force. Once the<br />
cutting unit is clamped in the KM automatic clamping unit, it is securely held<br />
in place until released by applying force to the end of the spring end cap.<br />
In most cases, this is accomplished using a hydraulic cylinder. KM automatic<br />
clamping units contain sealed coolant ports as well as a system for distributing<br />
air through the unit.<br />
Air serves two functions: (1) air is used to clean the taper and face area during<br />
tool change; (2) it is also used to detect improper tool change. Air is routed to<br />
the intersection of the taper and the face. If the faces of the cutting unit and the<br />
clamping unit do not totally seal after a tool change, air will continue to escape<br />
and can be used to detect a tool change fault. KM automatic clamping units are<br />
available in several configurations for application on a wide variety of machines.<br />
www.kennametal.com<br />
<strong>Technical</strong> <strong>Information</strong><br />
KM Automatic Clamping System<br />
M35<br />
<strong>Technical</strong> <strong>Information</strong>
<strong>Technical</strong> <strong>Information</strong><br />
<strong>Technical</strong> <strong>Information</strong><br />
KM ATC Configurations<br />
KM-TS • Kennametal Modular Tool Changing<br />
Automatic tool changer configuration<br />
KM-TS is engineered to provide machine tool builders the capability to design a<br />
machine around a very rigid and proven system while maintaining full<br />
automation. It is the ultimate in flexible tooling systems and is equipped with<br />
four holes in the V-groove.<br />
The next generation of multifunction mill-turn machines demand flexible and<br />
high-tech tooling systems. Previously, the V-groove in the KM system permitted<br />
automatic tool changing but without the capability for tool identification chips.<br />
Tool Changing Location Features<br />
• Two horizontally opposed holes in the V-groove for the tool changer<br />
and storage in the tool magazine. Within these two holes are<br />
counterbored holes that can be used for tool orientation.<br />
• Two vertically oriented holes in the V-groove for tool identification<br />
chip and balancing.<br />
Additional New Features<br />
• A standard hardness of 50–54 HRC makes the tool durable enough<br />
to withstand the forces generated during high-speed tool changes<br />
and enables long-term use.<br />
• Optimal toughness from the taper to the insert pocket seat ensures<br />
maximum protection against wear at all contact points and the highest<br />
stability under high cutting loads.<br />
• The KM-TS tools have a silver, satin-finished surface that provides<br />
durability and long-lasting appearance.<br />
O-ring<br />
KM<br />
size<br />
catalog<br />
number<br />
order<br />
number<br />
KM32TS OR00614070V90 1850414<br />
KM40TS OR00739070V90 1179959<br />
KM50TS OR00987103V90 1284041<br />
KM63TS OR01234139V90 1608616<br />
KM80TS OR01734139V90 1586813<br />
Summary of Benefits<br />
• A proven spindle interface for Daewoo ® , Nakamura-Tome , Takisawa ,<br />
and many other builders.<br />
• Full compatibility with KM63 and Kennametal UT63 tools and adapters.<br />
• Use with manual and fully automatic tool changing on lathes and modern<br />
mill/turn machines.<br />
• Precision-ground tool taper and locating face.<br />
• Optimal coolant supplied directly onto the cutting point, guaranteeing<br />
the highest-level of performance (see chart below).<br />
• For dry machining, the coolant hole can be easily closed with a screw.<br />
order<br />
number description<br />
1975161 M5 Coolant Nozzle<br />
M36 www.kennametal.com
KM63XMZ <br />
KM63XMZ has been engineered to work specifically on Mazak ® INTEGREX ®<br />
Mark IV Series of Integrex machines. The Mazak INTEGREX combines a<br />
high-powered turning center and a full-function machining center to produce<br />
parts in a single setup. KM63XMZ is an integral part of the success and<br />
ingenuity of these machines.<br />
A standard hardness of 50–54 HRC enables long-term use and durability<br />
to withstand the forces generated during high-speed tool changes. KM63XMZ<br />
standard material provides optimal toughness from the taper to the insert<br />
pocket seat. This ensures maximum protection against wear at all contact<br />
points and the highest stability under high cutting loads. The tools have a silver,<br />
satin-finished surface that provides a durable and long-lasting appearance.<br />
Conventional machine tools require multiple setups, extra manpower for part<br />
handling, in-process inventory, larger floor space, and increased tooling and<br />
workholding expenses.<br />
• KM63XMZ will help reduce your overall manufacturing cost with<br />
multitask piece part processing.<br />
• KM63XMZ will optimize your machining operations — however<br />
challenging your particular application!<br />
• The world’s most economical, rigid, and accurate modular<br />
quick-change tooling!<br />
• Dramatically reduce your machine downtime and increase productivity!<br />
• Large product selection for your machining needs!<br />
• Special design tools available for unique applications!<br />
• A proven tooling system for multitasking machines like the<br />
Mazak INTEGREX Machine Tool System!<br />
www.kennametal.com<br />
O-ring<br />
Automatic tool changer configuration<br />
KM<br />
size<br />
catalog<br />
number<br />
order<br />
number<br />
KM63XMZ OR01237103V90 1979353<br />
KM63XMZ Tool Orientation Specification<br />
Left-Hand Orientation<br />
For turning clockwise toward the main spindle.<br />
Catalog Number: KM63XMZMCLNLF12Y<br />
orientation notch<br />
Right-Hand Orientation<br />
For turning counterclockwise toward the main spindle.<br />
Catalog Number: KM63XMZMCLNR12Y<br />
<strong>Technical</strong> <strong>Information</strong><br />
KM XMZ Configurations<br />
orientation notch<br />
M37<br />
<strong>Technical</strong> <strong>Information</strong>
<strong>Technical</strong> <strong>Information</strong><br />
<strong>Technical</strong> <strong>Information</strong><br />
KM Application Data<br />
Operating Conditions<br />
The KM tooling joint is an extremely rigid and stable system that is specifically<br />
designed to supply consistent results. As with any mechanical coupling, KM has<br />
limits that, if exceeded, could result in mechanical damage to the joint and/or its<br />
components. To help you stay within these limits, Kennametal has established<br />
maximum safe tangential loads for each system size. These loads are described<br />
as a certain amount of force at the standard “F” and “L1” dimensions for each<br />
given system size.<br />
Example of Calculation:<br />
Where: P = rated tangential load<br />
K = empirical coefficient depending on<br />
KM system size and the units of measure<br />
P =<br />
KM32 K=190200<br />
KM40 K=383600<br />
KM50 K=887400<br />
KM63 K=1718000<br />
KM80 K=3085800<br />
K<br />
(0.8 L1) 2 + F 2<br />
Chart 1 F and L1 Dimensions (mm) vs. Tangential Loads (N)<br />
for KM32TS<br />
120<br />
Given: The KM integral shank boring bar, ordering code<br />
KM40TS S32G-MCLNR12<br />
Dimensions: L1 = 90mm (3.543")<br />
F = 22mm (0.866")<br />
Required: What is maximum permissible tangential load?<br />
M38 www.kennametal.com<br />
F<br />
(mm)<br />
P =<br />
100<br />
80<br />
60<br />
40<br />
20<br />
4000<br />
4700<br />
5400<br />
0<br />
0 20 40 60 80 100 120 140<br />
383600<br />
L1 (mm)<br />
Example<br />
IMPORTANT<br />
<strong>Information</strong> shown on the following charts was developed exclusively for use with KM tooling in static conditions. Do not use for any other tooling<br />
system because the results will not apply. To account for cutting force fluctuations in dynamic conditions, a reduction of 20–30% should be applied<br />
to the loads shown in charts.<br />
3400<br />
2700<br />
(0.8 x 90) 2 + 22 2<br />
2400<br />
2000<br />
1700<br />
= 5095 N<br />
(continued)
Operating Conditions (continued)<br />
IMPORTANT<br />
<strong>Information</strong> shown on the following charts was developed exclusively for use with KM tooling in static conditions. Do not use for any other tooling<br />
system because the results will not apply. To account for cutting force fluctuations in dynamic conditions, a reduction of 20–30% should be applied<br />
to the loads shown in charts.<br />
The following example illustrates how to use Charts 1, 3, 5, 7, and 9<br />
Safe cutting conditions are achieved when the actual tangential load that<br />
is being put on the KM tooling does not exceed the maximum permissible<br />
tangential force. To help you determine the approximate value of your<br />
actual tangential force, Charts 2, 4, 6, and 8 have been developed<br />
(pages K26–K35). They show the relationship between depth of cut<br />
and feed rate at various tangential forces.<br />
www.kennametal.com<br />
Given: KM40 integral shank boring bar, ordering code KM40TS-S32G-MCLNR12<br />
Dimensions: KM40 integral shank boring bar, ordering code KM40TS-S32G-MCLNR12 — L1 = 90mm, F = 22mm<br />
Required: What is maximum permissible tangential load?<br />
Solution: To determine the tangential load:<br />
a) Determine the correct chart to use. (This is a KM40 tool, so use Chart 3).<br />
b) Find the intersection point of the two lines that correspond to the dimensions<br />
L1 = 90mm, F = 22mm. These two lines intersect just above the 6670 N (1500 lbs) curve.<br />
c) The permissible tangential load is the approximate load at the point of intersection.<br />
The point of intersection is at approximately 6890 N (1550 lbs).<br />
<strong>Technical</strong> <strong>Information</strong><br />
KM Application Data<br />
As you can see from the calculation, the actual value is 6790 N (1528 lbs). Small variations are to be expected from reading the approximate location on the chart<br />
but should be inconsequential.<br />
The following example illustrates how to use Charts 2, 4, 6, 8, and 10<br />
Given: KM40 integral shank boring bar, ordering code KM40TS-S32G-MCLNR12<br />
feed rate: 0.016 IPR<br />
depth of cut: .200" (doc)<br />
Required: What is approximate tangential force?<br />
Solution: To determine the tangential force:<br />
a) Determine the correct chart to use. (This is a KM40 tool, so use Chart 4).<br />
b) Find the intersection point of the two lines that correspond to the 0.016 IPR<br />
feed rate and the .200" doc.<br />
c) The approximate tangential force is the force at the point of intersection.<br />
The point of intersection is at approximately 4450 N (1000 lbs).<br />
Please remember that these are approximate values and should be used<br />
only as a reference. If there is any doubt whether these charts are<br />
accurate enough, the actual cutting force should be calculated.<br />
They are recommended when using standard CNMG and TNMG insert<br />
geometries to machine plain carbon steels (AISI 1000 series), most alloy<br />
steels (AISI 4000 series), and some tool and stainless steels (H11, 316).<br />
These charts were designed to determine conditions within the limits of<br />
the various KM tooling system sizes. However, in actual cutting conditions,<br />
there are many other limitations, such as insert strength or excessive<br />
overhangs, that may limit the cutting forces to values far lower than<br />
those represented in the charts.<br />
M39<br />
<strong>Technical</strong> <strong>Information</strong>
<strong>Technical</strong> <strong>Information</strong><br />
<strong>Technical</strong> <strong>Information</strong><br />
KM Application Data<br />
Operating Conditions • KM32TS • Metric<br />
IMPORTANT<br />
<strong>Information</strong> shown on the following charts was developed exclusively for use with KM tooling in static conditions. Do not use for any other tooling<br />
system because the results will not apply. To account for cutting force fluctuations in dynamic conditions, a reduction of 20–30% should be applied<br />
to the loads shown in charts.<br />
Chart 1<br />
F<br />
(mm)<br />
Chart 2<br />
doc<br />
(mm)<br />
120<br />
100<br />
80<br />
60<br />
40<br />
20<br />
9,00<br />
7,50<br />
6,25<br />
5,00<br />
3,75<br />
2,50<br />
1,25<br />
F and L1 Dimensions (mm) vs. Tangential Loads (N)<br />
for KM32TS<br />
0<br />
0 20 40 60 80<br />
L1 (mm)<br />
100 120 140<br />
0<br />
5400<br />
4000<br />
4700<br />
Depth of Cut (mm) and Feed Rate (mm/rev) vs. Tangential Forces (N)<br />
for KM32TS<br />
1700<br />
3400<br />
2700<br />
3400<br />
2700<br />
2400<br />
2000<br />
0 0,10 0,20 0,30 0,40 0,50 0,60 0,70 0,80 0,90 1,00<br />
feed rate (mm/rev)<br />
M40 www.kennametal.com<br />
2400<br />
4000<br />
2000<br />
4700<br />
5400<br />
1700
Operating Conditions • KM32TS • Inch<br />
www.kennametal.com<br />
<strong>Technical</strong> <strong>Information</strong><br />
KM Application Data<br />
IMPORTANT<br />
<strong>Information</strong> shown on the following charts was developed exclusively for use with KM tooling in static conditions. Do not use for any other tooling<br />
system because the results will not apply. To account for cutting force fluctuations in dynamic conditions, a reduction of 20–30% should be applied<br />
to the loads shown in charts.<br />
Chart 1<br />
F<br />
(inch)<br />
Chart 2<br />
doc<br />
(inch)<br />
4.8<br />
4.0<br />
3.2<br />
2.4<br />
1.6<br />
0.8<br />
0.35<br />
0.30<br />
0.25<br />
0.20<br />
0.15<br />
0.10<br />
0.05<br />
F and L1 Dimensions (inch) vs. Tangential Loads (lbs)<br />
for KM32TS<br />
0<br />
0 1.0 2.0 3.0<br />
L1 (inch)<br />
4.0 5.0 5.5<br />
0<br />
1200<br />
1050<br />
Depth of Cut (inch) and Feed Rate (IPR) vs. Tangential Forces (lbs)<br />
for KM32TS<br />
400<br />
900<br />
500<br />
750<br />
550<br />
600<br />
600<br />
550<br />
750<br />
0 0.005 0.010 0.015 0.020 0.025 0.030 0.035 0.040<br />
900<br />
500<br />
feed rate (IPR)<br />
400<br />
1200<br />
1050<br />
M41<br />
<strong>Technical</strong> <strong>Information</strong>
<strong>Technical</strong> <strong>Information</strong><br />
<strong>Technical</strong> <strong>Information</strong><br />
KM Application Data<br />
Operating Conditions • KM40TS • Metric<br />
IMPORTANT<br />
<strong>Information</strong> shown on the following charts was developed exclusively for use with KM tooling in static conditions. Do not use for any other tooling<br />
system because the results will not apply. To account for cutting force fluctuations in dynamic conditions, a reduction of 20–30% should be applied<br />
to the loads shown in charts.<br />
Chart 3<br />
F<br />
(mm)<br />
Chart 4<br />
doc<br />
(mm)<br />
140<br />
120<br />
100<br />
80<br />
60<br />
40<br />
20<br />
11,50<br />
10,00<br />
9,00<br />
7,50<br />
6,25<br />
5,00<br />
3,75<br />
2,50<br />
1,25<br />
F and L1 Dimensions (mm) vs. Tangential Loads (N)<br />
for KM40TS<br />
0<br />
0 20 40 60 80<br />
L1 (mm)<br />
100 120 140 160<br />
0<br />
9000<br />
8000<br />
7000<br />
6000<br />
Depth of Cut (mm) and Feed Rate (mm/rev) vs. Tangential Forces (N)<br />
for KM40TS<br />
3000<br />
0 0,10 0,20 0,30 0,40 0,50 0,60 0,70 0,80 0,90 1,00<br />
feed rate (mm/rev)<br />
M42 www.kennametal.com<br />
5000<br />
4000<br />
3400<br />
4000<br />
3400<br />
9000<br />
8000<br />
7000<br />
6000<br />
5000<br />
3000
Operating Conditions • KM40TS • Inch<br />
Chart 3<br />
F<br />
(inch)<br />
Chart 4<br />
doc<br />
(inch)<br />
5.5<br />
4.8<br />
4.0<br />
3.2<br />
2.4<br />
1.6<br />
0.8<br />
0.45<br />
0.40<br />
0.35<br />
0.30<br />
0.25<br />
0.20<br />
0.15<br />
0.10<br />
0.05<br />
www.kennametal.com<br />
F and L1 Dimensions (inch) vs. Tangential Loads (lbs)<br />
for KM40TS<br />
0<br />
0 1.0 2.0 3.0<br />
L1 (inch)<br />
4.0 5.0 6.0<br />
0<br />
1100<br />
Depth of Cut (inch) and Feed Rate (IPR) vs. Tangential Forces (lbs)<br />
for KM40TS<br />
900<br />
feed rate (ipr)<br />
<strong>Technical</strong> <strong>Information</strong><br />
KM Application Data<br />
IMPORTANT<br />
<strong>Information</strong> shown on the following charts was developed exclusively for use with KM tooling in static conditions. Do not use for any other tooling<br />
system because the results will not apply. To account for cutting force fluctuations in dynamic conditions, a reduction of 20–30% should be applied<br />
to the loads shown in charts.<br />
1350<br />
1600<br />
1800<br />
2000<br />
700<br />
750<br />
900<br />
0 0.005 0.010 0.015 0.020 0.025 0.030 0.035 0.040<br />
1100<br />
750<br />
700<br />
1600<br />
1350<br />
2000<br />
1800<br />
M43<br />
<strong>Technical</strong> <strong>Information</strong>
<strong>Technical</strong> <strong>Information</strong><br />
<strong>Technical</strong> <strong>Information</strong><br />
KM Application Data<br />
Operating Conditions • KM50TS • Metric<br />
IMPORTANT<br />
<strong>Information</strong> shown on the following charts was developed exclusively for use with KM tooling in static conditions. Do not use for any other tooling<br />
system because the results will not apply. To account for cutting force fluctuations in dynamic conditions, a reduction of 20–30% should be applied<br />
to the loads shown in charts.<br />
Chart 5<br />
F<br />
(mm)<br />
Chart 6<br />
doc<br />
(mm)<br />
250<br />
200<br />
150<br />
100<br />
50<br />
15,00<br />
12,50<br />
10,00<br />
7,50<br />
5,00<br />
2,50<br />
F and L1 Dimensions (mm) vs. Tangential Loads (N)<br />
for KM50TS<br />
0<br />
0 30 60 90 120 150 180 210 240 270<br />
L1 (mm)<br />
0<br />
8400<br />
10000<br />
13400<br />
16800<br />
Depth of Cut (mm) and Feed Rate (mm/rev) vs. Tangential Forces (N)<br />
for KM50TS<br />
10000<br />
8400<br />
7000<br />
6000<br />
5000<br />
4000<br />
0 0,10 0,20 0,30 0,40 0,50 0,60 0,70 0,80 0,90 1,00 1,10 1,20 1,25<br />
feed rate (mm/rev)<br />
M44 www.kennametal.com<br />
7000<br />
6000<br />
5000<br />
4000<br />
13400<br />
16800
Operating Conditions • KM50TS • Inch<br />
Chart 5<br />
F<br />
(inch)<br />
Chart 6<br />
doc<br />
(inch)<br />
10.0<br />
8.0<br />
6.0<br />
4.0<br />
2.0<br />
www.kennametal.com<br />
F and L1 Dimensions (inch) vs. Tangential Loads (lbs)<br />
for KM50TS<br />
0<br />
0 1.0 2.0 3.0 4.0 5.0 6.0 7.0 8.0 9.0 10.0<br />
L1 (inch)<br />
Depth of Cut (inch) and Feed Rate (IPR) vs. Tangential Forces (lbs)<br />
for KM50TS<br />
feed rate (IPR)<br />
<strong>Technical</strong> <strong>Information</strong><br />
KM Application Data<br />
IMPORTANT<br />
<strong>Information</strong> shown on the following charts was developed exclusively for use with KM tooling in static conditions. Do not use for any other tooling<br />
system because the results will not apply. To account for cutting force fluctuations in dynamic conditions, a reduction of 20–30% should be applied<br />
to the loads shown in charts.<br />
0.60<br />
0.50<br />
0.40<br />
0.30<br />
0.20<br />
0.10<br />
0<br />
3000<br />
3800<br />
2300<br />
1900<br />
1600<br />
1400<br />
1900<br />
1600<br />
1400<br />
1200<br />
900<br />
0 0.005 0.010 0.015 0.020 0.025 0.030 0.035 0.040 0.045 0.050<br />
1200<br />
2300<br />
900<br />
3000<br />
3800<br />
M45<br />
<strong>Technical</strong> <strong>Information</strong>
<strong>Technical</strong> <strong>Information</strong><br />
<strong>Technical</strong> <strong>Information</strong><br />
KM Application Data<br />
Operating Conditions • KM63TS and KM63XMZ • Metric<br />
IMPORTANT<br />
<strong>Information</strong> shown on the following charts was developed exclusively for use with KM tooling in static conditions. Do not use for any other tooling<br />
system because the results will not apply. To account for cutting force fluctuations in dynamic conditions, a reduction of 20–30% should be applied<br />
to the loads shown in charts.<br />
Chart 7<br />
F<br />
(mm)<br />
Chart 8<br />
doc<br />
(mm)<br />
400<br />
350<br />
300<br />
250<br />
200<br />
150<br />
100<br />
50<br />
20,00<br />
17,50<br />
15,00<br />
12,50<br />
10,00<br />
7,50<br />
5,00<br />
2,50<br />
F and L1 Dimensions (mm) vs. Tangential Loads (N)<br />
for KM63TS and KM63XMZ<br />
0<br />
0 40 80 120 160 200 240 280 320 360 400 440<br />
L1 (mm)<br />
0<br />
13400<br />
16700<br />
20000<br />
26700<br />
10000<br />
8400<br />
Depth of Cut (mm) and Feed Rate (mm/rev) vs. Tangential Forces (N)<br />
for KM63TS and KM63XMZ<br />
0 0,10 0,20 0,30 0,40 0,50 0,60 0,70 0,80 0,90 1,00 1,10 1,20 1,30 1,40 1,50<br />
feed rate (mm/rev)<br />
M46 www.kennametal.com<br />
6700<br />
10000<br />
8400<br />
6700<br />
5000<br />
5000<br />
20000<br />
16700<br />
13400<br />
26700
Operating Conditions • KM63TS and KM63XMZ • Inch<br />
Chart 7<br />
F<br />
(inch)<br />
Chart 8<br />
doc<br />
(inch)<br />
16.0<br />
14.0<br />
12.0<br />
10.0<br />
8.0<br />
6.0<br />
4.0<br />
2.0<br />
www.kennametal.com<br />
0<br />
0.80<br />
0.70<br />
0.60<br />
0.50<br />
0.40<br />
0.30<br />
0.20<br />
0.10<br />
0<br />
F and L1 Dimensions (inch) vs. Tangential Loads (lbs)<br />
for KM63TS and KM63XMZ<br />
L1 (inch)<br />
Depth of Cut (inch) and Feed Rate (IPR) vs. Tangential Forces (lbs)<br />
for KM63TS and KM63XMZ<br />
feed rate (IPR)<br />
<strong>Technical</strong> <strong>Information</strong><br />
KM Application Data<br />
IMPORTANT<br />
<strong>Information</strong> shown on the following charts was developed exclusively for use with KM tooling in static conditions. Do not use for any other tooling<br />
system because the results will not apply. To account for cutting force fluctuations in dynamic conditions, a reduction of 20–30% should be applied<br />
to the loads shown in charts.<br />
6000<br />
4500<br />
3800<br />
3000<br />
2300<br />
1900<br />
0 1.5 3.0 4.5 6.0 7.5 9.0 10.5 12.0 13.5 15.0 16.5<br />
2300<br />
1900<br />
1500<br />
1200<br />
0 0.005 0.010 0.015 0.020 0.025 0.030 0.035 0.040 0.045 0.050 0.055 0.060<br />
1500<br />
3000<br />
3800<br />
4500<br />
1200<br />
6000<br />
M47<br />
<strong>Technical</strong> <strong>Information</strong>
<strong>Technical</strong> <strong>Information</strong><br />
<strong>Technical</strong> <strong>Information</strong><br />
KM Application Data<br />
Operating Conditions • KM80TS and KM80ATC • Metric<br />
IMPORTANT<br />
<strong>Information</strong> shown on the following charts was developed exclusively for use with KM tooling in static conditions. Do not use for any other tooling<br />
system because the results will not apply. To account for cutting force fluctuations in dynamic conditions, a reduction of 20–30% should be applied<br />
to the loads shown in charts.<br />
Chart 9<br />
F<br />
(mm)<br />
Chart 10<br />
doc<br />
(mm)<br />
400<br />
350<br />
300<br />
250<br />
F and L1 Dimensions (mm) vs. Tangential Loads (N)<br />
for KM80TS and KM80ATC<br />
200<br />
9000<br />
150<br />
11500<br />
15000<br />
100<br />
19000<br />
23000<br />
50<br />
30000<br />
27000<br />
38000<br />
0<br />
0 40 80 120 160 200 240 280 320 360 400 440<br />
L1 (mm)<br />
30<br />
27<br />
24<br />
21<br />
18<br />
15<br />
12<br />
9<br />
6<br />
3<br />
0<br />
Depth of Cut (mm) and Feed Rate (mm/rev) vs. Tangential Forces (N)<br />
for KM80TS and KM80ATC<br />
27000<br />
23000<br />
19000<br />
15000<br />
11500<br />
9000<br />
0 0,25 0,50 0,75 1,00 1,25 1,50 1,75 2,00 2,25 2,50<br />
feed rate (mm/rev)<br />
M48 www.kennametal.com<br />
30000<br />
38000
Operating Conditions • KM80TS and KM80ATC • Inch<br />
Chart 9<br />
F<br />
(inch)<br />
Chart 10<br />
doc<br />
(inch)<br />
16.0<br />
14.0<br />
12.0<br />
10.0<br />
8.0<br />
www.kennametal.com<br />
F and L1 Dimensions (inch) vs. Tangential Loads (lbs)<br />
for KM80TS and KM80ATC<br />
Depth of Cut (inch) and Feed Rate (IPR) vs. Tangential Forces (lbs)<br />
for KM80TS and KM80ATC<br />
feed rate (ipr)<br />
<strong>Technical</strong> <strong>Information</strong><br />
KM Application Data<br />
IMPORTANT<br />
<strong>Information</strong> shown on the following charts was developed exclusively for use with KM tooling in static conditions. Do not use for any other tooling<br />
system because the results will not apply. To account for cutting force fluctuations in dynamic conditions, a reduction of 20–30% should be applied<br />
to the loads shown in charts.<br />
6.0<br />
2700<br />
3400<br />
4.0<br />
4000<br />
5100<br />
2.0<br />
5900<br />
6800<br />
0<br />
8500<br />
0 1.5 3.0 4.5 6.0 7.5 9.0 10.5 12.0 13.5 15.0 16.5<br />
L1 (inch)<br />
1.20<br />
1.00<br />
0.90<br />
0.80<br />
0.70<br />
0.60<br />
0.50<br />
0.35<br />
0.25<br />
0.15<br />
0<br />
6800<br />
5900<br />
5100<br />
4000<br />
3400<br />
2700<br />
2000<br />
0 0.01 0.02 0.03 0.04 0.05 0.06 0.07 0.08 0.09 0.10<br />
2000<br />
8500<br />
M49<br />
<strong>Technical</strong> <strong>Information</strong>
<strong>Technical</strong> <strong>Information</strong><br />
<strong>Technical</strong> <strong>Information</strong><br />
KM Application Data<br />
VDI Application Guide<br />
left-hand KM units and bars<br />
Clockwise Spindle Rotation<br />
VDI Clamp Wedge • Top VDI Clamp Wedge • Bottom<br />
RCM RCM1<br />
Counterclockwise Spindle Rotation<br />
left-hand KM units and bars<br />
VDI Clamp Wedge • Top VDI Clamp Wedge • Bottom<br />
RCM RCM1<br />
LCM LCM1<br />
LCM LCM1<br />
right-hand KM units and bars right-hand KM units and bars<br />
M50 www.kennametal.com
Mounting Details • NCM Square Shank Conversion<br />
Toolholder Replacements • Metric<br />
*For MCLNR/L holders.<br />
Toolholder Replacements • Inch<br />
*For MCLNR/L holders.<br />
www.kennametal.com<br />
KM Toolholder Replacement — Square Shank Toolholder — Style MCLNL shown<br />
NOTE: F equals the dimension from the centerline of the KM cutting unit over the nose radius of the gage insert.<br />
F2 equals the dimension from the back of the clamping unit to the centerline of the KM cutting unit (see column F2 above).<br />
The offset is identical with most KM cutting units, except for positive lead angle units and neutral units.<br />
<strong>Technical</strong> <strong>Information</strong><br />
KM Application Data<br />
KM<br />
replacement unit<br />
square shank<br />
equivalent B* B H L1 F F2<br />
KM32-NCM4040 20 x 20 20 40 40 45 22 23<br />
KM32-NCM5040 25 x 25 25 40 50 45 22 23<br />
KM40-NCM5044 25 x 25 25 44 50 40 27 23<br />
KM40-NCM6444 32 x 32 32 44 64 40 27 23<br />
KM50-NCM6454 32 x 32 32 54 64 50 35 28<br />
KM<br />
replacement unit<br />
square shank<br />
equivalent B* B H L1 F F2<br />
KM32-NCM2425 3/4 x 3/4 3/4 1.562 1.500 1.378 0.866 0.884<br />
KM32-NCM3225 1 x 1 1 1.562 2.000 1.378 0.866 0.884<br />
KM40-NCM3228 1 x 1 1 1.750 2.000 1.575 1.063 0.937<br />
KM40-NCM4028 1-1/4 x 1-1/4 1-1/4 1.750 2.500 1.575 1.063 0.937<br />
KM50-NCM4034 1-1/4 x 1-1/4 1-1/4 2.125 2.500 1.969 1.378 1.122<br />
M51<br />
<strong>Technical</strong> <strong>Information</strong>
<strong>Technical</strong> <strong>Information</strong><br />
<strong>Technical</strong> <strong>Information</strong><br />
KM Tooling Mounting Dimensions<br />
KM Manual NCM-F Flanges<br />
KM<br />
size D1 D2 D3 D4 D5 D6 F L1 L2 L3 L4 L5 L6 L7 L8 L9 B G W1 W2 O-ring<br />
KM32<br />
32,02 30,30 24,00<br />
1.261 1.193 0.945<br />
43,00<br />
1.693<br />
4,00<br />
0.157<br />
6,370/<br />
6,348<br />
.2508/<br />
.2499<br />
18,01 26,37 25,20 0,50 21,50 17,61 12,33 11,18 11,00 11,51 11,00<br />
0.709 1.038 0.992 0.020 0.847 0.693 0.486 0.440 0.433 0.453 0.433<br />
M6 70º 35º OR00987103V75<br />
KM40<br />
40,02 35,51 29,01<br />
1.575 1.398 1.142<br />
54,00<br />
2.126<br />
5,00<br />
0.197<br />
6,370/<br />
6,348<br />
.2508/<br />
.2499<br />
22,00 31,88 30,61 0,80 27,00 22,12 15,49 11,18 18,01 12,75 12,70<br />
0.866 1.255 1.205 0.031 1.063 0.871 0.610 0.440 0.709 0.502 0.500<br />
M8 70º 35º OR01174103V75<br />
KM50<br />
50,03 42,80 37,01<br />
1.970 1.685 1.457<br />
67,01<br />
2.638<br />
6,50<br />
0.256<br />
7,958/<br />
7,935<br />
.3133/<br />
.3124<br />
27,51 39,88 38,61 1,00 33,50 27,44 19,22 12,70 18,01 18,24 17,50<br />
M10<br />
1.083 1.570 1.070 0.039 1.319 1.080 0.757 0.500 0.709 0.718 0.689<br />
70º 35º OR1487103V75<br />
KM63<br />
63,03 53,90 48,01<br />
2.481 2.122 1.890<br />
81,99<br />
3.228<br />
8,00<br />
0.315<br />
14,079/<br />
14,054<br />
.5543/<br />
.5533<br />
35,99 46,89 45,62 1,50 41,00 31,70 25,99 19,99 35,00 23,50 21,49<br />
M12 78º42' 39º21' OR01925103V75<br />
1.417 1.846 1.796 0.059 1.614 1.248 1.023 0.787 1.378 0.925 0.846<br />
KM80<br />
80,03 66,60 60,00 105,00<br />
3.151 2.622 2.362 4.134<br />
9,00<br />
0.354<br />
16,079/<br />
16,054<br />
.6330/<br />
.6320<br />
45,00 58,39 57,12 1,50 52,50 41,61 32,01 25,00 50,00 23,50 23,00<br />
M16 75º8'<br />
1.772 2.300 2.249 0.059 2.067 1.638 1.260 0.984 1.969 0.925 0.906<br />
37º34' OR02425103V75<br />
NOTE: Contact Kennametal for the latest dimensional data.<br />
max thru hole<br />
min coolant supply<br />
M52 www.kennametal.com<br />
o-ring
KM LOC-II CL2NS/T-EF Flanges • KM Manual NCM-EF Flanges<br />
www.kennametal.com<br />
max thru hole<br />
min coolant supply<br />
<strong>Technical</strong> <strong>Information</strong><br />
KM Tooling Mounting Dimensions<br />
KM<br />
size D1 D2 D3 D4 D5 D6 F L1 L2 L3 L4 L5 L6 L7 L8 G W1 W2 O-ring<br />
KM32 32,02 30,30 24,00 43,00 4,00 6,370/6,348 18,01 13,87 12,70 0,50 21,50 17,61 12,33 11,18 11,00 1.261 1.193 0.945 1.693 0.157 .2508/.2499 0.709 0.546 0.500 0.020 0.847 0.693 0.486 0.440 0.433<br />
M6 70º 35º OR00987103V75<br />
KM40 40,02 35,51 29,01 54,00 5,00 6,370/6,348 22,00 16,89 15,62 0,80 27,00 22,12 15,49 11,18 18,01 M8 70º 35º OR01174103V75<br />
1.575 1.398 1.142 2.126 0.197 .2508/.2499 0.866 0.665 0.615 0.031 1.063 0.871 0.610 0.440 0.709<br />
KM50 50,03 42,80 37,01 67,01 6,50 7,958/7,935 27,51 21,87 20,60 1,00 33,50 27,44 19,22 12,70 18,01 M10 70º 35º OR1487103V75<br />
1.97 1.685 1.457 2.638 0.256 .3133/.3124 1.083 0.861 0.811 0.039 1.319 1.080 0.757 0.500 0.709<br />
KM63 63,03 53,90 48,01 81,99 8,00 14,079/14,054 35,99 21,87 20,60 1,50 41,00 31,70 25,99 19,99 30,00 M12 78º42' 39º21' OR01925103V75<br />
2.481 2.122 1.890 3.228 0.315 .5543/.5533 1.417 0.861 0.811 0.059 1.614 1.248 1.023 0.787 1.181<br />
KM80 80,03 66,60 60,00 105,00 9,00 16,079/16,054 45,00 26,89 25,62 1,50 52,50 41,61 32,01 25,00 50,00 M16 75º8' 37º34' OR02425103V75<br />
3.151 2.622 2.362 4.134 0.354 .6330/.6320 1.772 1.059 1.009 0.059 2.067 1.638 1.260 0.984 1.969<br />
o-ring<br />
M53<br />
<strong>Technical</strong> <strong>Information</strong>
<strong>Technical</strong> <strong>Information</strong><br />
<strong>Technical</strong> <strong>Information</strong><br />
KM Tooling Mounting Dimensions<br />
KM Rapid RNS-EF<br />
KM<br />
size D4 D5 H11 D6 L3 L4 L5 L6 L7 L8 L9 min G<br />
KM40 40 10 5 16 21,7 27 13 12 15 44 M8<br />
KM50 50 12 6,5 20 28,7 35 16 14 20 46 M10<br />
KM63 63 14 8 26 31,7 41 20 16 24 52 M12<br />
NOTE: Chart values shown are metric.<br />
M54 www.kennametal.com
KM Rapid Plus RPNT-F<br />
www.kennametal.com<br />
<strong>Technical</strong> <strong>Information</strong><br />
KM Tooling Mounting Dimensions<br />
KM<br />
size D D2 D3 D4 D5 D6 L4 L5 L6 L7 L8 L9 L10 L11 L12 L13 L14 G1 G2<br />
screw<br />
DIN-ISO 7380<br />
KM40 40 30 6 13.5 17.2 5 16 21 24 12 46 80 15 20.5 34.5 25.5 12.5 M8 M6 M6x6<br />
KM50 50 40 6 18.5 22.2 8 20 25.5 29.2 12 59 105 25 26 43.8 33.5 16.5 M10 M8 M8x10<br />
KM63 63 45 10 24.5 28.5 8 26 31.7 38.5 20 18 120 30 35 58.5 41.3 19.5 M12 M8 M8x10<br />
NOTE: Chart values shown are metric.<br />
M55<br />
<strong>Technical</strong> <strong>Information</strong>
<strong>Technical</strong> <strong>Information</strong><br />
<strong>Technical</strong> <strong>Information</strong><br />
KM Tooling Mounting Dimensions<br />
KM-LOC CLNS/T-EF<br />
D5<br />
coolant<br />
supply<br />
o-rings<br />
KM<br />
size D1 D2 D3 D4 L1 L2 L3 L4 L5 L6 L7 L8 B G H W1 W2 O-ring<br />
KM32<br />
32,00<br />
1.260<br />
30,00<br />
1.181<br />
43,00<br />
1.693<br />
6,35<br />
0.250<br />
30,00<br />
1.181<br />
10,00<br />
0.394<br />
11,30<br />
0.445<br />
16,15<br />
0.646<br />
17,6<br />
0.693<br />
12,30<br />
0.484<br />
19,50<br />
0.768<br />
11,50<br />
0.453<br />
40,00<br />
1.575<br />
M6 60,00 70º 35º OR00145070V75<br />
KM40<br />
40,00<br />
1.575<br />
36,00<br />
1.417<br />
54,00<br />
2.126<br />
6,35<br />
0.250<br />
44,00<br />
1.732<br />
12,00<br />
0.472<br />
14,18<br />
0,558<br />
19,56<br />
0,770<br />
22,10<br />
0.870<br />
15,50<br />
0.610<br />
22,50<br />
0.886<br />
11,50<br />
0.453<br />
48,00<br />
1.890<br />
M8 70,00 70º 35º OR00176070V75<br />
KM50<br />
50,00<br />
1.969<br />
47,00<br />
1.850<br />
67,00<br />
2.638<br />
7,95<br />
0.313<br />
49,00<br />
1.929<br />
14,00<br />
0.551<br />
18,25<br />
0.719<br />
23,90<br />
0.941<br />
27,40<br />
1.079<br />
19,20<br />
0.756<br />
25,50<br />
1.004<br />
13,00<br />
0.512<br />
58,00<br />
2.283<br />
M10 85,00 70º 35º OR00208070V75<br />
M56 www.kennametal.com
KM LOC-II CL2NS/T-BC Boring Cartridge<br />
VIEW A<br />
top access<br />
cam location<br />
www.kennametal.com<br />
VIEW A<br />
side access<br />
cam location<br />
o-ring<br />
<strong>Technical</strong> <strong>Information</strong><br />
KM Tooling Mounting Dimensions<br />
<strong>Information</strong><br />
optional customer coolant<br />
port access area 360º<br />
to coolant port<br />
VIEW A VIEW B<br />
access area<br />
<strong>Technical</strong><br />
KM<br />
size D1 D2 D3 D4 D5 D6 D7 F F1 H H1 L1 L2<br />
KM40<br />
47,04<br />
1.852<br />
44,54<br />
1.754<br />
60,00<br />
2.362<br />
6,36<br />
0.250<br />
10,80<br />
0.425<br />
15,00<br />
0.591<br />
5,50<br />
0.217<br />
50,00<br />
1.969<br />
25,00<br />
0.984<br />
80,00<br />
3.150<br />
40,00<br />
1.575<br />
90,00<br />
3.543<br />
78,50<br />
3.091<br />
KM50<br />
58,29<br />
2.295<br />
54,10<br />
2.130<br />
74,00<br />
2.913<br />
7,94<br />
0.313<br />
10,80<br />
0.425<br />
18,00<br />
0.709<br />
6,50<br />
0.256<br />
64,00<br />
2.520<br />
32,00<br />
1.260<br />
96,00<br />
3.780<br />
48,00<br />
1.890<br />
100,00<br />
3.937<br />
88,00<br />
3.465<br />
KM63<br />
74,04<br />
2.915<br />
69,92<br />
2.753<br />
94,00<br />
3.701<br />
14,04<br />
0.553<br />
12,80<br />
0.504<br />
20,00<br />
0.787<br />
6,50<br />
0.256<br />
78,00<br />
3.071<br />
39,00<br />
1.535<br />
122,00<br />
4.803<br />
61,00<br />
2.402<br />
115,00<br />
4.528<br />
100,80<br />
1.535<br />
KM<br />
size L3 L4 L5 L6 L7 L8 L9 L10 L11 L12 G W1 W2 O-ring<br />
KM40<br />
32,75<br />
1.289<br />
30,00<br />
1.181<br />
25,98<br />
1.023<br />
15,00<br />
0.591<br />
20,00<br />
0.787<br />
16,00<br />
0.630<br />
65,50<br />
2.579<br />
3,75<br />
0.148<br />
2,00<br />
0.079<br />
18,10<br />
0.713<br />
M10 60 30 OR00614070V90<br />
KM50<br />
38,00<br />
1.496<br />
37,00<br />
1.457<br />
32,04<br />
1.261<br />
18,50<br />
0.728<br />
21,00<br />
0.827<br />
16,00<br />
0.630<br />
75,75<br />
2.982<br />
5,30<br />
0.209<br />
6,75<br />
0.266<br />
24,25<br />
0.955<br />
M12 60 30 OR00614070V90<br />
KM63<br />
47,20<br />
1.858<br />
47,00<br />
1.850<br />
40,70<br />
1.602<br />
23,50<br />
0.925<br />
20,00<br />
0.787<br />
16,00<br />
0.630<br />
87,50<br />
3.445<br />
6,45<br />
0.254<br />
5,00<br />
0.197<br />
26,00<br />
1.024<br />
M16 60 30 OR00739070V90<br />
VIEW B<br />
M57
<strong>Technical</strong> <strong>Information</strong><br />
<strong>Technical</strong> <strong>Information</strong><br />
KM Tooling Mounting Dimensions<br />
KM RACA and NAC<br />
D4<br />
coolant<br />
supply<br />
D5<br />
air<br />
supply<br />
KM<br />
size D1 D2 D3 D4 D5 D6 D7 L1 L2 L3 L4<br />
KM32<br />
52,00<br />
2.047<br />
51,60<br />
2.032<br />
10,08<br />
0.397<br />
5,00<br />
0.196<br />
5,00<br />
0.196<br />
47,08<br />
1.853<br />
85,00<br />
3.346<br />
9,00<br />
0.354<br />
72,00<br />
2.835<br />
85,00<br />
3.346<br />
24,00<br />
0.945<br />
KM40<br />
62,00<br />
2.441<br />
61,70<br />
2.421<br />
10,08<br />
0.397<br />
7,70<br />
0.303<br />
7,70<br />
0.303<br />
55,08<br />
2.168<br />
100,00<br />
3.937<br />
10,00<br />
0.394<br />
78,50<br />
3.091<br />
95,00<br />
3.74<br />
30,00<br />
1.181<br />
KM50<br />
72,00<br />
2.835<br />
71,70<br />
2.815<br />
12,08<br />
0.475<br />
8,00<br />
0.315<br />
8,00<br />
0.315<br />
65,08<br />
2.562<br />
120,00<br />
4.724<br />
10,00<br />
0.394<br />
97,00<br />
3.819<br />
115,00<br />
4.528<br />
34,00<br />
1.339<br />
KM63<br />
85,00<br />
3.346<br />
84,60<br />
3.327<br />
16,08<br />
0.633<br />
9,50<br />
0.374<br />
9,50<br />
0.374<br />
75,08<br />
2.956<br />
140,00<br />
5.512<br />
12,00<br />
0.472<br />
124,50<br />
4.902<br />
145,00<br />
5.709<br />
35,35<br />
1.392<br />
KM<br />
size L5 L6 L7 L8 L9 L10 L11 L12 L13 L14 L15 G<br />
KM32<br />
11,50<br />
0.453<br />
32,00<br />
1.260<br />
32,00<br />
1.260<br />
27,50<br />
1.083<br />
34,00<br />
1.339<br />
24,00<br />
0.945<br />
32,00<br />
0.945<br />
27,50<br />
1.083<br />
70,00<br />
2.756<br />
38,00<br />
1.496<br />
14.50<br />
0.571<br />
M8-1,25x20<br />
(.79) deep<br />
KM40<br />
15,00<br />
0.591<br />
37,00<br />
1.457<br />
39,50<br />
1.555<br />
33,00<br />
1.299<br />
40,00<br />
1.575<br />
26,50<br />
1.043<br />
39,50<br />
1.043<br />
34,00<br />
1.339<br />
84,00<br />
3.307<br />
46,00<br />
1.811<br />
22.00<br />
0.866<br />
M10-1,5x25<br />
(.98) deep<br />
KM50<br />
16,50<br />
0.650<br />
45,00<br />
1.772<br />
46,00<br />
1.811<br />
42,00<br />
1.654<br />
48,00<br />
1.890<br />
34,00<br />
1.339<br />
46,00<br />
1.339<br />
42,00<br />
1.654<br />
102,00<br />
4.016<br />
54,00<br />
2.126<br />
22.00<br />
0.866<br />
M12-1,75x25<br />
(.98) deep<br />
KM63<br />
18,80<br />
0.740<br />
51,70<br />
2.035<br />
55,00<br />
2.165<br />
46,00<br />
1.811<br />
55,00<br />
2.165<br />
42,15<br />
1.659<br />
55,00<br />
1.659<br />
47,00<br />
1.850<br />
117,00<br />
4.606<br />
65,00<br />
2.559<br />
24.00<br />
0.945<br />
M16-2,0x30<br />
(1.18) deep<br />
M58 www.kennametal.com<br />
min
KM RACA and<br />
NACA Spring-Pack Cylinder<br />
www.kennametal.com<br />
<strong>Technical</strong> <strong>Information</strong><br />
KM Tooling Mounting Dimensions<br />
KM<br />
size L1 L2 L3<br />
KM32<br />
85,00<br />
3.346<br />
76,50<br />
3.012<br />
3,00<br />
0.118<br />
KM40<br />
95,00<br />
3.740<br />
83,20<br />
3.276<br />
3,00<br />
0.118<br />
KM50<br />
115,00<br />
4.528<br />
103,00<br />
4.055<br />
3,00<br />
0.118<br />
KM63<br />
145,00<br />
5.709<br />
131,00<br />
5.157<br />
3,00<br />
0.118<br />
NCA Spring-Pack Mounting Details<br />
left-hand<br />
mounting<br />
locator pin holes<br />
air supply<br />
air supply<br />
turret disk<br />
L2<br />
L1 min<br />
coolant<br />
supply<br />
cylinder (F)<br />
force required<br />
for tool release<br />
cylinder retracted<br />
cylinder extended<br />
KM<br />
size D1 D2 D3 D4 D5 L1 L2 L3 L4 L5 L6 L7 G<br />
KM32-NCA-DS31<br />
51,00<br />
2.008<br />
50,50<br />
1.988<br />
8,00<br />
0.315<br />
3,20<br />
0.126<br />
3,20<br />
0.126<br />
36,00<br />
1.417<br />
10,50<br />
0.413<br />
27,50<br />
1.083<br />
19,50<br />
0.768<br />
6,00<br />
0.236<br />
44,00<br />
1.732<br />
9,00<br />
0.354<br />
M8-1,25x20<br />
(.79) deep<br />
KM40-NCA-DS40<br />
62,00<br />
2.441<br />
61,50<br />
2.421<br />
12,00<br />
0.472<br />
4,50<br />
0.177<br />
4,50<br />
0.177<br />
45,00<br />
1.772<br />
13,00<br />
0.512<br />
34,01<br />
1.339<br />
24,00<br />
0.945<br />
9,00<br />
0.354<br />
53,01<br />
2.087<br />
11,00<br />
0.433<br />
M10-1,5x20<br />
(.79) deep<br />
KM50-NCA-DS50<br />
78,00<br />
3.071<br />
71,50<br />
2.815<br />
15,00<br />
0.591<br />
5,50<br />
0.217<br />
5,50<br />
0.217<br />
56,00<br />
2.205<br />
16,00<br />
0.630<br />
42,00<br />
1.654<br />
28,00<br />
1.102<br />
6,00<br />
0.236<br />
74,00<br />
2.913<br />
12,00<br />
0.472<br />
M12-1,75x30<br />
(1.18) deep<br />
coolant<br />
supply<br />
L3 min<br />
M59<br />
<strong>Technical</strong> <strong>Information</strong>
<strong>Technical</strong> <strong>Information</strong><br />
<strong>Technical</strong> <strong>Information</strong><br />
KM Tooling Mounting Dimensions<br />
KM32 NCA<br />
coolant inlet<br />
left-hand<br />
mounting<br />
air inlet<br />
air inlet<br />
coolant inlet<br />
KM<br />
size D1 D2 D3 D4 D5 L1 L2 L3 L4 L5 L6 L7 L8 G<br />
KM32-NCA-DS16<br />
51,00<br />
2.008<br />
50,80<br />
2.000<br />
6,04<br />
0.238<br />
5,00<br />
0.197<br />
5,00<br />
0.197<br />
29,37<br />
1.156<br />
10,69<br />
0.421<br />
23,93<br />
0.942<br />
20,09<br />
0.791<br />
20,00<br />
0.787<br />
65,00<br />
2.559<br />
11,20<br />
0.441<br />
32,25<br />
1.270<br />
M8-1,25x15<br />
(.59) deep<br />
M60 www.kennametal.com
XGL – Static<br />
KM<br />
size<br />
KM80<br />
hydraulic<br />
inlet<br />
D1<br />
92,177<br />
3.629<br />
D2<br />
92,177<br />
3.629<br />
www.kennametal.com<br />
D3<br />
107,00<br />
4.213<br />
D4<br />
12,045<br />
.4742<br />
D5<br />
6,35<br />
0.25<br />
D6<br />
6,35<br />
0.25<br />
D5<br />
coolant<br />
supply<br />
D6<br />
air<br />
supply<br />
D7<br />
M10<br />
G<br />
M12<br />
L1<br />
18,00<br />
0.709<br />
L2<br />
81,95<br />
3.226<br />
L3<br />
53,525<br />
2.107<br />
L4<br />
14,00<br />
0.551<br />
L7<br />
30,00<br />
1.181<br />
<strong>Technical</strong> <strong>Information</strong><br />
KM Tooling Mounting Dimensions<br />
L2<br />
min depth<br />
for piston bore<br />
L8<br />
32,00<br />
1.26<br />
W1<br />
70º<br />
W2<br />
35º<br />
D2<br />
W3 W4<br />
17"30' 17"30'<br />
M61<br />
<strong>Technical</strong> <strong>Information</strong>
<strong>Technical</strong> <strong>Information</strong><br />
<strong>Technical</strong> <strong>Information</strong><br />
KM Micro /KM Mini Manual Clamping System<br />
The KM Micro/KM Mini Coupling<br />
The rigidity and stiffness of the patented KM Micro/KM Mini joint is achieved<br />
through a combination of unique design elements incorporated in both the<br />
shank of the tool and the clamping mechanism. The KM Micro/KM Mini joint<br />
was developed as a system and takes full advantage of both the tool shank and<br />
the mechanism to obtain maximum benefit from the space utilized.<br />
Face and Taper Contact<br />
Three Surface Contact<br />
KM Micro/KM Mini tooling is designed to have simultaneous taper and face<br />
contact. Two alternate methods provide metal-to-metal contact. One method is<br />
to manufacture both halves of the coupling holding very close tolerances. The<br />
other is to design a small amount of elastic deformation into the assembly. With<br />
KM Micro/KM Mini tooling, elastic deformation takes the form of expansion of<br />
the female taper (on the clamping unit) as the larger male taper (on the cutting<br />
unit) is pulled back during lockup.<br />
Our testing proved that an optimum combination of pull-back force and elastic<br />
deformation (rather than a close tolerance) provides greater static and dynamic<br />
stiffness and achieves a metal-to-metal fit.<br />
Taper Shank<br />
All KM Micro/KM Mini tooling is designed around a short 10:1 tapered<br />
shank. Extensive testing of many different lengths and angles proves<br />
this combination provides the maximum stiffness and input forces<br />
required for locking/unlocking. The taper is self-centering to promote<br />
easy tool loading and unloading.<br />
Clamping Mechanism<br />
The mechanism design consists of two components: the torque screw and the<br />
wedge nut. This simple, yet highly effective clamping mechanism allows the<br />
user to lock and unlock the cutting unit by simply using a preset torque<br />
wrench. This KM Micro/KM Mini clamping mechanism fits inside the taper<br />
shank of the KM Micro/KM Mini cutting unit and utilizes a coincidental cone<br />
design that maximizes the contact area between the clamping mechanism<br />
and the cutting unit. As a result, the cutting unit and clamping mechanism are<br />
on a shared axis and provide accurate axial and radial repeatability of<br />
±.00008" (± 2 micron) for a specific cutting unit in a specific clamping unit.<br />
When more than one cutting unit is used, the accuracy of each cutting unit<br />
must be considered. Pre-gaging (when changing tools) measures the<br />
deviations of each tool from the nominal. These deviations can then be<br />
compensated for by the machine tool control offsets.<br />
M62 www.kennametal.com
Locking Sequence<br />
The clamping sequence starts with the insertion of the cutting unit into the<br />
female taper of the clamping unit. The cutting unit first makes contact at a<br />
stand-off from the gage face of approximately .010" (0,25mm). The torque<br />
screw is then activated by a preset torque wrench at a right angle to the<br />
centerline of the cutting tool, located behind the gage face of the clamping<br />
unit. A small amount of elastic deformation takes place at the front of the<br />
female taper as the locking force is applied. As the torque screw is further<br />
tightened to the preset torque of 25–30 ft. lbs. (34–40 Nm), (4-1/4 turns),<br />
the cutting unit advances until the gage face makes contact with the<br />
face of the clamping unit. The final amount of torque applied allows the<br />
tail of the cutting unit to spread to clamp securely between the clamping<br />
mechanism and the clamping unit inside diameter. Once the proper<br />
operational torque is achieved, continuing to rotate the torque screw<br />
may damage the clamping components.<br />
Summary<br />
The KM Micro/KM Mini coupling offers a very rigid joint with a high degree of<br />
repeatability while maintaining a very compact envelope. This permits a high<br />
degree of versatility without sacrificing cutting performance.<br />
www.kennametal.com<br />
Installation<br />
<strong>Technical</strong> <strong>Information</strong><br />
KM Micro /KM Mini Manual Clamping System<br />
When initially clamping the KM Micro/KM Mini shank in a machine tool slot, it<br />
is recommended to have a cutting unit in the shank.<br />
Lubrication<br />
Using the appropriate wrench, back out the torque screw against the positive<br />
stop and generously apply grease to the threads and conical surface of the<br />
component hardware. Also, apply grease to the female taper surface. This<br />
should be done periodically. Recommended grease: GLEITMO 805.<br />
order<br />
lubricant<br />
number size<br />
GLEITMO 805 grease 1567575 500g cartridge<br />
GLEITMO 805 grease 1567577 1000g tin<br />
CAUTION<br />
DO NOT USE silicone cleaner or WD-40 -type lubricants.<br />
M63<br />
<strong>Technical</strong> <strong>Information</strong>
<strong>Technical</strong> <strong>Information</strong><br />
<strong>Technical</strong> <strong>Information</strong><br />
KM Micro /KM Mini Manual Clamping System<br />
KM Micro/KM Mini Clamping Operating Instructions (KM12–KM25)<br />
Locking<br />
Before inserting the KM Micro and KM Mini unit into the clamping mechanism<br />
(Figure 1), clean the contact face and taper. KM Micro and KM Mini manual<br />
clamping units require a torque wrench for proper operation. Turning the torque<br />
screw clockwise locks the cutting unit in position. For maximum safety, tighten<br />
the torque screw to the specified torque. Using a torque wrench ensures that the<br />
proper clamping forces are exerted.<br />
KM Micro/KM Mini Manual Clamping System • Operating Torque<br />
KM<br />
size<br />
torque<br />
(ft. lbs.)<br />
torque<br />
(Nm)<br />
Operating Position<br />
With the torque screw and nut to the proper torque, coincidental cones locked<br />
in position, and the face and self-locking taper fully engaged, the cutting unit<br />
and clamping unit are rigidly secured together (Figure 2).<br />
Unlocking<br />
Rotate the torque screw counterclockwise until initial resistance is felt. In this<br />
position, the locking cones are free of the cutting unit, but the taper interference<br />
is still holding the KM unit in the clamping unit. At this point, the bump-off angle<br />
is in position to free the cutting unit from the interference fit.<br />
Continue to rotate the torque screw slowly until the cutting unit is no longer<br />
making face contact (Figure 3) and is released from the taper. The torque screw<br />
will stop rotating and more resistance will be felt. Do not turn the torque screw<br />
any further.<br />
CAUTION<br />
Continuing to rotate the torque screw may damage<br />
the clamping components.<br />
actuation<br />
drive size<br />
KM12 5–6 7–8 25IP<br />
KM1612 5–6 7–8 25IP<br />
KM16 7–8 10–11 27IP<br />
KM2016 7–8 10–11 27IP<br />
KM20 14–16 19–22 5mm<br />
KM2520 14–16 19–22 5mm<br />
KM25 25–30 34–40 6mm<br />
KM3225 25–30 34–40 6mm<br />
Figure 1<br />
Contact Face<br />
CAUTION<br />
Over tightening can cause damage to the clamping mechanism.<br />
Figure 2<br />
Figure 3<br />
M64 www.kennametal.com<br />
Taper<br />
Clockwise<br />
for Locking<br />
Counterclockwise<br />
for Unlocking
KM Micro/KM Mini Center Height Adjustment Feature for Flange Clamping Units<br />
KM Micro flange mounts can adjust insert center height via a cam pin to be<br />
purchased separately. To do this:<br />
1. Remove the locating pin that is installed in the flange mount clamping unit.<br />
2. Install the adjusting cam in the toolblock-locating pin hole.<br />
3. Install the flange mount clamping unit to the toolblock, ensuring the cam<br />
portion of the adjusting pin locates within the slot on the back side of<br />
the flange.<br />
4. To adjust, simply access the hex through the locating pin hole of the flange<br />
unit and rotate to set center height with mounting screws loose.<br />
5. Tighten the mounting bolts to the required torque for the specific bolt size.<br />
KM<br />
size<br />
order<br />
number<br />
catalog<br />
number<br />
12 1925860 MICROCAM12<br />
16, 25, 3225 1851803 MICROCAM16<br />
What is KM1612/KM2016/KM2520/KM3225 for ID Machining?<br />
The KM1612/KM2016/KM2520/KM3225 is the ID endworking tooling<br />
product line to complement the KM12/KM16/KM20/KM25 OD turning<br />
tooling product line.<br />
• Products are through-coolant capable.<br />
• External tapers are the same as KM12/KM16/KM20/KM25.<br />
Major difference is center height location of the insert.<br />
H1<br />
www.kennametal.com<br />
KM12/KM16/KM20/KM25<br />
Square shank cutting units<br />
Insert is above centerline<br />
<strong>Technical</strong> <strong>Information</strong><br />
KM Micro /KM Mini Manual Clamping System<br />
Adjusting Cam<br />
Mounting Screws (4x)<br />
Round shank clamping units<br />
KM1612/KM2016/KM2520/KM3225<br />
Centerline cutting units<br />
Insert is on centerline<br />
M65<br />
<strong>Technical</strong> <strong>Information</strong>
<strong>Technical</strong> <strong>Information</strong><br />
<strong>Technical</strong> <strong>Information</strong><br />
KM Micro /KM Mini Manual Clamping System<br />
KM Micro/KM Mini Manual Clamping Repair Package Components<br />
Square Shank<br />
KM Manual Clamping Components • Functional Definitions<br />
1. Torque Screw<br />
• Rotation moves the locking cones.<br />
Clockwise rotation secures cutting unit.<br />
Counterclockwise rotation releases cutting unit.<br />
• Provides bump-off angle.<br />
2. Wedge Nut<br />
• Contains anti-rotation feature.<br />
3. Containment Screw<br />
• Provides unlocking positive stop.<br />
• Provides anchor for wedge nut anti-rotation feature.<br />
Operator Maintenance<br />
All KM Micro/KM Mini clamping units showing damage must be replaced or rebuilt.<br />
Burrs and nicks should be removed by stoning and/or polishing.<br />
• Use KM Micro/KM Mini Plugs to protect clamping units when they are not in<br />
use.<br />
For KM Micro Plugs, see page A117.<br />
For KM Mini Plugs, see page A186.<br />
1<br />
2<br />
KM Micro/KM Mini Manual Clamping Repair Packages<br />
KM<br />
size<br />
catalog<br />
number<br />
order<br />
number<br />
KM12 KM12NAPKG 3953388<br />
KM16 KM16NAPKG 3953386<br />
KM20 KM20NAPKG 3645146<br />
KM25 KM25NAPKG 3645145<br />
M66 www.kennametal.com<br />
3
KM Micro/KM Mini Manual Clamping Repair Package Components<br />
KM Manual Clamping Components • Functional Definitions<br />
1. Torque Screw<br />
• Rotation moves the locking cones.<br />
Clockwise rotation secures cutting unit.<br />
Counterclockwise rotation releases cutting unit.<br />
• Provides bump-off angle.<br />
2. Wedge Nut<br />
• Contains anti-rotation feature.<br />
3. Containment Pin<br />
• Provides unlocking positive stop.<br />
• Provides anchor for wedge nut anti-rotation feature.<br />
Operator Maintenance:<br />
All KM Micro/KM Mini Clamping Units showing damage must be replaced or<br />
rebuilt.<br />
Burrs and nicks should be removed by stoning and/or polishing.<br />
• Use KM Micro/KM Mini Plugs to protect clamping units when they are<br />
not in use.<br />
For KM Micro Plugs, see page A117.<br />
For KM Mini Plugs, see page A186.<br />
www.kennametal.com<br />
3<br />
Flange Mount<br />
3<br />
2<br />
1<br />
Round Shank<br />
<strong>Technical</strong> <strong>Information</strong><br />
KM Micro /KM Mini Manual Clamping System<br />
KM Micro/KM Mini Manual Clamping Repair Packages<br />
2<br />
KM<br />
size<br />
catalog<br />
number<br />
order<br />
number<br />
KM12<br />
KM1612<br />
KM12NRPKG 1925858<br />
KM16<br />
KM2016<br />
KM16NRPKG 1851801<br />
KM20<br />
KM2520<br />
KM2520NRPKG 3645148<br />
KM25 KM25NAPKG 2386037<br />
KM3225 KM3225NRPKG 2656552<br />
1<br />
M67<br />
<strong>Technical</strong> <strong>Information</strong>
<strong>Technical</strong> <strong>Information</strong><br />
<strong>Technical</strong> <strong>Information</strong><br />
KM Micro /KM Mini Manual Clamping System<br />
KM Micro/KM Mini • Assembly/Disassembly Instructions<br />
1. Apply GLEITMO 805 grease generously to threads, cones on torque screw<br />
and nut, and bump-off area (behind threads) of the torque screw. Also, apply<br />
grease generously to the female taper on the shank.<br />
2. Screw the torque screw and the nut together.<br />
3. Insert the torque screw and nut into the shank (as one unit) as shown<br />
in (Frame 1).<br />
4. Install the containment screw as shown (Frame 2).<br />
5. When initially clamping the KM Micro shank in a machine tool slot, it is<br />
recommended that a cutting unit be in the shank.<br />
6. Disassembly is the reverse of assembly procedure.<br />
Frame 1<br />
Torque Screw<br />
Tools Required<br />
• Hex wrenches.<br />
• Pliers.<br />
• Kennametal recommends and uses GLEITMO 805.<br />
• Clean towels or shop rags.<br />
• Solvent or degreaser that does not leave residue (used to clean inside the taper<br />
and canister). Should the unit become contaminated, you can use a degreasing<br />
agent or something similar to clean the surfaces.<br />
CAUTION<br />
DO NOT USE silicone cleaner or WD-40 -type lubricants.<br />
order<br />
lubricant<br />
number size<br />
GLEITMO 805 grease 1567575 500g cartridge<br />
GLEITMO 805 grease 1567577 1000g tin<br />
(continued)<br />
M68 www.kennametal.com<br />
Nut
KM Micro/KM Mini • Assembly/Disassembly Instructions (continued)<br />
Maintenance Schedule<br />
Disassemble the shanks once a month and re-apply new grease. Grease should<br />
also be applied 1 or 2 times per week to the torquw screw, nut, and both tapers<br />
(internal and external) in the release position without the need to disassemble.<br />
Before re-applying grease, shop air should be used to blow out oil coolant.<br />
If contamination of the grease is evident, then the old grease should be<br />
immediately removed and the shank cleaned. Then new grease should be<br />
re-applied acording to procedure.<br />
NOTE: Apply grease with a coarse bristle brush to prevent shedding of bristles.<br />
Frame 2<br />
www.kennametal.com<br />
<strong>Technical</strong> <strong>Information</strong><br />
KM Micro /KM Mini Manual Clamping System<br />
KM<br />
size<br />
Containment Screw<br />
hex<br />
size<br />
KM12 2,5mm<br />
KM16 3mm<br />
KM20 4mm<br />
KM25 5mm<br />
M69<br />
<strong>Technical</strong> <strong>Information</strong>
<strong>Technical</strong> <strong>Information</strong><br />
<strong>Technical</strong> <strong>Information</strong><br />
KM Micro /KM Mini Mounting Dimensions<br />
KM Micro/KM Mini NCM-SF<br />
KM<br />
size D1 D3 G L1 L4 L5 L6 L7 L8 L9 P<br />
KM12<br />
KM16<br />
KM20<br />
KM25<br />
10,025/<br />
10,050<br />
14,025/<br />
14,050<br />
18,025/<br />
18,050<br />
24,025/<br />
24,050<br />
4,064/<br />
4,077<br />
5,055<br />
5,075<br />
5,055/<br />
5,075<br />
5,055/<br />
5,075<br />
M3 5,0 8,25 8,00 5,13 6 8 10,0 22<br />
M4 6,5 10,75 10,25 6,00 10 12 15,0 28<br />
M5 8,0 13,00 12,25 7,75 10 12 15,0 34<br />
M6 8,5 15,75 14,50 10,50 10 15 18,0 40<br />
M70 www.kennametal.com
KM Micro/KM Mini NCM-SF with Coolant<br />
www.kennametal.com<br />
<strong>Technical</strong> <strong>Information</strong><br />
KM Micro /KM Mini Mounting Dimensions<br />
KM<br />
size D1 D3 D4 G L1 L4 L5 L6 L7 L8 L9 P<br />
KM1612<br />
KM2016<br />
KM2520<br />
17,025/<br />
17,050<br />
20,025/<br />
20,050<br />
26,025/<br />
26,050<br />
4,060/<br />
4,080<br />
5,055/<br />
5,075<br />
5,055/<br />
5,075<br />
6 - 12 M4 6 11,00 9,75 6,75 6 12 18 27,5<br />
6 - 16 M5 8 13,25 12,00 8,00 7 13 18 34,0<br />
6 - 22 24.5 8 16,15 14,50 10,00 10 12 18 39,0<br />
M71<br />
<strong>Technical</strong> <strong>Information</strong>
<strong>Technical</strong> <strong>Information</strong><br />
<strong>Technical</strong> <strong>Information</strong><br />
KM Micro /KM Mini Mounting Dimensions<br />
KM Mini NCM-SF with Coolant<br />
KM<br />
size D1 D3 D4 G L1 L3 L4 L5 L6 L7 L8 L9 L10 P<br />
KM3225<br />
D4<br />
(2X) coolant<br />
24,025/<br />
24,050<br />
5,106/<br />
5,126<br />
3 M6 8,5 14,7 9,5 17 13 10 15 18 16,5 45<br />
M72 www.kennametal.com
KM Micro <br />
Quick Change<br />
Tooling System<br />
A smaller, more compact version of the internationally renowned KM system.<br />
• Quick-change cutter heads reduce indexing and set-up times by 66%.<br />
• Specially designed for use with automatic and smaller universal lathes.<br />
• Unique flange attachment system increases machine tool capacity.<br />
• KM Micro square shank adapters can be installed quickly and easily in existing tool block adapters.<br />
Experience the advantages at your Authorized Kennametal Distributor or at www.kennametal.com.<br />
www.kennametal.com
<strong>Technical</strong> <strong>Information</strong><br />
<strong>Technical</strong> <strong>Information</strong><br />
Balancing<br />
Balancing<br />
Kennametal offers a range of balanced and balanced-by-design<br />
toolholders capable of extending spindle and tool life and improving<br />
part quality at higher machining speeds.<br />
Definitions for Balance<br />
Standard Toolholder<br />
A toolholder that may contain uncorrected features (unbalanced drive slots,<br />
notches, locking screws, etc.). Standard toolholders have no compensating<br />
features added to correct balance, used in basic, low-speed applications.<br />
Balanced-by-Design<br />
A toolholder designed with compensating features to correct any unbalance<br />
caused by uneven drive slots, notches, locking screws, etc. The balanced<br />
toolholder is capable of being used in high-speed applications. Small, residual<br />
unbalance may result due to normal manufacturing tolerances within the shank<br />
standards.<br />
When machining at higher speeds, responsible machining practices must<br />
be observed. Unbalance is caused by uneven mass distribution in the tool<br />
or toolholder. Potential sources of unbalance are movable parts (adjustable<br />
cartridges, set screws, spindle spring pack, and clamping mechanisms),<br />
manufacturing tolerances, and design.<br />
Balanceable<br />
A toolholder with a built-in mechanism that can adjust to correct any<br />
unbalance inaccuracies incurred during normal manufacturing. The fully<br />
assembled tool (toolholder and cutting tool) can be balanced as a system<br />
using a balancing device.<br />
Balanced<br />
A toolholder has been balanced to predetermined specification after manufacture<br />
by checking the balance condition with a balancing device. This may be followed<br />
by physically removing material from the toolholder, such as holes and/or slots.<br />
Forces caused by unbalance increase with the rotational speed squared.<br />
Excessive unbalance can cause premature wear to the tool and spindle bearing,<br />
which can adversely affect surface finish and accuracy.<br />
(continued)<br />
M74 www.kennametal.com
Balancing (continued)<br />
The balance quality is usually specified by the balance grade G, according<br />
to IS0 1940-1 and ANSI S2.19 standards.<br />
The balance quality grade (G) was derived from practical experience, which<br />
is expressed in millimeters per second (mm/s) and ranges from 0,16–4000.<br />
For rotating tooling and general machinery parts, it is usually specified to be<br />
G 2.5 or G 6.3. A lower number designates better balance quality.<br />
The permissible residual unbalance can be calculated by the following equation:<br />
U per =<br />
Where:<br />
9549 x G x M<br />
n<br />
The same value can be obtained from the chart on the following page. It gives<br />
the permissible specific unbalance in gram millimeters (gmm) as a function of the<br />
rotational speed and the balance quality (G). For the example above, at 10,000<br />
RPM and for grade G 6.3, the maximum residual unbalance would be 6 gmm/kg.<br />
The toolholder assembly (including the tool) has a mass equal to 2 kg, the<br />
permissible unbalance is [(6 gmm/kg) x 2 kg], which equals 12 gmm.<br />
www.kennametal.com<br />
U per = permissible unbalance, expressed in gram millimeters (gmm)<br />
G = desired balance grade<br />
M = rotor mass in kilograms (kg)<br />
n = operating speed in rotations per minute (RPM)<br />
Example:<br />
Rotor mass = 2 kg<br />
n = 10,000 RPM<br />
Desired balancing grade = G 6.3<br />
U per =<br />
9549 x 6.3 x 2<br />
10,000<br />
<strong>Technical</strong> <strong>Information</strong><br />
Balancing<br />
= 12 gmm<br />
(continued)<br />
M75<br />
<strong>Technical</strong> <strong>Information</strong>
<strong>Technical</strong> <strong>Information</strong><br />
<strong>Technical</strong> <strong>Information</strong><br />
Balancing<br />
Balancing (continued)<br />
permissible specific unbalance (gmm/kg)<br />
20<br />
15<br />
10<br />
5<br />
0<br />
5000 10000 15000 20000 25000 30000<br />
surface finish (Ra) vs. feed rate<br />
From the approach described in ISO 1940-1, the requirements for maximum<br />
residual unbalance become very strict as speed increases. For example, a G 2.5<br />
balancing grade can become unpractical at 25,000 RPM for a tool with a mass<br />
of 1 kg. The chart shows that the maximum residual unbalance would be 1 gmm,<br />
which could be very time consuming to be achieved or even beyond the accuracy<br />
of the balancing machine.<br />
Comparing the cutting forces can provide a reference for the balancing<br />
requirements. Generally, finishing operations generate lower cutting forces and<br />
require a better balance quality. Though rotating components should always be<br />
balanced, in most cases it is sufficient to keep the unbalance forces to 5–10%<br />
of the cutting forces.<br />
M76 www.kennametal.com<br />
G 1<br />
G 2.5<br />
G 6.3<br />
(continued)
Balancing (continued)<br />
The permissible residual unbalance can be calculated by the following equation:<br />
F = U x (n/9,549) 2 (Newtons)<br />
Where:<br />
In this particular case, the unbalanced induced force would be<br />
F = 1 x (25,000/9,549)2 = 6,9 N. The cutting forces generated<br />
are likely to be orders of magnitude greater than that.<br />
Unbalance can be corrected by material removal (drilling, milling, grinding),<br />
material addition (set screws), and material redistribution (balancing rings<br />
or set screws).<br />
Where:<br />
www.kennametal.com<br />
U = unbalance in gram millimeters (gmm)<br />
N = rotational speed (RPM)<br />
L = D - D2 - U x 1300/d 2<br />
2<br />
U = unbalance (gmm)<br />
D = diameter of placement (mm)<br />
d = hole diameter (flat bottom) (mm)<br />
L = hole depth (mm)<br />
<strong>Technical</strong> <strong>Information</strong><br />
Balancing<br />
Good balancing quality does not necessarily guarantee safe operation<br />
at higher speeds. Other variables (spindle connection, type of operation,<br />
cutting parameters, machine stiffness, bearing condition, etc.) should<br />
always be considered.<br />
For a given unbalance, the following formula can be used to determine<br />
the hole depth (L) necessary to correct for the unbalance*:<br />
* Formula for steel components only.<br />
M77<br />
<strong>Technical</strong> <strong>Information</strong>
<strong>Technical</strong> <strong>Information</strong><br />
<strong>Technical</strong> <strong>Information</strong><br />
Shrink Fit<br />
Shrink Fit<br />
The Concept<br />
HEAT<br />
Heat shrinking is not a new process in the machine tool industry. However,<br />
the concept was only recently implemented as a quick-change toolholding<br />
mechanism for clamping cylindrical cutting tools for high-speed machining<br />
applications.<br />
The Shrink Fit process begins by applying a quick and precise heat to the<br />
holding end of a toolholder. This causes the internal bore, which is slightly<br />
smaller than the shank of a cutting tool, to expand, allowing a tool to be<br />
inserted. As the toolholder cools, the bore shrinks to create 360° of uniform<br />
pressure along the entire length of the bore, resulting in an evenly distributed<br />
clamping force that mechanical toolholding cannot beat.<br />
Due to the design, flatted-style, Weldon ® , and Whistle Notch cutting tool<br />
shanks can employ Shrink Fit technology. To gain full benefits of the<br />
technology, fully cylindrical tool shanks are recommended. As long as the<br />
heating processes are kept within the elastic range of the toolholder material,<br />
this clamping operation can be repeated for several thousand cycles.<br />
HEAT<br />
HEAT<br />
toolholder body O.D.<br />
cutting tool shank<br />
clearance zone<br />
toolholder I.D.<br />
Shrink Fit Tooling Advantages:<br />
• Low runout — cutting tools are gripped 360° along the entire length of the<br />
cutting tool shank for an evenly distributed clamping force.<br />
• Clamping forces are greater than collets or hydraulic chucks.<br />
• During testing, tool material properties break down and shear before<br />
slippage occurs.<br />
• Slim and short toolholder profile designs are achievable because no moving<br />
parts are used.<br />
• Well suited for high-speed operations because their symmetry provides the<br />
best possible balance.<br />
• Sealing stop screws are not required — designed interference between the<br />
cutting tool and toolholder forms a seal that enables coolant to flow only<br />
through designated passages.<br />
These advantages enable Shrink Fit technology to work at greater speeds and<br />
feeds, produce better finishes, deliver increased tool and spindle life, and<br />
generate more productivity.<br />
M78 www.kennametal.com<br />
HEAT
Heat-Activating Systems<br />
Shorter cycle time, less cooling downtime, localized heating, and integrated<br />
cooling systems are essential for a safe and simple heating system. Shrink Fit<br />
heating systems include induction, hot-air, and open-flame methods, with<br />
induction being the easiest and fastest of these systems.<br />
Toolholders<br />
• Slim design.<br />
• Balanced.<br />
• Flatted-style, Weldon ® , and Whistle Notch shanks can be gripped. Optimal<br />
results are obtained with smooth, cylindrical shank cutting tools — without<br />
flats and/or notches.<br />
• Avoid using carbide tools with polished shanks. This will reduce<br />
torque values by 60%.<br />
HT (High Torque) Shrink Fit Toolholders<br />
HT Shrink Fit holders have a high interference level that offers 30–50% greater<br />
torque than competitive systems. This line is only to be used with carbide tools<br />
because of their low thermal expansion coefficient. These toolholders require<br />
a machine with at least 10 kW of power to apply heat quick enough to avoid<br />
heating the tool.<br />
GP (General Purpose) Shrink Fit Toolholders<br />
GP toolholders enable the use of all materials and extensions because<br />
they have lower interference levels. Operators should use this style if not<br />
generating high cutting forces.<br />
www.kennametal.com<br />
HEAT<br />
HEAT<br />
Ideal Surface Quality<br />
• Metric (ISO standard) Ra ≥0,8 μm surface finish.<br />
• Inch (industry standard) Ra ≥32 μin surface finish.<br />
<strong>Technical</strong> <strong>Information</strong><br />
Shrink Fit<br />
®<br />
®<br />
(continued)<br />
M79<br />
<strong>Technical</strong> <strong>Information</strong>
<strong>Technical</strong> <strong>Information</strong><br />
<strong>Technical</strong> <strong>Information</strong><br />
Shrink Fit<br />
Shrink Fit (continued)<br />
Straight shank toolholder extensions are a great complement to the Shrink Fit<br />
system. Use caution and do not overheat Slim Line products. Overheating can<br />
cause warping or other permanent damage. Toolholder life drastically reduces<br />
if activating heat is not properly controlled.<br />
Cutting Tool Requirements<br />
metric (ISO standard)<br />
cutting tool shank diameters tolerance<br />
3mm 2,997 3,000<br />
0.000/-0.003<br />
4mm 3,996 4,000<br />
h4<br />
0.000/-0.004<br />
5mm 4,995 5,000 h5 0.000/-0.005<br />
6mm 5,992 6,000<br />
0.000/-0.008<br />
8mm 7,991 8,000 0.000/-0.009<br />
10mm 9,991 10,000 0.000/-0.009<br />
12mm 11,989 12,000 0.000/-0.011<br />
14mm 13,989 14,000 0.000/-0.011<br />
16mm 15,989 16,000 0.000/-0.011<br />
18mm 17,989 18,000<br />
h6<br />
0.000/-0.011<br />
20mm 19,987 20,000 0.000/-0.013<br />
25mm 24,987 25,000 0.000/-0.013<br />
32mm 31,984 32,000 0.000/-0.016<br />
40mm 39,984 40,000 0.000/-0.016<br />
50mm 49,984 50,000 0.000/-0.003<br />
inch (industry standard)<br />
cutting tool shank shank diameters tolerance tolerance<br />
1/8 .1249 .1247 -0.0001/-0.0003<br />
3/16 .1874 .1872 -0.0001/-0.0003<br />
1/4 .2499 .2496 -0.0001/-0.0004<br />
5/16 .3124 .3121 -0.0001/-0.0004<br />
3/8 .3749 .3746 -0.0001/-0.0004<br />
7/16 .4375 .4371 0.0000/-0.0004<br />
1/2 .5000 .4996 0.0000/-0.0004<br />
9/16 .5625 .5621 0.0000/-0.0004<br />
5/8 .6250 .6246 0.0000/-0.0004<br />
11/16 .6875 .6871 0.0000/-0.0004<br />
3/4 .7500 .7495 0.0000/-0.0005<br />
7/8 .8750 .8745 0.0000/-0.0005<br />
1 1.0000 .9995 0.0000/-0.0005<br />
1-1/4 1.2500 1.2495 0.0000/-0.0005<br />
1-1/2 1.5000 1.4995 0.0000/-0.0005<br />
2 2.0000 1.9995 0.0000/-0.0005<br />
M80 www.kennametal.com
Axial Adjustment Gages<br />
Cutting tool length adjustment is performed using a special axial adjusting gage<br />
(b) before shrinking the cutting tool into the toolholder. This gage (b) is placed<br />
on the toolholder (a) along with the cutting tool (c). The length difference of the<br />
setting gage (l2) is calculated into the required tool assembly length. The whole<br />
assembly can then be placed into a length presetter for adjustment. Rotating<br />
the gage moves the axial stop screw and presets the assembled tool to the<br />
required length. After removing the gage, the cutting tool can then be shrunk<br />
into the toolholder.<br />
www.kennametal.com<br />
I2<br />
<strong>Technical</strong> <strong>Information</strong><br />
Shrink Fit<br />
c<br />
b<br />
a<br />
M81<br />
<strong>Technical</strong> <strong>Information</strong>
<strong>Technical</strong> <strong>Information</strong><br />
<strong>Technical</strong> <strong>Information</strong><br />
SAFE-LOCK <br />
SAFE-LOCK <br />
SAFE-LOCK is a pull-out protection system for high-performance<br />
machining, in particular for heavy-duty cutting. This is achieved by helical<br />
grooves that are ground into the tool shank. These, together with the<br />
respective pin drivers in a shrink fit holder, prevent the tool from being<br />
pulled out, even during extreme machining conditions.<br />
SAFE-LOCK Spiral<br />
grooves ground in cutting<br />
tool shank<br />
By locking the cutting tool in the holder, this pull-out security ensures<br />
optimum process reliability in conjuction with shrink fit runout accuracies<br />
and rigidity for longer tool life and maintains higher productivity and part<br />
accuracies for our customers.<br />
SAFE-LOCK feature in the chuck<br />
M82 www.kennametal.com
High-Performance<br />
Milling Chucks<br />
• Heavy- and fine-milling capabilities.<br />
• Prebalanced G6.3 @ 20,000 RPM — six threaded M6 holes to accept set screws for fine balancing.<br />
• Heavy milling — tighten locknut until O-ring on back face of locknut just touches the flange<br />
on the chuck body to achieve runout .0004" 3 x D1.<br />
• Fine milling — tighten as above, then back the locknut off 1/8–1/4 turn to achieve runout .0002" 3 x D1.<br />
• Sub-zero heat treatment for material stability.<br />
• Through-the-toolholder coolant capability using stop screw as sealing device.<br />
• 3/8" axial adjustment stop screw.<br />
Experience the advantages at your Authorized Kennametal Distributor or at www.kennametal.com.<br />
www.kennametal.com
<strong>Technical</strong> <strong>Information</strong><br />
<strong>Technical</strong> <strong>Information</strong><br />
Hydraulic Chucks<br />
Standard Styles<br />
Kennametal hydraulic chucks provide optimum performance for clamping fullcylindrical<br />
straight shanks, such as solid carbide drills and end mills. Activation<br />
of the chuck is achieved by turning the piston screw, which pressurizes the<br />
hydraulic fluid and exerts force on a thin-walled membrane along the length of<br />
the clamping bore. This highly concentric clamping force not only holds the tool<br />
shank more securely, but also produces a dampening effect that reduces<br />
vibration and helps eliminate microcracking on cutting edges.<br />
Slim Line<br />
Slim Line hydraulic chucks have a sophisticated shape for universal application<br />
and maximum precision. After the chucking process, safety is guaranteed if a<br />
minimum clamping force or a transmittable torque (determined according to<br />
the clamping diameter) is reached. This is achieved through the clamping<br />
screw operation and the stroke of the clamping piston that force the hydraulic<br />
oil into the thin-walled expansion chamber with high pressure.<br />
Trend Line<br />
New Trend Line hydraulic chucks offer maximum precision at an attractive<br />
price. This system provides the same accuracy specifications as the Standard<br />
Line except with an axial back-up screw through the chuck bore to achieve the<br />
3/8" radial adjustment of the cutting tool length. SEFAS chamfering rings also<br />
can be used with our Trend Line chucks.<br />
A safety stop prevents chuck damage caused by over-tightening either with or<br />
without the cutting tool in place. Another unique feature is the special spiral wiper<br />
groove in the chuck’s clamping bore that securely grips oily tool shanks. All<br />
Kennametal hydraulic chucks utilize a range of sealed, cutting-tool-reducing<br />
sleeves to maximize chuck versatility. Reducing sleeves can also be used for<br />
converting bores from inch to metric and vice versa.<br />
Standard/HP Line<br />
Our proven Standard Line hydraulic chucks have an external adjustment screw<br />
for radial alteration up to 3/8" of the cutting-tool length. This feature<br />
eliminates the need to remove the cutting tool or retention knob to make fine<br />
adjustments. Standard Line chucks are prebalanced and can also be used with<br />
SEFAS chamfering rings. Please see the toolholder sections of this catalog for<br />
information regarding balancing quality.<br />
Basic Line<br />
Basic Line hydraulic chucks have a high-quality runout specification of<br />
.0001. These chucks are balanced-by-design for speeds up to 10,000 RPM.<br />
Like the Trend Line, Basic Line chucks utilize an axial back-up screw<br />
through the chuck bore to achieve a 3/8" radial adjustment. Larger body<br />
diameters give this chuck a higher torque transmission (grip) of 220 ft. lbs.<br />
Please note that the standard SEFAS chamfering ring cannot be used in this<br />
chuck design.<br />
To learn more, scan here.<br />
For instructions on how to scan, please see page xxxiii.<br />
M84 www.kennametal.com
General Design<br />
Function<br />
Tightening the piston clamping screw exerts force on the pressure piston, which<br />
presses the hydraulic fluid, exerting force on the thin-walled expansion sleeve.<br />
This pressure causes the sleeve to compress around the tool shank, creating a<br />
highly concentric clamping force.<br />
Accuracy<br />
The accuracy shown is based on a round shank (no flats) with h6 tolerance<br />
and no reducing sleeve.<br />
www.kennametal.com<br />
piston clamping screw<br />
pressure piston<br />
Features<br />
• Turning the external set screw adjusts axial tool length. There is no need<br />
to remove the cutting tool or coolant supply unit for standard designs.<br />
• Maintained contact with the tool-length adjusting sleeve ensures that the<br />
tool is safely held. 10mm of adjustment is provided.<br />
• A sealed bore and a large hole through the tool-length adjusting screw<br />
enable maximum coolant to flow through coolant-fed cutting tools.<br />
• A uniquely designed piston clamping screw prevents damage from<br />
overtightening and accidentally actuating the hydraulic mechanism<br />
without a tool in the chuck.<br />
<strong>Technical</strong> <strong>Information</strong><br />
Hydraulic Chucks<br />
Effect<br />
The hydraulic clamping system has a dampening effect. Vibration in a<br />
mechanical clamping system can cause microcracking on insert cutting edges.<br />
This is prevented by the hydraulic expansion chuck and results in higher<br />
production quality and up to 4x better tool life.<br />
set screw for tool<br />
length adjustment<br />
tool length<br />
adjustment sleeve<br />
expansion chamber<br />
hydraulic medium<br />
clamping bore<br />
• High-performance balanced chucks can be converted to balanceable chucks<br />
by adding a set of Kennametal balance rings that compensate for cutter<br />
imbalance and optimize performance.<br />
• Wiper grooves inside the bore safely grip oily shanks, sealing the bore<br />
to eliminate contamination from chips, dirt, or coolant.<br />
• SEFAS chamfering rings can be added to chucks, reducing the need for step<br />
drills and secondary chamfering operations.<br />
• A wide assortment of reducer sleeves are available to increase the application<br />
range of hydraulic chucks. When using a bushing, the runout could be up to<br />
twice as high as the example shown.<br />
(continued)<br />
M85<br />
<strong>Technical</strong> <strong>Information</strong>
<strong>Technical</strong> <strong>Information</strong><br />
<strong>Technical</strong> <strong>Information</strong><br />
Hydraulic Chucks<br />
General Design (continued)<br />
Application<br />
Hydraulic expansion chucks work best when clamping these style shanks:<br />
• Shanks to DIN-6535 — forms HA, HB, and HE.<br />
• Shanks to DIN-1835 — forms A and B (with shank tolerance h6 and Ra<br />
minimum of 0,3 μm).<br />
• Forms HA and A — plain cylindrical shank, 6–32mm diameter.<br />
• Forms HB and B — Whistle Notch shank, 6–20mm maximum diameter.<br />
• Form HE — Whistle Notch shank, 6–20mm maximum diameter.<br />
(Kennametal suggests the use of a reducer collet).<br />
• Inch straight shanks:<br />
1/4–5/8" (.0004 under nominal diameter maximum).<br />
3/4–1-1/4" (.0005 under nominal diameter maximum).<br />
Slim Line Design<br />
Weldon ® shanks with a maximum diameter of 20mm (3/4") can be<br />
gripped without reducer collets. However, Kennametal recommends using<br />
reducer collets for all flatted shanks. Highest accuracy is obtained<br />
with plain, cylindrical shanks.<br />
Using a sleeve gives higher grip torque:<br />
Formula: sleeve bore x chuck torque = assembled torque<br />
chuck bore<br />
Example: 12mm (sleeve bore) x 220 Nm = 132 Nm<br />
20mm (chuck bore)<br />
While chart shows for a 12mm Hydraulic Chuck = 70 Nm approx.<br />
2x grip advantage<br />
M86 www.kennametal.com<br />
0,003mm<br />
(.0001")<br />
2.5 x D<br />
max 50mm<br />
(2")<br />
2.5 x D<br />
max 50mm<br />
(2")<br />
Dh6<br />
Dh6<br />
0,006mm<br />
(.0002")
Setting Up New Hydraulic Chucks<br />
www.kennametal.com<br />
Length adjustment for:<br />
Standard/HP Line and Slim/Standard Line<br />
clamping screw released<br />
max 10mm (3/8")<br />
limit stop for tool-length adjustment<br />
1. Remove all grease from the hydraulic chuck before using.<br />
2. Insert the cutting tool into the clamping bore as far as the<br />
stop pin/stop screw will allow.<br />
3. Adjust the cutting tool length with a hex wrench.<br />
Maintenance<br />
Kennametal hydraulic chucks are maintenance-free and deliver long service life.<br />
It is important that the clamping function be checked with a test pin on a regular<br />
basis. Any dirt in the bore can be removed with a nylon cleaning brush.<br />
• The clamping function can be tested quickly and easily using the test pin.<br />
• Insert the test pin into the clamping bore as far as the stop pin/stop<br />
screw allow.<br />
• Tighten the clamping screw with a hex wrench as far as the limit stop<br />
by hand tightening.<br />
• The chuck is functioning correctly if the test pin cannot be moved by normal<br />
hand pressure.<br />
Reducing sleeves are available; see page J4.<br />
Cleaning brushes are available; see page L15.<br />
Test pins are available; see page L14.<br />
Length adjustment for:<br />
Trend Line, Basic Line, and Slim/Trend Line<br />
clamping screw released<br />
max 10mm (3/8")<br />
<strong>Technical</strong> <strong>Information</strong><br />
Hydraulic Chucks<br />
limit stop for tool-length adjustment<br />
4. Always tighten the clamping screw with a hex wrench as far as the limit stop<br />
by hand tightening. Never try to adjust the stop pin when the hydraulic chuck<br />
is in the clamped position.<br />
5. The tool is now clamped and ready for use.<br />
turn screw clockwise<br />
to a full stop<br />
testing bar<br />
IMPORTANT<br />
Never tamper with the oil-loading orifice (sealed with a cap) as this could<br />
destroy the clamping ability of the hydraulic chuck and require it to be sent<br />
to Kennametal for service.<br />
In the event of small tool crashes or misuse of the chuck, please contact<br />
your local Kennametal Service and Repair Department to have your<br />
Kennametal hydraulic chuck serviced or repaired by qualified Kennametal<br />
service technicians.<br />
M87<br />
<strong>Technical</strong> <strong>Information</strong>
<strong>Technical</strong> <strong>Information</strong><br />
<strong>Technical</strong> <strong>Information</strong><br />
HPMC System<br />
The HPMC (High-Performance Milling Chuck) System<br />
Application<br />
The HPMC System is ideal for holding round shank cutting tools and extensions<br />
on various applications because it offers greater versatility. This makes it an<br />
excellent choice for end mills, reamers, indexable cutters, drills, straight shank<br />
extensions, and boring systems. The HPMC System, with its powerful gripping<br />
torque, provides the maximum performance for tough roughing and high metal<br />
removal applications, as well as delivering first-rate accuracy for finishing<br />
applications — all with the same chuck.<br />
These toolholders are through-coolant capable with the use of supplied<br />
backup screws. Threaded holes in the chucks accept set screws for fine<br />
balancing, and reducing sleeves allow the same holder to be converted for<br />
smaller gripping sizes.<br />
Design<br />
The HPMC System is comprised of an inner chuck body, a needle roller bearing<br />
assembly, and a thick-walled outer locknut. The inner chuck body, with radial and<br />
axial grooves at the inside bore, acts as a master collet by compressing around<br />
the cutting tool, exerting a very strong grip. The chuck bore is compressed by<br />
roller bearings as they track up a taper of approximately 4°. The roller bearings<br />
are held in a retainer (four per window to maximize contact) at an angle slightly<br />
skewed from that of the chuck taper angle. The locknut bearing retainer’s wall<br />
thickness is greater than that of the chuck body nose. Therefore, as the locknut<br />
is rotated clockwise, the roller bearings track in a helical movement, gradually<br />
climbing the shallow taper.<br />
There are no threads in the HPMC System. As the two tapers are forced together,<br />
a tremendously high, uniform force is created. This squeezes the chuck body<br />
inward, conforming it to the cutting tool shank. Radial grooves assist the internal<br />
diameter by evenly collapsing inward, which improves gripping torque, accuracy,<br />
and prevents fretting. Force continues to be applied until the locknut’s back face<br />
bottoms out on the chuck’s body face. This is the maximum gripping torque<br />
position. Oil residue left on cutting tool shanks can cause slippage, but axial<br />
grooves minimize this by draining contaminants.<br />
Shallow contact angles produce a self-locking effect, so the chuck will not<br />
release during operation. Because of this strong grip, no torque wrench is<br />
required. Also, the high gripping force of the HPMC enhances its ability to<br />
transmit energy to the machine tool, so vibration, deflection, and runout are<br />
minimized. The cutting tool shank offers an advantage over collet chucks<br />
because there is no axial drawback as the locknut is tightened.<br />
A single toolholder provides 5–10% more gripping torque for heavy milling,<br />
and the same chuck is versatile enough to do finishing work, too.<br />
To get the maximum accuracy out of the HPMC System, tighten the locknut to<br />
the face stop and then back off half a turn. As this is done, be sure the O-ring<br />
on the back face of the locknut stays in contact with the chuck face.<br />
Stop screws are included with all HPMC Systems for length adjustment or<br />
coolant feed. These screws are designed with a cone face and reversible<br />
flat face and an O-ring for coolant sealing options.<br />
HPMC Systems are subjected to sub-zero treatment to stabilize the material<br />
and prevent pitting on the bearing contact surface. This helps to ensure long,<br />
worry-free tool life.<br />
M88 www.kennametal.com<br />
Cutter<br />
(continued)
The HPMC (High-Performance Milling Chuck) System (continued)<br />
Cutting Tool Requirements<br />
The outside diameter of the cutting tool shank and the inside diameter of<br />
the HPMC System must be wiped with a clean dry cloth before assembly.<br />
Any contamination will increase runout and reduce gripping force.<br />
Carefully monitor the cutting tools used in these chucks so they do not exceed<br />
h6 (nominal to -.0005") on the shank diameter. Use tools as close to nominal<br />
as possible. Cutting tool shank roundness should be within 0,003mm (.0001").<br />
Undersized tools cause excessive stress and may cause chuck failure.<br />
Optimal chuck performance is attained when the cutting tool shank is round,<br />
without flats. Cutting tools with small flats may be held, but they will increase<br />
runout. Whistle and flatted cutting tool shanks are recommended in conjunction<br />
with reducing sleeves. For best performance, keep shank flats to a minimum.<br />
The minimum length of engagement is 2x the diameter of the cutting tool<br />
shank. Short holding length may cause the tool and/or chuck to break. This<br />
could dislodge the cutting tool and result in serious injury to the operator.<br />
The milling chuck should never be tightened without a cutting tool inside<br />
the bore. High gripping forces will cause permanent deformation to the<br />
inside diameter.<br />
Setting the Accuracy of the Milling Chuck<br />
Heavy Milling<br />
• Tighten the locknut all the way down with a milling chuck wrench until the<br />
O-ring on the locknut just touches the flange of the milling chuck body<br />
(O-ring should not be compressed).<br />
• Accuracy 10–20 μm (.0004–.0008") at 3x diameter up to 50mm (2").<br />
www.kennametal.com<br />
O-ring just touching flange<br />
O-ring backed off 1/8–1/4 from touching flange<br />
<strong>Technical</strong> <strong>Information</strong><br />
HPMC System<br />
Maintenance Operations<br />
Greasing the needle bearing is the only required maintenance. Follow the<br />
procedure below to ensure maintenance is properly performed:<br />
1. Tighten the locknut clockwise to obtain clearance from the retaining ring.<br />
2. Remove the retaining ring from the chuck.<br />
3. Unlock the locknut counterclockwise, and lift the nut assembly<br />
from the chuck.<br />
4. Wipe off old grease from the milling chuck and all other components.<br />
5. Recoat the needle bearings in the locknut liberally with a quality,<br />
water-resistant grease.<br />
6. Regrease the outside diameter of the milling chuck where the locknut<br />
is housed.<br />
7. Reinstall the locknut on the milling chuck body and tighten to gain<br />
clearance for reinserting the retaining ring.<br />
8. Tighten and loosen the locknut several times. Recheck the retaining ring<br />
for correct fitting.<br />
9. Wipe away any excess grease.<br />
Please contact the Kennametal Service and Repair Department to<br />
have your Kennametal products serviced or repaired by qualified<br />
Kennametal service technicians.<br />
Finish Cut<br />
• Back the locknut off 1/8–1/4 of a turn from above position.<br />
• Best accuracy — 5 μm (.0002") at 3x diameter up to 50mm (2").<br />
face contact can distraught chuck<br />
and damage bearings<br />
O-ring touching face of chuck<br />
CAUTION<br />
DO NOT over tighten the milling chuck without a tool shank inserted. This may cause serious damage to the milling chuck or loss of performance.<br />
X<br />
M89<br />
<strong>Technical</strong> <strong>Information</strong>
<strong>Technical</strong> <strong>Information</strong><br />
<strong>Technical</strong> <strong>Information</strong><br />
Tunable Tooling System (TTS)<br />
Tunable Tooling System (TTS)<br />
Overview<br />
When machining with extended length setups, undesirable regenerative vibrations<br />
(chatter) can arise, causing poor surface finish, dimensional control issues, and<br />
tool breakage. To avoid chatter, machine operators are generally forced to reduce<br />
cutting parameters, which decreases metal removal rates and diminishes<br />
productivity.<br />
Cutting force fluctuates when chip thickness varies. This is caused by waves left<br />
on the workpiece from the previous pass. These waves may create chatter when<br />
the cutting tool and workpiece interact. Continued chatter can further produce<br />
variation in cutting force, leading to more vibration. If not addressed, the<br />
amplitude of vibration may eventually reach levels that cause the tool<br />
to bounce out of the workpiece or even result in catastrophic failure.<br />
This problem can be approached in many different ways. Chatter can be avoided<br />
by drastically reducing cutting speeds to increase process damping (friction<br />
between flank face and workpiece), which dissipates energy to reduce vibrations.<br />
Another approach utilizes milling cutters that have inserts with differential<br />
spacing. This minimizes the regenerative effect by creating a disturbance on the<br />
wave pattern left on the workpiece. However, this approach provides limited<br />
success as chip loads are no longer evenly distributed over the cutting edges and<br />
may require the feed rate to be restricted. Also, because the spacing is not even,<br />
the surface quality could be negatively affected.<br />
While passive dampening improves the dynamic stiffness of an extended reach<br />
tool, the damping mechanism will not perform the same with every machine.<br />
Not only does the natural frequency of the tool affect its dynamic stiffness,<br />
frequencies inherent to the machine do as well. Because machine tools have<br />
their own dynamic signature, a tool that is tuned on one machine may not be<br />
tuned on another. Unlike other products on the market that are pretuned,<br />
Kennametal tunable boring bars and milling adapters are tunable. They allow<br />
users to adjust the passive damper, optimally tuning the tool for a specific<br />
machine or setup. This enables extended reach tooling to be retuned to match<br />
a machine’s dynamic signature, even as it changes over time. A key benefit<br />
of Kennametal’s tunable boring bars and milling adapters is that they can be<br />
optimally tuned for any given setup. While Kennametal standard tunable<br />
products come pretuned from the factory, it may be beneficial to further<br />
optimize them once installed.<br />
The problem with these solutions is that they do not allow high metal removal<br />
rates to be maintained. To uphold high rates, the dynamic stiffness of the system<br />
must be increased. Dynamic stiffness is proportional to the product of static<br />
stiffness and damping ratio. Static stiffness can be increased through using<br />
shorter setups or larger toolholder diameters. Materials with a higher modulus<br />
of elasticity can also increase static stiffness.<br />
The Kennametal Tunable Tooling System (TTS) provides a means for maximizing<br />
the dynamic stiffness of boring bars and milling adapters by suppressing<br />
vibrations with a passive dynamic absorber. TTS is designed with an internal mass<br />
that vibrates close to the natural frequency of the most dominant vibration mode<br />
in the system. The motion of the internal mass will dissipate energy and prevent<br />
chatter. The overall result depends on a machine’s dynamic characteristics*<br />
and the rigidity of the connection between tool and machine tool. Manufacturing<br />
tolerances, preload, and wear may change the dynamic response of a machine<br />
and adversely affect overall results.<br />
*Machines from same builder and model are not dynamically identical.<br />
(continued)<br />
M90 www.kennametal.com
Tunable Tooling System (TTS) (continued)<br />
With the Kennametal TTS System, longer L:D ratio toolholders can be used for<br />
larger DOC, better surface finishes, and longer tool life. When TTS is applied to<br />
milling adapters, using greater insert density on milling cutters or increasing<br />
ADOC or WOC enables higher MRR. Better surface finishes and tool life can also<br />
be expected from these adjustments.<br />
The benefits of using Kennametal’s Tunable Systems go beyond increased metal<br />
removal rates. In metalcutting tests, a good correlation between dynamic stiffness<br />
and vibration levels were measured at the spindle. Vibrations can not only cause<br />
premature tool life, but also limit spindle bearing life. Preventing vibration from<br />
propagating through the machine promotes longer life for spindle-related<br />
components and maintains machine accuracy over time.<br />
Dynamic Stiffness<br />
Figure 1 shows the relative dynamic stiffness of a tunable boring bar as a function<br />
of adjusting screw tightness — loose to tightened (left to right).<br />
The chart shows that for the given bar, optimal tuning occurs at about 70%<br />
or when the relative performance equals 1.<br />
It is also important to note that performance decreases more severely when the<br />
tool is over-tuned, compared to when it is under-tuned. For this reason, it is best<br />
to slightly under-tune the system.<br />
www.kennametal.com<br />
surface finish Ra (uin)<br />
dynamic stiffness (normalized)<br />
45<br />
40<br />
35<br />
30<br />
25<br />
20<br />
<strong>Technical</strong> <strong>Information</strong><br />
Tunable Tooling System (TTS)<br />
15<br />
40 50 60 70<br />
feed (IPM)<br />
80 90<br />
Surface finish measurements comparing a pretuned milling<br />
adapter from a competitor and a Kennametal’s optimally tuned adapter<br />
on the spindle. An increase of up to 50% in feed rate for similar<br />
surface finish values can be noticed.<br />
1.20<br />
1.00<br />
0.80<br />
0.60<br />
0.40<br />
0.20<br />
0.00<br />
1.20<br />
1.00<br />
0.80<br />
0.60<br />
0.40<br />
0.20<br />
0.00<br />
Competitor<br />
(pre-tuned)<br />
0 1 2 3 4 5 6 7 8 9<br />
0.34<br />
Surface Finish (Ra) vs. Feed Rate<br />
Kennametal Competitor<br />
0.75<br />
Normalized Dynamic Stiffness<br />
0.25<br />
Kennametal<br />
(tunable)<br />
number of turns<br />
Fig. 1<br />
Dynamic Stiffness of Damped Milling Adapters<br />
0.53<br />
1.00<br />
machine A machine B<br />
0.32<br />
Standard<br />
Toolholder<br />
M91<br />
<strong>Technical</strong> <strong>Information</strong>
<strong>Technical</strong> <strong>Information</strong><br />
<strong>Technical</strong> <strong>Information</strong><br />
Tunable Milling<br />
Tunable Milling Adapters<br />
The Kennametal Tuned Tooling System offers a full line of tunable milling adapters<br />
capable of performing at maximum output without the hindrance of vibration.<br />
Tunable milling adapters are through-coolant capable, and, because the internal<br />
damper can be adjusted to alleviate chatter, they provide optimum surface finish<br />
and longer tool life.<br />
General Guidelines for Milling with Extended Reach Adapters<br />
1. Loosen both clamping screws.<br />
2. Turn the adjusting screw in the positive direction until it becomes snug. The adjusting screw becomes snug when it locks the tuner mass.<br />
3. Turn the screw one complete turn in the negative direction and take a test cut.<br />
4. Repeat Step 3 until good surface finish is achieved. You may need to use small increments to find an optimal position.<br />
5. Back the adjusting screw off a 1/4–1/2 turn in the negative direction.<br />
6. Tighten both clamping screws and take a test cut to confirm desired results.<br />
1. 2. 3.<br />
4. 5. 6.<br />
*The TTS Milling Adapters will need to be re-tuned if the milling cutter is replaced with another with different mass.<br />
M92 www.kennametal.com
Tunable Boring Bars<br />
The Kennametal complete portfolio of Tunable Boring Bars helps prevent chatter<br />
and other problems associated with an internal dampening package designed<br />
for deep-hole boring applications.<br />
Advantages<br />
Optimal Rigidity<br />
Eliminates vibration to improve surface<br />
quality and tolerance.<br />
Increased Productivity<br />
Larger depth of cut and better chip removal<br />
by up to 10:1 (steel) and 15:1 (carbide)<br />
length-to-diameter ratio.<br />
Relative Stability<br />
10<br />
9<br />
8<br />
7<br />
6<br />
5<br />
4<br />
3<br />
2<br />
1<br />
TTS Tool:<br />
max DOC with a benefit<br />
of more than 500%<br />
www.kennametal.com<br />
Standard Tool:<br />
max DOC on<br />
stable conditions<br />
Machining without Chatter or Vibration<br />
Less noise exposure and improved results.<br />
Tunable Damping Mechanism<br />
To account for different vibration behavior,<br />
bars can be tuned on the machine, and<br />
tools can be adjusted.<br />
TTS Tool — area of optimum application<br />
Standard Tool — area of optimum application<br />
4 5 6 7 8 9 10 11 12<br />
Standard Tool L/D=4<br />
Note: This chart illustrates how KM Tunable Boring Bars proivde greater stability than standard toolholders, even in larger tool length-to-diameter ratios.<br />
Increased stablilty enables greater depth of cut.<br />
<strong>Technical</strong> <strong>Information</strong><br />
Tunable Boring Bars<br />
TTS Tool L/D=7<br />
Increased stability allows for<br />
greater depth of cut<br />
M93<br />
<strong>Technical</strong> <strong>Information</strong>
<strong>Technical</strong> <strong>Information</strong><br />
<strong>Technical</strong> <strong>Information</strong><br />
Tunable Boring Bars<br />
General Guidelines for Boring with Extended Reach Bars<br />
1. Select the largest boring bar diameter possible. Larger diameter bars<br />
are stiffer and more stable. Remember to leave enough space for<br />
chip evacuation.<br />
2. While larger diameters are more stable, the diameter may also be too large,<br />
preventing proper chip evacuation, affecting surface finish, or damaging<br />
the bar. Ensure the bar diameter is not so large that it will interfere with<br />
chip evacuation.<br />
3. Keep the overhang length of the tunable boring bar as short as possible.<br />
For Tunable Boring Bars, select the shortest bar possible.<br />
4. Balance machining parameters to prevent the occurrence of uncontrolled<br />
vibrations and resonance.<br />
5. The tool setting angle should be as close as possible to 90°.<br />
Selecting the Correct Bar<br />
Kennametal offers TTS Boring Bars with KM back-ends or straight shanks,<br />
KM front-ends, or bolt-on head connections, and they are available in<br />
either steel or carbide.<br />
To find the appropriate boring bar, first consider that the length-to-diameter ratio<br />
(L:D) should always be kept as small as possible. The smaller the L:D ratio, the<br />
greater the stiffness and stability of the bar.<br />
Holding Method<br />
The holding method is as critical to performance as selecting and tuning<br />
the boring bar. The connection between the boring bar and the machine should<br />
be as rigid as possible. Rigid connections enable the tuner mass to function<br />
more effectively. The minimum holding length of the bar should be 2.5x the<br />
diameter of the bar.<br />
Various connection methods are shown below and listed from most stable<br />
to least stable:<br />
Face and Taper Contact with Interference Fit<br />
Example: KM Tunable Boring Bar clamped with short overhang<br />
KM clamping unit on turret<br />
Split Sleeve/Full Cylindrical Contact<br />
Example: Straight Shank Tunable Boring Bar with split sleeve<br />
Screw Clamping<br />
Example: Straight Shank Tunable Boring Bar with screw clamping on bar flat<br />
6. Make sure the insert is in the correct center position.<br />
7. By choosing a small corner radius you can reduce forces on the workpiece.<br />
8. Use cutting heads with a negative back-rake angle that is as small<br />
as possible.<br />
9. Using inserts with a positive chip former is preferred.<br />
10. Change inserts when any flank wear is detected because radial back forces<br />
will increase in proportion to wear.<br />
The L:D ratios of Tunable Boring Bars are fixed, where straight shank tunable bar<br />
L:D ratios are not. When using straight shank bars, the overhang length should be<br />
kept as small as possible.<br />
Please note that only standard pretuned straight shank tunable bars are<br />
pretuned at the factory for 10:1 L:D. If the straight shank bar is mounted<br />
with less than 10:1 L:D, it may be necessary to retune the bar. This is<br />
discussed in more detail in the “Tuning the Bar” section.<br />
Most Stable<br />
Least Stable<br />
M94 www.kennametal.com
Tuning the Bar<br />
Standard tunable boring bars are pretuned at our factory. Though they may<br />
work right out of the box on some machines, for others, they may chatter because<br />
of differences in dynamic response. Chatter can be eliminated by optimally tuning<br />
the boring bar for a given setup, and the key benefit of our tunable boring bars<br />
is that they can be adjusted for any application. Therefore, corrections can be<br />
made to put the tool in tune with your machine, optimizing dynamic stiffness<br />
and negating chatter.<br />
Retuning a Tunable Boring Bar<br />
www.kennametal.com<br />
Several factors influence the required adjusting screw setting<br />
on tunable boring bars, including:<br />
• Overhang and L:D ratio.<br />
• Depth of cut.<br />
• Overall dynamics and rigidity of the machine.<br />
<strong>Technical</strong> <strong>Information</strong><br />
Tunable Boring Bars<br />
When retuning, it is best to slightly under-tune the bar. For this reason, the tuning<br />
process focuses on identifying the adjusting screw setting where chatter starts,<br />
and then backing off the screw by a 1/2 turn in the negative direction.<br />
1. Loosen both clamping screws.<br />
2. Turn the adjusting screw in the positive direction until it becomes snug. The adjusting screw becomes snug when it locks the tuner mass.<br />
3. Turn the screw one complete turn in the negative direction and take a test cut.<br />
4. Repeat Step 3 until chatter is eliminated.<br />
5. (A) Once chatter is eliminated, note that it starts between the current screw setting and one turn in the positive direction. Make 1/4 turn adjustments within<br />
this range, taking test cuts for each setting, until you can identify the adjusting screw setting that causes chatter to start. (B) Once the adjusting screw setting<br />
that causes chatter is determined, back the adjusting screw off a 1/2 turn in the negative direction.<br />
6. Tighten both clamping screws and take a test cut to confirm desired results.<br />
1. 2. 3.<br />
4. 5. 6.<br />
M95<br />
<strong>Technical</strong> <strong>Information</strong>
<strong>Technical</strong> <strong>Information</strong><br />
<strong>Technical</strong> <strong>Information</strong><br />
Screw-On Adapters<br />
Screw-On Adapters<br />
The universal design of Kennametal Screw-On Milling Cutter Adapters enables old<br />
and new tool styles to be used interchangeably yet maintain a rigid connection.<br />
All adapters offer superior runout accuracy, high metal removal rates, and<br />
through-coolant capability. Screw-On Milling Cutter Adapters can be used with<br />
Kennametal’s wide range of best-in-class inserts to guarantee excellent cutting<br />
results, performance, and productivity.<br />
Screw-On products can also be used with a variety of machining applications<br />
ranging from low-speed milling applications to rates greater than 20,000 RPM,<br />
with the added feature of coolant directed to the cutting edge. The system’s<br />
accuracy, repeatability, and stability should be equal or greater to the<br />
performance of any similar systems on the market today in all applications.<br />
Features, Functions, and Benefits<br />
• All adapters have through-coolant capability.<br />
• All products are stock standard products.<br />
• High accuracy — low runout.<br />
• Stable system for helix, pocket milling, contour cutting, and ramping.<br />
• KM , HSK, and steep taper prebalanced to G6.3 at 16,000 RPM.<br />
• Extensions and reducers are designed with through-coolant prevision.<br />
• The fine-tuned Screw-On indexable end mill cutters and the KM/ERICKSON toolholders together with a wide range of best-in-class inserts ensure<br />
excellence in cutting results, performance, and productivity.<br />
Applying Screw-On Adapters<br />
Heavy-Metal Adapters<br />
• Devibration extensions with heavy metal (Densimet D176).<br />
• Internal threads with accurate mating surface for best possible concentric<br />
and axial runout with the extended tools.<br />
• Through-coolant capability.<br />
Reducers<br />
• Adapter uses Screw-On tools with smaller size.<br />
• Through-coolant capability.<br />
• Mating surface helps generate accurate concentric and axial runout.<br />
A<br />
C D B<br />
A. Ground pilot and face for high rigidity and accuracy.<br />
B. Extended shanks have slow taper for added rigidity.<br />
C. Thread locking system.<br />
D. Through coolant on all adapters.<br />
E. Designed for long reach.<br />
F. Balanced.<br />
M96 www.kennametal.com<br />
E<br />
Extensions with Weldon ® Shank<br />
• Screw-On type extension with Weldon shank, as per DIN 1835-B.<br />
• Shank manufactured as per DIN 1835-B, internal-coolant capability.<br />
Extensions<br />
• Adapter uses Screw-On tools with larger thread size.<br />
• Through-coolant capability.<br />
• Mating surface helps generate accurate<br />
concentric and axial runout.<br />
To learn more, scan here.<br />
For instructions on how to scan, please see page xxxiii.<br />
F
Tightening Torque Milling Head<br />
Connecting<br />
thread size<br />
Through-Coolant Shell Mill Adapters<br />
Shell mill adapters with high-pressure and high-volume through-coolant capability<br />
are now available as standard offerings. Their unique design enables maximum<br />
coolant flow to be channeled directly to a tool’s cutting edge.<br />
These latest shell mill adapters with through coolant are ideal for holding<br />
indexable milling cutters. Together, the toolholder and cutter ensure excellence<br />
in tool life, surface quality, and productivity. With this combination, high-pressure<br />
or high-volume coolant can dramatically improve surface finishes, reduce tool<br />
wear, decrease cutting force, and control chip shape and evacuation. This<br />
makes through-coolant shell mill adapters perfect for machining hardened<br />
steels and other difficult-to-cut materials like titanium.<br />
Options<br />
• Extended lengths available in standard stocked offering.<br />
• Drive keys upgraded to high-strength material, allowing<br />
for high-torque capability.<br />
• Adapters are set for form AD coolant and can be converted<br />
to form B flange coolant using adjusting screws.<br />
• No extra components necessary to buy for standard tools.<br />
www.kennametal.com<br />
Tightening<br />
torque<br />
Mounting key size<br />
(mm)<br />
M10 40 Nm 15<br />
M12 60 Nm 17<br />
M16 80 Nm 24<br />
<strong>Technical</strong> <strong>Information</strong><br />
Through-Coolant Shell Mill Adapters<br />
<strong>Information</strong><br />
Coolant Flow Options<br />
• Through holes in the face of the pilot.<br />
• Through the center. <strong>Technical</strong><br />
M97
<strong>Technical</strong> <strong>Information</strong><br />
<strong>Technical</strong> <strong>Information</strong><br />
Collet Chuck Styles<br />
Collet Chuck Styles<br />
TG Collet Chucks<br />
Primarily for gripping straight shanks, TG collet chucks are the ERICKSON <br />
industry standard. These chucks offer flexibility for drilling, milling, and tapping<br />
applications and are also capable of gripping Whistle Notch cutters. TG collet<br />
chucks should be used for medium to light operations.<br />
TG collet chucks have a range of dedicated milling and tap collets available.<br />
Balanceable locknuts are offered for operating at relatively high speeds.<br />
Sealing/coolant locknuts and bonded collets are also available for chucks<br />
utilizing through coolant.<br />
ER Collet Chucks<br />
As the DIN 6499 industry standard, ER collet chucks are designed to grip straight<br />
shanks. They are flexible for drilling, light milling, and tapping applications. ER<br />
collet chucks are used for medium to light applications at medium speeds.<br />
Dedicated tap collets are available for this style collet chuck. For ER collet chucks<br />
using through coolant, sealing and coolant locknuts are available.<br />
• Clamping range of 0,3mm (.016").<br />
• Good rigidity and gripping power of 3:1.<br />
• Good concentricity.<br />
• Wide clamping range of 1mm (.040").<br />
• Fair rigidity and gripping power of 2:1.<br />
• Good concentricity.<br />
(continued)<br />
M98 www.kennametal.com
Collet Chuck Styles (continued)<br />
DA Collet Chucks<br />
DA collet chucks are an ERICKSON industry standard. They are intended for<br />
gripping straight shanks, but the DA style also has the ability to grip drill margins.<br />
This eliminates center drilling by shortening the drill. DA collet chucks also offer<br />
flexibility for drilling, milling, and tapping.<br />
DA — 01 Series<br />
Extended Nose Style<br />
Long nosepiece bearing and compensating locknut delivery offer<br />
proper axial position and prevent twisting. This style is ideal when<br />
extreme accuracy is required.<br />
DA — 04 Series<br />
Close Center Style<br />
Designed at the minimum safe outside diameter to solve close center problems.<br />
This style should be used where reach and close proximity of workpiece problems<br />
are encountered.<br />
DA — 08 Series<br />
Stub Nose Style<br />
This DA style has a compensating nose ring with the locknut that allows collets to<br />
find their own axial position and prevent twisting. They should be used when<br />
better rigidity is required.<br />
www.kennametal.com<br />
<strong>Technical</strong> <strong>Information</strong><br />
Collet Chuck Styles<br />
Milling and tap collet styles dedicated to the DA style are available. These chucks<br />
can also make use of bonded collets when employing through coolant. DA collet<br />
chucks can utilize three styles of locknuts.<br />
• Clamping range of 0,8mm (.031").<br />
• Fair rigidity and gripping power of 1:1.<br />
• Concentricity >0,025mm (.001").<br />
M99<br />
<strong>Technical</strong> <strong>Information</strong>
<strong>Technical</strong> <strong>Information</strong><br />
<strong>Technical</strong> <strong>Information</strong><br />
Collets<br />
TG • Tremendous Grip<br />
• Provides Tremendous Grip and accuracy for all drilling applications.<br />
• 0,4mm [1/64" (.016")] range of collapse.<br />
• Grips on back taper and margin of drill for maximum feed rates and more accurate holes.<br />
• Manufactured to DIN 6499 Class 2 accuracy.<br />
TGC • Tremendous Grip Coolant<br />
• Rubber-filled slots seal collet for coolant-fed tool applications.<br />
• Suitable for coolant pressure up to 100 bar (1500 psi).<br />
• Unique design features permit easy entry into nosepiece.<br />
• Available from stock in all popular sizes.<br />
• Fits all standard TG-style collet chucks.<br />
• 0,13mm (.005") range collapse.<br />
• Design enables flutes of drills to enter collet, unlike competitive designs.<br />
TGHP • Tremendous Grip High Precision<br />
• Twice as accurate as standard TG- and ER-style collets.<br />
• Available from stock in all popular sizes.<br />
• Can be used in all standard TG-style collet chucks.<br />
• 0,25mm (.010") range of collapse.<br />
• Manufactured to DIN 6499 Class 1 accuracy.<br />
TGCHP • Tremendous Grip Coolant High Precision<br />
• Rubber-filled slots seal collet for coolant-fed tool applications.<br />
• Suitable for coolant pressure up to 100 bar (1500 psi).<br />
• Unique design features permit easy entry into nosepiece.<br />
• Available from stock in all popular sizes.<br />
• Fits all standard TG-style collet chucks.<br />
• 0,13mm (.005") range of collapse.<br />
• Manufactured to DIN 6499 Class 1 accuracy.<br />
TGNP • Tremendous Grip Non-Pullout, Weldon ® Style<br />
• Positive retention and drive provided by drive wedge in collet.<br />
• Eliminates inaccuracy created by solid end mill holders.<br />
• 0,13mm (.005") range of collapse.<br />
• Fits all standard TG-style collet chucks.<br />
TGST • Tremendous Grip Single-Angle Tap Collet<br />
• Designed to grip the tap on the shank and square.<br />
• Fits all standard TG-style collet chucks.<br />
• 0,13mm (.005") range of collapse.<br />
TGSTC • Tremendous Grip Single-Angle Tap Collet, Coolant Style<br />
• Rubber-filled slots seal collet for coolant-fed tool applications.<br />
• Suitable for coolant pressure up to 70 bar (1000 psi).<br />
• Designed to grip the tap on the shank and square.<br />
• Fits all standard TG-style collet chucks.<br />
• 0,13mm (.005") range of collapse.<br />
M100 www.kennametal.com
ER • Single Angle<br />
• Provides good grip and accuracy for all drilling applications.<br />
• Wide clamping range.<br />
• Available in both inch and metric bores.<br />
• 1mm (.040") range of collapse.<br />
• Manufactured to DIN 6499 Class 2 accuracy.<br />
ERTC • Single-Angle Tap Collet<br />
• Designed to grip taps on shank and square to eliminate slippage.<br />
• Fits all standard ER-style collet chucks.<br />
• 0,13mm (.005") range of collapse.<br />
ERTCT • Single-Angle Tap Collet with Axial Compensation<br />
• Designed to grip taps on shank and square to eliminate slippage.<br />
• Tension only, cost-effective solution for machines that require axial compensation for tapping.<br />
• Fits all standard ER-style collet chucks.<br />
DA • Double-Angle<br />
• 0,8mm [1/32" (.031")] range of collapse.<br />
DAC • Double-Angle Coolant<br />
• Rubber-filled slots seal coolant-fed tool applications.<br />
• Suitable for coolant pressure up to 70 bar (1000 psi).<br />
• Fits all standard DA-style collet chucks.<br />
• 0,13mm (.005") range of collapse.<br />
DANP • Double-Angle Non-Pullout — Weldon ® Style<br />
• Designed to grip end mills with Weldon-style shanks.<br />
• Positive retention and drive provided by drive wedge in collet.<br />
• Eliminates inaccuracy created by solid end mill adapters.<br />
• Fits all standard DA-style collet chucks.<br />
• 0,13mm (.005") range of collapse.<br />
www.kennametal.com<br />
<strong>Technical</strong> <strong>Information</strong><br />
Collets<br />
M101<br />
<strong>Technical</strong> <strong>Information</strong>
<strong>Technical</strong> <strong>Information</strong><br />
<strong>Technical</strong> <strong>Information</strong><br />
Collets<br />
TG Collet Series<br />
The TG collet series is the first choice when high precision, gripping torque, and<br />
versatility are required. These single-angle collet chucks grip at approximately<br />
3:1 for grip torque versus tightening torque without a stop screw.<br />
Standard Collet<br />
• 0,40mm (.016") maximum collapse.<br />
Bonded Seal Collet<br />
• 0,13mm (.005") maximum collapse.<br />
• 100 bar (1,500 psi) coolant pressure.<br />
DA Collet Series<br />
DA-style collet chucks have a grip of approximately 1:1 tightening torque<br />
versus grip torque.<br />
ER Collet Series<br />
The ER collet series is an international standard style used for many<br />
applications. Collets from this series are ideal for boring, milling, reaming,<br />
tapping, and grinding.<br />
ER collets are manufactured from alloy steel and hardened for long life.<br />
They offer a grip of approximately 2:1 tightening torque versus grip torque.<br />
See page M103 for assembly/disassembly instructions.<br />
The taper’s slow angle produces a sticking action, so collets must be snapped<br />
into the locknut before assembling the locknut onto the chuck. Follow the<br />
procedure on page M103 for assembly/disassembly instructions.<br />
M102 www.kennametal.com
TG and ER Collet Assembly/Disassembly Instructions<br />
• First, place the locknut with nose ring over collet nose. Apply force on the<br />
locknut until it snaps into place. The nose ring is now seated into the collet<br />
undercut and should turn freely.<br />
www.kennametal.com<br />
• To remove the collet from the locknut, hold the nut firmly in one hand and<br />
apply a bending action on the collet with the other hand until the collet snaps<br />
free from the nose ring.<br />
NOTE<br />
Inserting the cutting tool less than 2/3 the gripping length into the collet can permanently damage the collet. The full length of the gripping bore needs to be<br />
maintained to achieve maximum accuracy and safety. Collet accuracies are based on size-for-size conditions. Using the collapsible range can influence the<br />
accuracy and gripping powers. Never try to stretch collets by clamping oversized cutting tools.<br />
L = 50mm (1.969")<br />
D = 18–28mm (.71–1.02")<br />
L = 50mm (1.969")<br />
D = 10–18mm (.39–.71")<br />
L = 25mm (.984")<br />
D = 6–10mm (.24–.39")<br />
L = 16mm (.630")<br />
D = 3–6mm (.12–.24")<br />
L = 10mm (.394")<br />
D = 1,6–3mm (.06–.12")<br />
L = 6mm (.236")<br />
D = 1–1,6mm (.04–.06")<br />
ER-Style Collet TG-Style Collet<br />
TGHP (precision) =<br />
DIN 6499 Class 1<br />
Maximum Runout Error<br />
0,008mm<br />
(.0003")<br />
0,010mm<br />
(.0004")<br />
0,015mm<br />
(.0006")<br />
TG (standard) =<br />
ER — DIN 6499 Class 2<br />
<strong>Technical</strong> <strong>Information</strong><br />
Collets<br />
0,020mm<br />
(.0008")<br />
M103<br />
<strong>Technical</strong> <strong>Information</strong>
<strong>Technical</strong> <strong>Information</strong><br />
<strong>Technical</strong> <strong>Information</strong><br />
Gripping Strength Comparison Chart<br />
ER collet chuck<br />
based on ER40<br />
NOTE: Torque values in in. lbs.<br />
Minimum values calculated for maximum bore size and minimum shank size.<br />
Maximum values calculated for minimum bore size and maximum shank size.<br />
Gripping Strength Comparison Chart • Metric<br />
TG collet chuck<br />
based on TG100<br />
standard<br />
hydraulic<br />
Gripping Strength Comparison Chart • Inch<br />
Slim Line<br />
hydraulic<br />
mm Nm mm Nm mm Nm mm Nm<br />
3 — 3 — 3 — 3 —<br />
4 — 4 — 4 — 4 —<br />
5 — 5 — 5 — 5 —<br />
6 38 6 — 6 12 6 26<br />
8 52 8 115 8 30 8 50<br />
10 70 10 144 10 40 10 80<br />
12 103 12 300 12 70 12 115<br />
14 108 14 312 14 100 14 160<br />
16 118 16 325 16 135 16 200<br />
18 156 18 339 18 180 18 250<br />
20 206 20 384 20 220 20 230<br />
25 255 25 536 25 500 25 —<br />
32 — 32 569 32 700 32 —<br />
40 — 40 — 40 — 40 —<br />
50 — 50 — 50 — 50 —<br />
ER collet chuck<br />
based on ER40<br />
TG collet chuck<br />
based on TG100<br />
standard<br />
hydraulic<br />
Slim Line<br />
hydraulic<br />
in ft. lbs. in ft. lbs. in ft. lbs. in ft. lbs.<br />
1/8 — 1/8 — 1/8 — 1/8 —<br />
3/16 — 3/16 — 3/16 — 3/16 —<br />
1/4 28 1/4 — 1/4 9 1/4 19.2<br />
5/16 38 5/16 85 5/16 22 5/16 —<br />
3/8 52 3/8 106 3/8 30 3/8 59<br />
7/16 — 7/16 — 7/16 — 7/16 —<br />
1/2 76 1/2 221 1/2 55 1/2 89<br />
9/16 80 9/16 230 9/16 74 9/16 —<br />
5/8 87 5/8 240 5/8 100 5/8 148<br />
11/16 115 11/16 250 11/16 129 11/16 —<br />
3/4 152 3/4 283 3/4 148 3/4 155<br />
7/8 — 7/8 — 7/8 — 7/8 —<br />
1 188 1 395 1 369 1 —<br />
1 1/4 — 1 1/4 420 1 1/4 516 1 1/4 —<br />
1 1/2 — 1 1/2 — 1 1/2 — 1 1/2 —<br />
2 — 2 — 2 — 2 —<br />
M104 www.kennametal.com
NOTE: Torque values in in. lbs.<br />
Minimum values calculated for maximum bore size and minimum shank size.<br />
Maximum values calculated for minimum bore size and maximum shank size.<br />
www.kennametal.com<br />
milling<br />
chuck<br />
Gripping Strength Comparison Chart • Metric<br />
Shrink Fit<br />
Gripping Strength Comparison Chart • Inch<br />
<strong>Technical</strong> <strong>Information</strong><br />
Gripping Strength Comparison Chart<br />
standard (Nm) high torque (Nm)<br />
mm Nm min max min max<br />
3 — 3.3 11 — —<br />
4 — 5.2 16 — —<br />
5 — 6.8 20 — —<br />
6 — 19 116 — —<br />
8 — 26 176 — —<br />
10 — 91 312 — —<br />
12 — 132 445 269 582<br />
14 — 169 546 346 723<br />
16 — 253 587 444 779<br />
18 — 304 865 540 1101<br />
20 1127 412 1049 654 1292<br />
25 1666 901 1896 1233 2227<br />
32 2347 1033 2079 1338 2384<br />
40 — 1907 3482 2432 4007<br />
50 — 2651 4465 3029 4843<br />
milling<br />
chuck<br />
Shrink Fit<br />
standard (ft. lbs.) high torque (ft. lbs.)<br />
in ft. lbs. min max min max<br />
1/8 — 3.2 13 — —<br />
3/16 — 4.6 19 — —<br />
1/4 — 13 86 — —<br />
5/16 — 18 117 — —<br />
3/8 — 53 196 — —<br />
7/16 — 65 269 — —<br />
1/2 — 111 340 225 455<br />
9/16 — 160 410 285 535<br />
5/8 — 172 442 307 576<br />
11/16 — 262 648 427 814<br />
3/4 831 336 797 509 970<br />
7/8 — 363 791 524 951<br />
1 1229 674 1382 939 1647<br />
1 1/4 1731 784 1445 1115 1775<br />
1 1/2 — 1132 1818 1389 2075<br />
2 — 1942 3049 2357 3465<br />
M105<br />
<strong>Technical</strong> <strong>Information</strong>