MOTIF XF Editor VST Owner's Manual - Cyborgstudio.com
MOTIF XF Editor VST Owner's Manual - Cyborgstudio.com
MOTIF XF Editor VST Owner's Manual - Cyborgstudio.com

Create successful ePaper yourself
Turn your PDF publications into a flip-book with our unique Google optimized e-Paper software.
<strong>MOTIF</strong> <strong>XF</strong> <strong>Editor</strong> <strong>VST</strong><br />
Owner’s <strong>Manual</strong><br />
Contents<br />
What is the <strong>MOTIF</strong> <strong>XF</strong> <strong>Editor</strong> <strong>VST</strong>? .........................................2<br />
Data Structure of the <strong>MOTIF</strong> <strong>XF</strong> <strong>Editor</strong> <strong>VST</strong> ...........................3<br />
Starting the <strong>MOTIF</strong> <strong>XF</strong> <strong>Editor</strong> <strong>VST</strong> ..........................................4<br />
An Example of <strong>MOTIF</strong> <strong>XF</strong> <strong>Editor</strong> <strong>VST</strong> in Use..........................7<br />
<strong>MOTIF</strong> <strong>XF</strong> <strong>Editor</strong> <strong>VST</strong> Window...............................................13<br />
Basic Operations....................................................................35<br />
Menu ........................................................................................37<br />
Troubleshooting .....................................................................54<br />
• Copying of the <strong>com</strong>mercially available music sequence data and/or digital audio files is strictly prohibited except for<br />
your personal use.<br />
• The software and this owner’s manual are exclusive copyrights of Yamaha Corporation.<br />
• Copying of the software or reproduction of this manual in whole or in part by any means is expressly forbidden without<br />
the written consent of the manufacturer.<br />
• Yamaha makes no representations or warranties with regard to the use of the software and documentation and cannot<br />
be held responsible for the results of the use of this manual and the software.<br />
• The screen displays as illustrated in this Owner’s <strong>Manual</strong> are for instructional purposes, and may appear somewhat<br />
different from the screens which appear on your <strong>com</strong>puter.<br />
• The <strong>com</strong>pany names and product names in this Owner’s <strong>Manual</strong> are the trademarks or registered trademarks of their<br />
respective <strong>com</strong>panies.<br />
• Click on the blue-colored text to jump to the related item in this manual.<br />
This owner’s manual assumes that you are already familiar with basic Windows/Mac operations. If you are not,<br />
please refer to the owner’s manual which came with your Windows/Mac software before using the <strong>MOTIF</strong> <strong>XF</strong> <strong>Editor</strong><br />
<strong>VST</strong>.<br />
For information about hardware requirements, the interconnection of devices and the installation of the <strong>MOTIF</strong> <strong>XF</strong><br />
<strong>Editor</strong> <strong>VST</strong> software, refer to the separate Installation <strong>Manual</strong> as well as the Owner’s <strong>Manual</strong> for the respective MIDI<br />
device.<br />
© 2010 Yamaha Corporation. All rights reserved.<br />
<strong>MOTIF</strong> <strong>XF</strong> <strong>Editor</strong> <strong>VST</strong> Owner’s <strong>Manual</strong> 1
What is the <strong>MOTIF</strong> <strong>XF</strong> <strong>Editor</strong> <strong>VST</strong>?<br />
What is the <strong>MOTIF</strong> <strong>XF</strong> <strong>Editor</strong> <strong>VST</strong>?<br />
<strong>MOTIF</strong> <strong>XF</strong> <strong>Editor</strong> <strong>VST</strong> is a convenient tool which lets you edit and save the various parameters of your <strong>MOTIF</strong><br />
<strong>XF</strong> tone generator. These include Voice and Mixing parameters (edited in the Voice or Mixing mode of the<br />
<strong>MOTIF</strong> <strong>XF</strong>) such as Volume, Pan, EG, and Cutoff and other settings. Thanks to its easy-to-understand<br />
graphical interface, you can edit various parameters of the <strong>MOTIF</strong> <strong>XF</strong> right from your <strong>com</strong>puter — using the<br />
mouse to adjust the virtual knobs, sliders, and buttons and entering values from the <strong>com</strong>puter keyboard.<br />
Finally, all the changes you have made can be saved to your <strong>com</strong>puter or transmitted to the <strong>MOTIF</strong> <strong>XF</strong><br />
instrument.<br />
The <strong>MOTIF</strong> <strong>XF</strong> <strong>Editor</strong> <strong>VST</strong>, based on the “<strong>VST</strong>3 technology” by Steinberg, works as a <strong>VST</strong>3 plug-in with<br />
Cubase5.1.1/Cubase Studio5.1.1/Cubase Essential 5.1.1/Cubase AI5.1.1 or later (Cubase series). The<br />
<strong>MOTIF</strong> <strong>XF</strong> <strong>Editor</strong> <strong>VST</strong> also works as the same way as other <strong>VST</strong> instrument software, allowing you to save the<br />
edited settings of the <strong>MOTIF</strong> <strong>XF</strong>, or use them for another project. In addition, you can handle the <strong>MOTIF</strong> <strong>XF</strong><br />
Voices in the Media Bay window in Cubase series when using the <strong>MOTIF</strong> <strong>XF</strong> <strong>Editor</strong> <strong>VST</strong> with Cubase series,<br />
allowing you to search for, listen, and load the <strong>MOTIF</strong> <strong>XF</strong> Voices within Media Bay in Cubase series. The<br />
<strong>MOTIF</strong> <strong>XF</strong> <strong>Editor</strong> <strong>VST</strong> provides a <strong>com</strong>prehensive and seamless music production environment — making the<br />
use of hardware and software both easier and much more efficient.<br />
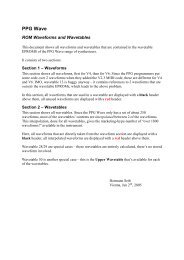
The <strong>MOTIF</strong> <strong>XF</strong> <strong>Editor</strong> <strong>VST</strong> lets you adjust the hue as desired (page 6). This manual uses example screen<br />
shots having the most universal color visibility, allowing the manual to be easily viewed by many people<br />
having different types of color recognition.<br />
Default Adjusted to universal hue<br />
<strong>MOTIF</strong> <strong>XF</strong> <strong>Editor</strong> <strong>VST</strong> Owner’s <strong>Manual</strong> 2
Data Structure of the <strong>MOTIF</strong> <strong>XF</strong> <strong>Editor</strong> <strong>VST</strong><br />
Data Structure of the <strong>MOTIF</strong> <strong>XF</strong> <strong>Editor</strong> <strong>VST</strong><br />
The <strong>MOTIF</strong> <strong>XF</strong> <strong>Editor</strong> <strong>VST</strong> lets you create the following data and save them as a single file (extension: X3E).<br />
• Current Global data (latest status of edited global parameters)<br />
• Current data in the Voice mode (latest status of edited Voice)<br />
• Current data in the Song/Pattern mode (consisting of Mixing setup, latest status of edited Voice and 16 Mixing Voices)<br />
• User Voice data (consisting of three Normal Voice Banks and one Drum Voice Bank)<br />
Current settings includes the latest settings of the Common and Element parameters for the Voice last assigned to<br />
each of Parts 1 – 16, as well as Mixing parameter settings such as Voice assignment, pan, volume and effect for<br />
each Part. Among the Voice Banks, only the Mixing Voice Bank data belongs to the Current settings. The <strong>MOTIF</strong><br />
<strong>XF</strong> <strong>Editor</strong> <strong>VST</strong> lets you edit parameters (including Element parameters) of the Voice assigned to each Part and<br />
save the latest edit status as a file without storing it as a User Voice or a Mixing Voice. This means that you can<br />
easily recall the latest status of the previous edit simply by opening the file.<br />
n The <strong>MOTIF</strong> <strong>XF</strong> <strong>Editor</strong> <strong>VST</strong> handles the Global data which includes some of the parameters shown on the “G” row in the<br />
Mixer section and all the parameters in the Global Settings of the Parameter Category section (pages 21 and 24).<br />
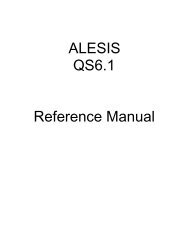
The diagram illustrated below indicates the structure of the data created via the <strong>MOTIF</strong> <strong>XF</strong> <strong>Editor</strong> <strong>VST</strong>, the<br />
structure of the data stored in the internal memory of the <strong>MOTIF</strong> <strong>XF</strong> instrument and the relationship between<br />
those two types of data.<br />
Data sync *1<br />
Data sync *1<br />
Data sync *1<br />
Project file of the DAW application (<strong>com</strong>puter)<br />
<strong>MOTIF</strong> <strong>XF</strong> <strong>Editor</strong> <strong>VST</strong> (<strong>VST</strong>3 Plug-in)<br />
Current Global data<br />
Current data in the Voice mode<br />
Current data in the Song or<br />
Pattern mode<br />
• Mixing data<br />
• Multi Common data<br />
Part Voice data<br />
(16 Voices)<br />
Store Voice *2 (page 49)<br />
Mixing Voice data<br />
(16 Voices)<br />
Current Global data<br />
Current data in the Voice mode<br />
Current data in the Song or<br />
Pattern mode<br />
• Mixing data<br />
• Multi Common data<br />
Part Voice data<br />
(16 Voices)<br />
Store Voice *2<br />
(page 49)<br />
Store Voice *2<br />
(page 49)<br />
<strong>MOTIF</strong> <strong>XF</strong> instrument<br />
Store Global *3 (page 49)<br />
Store Voice *2 (page 49)<br />
Store Voice *2<br />
(page 49)<br />
Store Mixing *3 (page 50)<br />
Store Voice *2 (page 49)<br />
User Voice data<br />
• Normal User 1 (128 Voices)<br />
• Normal User 2 (128 Voices)<br />
• Normal User 3 (128 Voices)<br />
• Normal User 4 (128 Voices)<br />
• Drum User (32 Voices)<br />
Global data<br />
User Voice data<br />
• Normal User 1 (128 Voices)<br />
• Normal User 2 (128 Voices)<br />
• Normal User 3 (128 Voices)<br />
• Normal User 4 (128 Voices)<br />
• Drum User (32 Voices)<br />
Mixing data<br />
• Multi Common data<br />
Mixing Voice data<br />
(16 Voices)<br />
<strong>Editor</strong> file<br />
(Extension: .X3E)<br />
*1 When the <strong>MOTIF</strong> <strong>XF</strong> instrument is connected to the <strong>com</strong>puter properly with the ONLINE status, editing a parameter on the <strong>MOTIF</strong> <strong>XF</strong> <strong>Editor</strong> <strong>VST</strong> affects the same parameter on the <strong>MOTIF</strong> <strong>XF</strong> itself,<br />
and vice versa.<br />
*2 The Store Voice operation on the <strong>Editor</strong> will store the Voice data to the memory of the <strong>MOTIF</strong> <strong>XF</strong> instrument as well as the memory of the <strong>Editor</strong>.<br />
*3 The Store Global operation and Store Mixing operation will store the data only to the memory of the <strong>MOTIF</strong> <strong>XF</strong> instrument.<br />
<strong>MOTIF</strong> <strong>XF</strong> <strong>Editor</strong> <strong>VST</strong> Owner’s <strong>Manual</strong> 3
Starting the <strong>MOTIF</strong> <strong>XF</strong> <strong>Editor</strong> <strong>VST</strong><br />
Starting the <strong>MOTIF</strong> <strong>XF</strong> <strong>Editor</strong> <strong>VST</strong><br />
Install the driver (USB-MIDI driver or Yamaha Steinberg FW Driver), and <strong>MOTIF</strong> <strong>XF</strong> <strong>Editor</strong> <strong>VST</strong> by following<br />
the respective Installation Guides. After making the required connection and setting the MIDI IN/OUT<br />
parameter to “USB” or “FW” in the Utility mode, follow the instructions below to start the <strong>MOTIF</strong> <strong>XF</strong> <strong>Editor</strong> <strong>VST</strong>.<br />
This example describes the operation steps for Cubase 5.5 with the optional FireWire Expansion Board<br />
FW16E connected to a <strong>com</strong>puter via an IEEE1394 (FireWire) cable.<br />
n For details about connection between the <strong>MOTIF</strong> <strong>XF</strong> and a <strong>com</strong>puter, refer to the Owner’s <strong>Manual</strong> of the <strong>MOTIF</strong> <strong>XF</strong>.<br />
1. Open the <strong>VST</strong> Instrument window via [Devices] [<strong>VST</strong> Instruments] in the Cubase<br />
series menu.<br />
2. Click the Instrument Slot in the <strong>VST</strong> Instrument Rack, then select [External] [<strong>MOTIF</strong> <strong>XF</strong><br />
<strong>VST</strong>].<br />
3. When the dialog box asking “Do you want to create a MIDI track assigned to plug-in<br />
“<strong>MOTIF</strong> <strong>XF</strong> <strong>VST</strong>”?” appears, click [Create].<br />
A MIDI track will be created and the <strong>MOTIF</strong> <strong>XF</strong> <strong>Editor</strong> <strong>VST</strong> window will appear.<br />
<strong>MOTIF</strong> <strong>XF</strong> <strong>Editor</strong> <strong>VST</strong> Owner’s <strong>Manual</strong> 4
Starting the <strong>MOTIF</strong> <strong>XF</strong> <strong>Editor</strong> <strong>VST</strong><br />
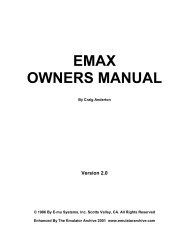
4. Click the Output Setup button at the right side of the Edit button ( ) in the <strong>VST</strong><br />
Instrument Rack, then select [Activate All Outputs].<br />
After this operation, the <strong>MOTIF</strong> <strong>XF</strong>1 – 8 Busses appear in the project window of the Cubase series.<br />
5. Call up the <strong>Editor</strong> Setup window in the <strong>MOTIF</strong> <strong>XF</strong> <strong>Editor</strong> <strong>VST</strong> via [File] [<strong>Editor</strong> Setup].<br />
6. Select “FW/1394” at the [FW/1394] checkbox.<br />
7. Select “<strong>MOTIF</strong> <strong>XF</strong>6 (<strong>MOTIF</strong> <strong>XF</strong>7, or <strong>MOTIF</strong> <strong>XF</strong>8)” at the [FW Device] column.<br />
8. Select “<strong>MOTIF</strong> <strong>XF</strong>6 (<strong>MOTIF</strong> <strong>XF</strong>7, or <strong>MOTIF</strong> <strong>XF</strong>8) Main” at the [MIDI Out] column.<br />
9. Click [OK] button at the bottom.<br />
Output Setup button<br />
10. Call up the <strong>VST</strong>i Setup window in the <strong>MOTIF</strong> <strong>XF</strong> <strong>Editor</strong> <strong>VST</strong> via [File] [<strong>VST</strong>i Setup].<br />
11. Click the [Auto] button then all the audio ports are assigned automatically.<br />
12. Click the [OK] button at the bottom.<br />
13. If the <strong>MOTIF</strong> <strong>XF</strong> <strong>Editor</strong> <strong>VST</strong> is “OFFLINE,” click the [ONLINE/OFFLINE] button to go<br />
“ONLINE.”<br />
<strong>MOTIF</strong> <strong>XF</strong> <strong>Editor</strong> <strong>VST</strong> Owner’s <strong>Manual</strong> 5
Starting the <strong>MOTIF</strong> <strong>XF</strong> <strong>Editor</strong> <strong>VST</strong><br />
14. In Quick Set Up, select [Rec on PC] in the MIDI button group, and [With PC] in the FW<br />
Monitor button group.<br />
n Step 5 through 12 are required when starting <strong>MOTIF</strong> <strong>XF</strong> <strong>Editor</strong> <strong>VST</strong> for the first time. These steps are saved in<br />
the editor and do not need to be repeated each time it is started.<br />
n The <strong>MOTIF</strong> <strong>XF</strong> <strong>Editor</strong> <strong>VST</strong> can be started also from the Instrument track via the following steps. From the<br />
“Project” menu of Cubase series, select “Add Track” then “Instrument” to call up the “Add Instrument Track”<br />
window. Press the “Add Track” button to call up the Instrument track. Press the “Edit Instrument” button on<br />
the Instrument track to start the <strong>MOTIF</strong> <strong>XF</strong> <strong>Editor</strong> <strong>VST</strong>.<br />
n The <strong>MOTIF</strong> <strong>XF</strong> <strong>Editor</strong> can be started also from Media Bay via the following steps. From the “Media” menu of<br />
Cubase series, select “MediaBay” to call up the MediaBay window. Select a Voice from the MediaBay, rightclick<br />
to call up “Property,” then select “Create Track.” Press the “Edit Instrument” button on the created<br />
Instrument track to start the <strong>MOTIF</strong> <strong>XF</strong> <strong>Editor</strong> <strong>VST</strong>.<br />
n On the <strong>MOTIF</strong> <strong>XF</strong>, press the [UTILITY] [F5] Control [SF2] MIDI then set the MIDI parameter to the proper<br />
value. Set this parameter to “USB” in case of USB connection, or “FW” in case of IEEE1394 connection, then<br />
press the [STORE] button to store this Utility setting.<br />
Adjusting the hue of the display<br />
The <strong>MOTIF</strong> <strong>XF</strong> <strong>Editor</strong> <strong>VST</strong> lets you adjust the hue as desired.<br />
1. At the left bottom of the <strong>Editor</strong> window, click the triangle button to call up the slider.<br />
Click the triangle button again to close the slider.<br />
2. Drag or click the slider to adjust the hue.<br />
In Windows, to reset the hue to its default, simultaneously hold down the key and click on the<br />
slider.<br />
On the Mac, to reset the hue to its default, simultaneously hold down the key and click<br />
on the slider.<br />
For details about slider operation, refer to page 36.<br />
<strong>MOTIF</strong> <strong>XF</strong> <strong>Editor</strong> <strong>VST</strong> Owner’s <strong>Manual</strong> 6
An Example of <strong>MOTIF</strong> <strong>XF</strong> <strong>Editor</strong> <strong>VST</strong> in Use: Editing in the Voice mode<br />
An Example of <strong>MOTIF</strong> <strong>XF</strong> <strong>Editor</strong> <strong>VST</strong> in Use<br />
There is no single way to use the many <strong>com</strong>ponents in the <strong>MOTIF</strong> <strong>XF</strong> <strong>Editor</strong> <strong>VST</strong>. Your editing needs and<br />
preferences may differ; however, the following example gives you a simple step-by-step guide in how to use<br />
the <strong>MOTIF</strong> <strong>XF</strong> <strong>Editor</strong> <strong>VST</strong>. As an example, this section explains how to edit a Voice in the Voice mode, edit a<br />
Mixing program in the Song mode, then store the edited data to the memory of the <strong>MOTIF</strong> <strong>XF</strong> instrument and<br />
save the final results of your editing to a file.<br />
Editing in the Voice mode<br />
n If the [Song] or [Pattern] indication (at the top left of the display) is on, perform the instructions below from step 1. If the<br />
[Voice] indication is on, perform the instructions below from step 2.<br />
1. Change the mode to the Voice mode by clicking the [Voice] indication (at the top left of<br />
the display).<br />
If the [ONLINE]/[OFFLINE] indication is set to [ONLINE] before changing the mode, the Auto Sync<br />
window will be called up automatically when this step is executed. As step 2 is thus unnecessary, you<br />
should proceed to step 3.<br />
2. Click the [OFFLINE] to call up the Auto Sync window if the [ONLINE]/[OFFLINE]<br />
indication is set to [OFFLINE].<br />
3. On the Auto Sync window, set <strong>com</strong>munication-related parameters such as Input Port,<br />
Output Port and Device Number in the Data Port section, then set the direction of Data<br />
Auto Synchronization (Global, Current and Voice) in the Auto Sync Setting section.<br />
When you want to use the settings on the <strong>MOTIF</strong> <strong>XF</strong> itself as starting data for editing, set the boxes of<br />
Global, Current and Voice in the Auto Sync Setting to on so that the data flows from the instrument to the<br />
<strong>com</strong>puter. To use the settings on the <strong>MOTIF</strong> <strong>XF</strong> <strong>Editor</strong> <strong>VST</strong> as starting data, set both Global, Current and<br />
Voice to the opposite, so that the arrow indicates data flow from the <strong>com</strong>puter to the keyboard. For<br />
details, see page 40.<br />
NOTICE<br />
• Keep in mind that when you set Global, Current and Voice to On, enable data sync from the <strong>com</strong>puter to the <strong>MOTIF</strong><br />
<strong>XF</strong> (instrument), and then click the [Start] button at the bottom, this operation transmits these types of data<br />
currently on the <strong>Editor</strong> to the <strong>MOTIF</strong> <strong>XF</strong> itself, automatically overwriting and erasing all the corresponding data<br />
already existing on memory of the <strong>MOTIF</strong> <strong>XF</strong> instrument. When you want to use the settings on the <strong>MOTIF</strong> <strong>XF</strong> itself<br />
as starting data for editing, set the boxes of Global, Current and Voice in the Auto Sync Setting to on so that the<br />
data flows from the instrument to the <strong>com</strong>puter.<br />
• Make sure to set the desired data transfer direction in order to avoid data loss.<br />
• Any data which was overwritten and lost accidentally cannot be recovered.<br />
<strong>MOTIF</strong> <strong>XF</strong> <strong>Editor</strong> <strong>VST</strong> Owner’s <strong>Manual</strong> 7
An Example of <strong>MOTIF</strong> <strong>XF</strong> <strong>Editor</strong> <strong>VST</strong> in Use: Editing in the Voice mode<br />
4. From the Auto Sync window, click [Start] at the bottom.<br />
The data synchronization will be started if the Port settings are correct. As soon as data synchronization<br />
is <strong>com</strong>pleted, the Auto Sync window is closed, then the OFFLINE indication is changed to ONLINE<br />
indication automatically. In this ONLINE status, editing a parameter on the <strong>MOTIF</strong> <strong>XF</strong> <strong>Editor</strong> <strong>VST</strong> affects<br />
the same parameter on the <strong>MOTIF</strong> <strong>XF</strong> itself, and vice versa.<br />
For more information, refer to “ONLINE/OFFLINE” on page 13.<br />
5. Edit the Voice in the Voice mode.<br />
5-1 On the “V” row of the Voice section, click the Bank name or Voice name to call up the<br />
VOICE LIBRARY window.<br />
5-2 From the list in the VOICE LIBRARY, select the desired Voice to assign it temporarily to<br />
the current Part.<br />
You can confirm the sound of the selected Voice by clicking any note on the virtual keyboard or the<br />
<strong>MOTIF</strong> <strong>XF</strong> keyboard.<br />
5-3 Click the Voice name or [OK] at bottom right of the window to close the VOICE LIBRARY<br />
window.<br />
You can cancel the Voice selection by clicking the Close (X) button or [Cancel] button at bottom right of<br />
the window. By executing this operation, the Voice selection is reset to the original status and the VOICE<br />
LIBRARY window closes.<br />
NOTICE<br />
When a different Voice has been selected, your edits of the previously selected Voice will be lost. If you want to store<br />
the edits, make sure to store the Voice by using the Store window (page 49) before changing the Voice.<br />
<strong>MOTIF</strong> <strong>XF</strong> <strong>Editor</strong> <strong>VST</strong> Owner’s <strong>Manual</strong> 8
An Example of <strong>MOTIF</strong> <strong>XF</strong> <strong>Editor</strong> <strong>VST</strong> in Use: Editing in the Voice mode<br />
5-4 Edit the Voice parameters as desired.<br />
Edit the parameters (EQ, chorus, reverb, etc.) in the “V” row by clicking them.<br />
To confirm how the parameter edit affects the Voice sound, click any note on the virtual keyboard or the<br />
<strong>MOTIF</strong> <strong>XF</strong> keyboard.<br />
To make detailed settings of the selected Voice, click the arrow button at the top of the right panel<br />
next to the main window to call up the Detailed Parameter section.<br />
n For details about Voice parameters, refer to “Editing a Normal Voice” and “Editing a Drum Voice” in the<br />
Reference <strong>Manual</strong>.<br />
6. Store the edited settings as a User Voice, as necessary.<br />
6-1 Click [Store Voice] under [Edit] in the menu bar to open the Store window (page 49).<br />
6-2 Select a Voice Bank from the following list:<br />
• Normal User 1<br />
• Normal User 2<br />
• Normal User 3<br />
• Normal User 4<br />
• Drum User<br />
n Normal User 1 – 4 are shown in the Store window when editing the Normal Voice while Drum User is shown in<br />
the Store window when editing the Drum Voice.<br />
<strong>MOTIF</strong> <strong>XF</strong> <strong>Editor</strong> <strong>VST</strong> Owner’s <strong>Manual</strong> 9
An Example of <strong>MOTIF</strong> <strong>XF</strong> <strong>Editor</strong> <strong>VST</strong> in Use: Mixing edit in the Song or Pattern mode<br />
6-3 Open the selected Bank, select the desired number as destination, then enter the name<br />
of the Voice in the box at the top of this window.<br />
6-4 Click [Store] to store the edited Voice to the selected number in the selected Bank.<br />
Performing this operation will store the Voice data to the User Voice Bank in the <strong>MOTIF</strong> <strong>XF</strong> instrument as<br />
well as that within the <strong>Editor</strong>.<br />
NOTICE<br />
When you execute the Store operation, the settings for the destination memory (of both the <strong>Editor</strong> and instrument)<br />
will be overwritten. Select the destination Voice number carefully to prevent important data from being erased<br />
accidentally. For this reason, important data should always be saved to a separate USB storage device.<br />
n You can store the settings of the parameters in the “G” row except for the Chorus and Reverb settings by<br />
clicking [Store Global] under [Edit] in the menu bar.<br />
Mixing edit in the Song or Pattern mode<br />
This section explains how to edit a Mixing program in the Song mode.<br />
1. Change the mode to the Song mode by clicking [Song] of the [Voice]/[Song]/[Pattern]<br />
indication.<br />
The Auto Sync appears automatically during ONLINE status.<br />
2. From the Auto Sync window, click [Start] at the bottom.<br />
Data synchronization will be started if the Port settings are correct. As soon as data synchronization is<br />
<strong>com</strong>pleted, the Auto Sync window is closed.<br />
<strong>MOTIF</strong> <strong>XF</strong> <strong>Editor</strong> <strong>VST</strong> Owner’s <strong>Manual</strong> 10
An Example of <strong>MOTIF</strong> <strong>XF</strong> <strong>Editor</strong> <strong>VST</strong> in Use: Mixing edit in the Song or Pattern mode<br />
3. Edit the parameters of the Mixing and Voice assigned to each Part.<br />
If you want to change the parameter values from the original ones of the selected Song or Pattern, click<br />
(drag and drop) each of the parameters such as EQ and effect lined up to the right of “G” in the Global/<br />
Multi section and “1” – “16” in the Part section.<br />
To confirm how the parameter edit affects the Voice sound, click any note on the virtual keyboard.<br />
To make detailed settings of the selected Multi, click the arrow button at the top of the right panel<br />
next to the main window to call up the Detailed Parameter section.<br />
n The <strong>MOTIF</strong> <strong>XF</strong> <strong>Editor</strong> <strong>VST</strong> lets you edit the Voice parameters in the Song or Pattern mode as well as Voice<br />
mode. In the Voice mode, you can edit only the selected Voice. In the Song or Pattern mode, on the other<br />
hand, you can edit the parameters of the Voice assigned to each Part as well as the Mixing parameters. The<br />
edited Voice can be stored to the same Voice Bank as a User Voice regardless of the mode used for editing.<br />
<strong>MOTIF</strong> <strong>XF</strong> <strong>Editor</strong> <strong>VST</strong> Owner’s <strong>Manual</strong> 11
4. Store the edited Voice or a Mixing, as necessary.<br />
An Example of <strong>MOTIF</strong> <strong>XF</strong> <strong>Editor</strong> <strong>VST</strong> in Use: Mixing edit in the Song or Pattern mode<br />
4-1 On the <strong>MOTIF</strong> <strong>XF</strong> instrument, press the [STORE] button to call up the Mixing Store<br />
window, select the destination, then press the [ENTER] button to store the edited Mixing.<br />
For details, refer to the Owner’s <strong>Manual</strong> of the <strong>MOTIF</strong> <strong>XF</strong>.<br />
n You can store the edited Mixing also by selecting [Store Mixing] under [Edit] in the menu bar. Note that this<br />
operation does not allow you to select the Song as destination and the edited Mixing will be stored to the<br />
currently selected Song.<br />
4-2 Select the Part to which the desired Voice is assigned, select [Store Voice] under [Edit] in<br />
the menu bar to call up the Store window (page 49) then store the Voice via the same<br />
operations as in steps 6-1, 6-2, 6-3 and 6-4.<br />
5. Select [Save] or [Save As] under [File] on the menu bar to save the edited data as a file<br />
(extension: *.X3E).<br />
All the settings you made and the Voice data you stored to the User Banks will be saved as a single file<br />
(extension: X3E). When you open this file next time to call up the Auto Sync window, click [Start] to<br />
synchronize the status of the parameter settings between the <strong>MOTIF</strong> <strong>XF</strong> <strong>Editor</strong> <strong>VST</strong> and the <strong>MOTIF</strong> <strong>XF</strong><br />
instrument.<br />
The Save operation from the Cubase series File menu will save the Project file including the settings<br />
made via the <strong>MOTIF</strong> <strong>XF</strong> Voice <strong>Editor</strong> <strong>VST</strong>. This means that opening the same Project file next time will call<br />
up the settings lastly made via the <strong>MOTIF</strong> <strong>XF</strong> Voice <strong>Editor</strong> <strong>VST</strong>.<br />
NOTICE<br />
It is re<strong>com</strong>mended that Auto Save be set to off in the Preferences - General window of Cubase series. If Auto Save is<br />
set to on, a backup of the Cubase series Project file will be created automatically, resulting in the Indicators showing<br />
the Editing Status being turned off, even though the Voice Edit settings have not been saved yet. This allows you to<br />
open a new file or different file, resulting in the settings being lost. In other words, to best avoid losing your editing<br />
data, set Auto Save to off.<br />
<strong>MOTIF</strong> <strong>XF</strong> <strong>Editor</strong> <strong>VST</strong> Owner’s <strong>Manual</strong> 12
<strong>MOTIF</strong> <strong>XF</strong> <strong>Editor</strong> <strong>VST</strong> Window: Mixer section (when the Voice/Song/Pattern is set to “Song” or “Pattern”)<br />
Rcv Channel (Receive Channel)<br />
Determines the MIDI Receive Channel for each Part.<br />
Output Select<br />
Determines the specific output(s) for the individual Part. The following settings are available.<br />
LCD Output jacks Stereo/Mono<br />
L&R OUTPUT L and R Stereo<br />
asL&R ASSIGNABLE OUTPUT L and R Stereo<br />
FW1&2 FW OUTPUT 1 and 2 Stereo (1: L, 2: R)<br />
FW3&4 FW OUTPUT 3 and 4 Stereo (3: L, 4: R)<br />
FW5&6 FW OUTPUT 5 and 6 Stereo (5: L, 6: R)<br />
FW7&8 FW OUTPUT 7 and 8 Stereo (7: L, 8: R)<br />
FW9&10 FW OUTPUT 9 and 10 Stereo (9: L, 10: R)<br />
FW11&12 FW OUTPUT 11 and 12 Stereo (11: L, 12: R)<br />
FW13&14 FW OUTPUT 13 and 14 Stereo (13: L, 14: R)<br />
asL ASSIGNABLE OUTPUT L Mono<br />
asR ASSIGNABLE OUTPUT R Mono<br />
FW1 FW OUTPUT 1 Mono<br />
: : :<br />
FW14 FW OUTPUT 14 Mono<br />
drum See below* See below*<br />
* When a Normal Voice is assigned to the edited Part, this value is indicated as “L&R (dr)” and the sound will be<br />
output via the OUTPUT L and R jacks in stereo. When a Drum Voice is assigned to the edited Part, this value is<br />
indicated as “drum” and the sound will be output via the jacks set in the Drum Key Edit as the Output Select<br />
parameter on the <strong>MOTIF</strong> <strong>XF</strong> <strong>Editor</strong> <strong>VST</strong>.<br />
n Depending on the setting of the Quick Setup (page 33), the audio signal of Parts which are set to “L&R” or<br />
“FW1” – “FW14” or “FW1&2” – “FW13&14” will be output via the OUTPUT L/R jack as well as FW.<br />
ARP (Arpeggio)<br />
Turns Arpeggio playback on or off for each Part.<br />
n Up to four Parts can play back the Arpeggio simultaneously.<br />
When [AD/FW Part] is selected:<br />
This section lets you edit parameters for the AD/FW Part in the Song or Pattern mode. Clicking “AD” or<br />
“FW” row turns this section on as illustrated below.<br />
Ins FX (Insertion Effect)<br />
Switches the Insertion Effect on or off (only in the AD Part).<br />
Cho, Rev, Pan (Chorus, Reverb, Pan)<br />
Adjusts the Chorus Send level, Reverb Send level and stereo Pan position for the AD/FW Part by using<br />
the knob icons.<br />
Volume<br />
Adjusts the Volume for the AD/FW Part.<br />
Output Select<br />
Determines the specific output(s) for the AD/FW Part. The available settings are the same as those of the<br />
AD/FW Part in the Voice mode. Refer to page 17.<br />
<strong>MOTIF</strong> <strong>XF</strong> <strong>Editor</strong> <strong>VST</strong> Owner’s <strong>Manual</strong> 20
<strong>MOTIF</strong> <strong>XF</strong> <strong>Editor</strong> <strong>VST</strong> Window: Parameter Category section (when the Voice/Song/Pattern is set to “Voice”)<br />
Parameter Category section (when the Voice/Song/Pattern is set to<br />
“Voice”)<br />
You can edit detailed parameters for the current Part by clicking the button (located near the top right of<br />
the window, just below the model name) to call up the Detailed Parameter section. Calling up the Detailed<br />
Parameter section moves the Parameter Category Section rightward as shown below.<br />
Parameter Category section<br />
Parameter Category section Detailed Parameter section<br />
<strong>MOTIF</strong> <strong>XF</strong> <strong>Editor</strong> <strong>VST</strong> Owner’s <strong>Manual</strong> 21
<strong>MOTIF</strong> <strong>XF</strong> <strong>Editor</strong> <strong>VST</strong> Window: Parameter Category section (when the Voice/Song/Pattern is set to “Song” or “Pattern”)<br />
Parameter Category section (when the Voice/Song/Pattern is set to<br />
“Song” or “Pattern”)<br />
You can edit detailed parameters for the current Part by clicking the button (located near the top right of the<br />
window, just below the model name) to call up the Detailed Parameter section. Calling up the Detailed<br />
Parameter section moves the Parameter Category Section rightward as shown below.<br />
Parameter Category section<br />
Parameter Category section Detailed Parameter section<br />
<strong>MOTIF</strong> <strong>XF</strong> <strong>Editor</strong> <strong>VST</strong> Owner’s <strong>Manual</strong> 24
<strong>MOTIF</strong> <strong>XF</strong> <strong>Editor</strong> <strong>VST</strong> Window: Detailed Parameter section (when the Voice/Song/Pattern is set to “Voice”)<br />
Detailed Parameter section (when the Voice/Song/Pattern is set to<br />
“Voice”)<br />
This section indicates the detailed parameters of the selected category for the current Voice or Global<br />
settings. This section introduces what parameters belong to each of the Parameter Categories. For details<br />
about each parameter, refer to the Owner’s <strong>Manual</strong> of the <strong>MOTIF</strong> <strong>XF</strong>.<br />
Three Indicators showing the Editing Status<br />
One or more of the following three indicators are shown at the right top of the window when you edit a<br />
parameter.<br />
Indicates that the Voice edits are not stored yet as a User Voice or Mixing Voice. This indicator<br />
disappears when you execute Voice Store (page 49).<br />
Indicates that the Global edits are not stored yet. This indicator disappears when you execute Global<br />
Store (page 49).<br />
Indicates that the parameter edits are not saved yet as a file.<br />
V, G, F<br />
indicators<br />
n These indicators, “V,” “G” and “F” are linked with the small squares at the top right of “1” – “16” boxes and<br />
“G” box in the Mixer section. The “V” and “G” indicators disappear if you execute the Voice Store, Mixing<br />
Store and Global Store operation, respectively. The “F” indicator and the small squares at the top right of the<br />
“G” box in the Mixer section disappear only if you execute the File Save operation. All the indicators and the<br />
small squares disappear if you execute the File Save operation.<br />
<strong>MOTIF</strong> <strong>XF</strong> <strong>Editor</strong> <strong>VST</strong> Owner’s <strong>Manual</strong> 26
<strong>MOTIF</strong> <strong>XF</strong> <strong>Editor</strong> <strong>VST</strong> Window: Detailed Parameter section (when the Voice/Song/Pattern is set to “Voice”)<br />
Global Settings<br />
This Parameter category which is called up by selecting the “G” row in the Mixer section consists of the<br />
following sub categories.<br />
Master FX/EQ (Master Effect/EQ)<br />
Clicking this in the Parameter Category section calls up the Master Effect/EQ parameters in the Detailed<br />
Parameter section. On the <strong>MOTIF</strong> <strong>XF</strong> instrument, these parameters are the same as those called up by<br />
selecting “Master FX” or “Master EQ” on the UTILITY window.<br />
Controller Assign<br />
Clicking this in the Parameter Category section calls up the Controller Assign parameters in the Detailed<br />
Parameter section. On the <strong>MOTIF</strong> <strong>XF</strong> instrument, these parameters are the same as those called up by<br />
selecting “Control” on the UTILITY window.<br />
Micro Tuning<br />
Clicking this in the Parameter Category section calls up the Micro Tuning parameters in the Detailed<br />
Parameter section. On the <strong>MOTIF</strong> <strong>XF</strong> instrument, these parameters are the same as those called up by<br />
selecting “Tuning” on the UTILITY window.<br />
Voice Common<br />
This Parameter Category is called up by selecting the “V” row in the Mixer section. The parameters<br />
belonging to this category lets you make the settings applied to all the Elements or Drum Keys <strong>com</strong>monly.<br />
The following sub categories are included.<br />
General<br />
Clicking this in the Parameter Category section calls up the parameters such as Voice name and pitchrelated<br />
parameters in the Detailed Parameter section. On the <strong>MOTIF</strong> <strong>XF</strong> instrument, these parameters<br />
are the same as those called up by selecting “EG/EQ” on the Voice Play window ([VOICE] [F3]) and<br />
“Name” and “Play Mode” on the VOICE Edit-Common window.<br />
ARP (Arpeggio)<br />
Clicking this in the Parameter Category section calls up the Arpeggio-related parameters in the Detailed<br />
Parameter section. On the <strong>MOTIF</strong> <strong>XF</strong> instrument, these parameters are the same as those called up by<br />
selecting “ARP Main” and “ARP Other” on the VOICE Edit-Common window.<br />
Clicking the row of the Bank/Category/Sub/Number/Name will call up the ARP LIBRARY window which<br />
lets you use the search function for the selecting Arpeggio Types, as with the VOICE LIBRARY window<br />
(page 15).<br />
Controller Set<br />
Clicking this in the Parameter Category section calls up the Controller Set parameters in the Detailed<br />
Parameter section. On the <strong>MOTIF</strong> <strong>XF</strong> instrument, these parameters are the same as those called up by<br />
selecting “Control Set” on the VOICE Edit-Common window.<br />
LFO (Low Frequency Oscillator)<br />
Clicking this in the Parameter Category section calls up the LFO-related parameters in the Detailed<br />
Parameter section. On the <strong>MOTIF</strong> <strong>XF</strong> instrument, these parameters are the same as those called up by<br />
selecting “Com LFO” on the VOICE Edit-Common window. This Parameter Category is not available for<br />
Drum Voices.<br />
Effect<br />
Clicking this in the Parameter Category section calls up the Effect-related parameters in the Detailed<br />
Parameter section. On the <strong>MOTIF</strong> <strong>XF</strong> instrument, these parameters are the same as those called up by<br />
selecting “Effect” on the VOICE Edit-Common window.<br />
<strong>MOTIF</strong> <strong>XF</strong> <strong>Editor</strong> <strong>VST</strong> Owner’s <strong>Manual</strong> 27
<strong>MOTIF</strong> <strong>XF</strong> <strong>Editor</strong> <strong>VST</strong> Window: Detailed Parameter section (when the Voice/Song/Pattern is set to “Voice”)<br />
Element or Drum Key<br />
This Parameter Category is called up by selecting the “V” row in the Mixer section. The “Element” is shown<br />
when the Normal Voice is selected while the “Drum Key” is shown when the Drum Voice is selected. The<br />
parameters belonging to this category lets you make the settings applied to each of the Elements or Drum<br />
Keys individually. The following sub categories are included.<br />
n For information about the checkboxes at left of each Element number 1 – 8 and “All,” refer to page 23. For information<br />
about the Drum Key (note name) and checkbox, refer to page 23.<br />
Oscillator/Pitch<br />
Clicking this in the Parameter Category section calls up the parameters related to the Oscillator and<br />
Pitch in the Detailed Parameter section.<br />
Filter<br />
Clicking this in the Parameter Category section calls up the Filter-related parameters in the Detailed<br />
Parameter section.<br />
Amplitude<br />
Clicking this in the Parameter Category section calls up the Amplitude-related parameters in the<br />
Detailed Parameter section.<br />
LFO/EQ (Low Frequency Oscillator/Equalizer)<br />
Clicking this in the Parameter Category section calls up the parameters related to the LFO and EQ in the<br />
Detailed Parameter section.<br />
AD/FW<br />
This Parameter Category is called up by selecting the “AD/FW” row in the Mixer section. The parameters<br />
belonging to this category lets you make the settings applied to the AD/FW Part in the Voice mode. The<br />
following sub category is included.<br />
Effect<br />
Clicking this in the Parameter Category section calls up the parameters related to the Effect applied to<br />
the AD/FW Part of the Voice mode in the Detailed Parameter section.<br />
<strong>MOTIF</strong> <strong>XF</strong> <strong>Editor</strong> <strong>VST</strong> Owner’s <strong>Manual</strong> 28
<strong>MOTIF</strong> <strong>XF</strong> <strong>Editor</strong> <strong>VST</strong> Window: Detailed Parameter section (when the Voice/Song/Pattern is set to “Song” or “Pattern”)<br />
Detailed Parameter section (when the Voice/Song/Pattern is set to<br />
“Song” or “Pattern”)<br />
This section indicates the detailed parameters of the selected category for the current Part and the Voice<br />
assigned to the current Part, or the Global settings. This section introduces what parameters belong to each<br />
of the Parameter Categories. For details about each parameters, refer to the Owner’s <strong>Manual</strong> of the <strong>MOTIF</strong><br />
<strong>XF</strong>.<br />
Four Indicators showing the Editing Status<br />
One or more of the following four indicators are shown at the right top of the window when you edit a<br />
parameter.<br />
Indicates that the Voice edits are not stored yet as a User Voice or Mixing Voice. This indicator<br />
disappears when you execute Voice Store (page 49).<br />
Indicates that the Multi edits are not stored yet. This indicator disappears when you execute Mixing<br />
Store (page 50).<br />
Indicates that the Global edits are not stored yet. This indicator disappears when you execute Global<br />
Store (page 49).<br />
Indicates that the parameter edits are not saved yet as a file.<br />
V, M, G, F<br />
indicators<br />
n These indicators, “V,” “M,” “G” and “F” are linked with the small squares at the top right of “1” – “16” boxes and “G” box<br />
in the Mixer section. The “V,” “M” and “G” indicators disappear if you execute the Voice Store, Mixing Store and Global<br />
Store operations, respectively. The “F” indicator and the small squares at the top right of the “G” box in the Mixer section<br />
disappear only if you execute the File Save operation. All the indicators and the small squares disappear if you execute<br />
the File Save operation.<br />
Global Settings<br />
This Parameter category, called up by selecting the “G” row in the Mixer section, consists of the following<br />
sub categories.<br />
Controller Assign<br />
Clicking this in the Parameter Category section calls up the Controller Assign parameters in the Detailed<br />
Parameter section. On the <strong>MOTIF</strong> <strong>XF</strong> instrument, these parameters are the same as those called up by<br />
selecting “Ctrl Asgn” on the SONG or PATTERN Edit-Common window.<br />
<strong>MOTIF</strong> <strong>XF</strong> <strong>Editor</strong> <strong>VST</strong> Owner’s <strong>Manual</strong> 29
<strong>MOTIF</strong> <strong>XF</strong> <strong>Editor</strong> <strong>VST</strong> Window: Detailed Parameter section (when the Voice/Song/Pattern is set to “Song” or “Pattern”)<br />
Micro Tuning<br />
Clicking this in the Parameter Category section calls up the Micro Tuning parameters in the Detailed<br />
Parameter section. On the <strong>MOTIF</strong> <strong>XF</strong> instrument, these parameters are the same as those called up by<br />
selecting “Tuning” on the UTILITY window.<br />
Multi Common<br />
This Parameter category, called up by selecting the “G” row in the Mixer section, consists of the following<br />
sub categories.<br />
Effect<br />
Clicking this in the Parameter Category section calls up the Effect-related parameters in the Detailed<br />
Parameter section. On the <strong>MOTIF</strong> <strong>XF</strong> instrument, these parameters are the same as those called up by<br />
selecting “Reverb” and “Chorus” on the SONG or PATTERN Edit-Common window.<br />
Master FX/EQ (Master Effect/EQ)<br />
Clicking this in the Parameter Category section calls up the parameters related to the Master Effect and<br />
EQ in the Detailed Parameter section. On the <strong>MOTIF</strong> <strong>XF</strong> instrument, the Master EQ parameters are the<br />
same as those called up by selecting “Master FX”/”Master EQ” on the SONG or PATTERN Edit-Common<br />
window.<br />
Part Common<br />
This Parameter category which is called up by selecting any of the “1” – “16” rows in the Mixer section<br />
consists of the following sub categories.<br />
General<br />
Clicking this calls up the GENERAL window in the Parameter Category section. This window lets you edit<br />
the Voice Common parameters such as naming and the Mixing Part parameters such as Pitch,<br />
Portamento, Note/Velocity Limit and Part EQ. In the Part Common General section, both the Mixing Part<br />
parameters (the “M” indicator appears at the top right during editing) and Voice Common parameters<br />
(the “V” indicator appears at the top right during editing) can be edited. To distinguish between them, a<br />
small dot is shown at the immediate left of the parameters.<br />
ARP (Arpeggio)<br />
Clicking this in the Parameter Category section calls up the parameters related to the Arpeggio<br />
assigned to the current Part in the Detailed Parameter section. On the <strong>MOTIF</strong> <strong>XF</strong> instrument, these<br />
parameters are the same as those called up by selecting “ARP Main” and “ARP Other” on the SONG or<br />
PATTERN Edit-Part window.<br />
Clicking the row of the Bank/Category/Sub/Number/Name will call up the ARP LIBRARY window which<br />
lets you use the search function for the selecting Types, as with the VOICE LIBRARY window (page 15).<br />
RCV/Control Set (Receive/Control Set)<br />
Clicking this calls up the RCV/CONTROLLER SET ASSIGN window in the Parameter Category section.<br />
This window lets you edit the Receive Switch parameters for the current Part and the Controller Set<br />
Assign parameters for the current Part and the Voice. On the <strong>MOTIF</strong> <strong>XF</strong> instrument, these parameters<br />
are the same as those called up by selecting “RcvSwitch” on the SONG or PATTERN Edit-Part window.<br />
LFO (Low Frequency Oscillator)<br />
Clicking this in the Parameter Category section calls up the LFO-related parameters of the Voice<br />
assigned to the current Part in the Detailed Parameter section. This Parameter Category is not available<br />
if the Drum Voice is assigned to the current Part.<br />
Effect<br />
Clicking this in the Parameter Category section calls up the parameters related to the Insertion Effect for<br />
the current Part and System Effect applied to all the Parts in the Detailed Parameter section.<br />
<strong>MOTIF</strong> <strong>XF</strong> <strong>Editor</strong> <strong>VST</strong> Owner’s <strong>Manual</strong> 30
<strong>MOTIF</strong> <strong>XF</strong> <strong>Editor</strong> <strong>VST</strong> Window: Detailed Parameter section (when the Voice/Song/Pattern is set to “Song” or “Pattern”)<br />
Element or Drum Key<br />
This Parameter Category is called up by selecting any of the “1” – “16” rows in the Mixer section. The<br />
“Element” indication appears when the Normal Voice is assigned to the current Part while the “Drum Key” is<br />
shown when the Drum Voice is assigned. The parameters belonging to this category lets you make the<br />
settings applied to each of the Elements or Drum Keys individually. For details, see the Voice mode section.<br />
AD/FW<br />
This Parameter Category is called up by selecting the “AD/FW” row in the Mixer section. The parameters<br />
belonging to this category lets you make the settings applied to the AD/FW Part in the Song or Pattern mode.<br />
The following sub category is included.<br />
Effect<br />
Clicking this in the Parameter Category section calls up the parameters related to the Effect applied to<br />
the AD/FW Part of the Song or Pattern mode in the Detailed Parameter section.<br />
<strong>MOTIF</strong> <strong>XF</strong> <strong>Editor</strong> <strong>VST</strong> Owner’s <strong>Manual</strong> 31
Basic Operations<br />
This section covers basic operations of the <strong>MOTIF</strong> <strong>XF</strong> <strong>Editor</strong> <strong>VST</strong>.<br />
Naming a Voice<br />
You can assign an original name of your choice to the edited Voice on the VOICE LIBRARY window,<br />
GENERAL window in the Part Common General, and the Store window.<br />
Basic Operations<br />
From the VOICE LIBRARY window (page 15), select a User Voice or Mixing Voice then click the selected<br />
Voice so that you can edit the name. After editing the Voice name, pressing the key or locating the<br />
cursor to another parameter finalizes the edited name while pressing the key aborts it.<br />
From the GENERAL window (below) and Store window (page 49), locate the cursor in the text box of “Voice<br />
Name” at the top of this window, then edit the name in the text box as desired. After editing, pressing the<br />
key or locating the cursor to another parameter finalizes the edited name.<br />
Searching for a Voice/Arpeggio Type<br />
You can search for the desired Voice and Arpeggio type on the VOICE LIBRARY window (page 15) and ARP<br />
LIBRARY window just by inputting a keyword in the text box at the bottom of these windows respectively.<br />
Likewise, the Search function is available on the Import window (page 38).<br />
Inputting a numerical value<br />
When double clicking a value box such as that shown above, the value box can be edited and you can input<br />
a numerical value directly by using numeric keys. After editing, pressing the key or locating the<br />
cursor to another parameter finalizes the value while pressing the key aborts it. You can edit the value<br />
also by using the Cursor key or / key after clicking this box.<br />
In Windows, to reset the value to its default, simultaneously hold down the key and click on the value<br />
box. On the Mac, to reset the value to its default, simultaneously hold down the Command key and click on<br />
the value box.<br />
n For certain parameters, the value can be edited only by using the mouse and cannot be input directly by using the<br />
numeric keys.<br />
<strong>MOTIF</strong> <strong>XF</strong> <strong>Editor</strong> <strong>VST</strong> Owner’s <strong>Manual</strong> 35
Selecting a value<br />
Basic Operations<br />
Clicking inside the value box like such as that shown above calls up the list box, from which you can select<br />
the desired value. You can also select the value also by clicking the arrow at right end of this box.<br />
Using a knob<br />
Dragging or clicking the knob such as that shown above changes the value of the corresponding parameter.<br />
After clicking this, you can edit the value by using the cursor key or / key. If you<br />
want to make fine adjustments to the value, drag the mouse while holding the key.<br />
The specific operation of the knob is determined by the settings of the Knob Guide parameter and Knob<br />
Mouse Control parameter in the Setup window (page 40). In Windows, to reset the value to its default,<br />
simultaneously hold down the key and click on the knob. On the Mac, to reset the value to its default,<br />
simultaneously hold down the Command key and click on the knob.<br />
Using a slider<br />
Dragging or clicking the slider such as that shown above changes the value of the corresponding parameter.<br />
After clicking this, you can edit the value by using the cursor key or / key. If you<br />
want to make fine adjustments to the value, drag the mouse while holding the key.<br />
The specific operation of the slider is determined by the setting of the Slider Mouse Control parameter in the<br />
Setup window (page 40). In Windows, to reset the value to its default, simultaneously hold down the <br />
key and click on the slider. On the Mac, to reset the value to its default, simultaneously hold down the<br />
Command key and click on the slider.<br />
Using a graph<br />
Dragging one of the boxes in the graph (as shown above) changes the value of the corresponding parameter.<br />
In Windows, simultaneously hold down the key and click on the box to reset the corresponding value<br />
to the default setting. To reset the entire graph and its values to the default setting, simultaneously hold down<br />
the key and click on any section in the graph (other than one of the boxes) to reset the entire graph<br />
and its values to the default setting. On the Mac, simultaneously hold down the Command key and click on<br />
the box to reset the corresponding value to the default setting. To reset the entire graph and its values to the<br />
default setting, simultaneously hold down the Command key and click on any section in the graph (other<br />
than one of the boxes) to reset the entire graph and its values to the default setting.<br />
<strong>MOTIF</strong> <strong>XF</strong> <strong>Editor</strong> <strong>VST</strong> Owner’s <strong>Manual</strong> 36
Menu<br />
[File] menu<br />
New<br />
Creates and opens a new file containing the default Mixing setup and Voice data.<br />
Menu: [File] menu<br />
Open...<br />
Opens an already saved file of the <strong>MOTIF</strong> <strong>XF</strong> <strong>Editor</strong> <strong>VST</strong>. The following file types can be selected and<br />
opened.<br />
• <strong>MOTIF</strong> <strong>XF</strong> <strong>Editor</strong> Files (.X3E)<br />
• <strong>MOTIF</strong> <strong>XF</strong> All Files (.X3A)<br />
• <strong>MOTIF</strong> XS <strong>Editor</strong> Files (.X0E)<br />
• <strong>MOTIF</strong> XS All Files (.X0A)<br />
• <strong>MOTIF</strong>-RACK XS <strong>Editor</strong> Files (.X1E)<br />
• MO6/MO8 Multi Part <strong>Editor</strong> Files (.M4E)<br />
• <strong>MOTIF</strong> ES6/7/8 Multi Part <strong>Editor</strong> Files (.M4E)<br />
• <strong>MOTIF</strong>-RACK ES Multi Part <strong>Editor</strong> Files (.M3E)<br />
NOTICE<br />
Unlike files of other applications such as word processors, only a single file can be opened and edited on the <strong>MOTIF</strong> <strong>XF</strong> <strong>Editor</strong><br />
<strong>VST</strong>. Before opening a new file, make sure to save the edited settings as a file to avoid losing data.<br />
Save<br />
Saves the current settings by overwriting the current file.<br />
Save As...<br />
Saves the current settings as a <strong>MOTIF</strong> <strong>XF</strong> <strong>Editor</strong> file (.X3E) under a new or different name.<br />
<strong>MOTIF</strong> <strong>XF</strong> <strong>Editor</strong> <strong>VST</strong> Owner’s <strong>Manual</strong> 37
Troubleshooting<br />
Troubleshooting<br />
If you encounter problems such as no sound output or abnormal behavior, verify the connections before<br />
checking the following.<br />
Sound does not change when using the knobs or sliders.<br />
• Is “ONLINE” indicated on the <strong>Editor</strong> window?<br />
• Is the lamp at left of “ONLINE” indicator turned on?<br />
If it is turned off, the settings related to <strong>com</strong>munication between the <strong>MOTIF</strong> <strong>XF</strong> and a <strong>com</strong>puter may be<br />
wrong. Check the MIDI Port setting (page 40) on the <strong>MOTIF</strong> <strong>XF</strong> <strong>Editor</strong> <strong>VST</strong>, the MIDI IN/OUT parameter<br />
setting in the MIDI display of the Utility mode on the <strong>MOTIF</strong> <strong>XF</strong> instrument, or the cable connection between<br />
the <strong>MOTIF</strong> <strong>XF</strong> and the <strong>com</strong>puter.<br />
• Check the MIDI Port setting and Device No. setting. (page 40)<br />
Bulk data is not transmitted/received successfully.<br />
• Check the same points as above such as “ONLINE” indication and MIDI Port settings.<br />
The appropriate Port is not shown in the Setup window.<br />
• The MIDI Port in the Setup window can be selected from the Ports specified in the Cubase series. Check the<br />
MIDI Port settings in the Cubase series.<br />
• When “!” is shown at left of the Port name (e.g., “! Yamaha USB IN 0-1”), this indicates that the previously<br />
used Port cannot be found or some Ports are not set properly. Check the MIDI Port settings in the Cubase<br />
series.<br />
The sounds of the <strong>MOTIF</strong> <strong>XF</strong> do not <strong>com</strong>e to the Audio Mixer in the Cubase series.<br />
• Set up the audio ports connected the <strong>MOTIF</strong> <strong>XF</strong> in the <strong>VST</strong>i Setup window (page 45).<br />
The current audio ports do not appear when clicking the [AUTO] button in the <strong>VST</strong>i<br />
Setup window.<br />
• Make sure to put checkmarks to the “Display” for the current audio ports in the “Devices” menu “Device<br />
Setup” “<strong>VST</strong> audio system” in the Cubase series.<br />
The multi port audio from <strong>MOTIF</strong> <strong>XF</strong> does not <strong>com</strong>e to the Cubase series.<br />
• Refer to “Starting the <strong>MOTIF</strong> <strong>XF</strong> <strong>Editor</strong> <strong>VST</strong>” (page 4).<br />
No sound <strong>com</strong>es from the <strong>MOTIF</strong> <strong>XF</strong> after using the <strong>MOTIF</strong> <strong>XF</strong> <strong>Editor</strong> <strong>VST</strong>.<br />
• Set the “Monitor Setup” to “stand alone” in the Utility mode [F2] I/O.<br />
• Set the “Quick Setup” to “Setup Number 1” in the [SEQ SETUP] [F3] Quick.<br />
<strong>MOTIF</strong> <strong>XF</strong> <strong>Editor</strong> <strong>VST</strong> Owner’s <strong>Manual</strong> 54
Cannot be set to ONLINE or “Port Open Error” is shown.<br />
Troubleshooting<br />
• Check whether or not the <strong>MOTIF</strong> <strong>XF</strong> is connected to the <strong>com</strong>puter properly, and check whether or not the<br />
power of the <strong>MOTIF</strong> <strong>XF</strong>6/7/8 is turned on.<br />
• Make sure that the checkmark is removed at the "Visible" column of the <strong>MOTIF</strong> <strong>XF</strong>6/7/8 MIDI Port 4 in the<br />
Device Setup window — "MIDI Port Setup".<br />
• On Windows, quit any application software which may be using the <strong>MOTIF</strong> <strong>XF</strong>6/7/8 Port. If the application<br />
software closes unexpectedly without user input, restart the <strong>com</strong>puter.<br />
“Time Out Error” or “Communication Time Out Error” is shown.<br />
• This message appears when the <strong>com</strong>puter cannot get the response from the <strong>MOTIF</strong> <strong>XF</strong>6/7/8 and another<br />
error occurs. Check whether or not the Receive Bulk parameter and the MIDI In/Out parameter of the <strong>MOTIF</strong><br />
<strong>XF</strong> are set properly in the Utility display called up via [UTILITY] [F5] [SF2].<br />
The <strong>MOTIF</strong> <strong>XF</strong> <strong>Editor</strong> <strong>VST</strong> may be revised and updated without prior notice.<br />
For details and the latest information on the <strong>Editor</strong>, refer to the following URL:<br />
http://www.yamahasynth.<strong>com</strong>/downloads/<br />
U.R.G., Digital Musical Instruments Division<br />
©2010 Yamaha Corporation<br />
006MW-A0<br />
<strong>MOTIF</strong> <strong>XF</strong> <strong>Editor</strong> <strong>VST</strong> Owner’s <strong>Manual</strong> 55