Xbase 09 Operating Manual - Cyborgstudio.com
Xbase 09 Operating Manual - Cyborgstudio.com
Xbase 09 Operating Manual - Cyborgstudio.com

Create successful ePaper yourself
Turn your PDF publications into a flip-book with our unique Google optimized e-Paper software.
XBase <strong>09</strong> <strong>Operating</strong> <strong>Manual</strong><br />
9<br />
Software Version 2.<strong>09</strong>
Page 2 XBase <strong>09</strong> <strong>Operating</strong> <strong>Manual</strong>
Contents Page<br />
1. Introduction 05<br />
1.1 Introducing the XBase<strong>09</strong> 05<br />
2. Connecting the <strong>Xbase</strong><strong>09</strong> 07<br />
2.1 Back Panel 07<br />
2.2 Power supply 07<br />
2.3 Audio connections 07<br />
2.4 MIDI connections 08<br />
2.4.1 Midi In 08<br />
2.4.2 Midi Out 08<br />
2.4.3 Midi Thru 08<br />
2.5 DIN SYNC OUT 08<br />
3. Quick start guide <strong>09</strong><br />
3.1 Listening to already programmed patterns <strong>09</strong><br />
3.2 To play with the sounds <strong>09</strong><br />
3.3 To programm patterns 10<br />
4 . Detailed description 13<br />
4.1 The Controls 13<br />
4.1.1 Diagram 13<br />
4.2 Functions of Buttons and Knobs 14<br />
4.2.1 Sound Control Knobs 14<br />
4.2.1.1 Base Drum Parameters 15<br />
4.2.1.2 SnareDrum Parameters 15<br />
4.2.1.3 HiHat Parameters 15<br />
4.2.2 Tempo / data control 16<br />
4.2.3 Up / Down buttons 16<br />
4.2.4 Instrument volume control 16<br />
4.2.5 Master volume control 16<br />
4.2.6 Accent control 16<br />
4.2.7 WRITE 17<br />
4.2.8 Mode buttons PERF, PATT, SONG, 17<br />
4.2.9 Step- / Pattern- / Function buttons 17<br />
4.2.10 Instrument buttons 18<br />
5. Perform Mode 19<br />
5.1 Perform Play Mode (pattern playback) 19<br />
5.2 Selecting Drum kits 19<br />
5.3 Creating and storing your custom Drum kits 19<br />
5.4 Recording Patterns in Perform-WriteMode 20<br />
6. Pattern Mode 21<br />
6.1 Pattern Play Mode (pattern playback) 21<br />
XBase <strong>09</strong> <strong>Operating</strong> <strong>Manual</strong> Page 3
6.2 Pattern Write Mode (recording patterns) 21<br />
6.3 Recording sound changes in Pattern Write Mode 21<br />
6.3. 1.Individual Step Edit 21<br />
6.3.2 Track Record Mode 21<br />
6.4 Pattern functions 22<br />
6.4.1 Copy 22<br />
6.4.2 Clear 22<br />
6.4.3 Bank No. 22<br />
6.4.4 Scale 23<br />
6.4.5 Last Step 23<br />
6.4.6 Shuffle 24<br />
6.4.7 Real-time Write 25<br />
6.4.8 Metronome 25<br />
6.4.9 HH Sample Select 25<br />
6.4.10 HH Reverse 26<br />
6.4.11 LFO Page 26<br />
6.4.12 Track Page 29<br />
7. Song Mode 30<br />
7.1 Song Play Mode 30<br />
7.2 Song Write Mode 30<br />
7.2.1 Song - Step (BASS DRUM button) 30<br />
7.2.2 Pattern - Number (SNARE DRUM button) 30<br />
7.2.3 Repeat (CLOSED HH button) 31<br />
7.2.4 Song End 31<br />
7.2.5 Store Song Step (OPEN HH button) 31<br />
7.3 Song functions 31<br />
7.3.1 Copy Song 31<br />
7.3.2 Clear Song 31<br />
8. Saving and loading Data via MIDI-Dump 32<br />
8.1 Saving the <strong>Xbase</strong>’s memory to an external MIDI recorder 32<br />
8.2 Loading <strong>Xbase</strong><strong>09</strong> data from an external MIDI player 32<br />
9. Controlling the XBase<strong>09</strong> via MIDI 33<br />
9.1 MIDI Channel 33<br />
9.2 MIDI Modes 33<br />
10. Synchronisation with other Devices 34<br />
10.1 MIDI - Clock 34<br />
10.2 DIN - Sync 34<br />
11. MIDI Implementation 35<br />
11.1 Sound parameters 35<br />
11.2 Note messages 36<br />
11.3 System Exclusive Data 36<br />
11.4 Memory Clear / Reset 36<br />
11.5 Software Version Display 36<br />
12. Technical data 37<br />
Page 4 XBase <strong>09</strong> <strong>Operating</strong> <strong>Manual</strong>
1. INTRODUCTION<br />
1.1 Introducing the XBase<strong>09</strong><br />
Dear Musician!<br />
First of all we want to thank you for choosing the XBase<strong>09</strong> Analogue Drum Module. You can<br />
now program drum grooves on an instrument that not only matches the sound quality and<br />
character of its predecessor, but surpasses it by opening an even larger scope of sound potential,<br />
adding modern control technology to honest to goodness punchy old-time analog sound<br />
generation<br />
We <strong>com</strong>bined our experience from many modifications of the TR 9<strong>09</strong> and other drum <strong>com</strong>puters<br />
and our MIDI interface know-how to develop this new product you now have in front of you. The<br />
<strong>Xbase</strong><strong>09</strong> is more than just a drum machine because it is capable of closing the gap that seperates<br />
"noisy" percussive sounds from more "tonal" sounds.<br />
Among its most interesting features are:<br />
3 instruments or rather monophonic sound generators, namely bass drum, snare drum and<br />
hihat with greatly enhanced sound forming parameters. Crazy kick drums, nasaly noisy snares<br />
and hihat modulations (including reversed playback) that the TR 9<strong>09</strong> could never have done are<br />
now possible .<br />
Original 9<strong>09</strong> analog sound generation with storable digital Midi control of ALL parameters. In<br />
order to preserve the "analogness" of sound generation as well as of sound control, all parameters<br />
are controlled by specially adapted and discretely built digital to analog converters. This measure<br />
requires extra hardware, but enables practically immediate response to control messages. Great<br />
care has been taken to preserve the analog feel of control voltages in the <strong>Xbase</strong><strong>09</strong>’s MIDI control<br />
of sound parameters. For most parameters, the range of control has been greatly increased.<br />
All sound forming parameters have a dedicated physical knob on the unit that sends the<br />
respective MIDI controller. In PERFORM-MODE the <strong>Xbase</strong><strong>09</strong> can send MIDI controllers and<br />
receive them at the same time.<br />
100 ROM drum kits are already programmed for immediate access.<br />
100 of your own custom drum kits can be stored in the RAM-Section.<br />
64 patterns are stored in 4 memory banks containing 16 patterns each.<br />
10 Songs can be stored. These can be <strong>com</strong>prised of 64 patterns and can repeat every pattern 255<br />
times per song step. 100 song steps are allowed per song, each of which may run at its own<br />
tempo<br />
XBase <strong>09</strong> <strong>Operating</strong> <strong>Manual</strong> Page 5
The on-board step sequencer allows for extensive direct access, even in a live concert situation.<br />
All sound-forming parameters are programmable for every step by simply turning the control<br />
knobs. This is the decisive feature of the XBase<strong>09</strong>.<br />
Depending on the used mode, it is possible to program <strong>com</strong>pletely different sounds for every<br />
single step in a pattern.<br />
Also possible are continous soundchanges over several steps and these features can be used for<br />
bass-, snare- and HiHat-track individually.<br />
Software-Version 2.<strong>09</strong> :<br />
There are also three additional Sequencer-Tracks. Their data is putted out via Midi to control up<br />
to three different outboard soundsources. Notes and length is controlled easily by the knobs on the<br />
XBase<strong>09</strong> front panel. (See V2-Update!)<br />
The internal sequencer enables sound and tone control for each instrument in each step without<br />
the timing delays that MIDI controllers and note-on messages would produce. This is the reason<br />
why the <strong>Xbase</strong><strong>09</strong> grooves so tightly when running on its own, much tighter than if it played the<br />
same pattern in MIDI remote control mode.<br />
Page 6 XBase <strong>09</strong> <strong>Operating</strong> <strong>Manual</strong>
2. CONNECTING THE XBASE <strong>09</strong><br />
Before you connect the <strong>Xbase</strong><strong>09</strong> to any other device, you should always switch off all the<br />
involved devices.<br />
2.1 Back Panel<br />
You will find the following connections on the <strong>Xbase</strong><strong>09</strong>'s Back Panel:<br />
12V~AC IN ON/OFF MIDI IN MIDI OUT MIDI THRU DIN SYNC HH OUT SD OUT BD OUT MIX OUT<br />
2.2 Power Supply<br />
Insert the power supply unit shipped with the <strong>Xbase</strong><strong>09</strong> into a power outlet and connect it to the<br />
power supply socket labelled 12V~ AC IN on the <strong>Xbase</strong><strong>09</strong>'s back panel. Should you for some<br />
reason not use the original power supply unit, make sure you are using one that provides<br />
alternating current (AC/AC) with 12 volts and at least 1 ampere.<br />
NEVER use an AC/DC power supply unit, as this can permanently damage the <strong>Xbase</strong><strong>09</strong>.<br />
2.3 Audio Connections<br />
Switch off the <strong>Xbase</strong><strong>09</strong> and your mixer. The <strong>Xbase</strong><strong>09</strong> has a MIX output which carries the audio<br />
signals of all instruments provided there are no plugs inserted into one of the individual outputs.<br />
Individual outputs are provided for the bass drum, the snare drum and the hihat section. As soon<br />
as a jack plug is inserted into one of these individual outputs, that instrument is no longer played<br />
back through the <strong>Xbase</strong><strong>09</strong>'s MIX output. Connect the required outputs to your mixer's inputs with<br />
1/4" jack plug cables.<br />
XBase <strong>09</strong> <strong>Operating</strong> <strong>Manual</strong> Page 7
2.4 MIDI Connections<br />
2.4.1 MIDI In<br />
The <strong>Xbase</strong><strong>09</strong> can be controlled by (and synchronize to) MIDI devices (keyboards, <strong>com</strong>puters,<br />
sequencers, tape recorders) connected to the MIDI in socket.<br />
Connect the <strong>Xbase</strong><strong>09</strong>’s MIDI In to the other device’s MIDI Out with a standard MIDI cable.<br />
2.4.2 MIDI Out<br />
The <strong>Xbase</strong><strong>09</strong> transmits MIDI data to other MIDI devices such as keyboards, <strong>com</strong>puters and<br />
sequencers via MIDI Out. Connect the XBase<strong>09</strong>'s MIDI Out socket with the other device's MIDI<br />
In socket by means of a standard MIDI cable.<br />
2.4.3 MIDI Thru<br />
MIDI data received at the XBase<strong>09</strong>'s MIDI In is echoed unchanged at the MIDI Thru socket.<br />
You can connect additional MIDI devices to MIDI Thru.<br />
2.5. DIN Sync Out<br />
The <strong>Xbase</strong><strong>09</strong> features a DIN Sync Out socket. This enables you to sync a TB or TR machine to<br />
the <strong>Xbase</strong><strong>09</strong>. The clock triggers are very precisely aligned to the <strong>Xbase</strong><strong>09</strong>'s internal timing.<br />
You can synchronise sequencers, drum machines etc. that support the DIN sync protocl (e.g.<br />
Roland TR808,TB303, Korg Rythm 55b, KPR77 ) to the XBase<strong>09</strong> by connecting them to DIN<br />
Sync Out.<br />
Connect the XBase<strong>09</strong>'s DIN Sync Out with the Syn In socket of the device you want to<br />
synchronize to the XBase<strong>09</strong>. Make sure that the device is set to external sync mode.<br />
The XBase<strong>09</strong> outputs the following signals via DIN-Sync-Out :<br />
Start/Stop (Pin 1)<br />
Clock Trigger with 24 Ticks/Quarter Note (Pin 3)<br />
Ground (Pin 2)<br />
Signal level is 5 volts<br />
Make sure that your cables actually connect the abovementioned pins. Some specialized<br />
MIDI cables don't, becaus these pins are not used for MIDI transmission.<br />
Page 8 XBase <strong>09</strong> <strong>Operating</strong> <strong>Manual</strong>
3.0 Quick start guide<br />
Turn unit on (back panel)!<br />
Turn up the master Volume control (upper right of the machine).<br />
Turn up the individual volumes (BD Level, SD Level and HH level at lower center).<br />
3.1 To listen to sample patterns already programmed into the XBase-<strong>09</strong><br />
Hit the Pattern button (labeled „Patt", on the right of the machine).<br />
Use the Up/Down keys to scroll down to Pattern 1 (LED display will read „P01").<br />
Hit the Start button (on the left of the machine).<br />
To adjust tempo to your liking keep the Accent-Button pressed down and use the<br />
Tempo/Data knob (on the right of the machine).<br />
Using the Up/Down buttons you can change patterns while the machine is in play.<br />
To learn more about how the <strong>Xbase</strong> is making the sounds it is, you can „solo" the Bass, Snare or<br />
HiHat channel by turning down the individual volumes of the other two channels.<br />
If you hear interesting „swooshing sounds" in some of the Patterns, these sounds are being<br />
generated by one of the two onboard LFO sections (which can run „free", be triggered on each hit<br />
or sync'ed to Midi).<br />
You may <strong>com</strong>e across Patterns that are long enough to occupy two Pattern spaces. To move past<br />
these Patterns once you've listende to them, hit the Stop button, then the Patt button and you can<br />
once again use the Up/Down keys to scroll past these special Patterns.<br />
3.2 To play with the sounds in the XBase-<strong>09</strong><br />
Hit the Pattern button (labeled Patt) and use the Up/Down keys to scroll until the display reads<br />
„P01". Now hit the Peformance button (labeled Perf). You can hit any of the Instrument pads at<br />
the bottom of the front panel and turn the appropriate controls above (for the Bass Drum, turn the<br />
Bass Drum controls, etc.). Twiddle the knobs! Have fun! The controls are highly interactive, so<br />
be prepared to hear a lot of different sounds as you turn knobs.<br />
If you'd like to hear the Bass Drum playing without having to hit the pad, simply hit the „Start"<br />
button (on the left of the machine). If you want, you can „solo" the Bass Drum by turning down<br />
the Snare and HiHat volumes. If you'd like to adjust the tempo, turn the Tempo control (on the<br />
right of the machine). You can still play with the knobs now!<br />
Now, turn down the Bass Drum volume and „solo" the Snare by turning up its volume. Play with<br />
the Snare controls. Try the Hat section, as well. The Clap, Rim, Crash, Ride and Noise Samples,<br />
and the Reverse versions of all of those are best explored within the Pattern context described<br />
below.<br />
While the machine is playing, you can hear different pre-programmed „drum kits" by simply<br />
hiting the Up/Down keys. Also, while the machine is playing, sou can change the Pattern you are<br />
listening to simply by hitting one of the buttons labeled 1 to 16. To switch „drum kits" while<br />
hearing this new pattern, simply hit the Up/Down keys. There are 100 ROM kits preprogrammed<br />
in the machine. They are stored in the memoryslots r00 to r99.<br />
XBase <strong>09</strong> <strong>Operating</strong> <strong>Manual</strong> Page 9
3.3 To Programm patterns into the XBase-<strong>09</strong> (the real fun!)<br />
Here's where the real fund begins:<br />
Make sure the machine is in Pattern mode (Patt light is on). Make sure the Bass Drum, Snare<br />
Drum and Hi Hat volumes are up, and the Master Volume control is up.<br />
Hit the „Start" button.<br />
(If you follow the directions carefully, you should never(!) have to hit the „Stop" button!)<br />
Using the Up/Down keys, scroll to a Pattern number where this is no data... you'll know when<br />
you've reached an empty Pattern when you hear no sound (brilliant!). Try above Pattern 30 to find<br />
an empty one.<br />
Hit the Write button (Write button will light up). Notice that the Bass Drum pad is blinking. This<br />
means you're ready to Programm the pattern of the Bass Drum.<br />
By pushing the various 16 red „Note Buttons 1, 5, 9 and 13 will give you a Bass Drum hit on<br />
every quarter note. For our Pattern, choose 1, 5, 8, 9, 11, 14 and 16.<br />
Now hit the Snare Drum pad (the lights blinks next to it, telling you the machine is ready to<br />
Programm where the snare will play). Now hit the Note Buttons where you would like the snare<br />
to play. (Tor this pattern, push Notes 1, 3, 4, 5, 7, 8, 9, 11, 13, 14, 15 and 16)<br />
Hit the Closed Hi Hat pad (light blinks), and Choose where you want it to play (try 7, 11, 15),<br />
Now that the Kick, Share and Hat are playing, adjust their individual volumes to your taste.<br />
NOW... hit the Snare Drum pad again. Hit the Accent pad (accent button flashes along with snare<br />
button light). Notice that all of the Note lights disappear. This is because you have not yet chosen<br />
any snare notes to be „accented" (louder volume). For a note to be Accented, it must already be<br />
chosen to play normally.<br />
To remember which Snare notes you've previously chosen to play normally, simply hit the Accent<br />
pad again (accent light goes out) and the Note buttons will light up where you have normal snares<br />
programmed. Hit the Accent pad again (Accent light flashing).<br />
Choose some of the Snare notes to accent. Try 5, 8, 13, 14, 15 and 16. Adjust the Accent level by<br />
using the Accent volume control (upper right of the machine). Hit the Accent pad to <strong>com</strong>e out of<br />
Accent mode.<br />
You may hit either the Bass Drum pad or the Closed Hat pad, then hit the Accent pad so that the<br />
Accent light is flashing and set either Kick notes or Closed Hat notes to be accented also.<br />
... Now, are you ready for the next level?<br />
Now let's edit the sounds in this pattern.<br />
„Solo" the Bass Drum by turning down the Snare and Hat volume controls.<br />
Push the Bass Drum pad and -while holding it down- push the „Write" button (both Bass Drum<br />
pad and Write button are blinking). Perhaps the sound of the Bass Drum has now changed... this<br />
is because the Bass Drum sound knobs have been activated.<br />
Now start turning the Bass Drum sound controls (labeled Tune, Pitch, Decay, etc). Keep turning<br />
until you find a sound you like. That sound is now being written into the Pattern. Hit the „Write"<br />
button once to deselect it. Hit it once again so the Write light is on, but not blinking. We do this<br />
so that we can now change the sound of INDIVIDUAL Bass Drum notes, as opposed to ALL of<br />
them.<br />
Page 10 XBase <strong>09</strong> <strong>Operating</strong> <strong>Manual</strong>
Push the Bass Drum pad and -while holding it down- push the „Note #1" button once to deselect<br />
it then once again so that it is in „record" (Note #1 light flashing). Notice that the Kick sound on<br />
Note #1 is different. Again use the controls to alter the sound of the Kick on Note #1. Try<br />
lenghening the decay, for instance. Once you have found a sound you like, hit the „Note #1"<br />
button once to deselect it from recording, then hit it again so that it is playing, but it is not in<br />
record.<br />
You may follow this procedure for any of the other instruments as well.<br />
... Let's get crazy!<br />
Now let's edit the snare sound, changing it over the course of the whole bar.<br />
„Solo" the sanre Drum by turning down the Bass and Hat volume controls.<br />
Push the Snare Drum pad and -while holding it down- push the „Write" button (both Snare Drum<br />
pad and Write button flash).<br />
Now start turning the snare Drum sound controls. Keep turning until you find a sound you like.<br />
That sound is now being written into the Pattern.<br />
... Now for some real fun:<br />
While you are still in this mode (Snare pad and Write lights blinking), turn the Snare tune knob<br />
all the way counter-clockwise (Snare is at lowest possible pitch). You may choose to slow the<br />
tempo down ( don’t forget to press the Accent-Knob !) to make this next move. Here we go...<br />
keep your hand on the Snare Tune knob, and when the bar begins, move the knob clockwise<br />
(turning up the pitch of the snare) so that at the end of the bar, the snare is near ist highest pitch.<br />
You can practice this until you get a good „preformance". Once you have a good performance of<br />
tuning up the pitch, hit the „Write" button at the end of the bar, before the bar starts over so that<br />
you <strong>com</strong>e out of the „record" mode! Your „performance" will now be stored with the Pattern! (If<br />
you don't like your performance, hit the Write button, then push the Snare Drum pad again and -<br />
while hoding it down- push the Write button again and try again).<br />
You will notice when you hit the Write button at the end of that last move, its light went out. Hit<br />
the Write button to activate the write mode again. Hit the Snare Drum pad so that ist light blinks.<br />
Now, while holding down the Snare pad, hit Note button 9 twice and then Note button 11 twice.<br />
These two Note buttons should be blinking. Turn the Snare Tune knob all the way up, turn<br />
XSnapp, Dacay, Noise Tune and Detune knobs all the way down. Now the snare sounds like a<br />
cowbell! Hit Note button 11 twice to take it „out of record", turn the Snare Tune knob down so<br />
that Note 9 will have a different pitch than note 11. Now hit Note button 9 twice to take it out of<br />
record. If you want, hit the Accent pad and select Notes 9 and 11 to increase the volume of those<br />
cowbell hits.<br />
... Let's get crazier !<br />
Now let's look into the HiHat section:<br />
„solo" the Hi Hat by turning down the Bass and Snare volume controls.<br />
Hit the Closed Hi Hat pad. At this point, Notes 7, 11, 15 are lit. Make sure the Write light is lit,<br />
but not blinking.<br />
Now select Notes 9 and 10 by hitting those Note buttons.<br />
Hit the shift button (lower right) and the Note button 13 (notice that below this Note button it says<br />
„HH sample select"). Using the Up/Down buttons, scroll to where the display says „CLP". now<br />
select Note buttons 9 and 10 and hit the „Enter" button. Those notes change to a 9<strong>09</strong> Rim sound.<br />
XBase <strong>09</strong> <strong>Operating</strong> <strong>Manual</strong> Page 11
Now hold down the Closed Hi Hat pad and -while holding it down- hit Note buttons 9 and 10<br />
twice... both Note Buttons 9 and 10 should be blinking. Now turn the Hi Hat Tune knob and<br />
select a pitch for the Rim. Once you've got a good pitch, hit buttons 9 and 10 twice each again to<br />
take them out of record. If you'd like either of those, hit louder, hit the Accent pad and select 9<br />
and/or 19. Hit the Accent button again to <strong>com</strong>e out of Accent mode.<br />
Now, push the Open Hi Hat pad. Select Note buttons 1 and 13. Press Shift, and while holding it<br />
down, hit Button 13 again. Use Up/Down to scroll to „CLP". Hit Button 13 to light it, then hit the<br />
Enter Button. Note 13 be<strong>com</strong>es a Clap. By hitting the Accent mode, you can choose Button 13 to<br />
make the claps louder. (Remember to hit the Accent pad again to <strong>com</strong>e out of Accent). Now hold<br />
down the Open Hi Hat pad and hit button 13 twice. Use the Hi Hat Tune knob and the OH Decay<br />
knob to find a clap sound you like. Once you've found it, hit button 13 twice to deselect it from<br />
recording.<br />
Now push the Shift button, hold it down and hit Note button 13 again. Use the Up/Down keys to<br />
scroll until the display reads „CrH", then hit Note button 1 and „Enter". There is now a crash<br />
cymbal on Note 1.<br />
... On to new frontiers!<br />
... Turn up the Bass and Snare Drum volumes,<br />
sit back and listen to what you've created so far!<br />
Hit the „Shift" button, hold it down and hit Note button #6 (Shuffle). Use the Down button to<br />
make the display read „2", which will swing the notes we choose to be a little late to the beat. Hit<br />
the Note buttons 2, 4, 6, 8, 10, 12, 14, 16. Hit the „Enter" button. Notice that the „feel" of the<br />
track has changed. If you like that sound, move to the next paragraph, or to change it back to<br />
„straight time", hit the „Shift" button, hold it down and hit Note button 6 (shuffle). Use the<br />
Up/Down buttons to make the display read „0", then light all of the unlit note buttons and hit<br />
„Enter".<br />
Hit the „Write" button twice so that it is lit.<br />
Solo the HiHat by turning down the Bass Drum and Snare drum volumes.<br />
Hit the Shift button, hold it down and select Note button 15 (LFO Page).<br />
Turn the Bass Drum Decay (LFO Intensity) control so the display reads „000 or 001".<br />
Turn the Bass Drum Tune (LFO Waveform) control so the display reads „tri".<br />
Turn the Bass Drum Pitch (LFO Destination) control so the display reads „Htu".<br />
Turn the Bass Drum Harmonics (LFO Speed) control so the display reads „004".<br />
Turn the Bass Drum Pulse (LFO Sync) control so the display reads „SYn".<br />
Now, turn the Bass Drum Decay (LFO Intensity) control so the display reads „010".<br />
Hit the „Enter" button.<br />
Hit the „Stop" button and then hit the „Write" button so that ist light goes out.<br />
Turn up the Bass Drum and Snare Drum levels.<br />
... Now, kick back, hit „START" and listen to your creation !<br />
Page 12 XBase <strong>09</strong> <strong>Operating</strong> <strong>Manual</strong>
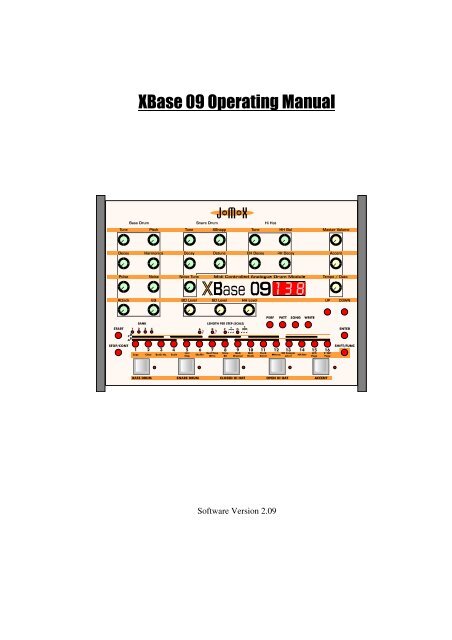
4. Detailed description<br />
4.1 The Controls<br />
4.1.1 Diagram<br />
Sound control knobs (light green)<br />
Global knobs (light beige)<br />
Up / Down (red)<br />
Mode select (red)<br />
Enter (red)<br />
Step buttons1..16 (red)<br />
Shift (red)<br />
Start / Stop (red)<br />
Instrument buttons (light grey)<br />
XBase <strong>09</strong> <strong>Operating</strong> <strong>Manual</strong> Page 13<br />
9
4.2 Functions of buttons and knobs<br />
4.2.1 Sound control knobs<br />
The sound control knobs adjust the sound of the three sound sources, namely bass drum, snare<br />
drum and hihat in Perform and Pattern mode.<br />
When a knob is turned, the <strong>Xbase</strong><strong>09</strong> displays the current parameter value. In PERForm mode. the<br />
values are processed additively. This means that the parameter value is loaded from the<br />
performance memory and added to (or subtracted from) the value generated by the control knob.<br />
This process is started by turning a sound control knob.<br />
It can therefore happen that a parameter value can’t be set to maximum (127) by turning a knob<br />
fully clockwise, as is the case when the value stored in performance memory is small and the<br />
knob's starting point is in the last third of its range. If you want to set a higher value in this case,<br />
turn the knob all the way down and then set the desired value. Apply the opposite of this<br />
procedure if you can’t directly set a level low enough.<br />
All knob movements are transmitted as MIDI controllers. When receiving these MIDI controllers,<br />
the <strong>Xbase</strong><strong>09</strong> responds as though its own control knobs have been turned. The same applies for<br />
"Track Record" and "Step Editt" modes. This means that sound editing in the <strong>Xbase</strong><strong>09</strong>'s internal<br />
sequencer can also be made via MIDI. See the MIDI implementation chart to find out which<br />
controller is mapped to a given parameter. This mapping is fixed and can’t be changed.<br />
Note: The hihat section is a monophonic sound generator that can play one of six samples (closed<br />
hihat, open hihat, crash cymbal, ride cymbal rim shot and clap) or analog noise. This is what is<br />
meant by "hihat section" in this manual. Although it carries the name, the hihat section does not<br />
always produce the sound of a hihat!<br />
4.2.1.1 Bass Drum Parameter<br />
TUNE controls the pitch envelope amount on the bass drums VCO, just as on the TR 9<strong>09</strong>. The<br />
range of control has been increased.<br />
PITCH ranges from 25 Hz subbass to relatively high tones. This is the actual VCO tuning<br />
parameter as opposed to TUNE.<br />
DECAY controls the bass drums decay, just as on the TR 9<strong>09</strong>. The range has been increased to<br />
allow for "walking bass" sounds with a maximum decay of 2.5 seconds.<br />
HARMONICS changes the harmonics of the bass drum’s VCO. The original sine wave is<br />
gradually distorted by a diode limiter which makes for a harder, timpani-like sound.<br />
PULSE controls the pulse <strong>com</strong>ponent of the attack<br />
NOISE controls the noise <strong>com</strong>ponent of the attack.<br />
ATTACK controls how much of the PULSE and NOISE mix is added to the bass drum sound,<br />
just as on the TR 9<strong>09</strong>. PULSE is a square wave impulse, while NOISE generates a noisy clap-like<br />
Page 14 XBase <strong>09</strong> <strong>Operating</strong> <strong>Manual</strong>
sound. It is possilble to set both PULSE and NOISE to 0, emabling bass drum sounds <strong>com</strong>pletely<br />
without attack or with PULSE or NOISE <strong>com</strong>ponents only.<br />
EQ smoothes the bass drum sound with a gently sloping filter. Use this for creating soft TR 808<br />
like kick drum sounds.<br />
4.2.1.2 Snare Drum Parameter<br />
TUNE Just as on the TR9<strong>09</strong>, TUNE controls the pitch of the two percussion oscillators, but with<br />
an extended range of control.<br />
XSNAPP controls the proprtion of noise in the snare sound and is actually filtered noise, just as<br />
in the TR9<strong>09</strong>, but with an extended range of control.<br />
DECAY controls the snare’s noise decay time, just as "TONE" does on the TR9<strong>09</strong>, but with an<br />
extended range of control.<br />
DETUNE detunes the snare drum oscillators<br />
NOISE TUNE tunes the snare drum’s noise filter. If NOISE TUNE is set to 0, the noise signal is<br />
turned off, leaving only the two oscillators sounding. Using the TUNE parameter you can<br />
generate various percussion instruments with sounds similar to rim shot, cow bell or tom tom.<br />
4.2.1.3 Hihat Parameters<br />
The <strong>Xbase</strong><strong>09</strong>ïs hihat section is essentially a monophonic sound generator that can play any of six<br />
selectable samples or noise. "Monophonic" means that you can’t play Closed Hihat and Open<br />
Hihat at the same time, (just as on a real hihat).<br />
As in the original TR9<strong>09</strong>, "Open Hihat" and "Closed Hihat" samples are six bit samples<br />
You can substitute the "Open Hihat" and "Closed Hihat" samples with other onboard samples.<br />
These are: Rim shot, Clap, Crash Cymbal and Ride Cymbal.<br />
The Crash and Ride samples can be played back with the short "Closed Hihat" envelope. Noise<br />
can be assigned as sound source instead of a sample All samples can be played back backwards<br />
excepting "Ride Cymbal".<br />
Sample assignment is arranged in the following order:<br />
HH Sample<br />
Select<br />
HH CLP CrH rid noi<br />
C H Closed Hi Hat Rim Shot Crash short Ride short Noise short<br />
O H Open Hi Hat Hand Clap Crash long Ride long Noise long<br />
C H Reverse Closed HH Rev Rim Shot Rev Crash short Rev<br />
O H Reverse Open HH Rev Hand Clap Rev Crash long Rev<br />
The samples played by either CH or OH are processed by a VCA working as a dynamic expander<br />
that controls the volume envelope.<br />
XBase <strong>09</strong> <strong>Operating</strong> <strong>Manual</strong> Page 15
OH DECAY controls the decay time of the analog volume envelope that is laid over the OH<br />
sample, just as on the TR9<strong>09</strong>.<br />
CH DECAY does the same for the sample assigned to CH.<br />
HH BAL controls the volume balance between the samples assigned to OH and CH. Use this to<br />
adjust the volume of different samples in pattern mode<br />
TUNE defines the pitch i. e. the playback speed of the sample in a fairly wide range<br />
All samples are processed by the VCA envelope. This VCA envelope is however not reversible,<br />
which means that the DECAY parameter may need to be turned all the way up for the envelope<br />
not to cut off the end part of a sample.<br />
4.2.2 Tempo/Data Control<br />
In PATTERN, SONG and SONG-PLAY modes, this knob controls the sequencer’s tempo.<br />
Especially in a live-situation, it might be possible that you change the tempo by hitting the<br />
Tempo-Knob unintended. To avoid this, the Tempo-Knob is only active when you hit the Accent-<br />
Button and keep it pressed down while you turn the Tempo-Knob.<br />
In some functions, it also serves to set the value of the parameter shown in the display.<br />
Turning the knob counter clockwise reduces the value, turning it clockwise increases it. The data<br />
knob can set tempo changes only in steps of two. To fine-set a BPM value, press the ACCENT<br />
button and scroll through the values with the UP/DOWN buttons in single steps. It is not possilbe<br />
to set fractions of BPM.<br />
4.2.3 UP/DOWN buttons.<br />
Use the UP/DOWN buttons to increase/decrease the values shown in the display in single steps. It<br />
is possible to reverse the response of these buttons to what suits you better. Press the SHIFTand<br />
UP buttons at the same time. You can now choose between the assignments Ud (Up Down) and<br />
dU (Down UP). Press ENTER to select or SHIFT to abort.<br />
4.2.4 Instrument Volume Control<br />
BD Level, SD Level, HH Level<br />
Use this to set the basic volume level of the individual instruments. These knobs also control the<br />
level at the individual outputs.<br />
4.2.5 Master-Volume Control<br />
Use this to set the volume of the MIX output. For best sound quality, keep this knob turned up all<br />
the way.<br />
4.2.6 Accent Control<br />
Depending on the ACCENT mode selected, this knob serves to set the global maximum accent.<br />
Page 16 XBase <strong>09</strong> <strong>Operating</strong> <strong>Manual</strong>
4.2.7 WRITE<br />
This button switches between Pattern-Write, Perform-Write or Song-Write modes. Pressing the<br />
button once activates the respective write mode which is indicated by the write button lighting up<br />
. Pressing this button again switches the unit back into play mode, at which point the write<br />
button's light turns off.<br />
All mode functions can also be switched while the sequencer is running without timing glitches.<br />
An interesting feature is switching from Perform to Pattern mode, since both modes use the same<br />
patterns but with differing treatment of instrument sound parameters. This can be useful in live<br />
performance.<br />
4.2.8 STEP / PATTERN / FUNCTION buttons<br />
START button<br />
Start the <strong>Xbase</strong><strong>09</strong>'s sequencer by pressing the START button.<br />
STOP/CONT button<br />
To stop the sequencer, press the STOP/CONT button. To continue playing the sequencer, press<br />
the STOP/CONT button again.<br />
1 . . . 16 buttons<br />
The 16 step buttons select patterns and steps directly. Press the shift button to access additional<br />
functions (copy, clear, bank number, scale, last step, shuffle...).<br />
ENTER button<br />
Use the ENTER button to confirm the various SHIFT functions.<br />
SHIFT button<br />
After pressing the SHIFT button (which then lights up) you can select the functions as shown by<br />
the step button’s labels. The selected SHIFT mode is displayed by the respective step button and<br />
the shift button blinking until a data entry has been made. You can abort the function by pressing<br />
the SHIFT button again.<br />
4.2.9 INSTRUMENT Buttons.<br />
BASS DRUM, SNARE DRUM, CLOSED HI HAT, OPEN HI HAT<br />
The instrument buttons serve to select or to monitor the respective instrument. In Song mode,<br />
special SONG - WRITE functions are assigned to these buttons! The LED next to each button<br />
indicates the selected instrument depending on which mode is currently active.<br />
XBase <strong>09</strong> <strong>Operating</strong> <strong>Manual</strong> Page 17
ACCENT / TEMPO FINE<br />
In Pattern and Perform - Write mode, the ACCENT button serves to select the ACCENT track of<br />
the currently active instrument. This is indicated by simultaneous blinking of both the ACCENT<br />
LED and the LED of the respective instrument. Pressing the ACCENT button again switches back<br />
into the instrument track. Pressing an instrument button while ACCENT is active also switches<br />
ACCENT off again. ACCENT intensity is is globally controlled by the ACCENT knob in all<br />
PLAY modes (PERFORM, PATTERN, SONG) and is valid for all instruments.<br />
Setting the tempo with the ACCENT button:<br />
Hold down the ACCENT button. Now you can increase or decrease the tempo with the<br />
UP/DOWN buttons in steps of a single BPM.<br />
Using the Accent button to make the <strong>Xbase</strong><strong>09</strong> display an absolute parameter value<br />
Hold down the ACCENT and turn the desired knob. You thereby obtain the absolute value<br />
corresponding to the knobs position (full left: 0, full right: 127), as opposed to the knob's additive<br />
value.<br />
Bank LEDs<br />
The bank LEDs indicate which Pattern bank is active. There are 4 banks, each containing 16<br />
patterns.<br />
Scale LEDs<br />
The scale LED indicates the note length of a step (scale) of the current pattern.<br />
4.2.10 Mode select buttons PERF, PATT, SONG, WRITE<br />
The mode buttons serve to select the <strong>Xbase</strong><strong>09</strong>'s various operating modes (see next chapter !).<br />
Page 18 XBase <strong>09</strong> <strong>Operating</strong> <strong>Manual</strong>
5. PERFORM MODE<br />
Press the PERF button to switch into Perform mode. In Perform mode you can select and edit<br />
drum kits and patterns, in a way similar to many "vintage" drum machines. In Perform mode,<br />
sound parameter changes ARE NOT recorded and played back as in Perform Write mode (see<br />
below). The <strong>Xbase</strong><strong>09</strong>'s speciality is programming patterns in Pattern Write mode.<br />
5.1 Perform Play Mode (Pattern playback)<br />
You can select from 64 patterns that are arranged in four banks with 16 patterns each.<br />
To select a bank, press SHIFT/Bank No. and set the desired bank number with the UP/DOWN<br />
buttons. One of the four bank LEDs will display which bank you have selected.<br />
To select a pattern within that bank, press one of the 16 step buttons. The respective patterns step<br />
button will light up.<br />
Patterns can be selected while the sequencer is running.<br />
If the XBase gets Midi-Programm-Change orders, the patterns are changed.<br />
Pressing the START button causes the sequencer to play the pattern from its beginning. To stop<br />
the sequencer, press STOP/CONT. Pressing STOP/CONT again will make it continue playing<br />
back from the point where STOP/CONT was last pressed.<br />
5.2 Selecting Drum kits<br />
Pressing the UP/DOWN buttons selects a drum kit. In the ROM-section are 100 already<br />
programmed drumkits stored. The display reads r00 to r99.<br />
By stepping over r99, hitting the UP-button, you reach the RAM-section. The display now reads<br />
f00. When you are on kit r00 (ROM 00), you reach RAM-kit 99 by hitting the DOWN-button<br />
(now display reads f99 ).<br />
You can select a new drum kit while the sequncer is running.<br />
The Hihat sample - select function (see pattern functions) can be used here to trigger other<br />
samples for closed or open hihat and for editing the hihat section's sound parameters.<br />
5.3 Creating and storing your custom drumkits<br />
Select a drum kit you want to edit or an empty drum kit memory slot and set the parameters for<br />
bass drum, snare drum and hihat.<br />
The dot in the display indicates that the selected drum kit has been edited and not yet stored.<br />
To store an edited kit, press the SHIFT button and select the "Store Kit" function (step button 8).<br />
Select the memory slot where you want to store the kit by using the UP/DOWN buttons. Press<br />
ENTER to store the kit to that memory slot. Press SHIFT to abort. To edit ROM-kits you don`t<br />
like, you have to copy the kit you want to change into the RAM-section like described above.<br />
XBase <strong>09</strong> <strong>Operating</strong> <strong>Manual</strong> Page 19
5.4 Recording patterns in Perform Write mode<br />
To get into PERFORM WRITE mode, press the WRITE button while in PERFORM mode (PERF<br />
is lit).<br />
In perform write mode you can record patterns. You can either step - program patterns or play and<br />
record instruments in real time with the aid of the real time write function (see REAL TIME<br />
WRITE).<br />
Sound parameter changes can NOT be recorded in PERFORM WRITE mode!<br />
You can set the pattern’s time signature by setting its scale and length (Last Step). See also<br />
"Pattern functions".<br />
All empty patterns default to scale = 16, last step = 16. This means that the pattern has the time<br />
signature 4/4 and consists of 16 steps each with a length of 1/16 th note.<br />
Patterns that are longer than 16 steps occupy two or more pattern memory slots. To edit the steps<br />
after 16 in a 24 step pattern, increase the pattern number by 1 with the UP/DOWN buttons.<br />
Decreasing the pattern number by 1 with the UP/DOWN buttons changes back to the first 16<br />
steps.<br />
Select the instrument you want to play or edit by pressing one of the instrument buttons labelled<br />
BASS DRUM, SNARE DRUM, CLOSED HIHAT ans OPEN HIHAT. BASS DRUM is selected<br />
automatically when the WRITE button is pressed.<br />
The 16 step buttons light up at the steps where the selected instrument is playing. Pressing a lit<br />
step button switches its light off and mutes the selected instrument at that step.<br />
You can press any step button while the sequncer is running to switch it on or off. Use the<br />
instrument buttons to quickly switch between the three instrument tracks.<br />
If you press the ACCENT button, the 16 step buttons will indicate at which step the selected<br />
instrument is played with an accent. Press the step buttons to switch the accentuation of<br />
individual steps on or off. Press the ACCENT button repeatedly to switch between an instrument<br />
track and its accent track. The ACCENT knob adjusts the strength of the accent (see also sound<br />
generation).<br />
Note: There is only one ACCENT track for the hihat section, because open hihat and closed hihat<br />
can never sound at the same time.<br />
In this mode you have direct control over each instrument’s sound by means of the sound control<br />
knobs. The pattern sequencer serves only to trigger the selected Perform kits 0 - 99. The selection<br />
is displayed as “F xx” (xx = Perform Kit number). For further details see "Perform Mode" section<br />
Page 20 XBase <strong>09</strong> <strong>Operating</strong> <strong>Manual</strong>
6. PATTERN MODE<br />
You get into Pattern mode by pressing the PATT button. You can program and play patterns in<br />
Pattern mode just as in Perform mode, the big difference being that you can store and play back<br />
all instrument sound parameters for every single step.<br />
Drum kits cannot be recalled or edited in Pattern mode.<br />
6.1 Pattern Play Mode (Pattern Playback)<br />
Pattern playback functions are the same as in Perform mode. The UP/DOWN buttons select a new<br />
pattern number.<br />
If the XBase gets Midi-Programm-Change orders, the patterns are changed.<br />
6.2 Pattern WRITE mode (Recording patterns)<br />
The basic recording functions are the same as in Perform mode. The UP/DOWN buttons select a<br />
new pattern number.<br />
6.3 Recording Sound Changes in Pattern Write Mode<br />
6.3.1 Individual Step Edit<br />
This function lets you assign new sound parameter values to one or more steps by turning a sound<br />
control knob.<br />
To switch a step into edit mode, hold down the instrument button (BASS DRUM, SNARE<br />
DRUM, CLOSED HI HAT or OPEN HI HAT) of the instrument you want to edit and press the<br />
step button (1-16) you want to edit. The step button light will start blinking.<br />
It is possible to edit multiple steps at the same time.<br />
NOTE: If the step you want to edit is already selected (step button is lit), the first button press will<br />
deselect it, also if the instrument button is held down. In this case you should press the step button<br />
a second time to switch it into edit mode.<br />
Now turn the sound programming knobs of the selected instrument to until you have reached a<br />
satisfactory setting.<br />
To switch off edit mode for a particular step, press the respective (blinking) step button as often<br />
as is necessary to switch its light off.<br />
6.3.2 Track Record Mode<br />
With the Track Record mode function all steps of the current pattern can be edited.<br />
Hold down the button of the instrument you wish to edit and press the WRITE button to activate<br />
the Track Record mode functions. The WRITE button starts blinking.<br />
Now turn one of the sound control knobs of the selected instrument. This replaces that knob’s<br />
parameter values in all the steps it passes over with new values.<br />
If you want to record continuous sound parameter changes, do the following:<br />
After <strong>com</strong>pleting a successful pass through the pattern, immediately press the WRITE button<br />
again to exit Track Record mode., because a renewed run through the pattern would overwrite the<br />
settings you just recorded..<br />
XBase <strong>09</strong> <strong>Operating</strong> <strong>Manual</strong> Page 21
6.4 Pattern functions<br />
To select the following functions, press SHIFT and then press the step button bearing the name<br />
of the function.<br />
6.4.1 Copy<br />
In Perform mode: Copies the soundparameter data from Perform mode into all the steps of the<br />
selected pattern. The display reads: F-P<br />
Use this function to assign the settings of a Perform mode drum kit (F) to all steps of a pattern. In<br />
this wise you can copy existing drum kits and create static patterns (i.e. patterns played by drum<br />
kits whose sounds are not continuously changing) in Pattern Write mode.<br />
The individual steps can be edited later (see Pattern Write mode).<br />
Select a pattern to which you want to copy the sound data.<br />
Activate the Copy function by pressing SHIFT and COPY. Both buttons will start blinking.<br />
Use the UP/DOWN buttons to select a drum kit (F00-99) whose sound data you wish to copy.<br />
Press ENTER to copy or SHIFT to abort.<br />
In Pattern mode: Copies whole patterns. The display reads: P - P<br />
While in Pattern mode or in Pattern Write mode, select the pattern you wish to copy.<br />
Activate the Copy function by pressing SHIFT and COPY. Both buttons will start blinking.<br />
Use the UP/DOWN buttons to select the pattern memory slot number where you wish to copy the<br />
pattern to.<br />
Press ENTER to copy or SHIFT to abort.<br />
6.4.2 Clear<br />
Clear deletes patterns<br />
Select the pattern you wish to delete.<br />
Activate the Clear function by pressing SHIFT and Clear. Both buttons will start blinking.<br />
Press ENTER to clear or SHIFT to abort.<br />
6.4.3 Bank No.<br />
Bank No. lets you switch between pattern banks.<br />
Activate the Bank No. function by pressing SHIFT and Bank No. Both buttons will start blinking.<br />
Use the UP/DOWN buttons to select one of the four banks. The respective Bank LED will light<br />
up.<br />
Page 22 XBase <strong>09</strong> <strong>Operating</strong> <strong>Manual</strong>
In Perform and Pattern Play modes, the 16 step buttons always correspond to the 16 patterns in<br />
the selected bank. Bank selection does not have to be confirmed by pressing ENTER. Press<br />
ENTER or SHIFT to quit "Bank No".<br />
6.4.4 Scale<br />
Activate the Scale function by pressing SHIFT and Scale. Both buttons will start blinking.<br />
Set the step length with the UP/DOWN buttons. The possible settings are:<br />
1/16, 1/32, 1/8 Triplets or 1/16 Triplets<br />
The four scale LEDs show the selected scale.<br />
Directly above the step buttons you will find four sets of stripes in two colours, labelled A,B, C<br />
and D respectlively. These stripes indicate where the strong beats (quarter notes) are to be found<br />
in the four different scalings.<br />
In a pattern with a 32th scaling, the first beat is on step 1, the second beat on step 9, exactly where<br />
the corresponding orange stripes begin on the left.<br />
The same applies for the other scalings. In order for the scale settings to make sense, the variable<br />
"last step" , which determines the last step of a pattern, is set automatically.<br />
The <strong>com</strong>bination of the settings "Scale" and "last step" determines the time siganture and tempo.<br />
You can’t convert a 4/4 pattern into a triplet pattern simply by changing the scale. The<br />
programming of the individual steps has to be adapted.<br />
Patterns programmed in scales B (32th) and D (16th triplets) extend into the next higher<br />
numbered pattern. This should be borne in mind when you edit them. For further information,<br />
read the following section "Last Step".<br />
Press ENTER to select the new scale or SHIFT to abort.<br />
6.4.5 Last Step<br />
Activate the "Last Step" function by pressing SHIFT and LAST STEP. Both buttons will start<br />
blinking.<br />
Use the UP/DOWN arrows to set the pattern length (number of steps). Possible values are 1 to<br />
255.<br />
Press ENTER to set "Last Step" or SHIFT to abort.<br />
If the number of steps is greater than 16, the selected pattern will occupy two or more consecutive<br />
pattern memory slots that are played back consecutively but which have to edited individually.<br />
If, for example, you set the last step for pattern 05 to 32, selecting pattern 05 in perform/pattern<br />
play mode will cause the step buttons 5 and 6 to light up together, These patterns will always be<br />
played back together, 05 after 06.<br />
XBase <strong>09</strong> <strong>Operating</strong> <strong>Manual</strong> Page 23
With this function you can create nearly all musical time signatures. The default setting after<br />
clearing a pattern is 16, which means 4/4 time.<br />
Changing the last step to 12 will give you 3/4 time in 16th note resolution. During playback, the<br />
step light will jump to the first step after reaching step number 12.<br />
Further examples:<br />
Last Step = 6 gives you 3/4 time in 8th note resolution at double speed<br />
(relative to 16th note resolution.)<br />
Last Step = 14 gives you 7/8 time in 16th resolution<br />
Last Step = 20 gives you 5/4 time in 16th resolution<br />
Last Step = 10 gives you 5/4 time in 8th resolution and double speed realative to 16th resolution<br />
You can chain together multiple 16th patterns by setting Last Step as a multiple of 16. Setting<br />
Last Step to 64 (= 4x16) will cause 4 patterns always to be played one after the other. The Last<br />
Step information is contained only in the first of the four consecutive patterns.<br />
The other patterns can have Last Step information of their own which is displayed by the pattern<br />
LED. In this wise, you can very flexibly generate short multi-measure sequences by selecting<br />
patterns in <strong>com</strong>bination with programmed Last Step values that can be switched during live<br />
performance. Neat, huh?<br />
Recapitulation:<br />
The <strong>Xbase</strong><strong>09</strong> has 64 single patterns each with a maximum of 16 steps.<br />
A "Last Step" can be programmed for each pattern. The highest possible "Last Step" number is<br />
255. This enables a single pattern to spread over a maximum of 16 consecutively numbered<br />
patterns.<br />
6.4.6 Shuffle<br />
Activate the Shuffle function by pressing SHIFT and Shuffle. Both buttons will start blinking.<br />
The Shuffle function can push or delay selectable steps inside a selected scale in order to create<br />
all kinds of grooves. Any step can be played back up to 6/192ths earlier or later.<br />
The 16 step buttons indicate which steps are shifted by the number of 192ths shown in the<br />
display.<br />
The default setting all steps of a pattern will light up when the display reads "0".<br />
Use the UP/DOWN buttons to make the display read -6 to 6.<br />
“ 0” means no shift.<br />
“-1” means a predelay of 1/192th, -6 means a predelay of 6/192ths.<br />
“ 1” means a delay of 1/192th, 6 means a delay of 6 1/192ths.<br />
Pressing a step button will cause that step to be shifted by the displayed amount.<br />
The steps shifted in this way will light up.<br />
Pressing ENTER programs the shift, SHIFT aborts the shuffle function.<br />
Page 24 XBase <strong>09</strong> <strong>Operating</strong> <strong>Manual</strong>
NOTE: If you want to shift some steps by -1 and other steps by 2, perform the -1 shift by pressing<br />
ENTER and then perform the 2 shift in a second pass by calling up the shuffle function again,<br />
making the settings and confriming these by pressing ENTER again.<br />
6.4.7 Realtime Write<br />
Realtime Write lets you record the <strong>Xbase</strong><strong>09</strong>'s instruments in real time.<br />
Activate the Real Time Write function by pressing SHIFT and Real Time Write. Both buttons<br />
will start blinking.<br />
The display now reads "rEC". Press ENTER. The WRITE LED and the "rEC" display will begin<br />
to blink.<br />
Start the sequencer. You will hear the sound of the metronome playing 1/4 notes. Now play the<br />
instrument buttons. The metronome is automatically switched off after the sequencer has been<br />
stopped.<br />
Confrim your recording by pressing ENTER or abort by pressing SHIFT.<br />
6.4.8 Metronome<br />
Press SHIFT and Metronome to turn the Metronome On or Off.<br />
A click is running through Mix out all the time.<br />
6.4.9 Hihat Sample select<br />
Selects samples for the Closed Hihat and Open Hihat buttons.<br />
Press SHIFT and HH Sample select. Use the UP/DOWN buttons to choose one of the following<br />
settings that are shown in the display:<br />
HH: The step buttons indicate which steps are assigned to the hihat sample. The default setting is:<br />
“All steps”.<br />
CLP: The step buttons indicate which steps are assigned to the rim shot or the clap sample<br />
CrH: The step buttons indicate which steps are assigned to the crash cymbal sample<br />
rid: The step buttons indicate which steps are assigned to the ride cymbal sample<br />
noi: The step buttons indicate which steps are assigned to the noise signal.<br />
(see also the table in the introduction, desciption of sound parameters.)<br />
Select a sample and determine where it should sound in place of the hihat sample by pressing the<br />
appropriate step button.<br />
Confirm this selection by pressing ENTER. You can also select a new sample to assign and<br />
confirm all edits with ENTER later or you can abort by pressing SHIFT.<br />
XBase <strong>09</strong> <strong>Operating</strong> <strong>Manual</strong> Page 25
NOTE: This function only determines which sample is to be played when the respective step is<br />
set to play a sound. If the step where you want to play a certain sample is not set in either the<br />
closed hihat or the open hihat track, no sample will be played in the HH Sample select function. It<br />
is therefore advised that you program an open Hihat for the step you want to assign the clap<br />
sample to in HH Sample select.<br />
The samples "crash", "ride" and noise can be played back by the open and the closed hihat<br />
instrument tracks. This lets you program closed and open crashes. The only exceptions are the<br />
"rim shot" and "clap" samples which can be triggered only by the closed hihat and the open hihat<br />
instrument track respectively.<br />
NOTE: After activating the step edit function in pattern mode you can adjust the volume level of<br />
the various hihat samples and noise by means of the HH Balance knob.<br />
6.4.10 HH Reverse<br />
HH Reverse reverses playback of the HiHat-, Crash- and Rim-Samples in the hihat section. Rideand<br />
Clap are not reversible.<br />
To reverse the sounds, first you have to select the samples and the steps you want to reverse<br />
(described in6.4.9).<br />
Activate the "HH Reverse" function by pressing SHIFT and HH Rev. Both buttons will start<br />
blinking. The display reads "rEV"<br />
The 16 step buttons now indicate which of the steps in the hihat track are being played<br />
backwards. Press a step button to determine wether that step is to be played backwards (step<br />
button is lit) or forwards (step button is not lit).<br />
Confirm your edit by pressing ENTER, press SHIFT to abort.<br />
Use the sound control knobs in step edit mode to edit the sound to suit your taste.<br />
6.4.11 LFO Page<br />
<strong>Xbase</strong><strong>09</strong> software versions 1.23 and higher provide two LFOs (Low Frequency Oscillators) for<br />
sound modulation.<br />
The LFOs are designed to modulate the three instrument’s sound parameters. When the LFO<br />
function is active, the first five sound control knobs of the bass drum and snare drum section<br />
control the parameters for LFO 1 and LFO 2. instead of instrument sound parameters.<br />
LFO parameter settings must always be made while the sequencer is running, because the<br />
absolute LFO frequency is always dependant on the sequencer tempo.<br />
The effect the LFO settings have on an instrument’s sound are only audible when the sequencer is<br />
running. The LFOs are inactive when the sequencer is stopped.<br />
Activate the LFO function by pressing SHIFT and LFO Page. Both buttons will satrt blinking.<br />
Page 26 XBase <strong>09</strong> <strong>Operating</strong> <strong>Manual</strong>
The first five knobs of the bass drum and the snare drum control the parameters for LFO 1<br />
and LFO 2.<br />
LFO parameters are assigned as follows:<br />
LFO 1 Controls (Bass Drum Controls)<br />
Tune = LFO 1 Waveform<br />
Pitch = Modulation target<br />
Decay = LFO 1 Intensity<br />
Harmonics = LFO 1 Frequency<br />
Pulse = LFO 1 sync/free<br />
LFO 2 Controls (Snare Drum)<br />
Tune = LFO 2 Waveform<br />
XSnapp = Modulation target<br />
Decay = LFO 2 Intensity<br />
Detune = LFO 2 Frequency<br />
Noise Tune = LFO 2 sync/free<br />
LFO - Waveforms<br />
This determines the waveform generated by the LFO. Turning the knob selects the waveform. The<br />
available waveforms are shown in the display<br />
SuP = saw up<br />
Sdo = saw down<br />
tri = triangle<br />
rCt = rectangular<br />
LFO Modulation target<br />
This determines the parameter the LFO will modulate. Turning the knob will select one of the<br />
possible targets. Both LFOs can modulate one of the following parameters:<br />
BD Pitch, Snare Tune, Xsnapp, Noise Tune, Hi Hat Tune .<br />
Furthermore, LFO 1 can modulate LFO 2's frequency.<br />
Modulation targets are displayed as:<br />
bPi = Bass Drum Pitch<br />
Stu = Snare Drum Tune<br />
SSn = Snare Drum Xsnapp<br />
Snt = Snare Drum Noise Tune<br />
Htu = Hi Hat Tune<br />
LF2 = LFO 2 Frequency (LFO 1 only)<br />
XBase <strong>09</strong> <strong>Operating</strong> <strong>Manual</strong> Page 27
LFO Intensity<br />
LFO Intensity determines the intensity with which the LFO will modulate its target. LFO<br />
intensity is displayed as a numeric value between 0 and 127.<br />
To switch off an LFO, set the value to 0.<br />
Should you not be able to set the value to 0, hold the ACCENT button pressed and turn the knob<br />
counterclockwise until the display reads 0.<br />
LFO Frequency<br />
LFO Frequency sets the frequency (relative to the sequencer tempo) i. e. the LFO speed. The<br />
frequency is displayed as a numeric value between 0 and 127.<br />
NOTE: The absolute LFO frequency depends on the current sequencer tempo. In this wise, it is<br />
also possible to generate modulations with a free running LFO.<br />
LFO Synchronisation<br />
This parameter determines wether the LFO restarts at every programmed instrument step or if it<br />
freewheels past the instrument triggers.<br />
The display reads:<br />
FrE = freewheeling LFO<br />
SYn = beat synchronized LFO<br />
Select a setting by turning the "pulse" or "noise tune" knobs.<br />
To store your LFO page edits, press ENTER. This stores all LFO settings for the currently<br />
selected pattern.<br />
LFOs are active in Pattern and in Perform modes.<br />
Abort by pressing SHIFT.<br />
In this mode you select the patterns with different instrument control settings for each step. These<br />
are displayed as “P xx” (pattern number 1-64) The instrument’s sound control knobs influence the<br />
sound of the individual steps indirectly in the various Pattern Edit modes. For further details, see<br />
"Perform Mode" section.<br />
Page 28 XBase <strong>09</strong> <strong>Operating</strong> <strong>Manual</strong>
6.4.12 Track Page<br />
The Track Page contents three further sequencertracks. Their data is sended out via Midi-Out<br />
socket to control external Midi-soundgenerators directly from XBase<strong>09</strong> internal sequencer.<br />
Every track can have its individual Midi-channel. Notenumber and -length is adjustable for<br />
every single step. Even accent-setting is possible.<br />
So up to three different melodielines or chords up to three notes can be programmed.<br />
Programming the steps is the same procedure like programming drumtracks, described in<br />
Pattern- Mode ( chapter 6.3, P.18).<br />
When sequencertracks are added to existing drumpatterns, the drumpatterns will not be<br />
changed in any way.<br />
To edit Midichannel, Notenumber and -length, the first four knobs of every instrument-section<br />
(BD, SD, HH) have a ‘page two’-function :<br />
1. Tune = Note 2. Pitch = Octave<br />
3. Decay = Midichannel 4. Harmonics = Notelength<br />
The knobs of Snaredrum- and HiHatsection are changing in the equal way.<br />
Now, we describe the programming procedure of a sequencertrack :<br />
���� hit PATT button patternmode active LED ligths up<br />
���� hit UP/DOWN or 1-16 buttons choose pattern display shows patternnumber<br />
���� hit SHIFT,then TRACKPAGE button sequencer active display shows ‘ trC ’ for ‘track’<br />
���� hit WRITE button sequencer ‘sharp’ LED ligths up<br />
���� hit INSTRUMENT-button select track BD=1,SD=2,CH=3 LED lights up<br />
���� move knob 3 select midichannel display shows midich.-number<br />
���� move knob 4 select notelength display shows ‘ Stac ‘ or ‘ Leg ‘<br />
-Staccato: every step is triggert<br />
-Legato: following steps are connected<br />
� hit STRART button sequenzer started<br />
� set steps described in chapter 6.3 P.18<br />
Use Induvidual Step Mode (6.3.1) to assign different notes to individual steps.<br />
Use Track Record Mode (6.3.2 ) to assign same note to all steps. By moving knobs<br />
1 and 2 , you can change your melodies in realtime. To get ‘musical’ results this way,<br />
you might need some practice.<br />
� move knob 1 and 2 assign notes and octave display shows note and trackno.<br />
when sequencer is running and<br />
reaching a step ‘ E - 1’<br />
� Happy with your first track ???<br />
� hit WRITE button Trk.Rec.Mode off LED stops flashing<br />
� hit WRITE, then INSTRUMENTbutt. select next track<br />
� move knob 3 select midichannel<br />
� and so on... programm new track like above .<br />
� Happy with all your tracks ???<br />
� hit ENTER button pattern is stored, RampPage left<br />
XBase <strong>09</strong> <strong>Operating</strong> <strong>Manual</strong> Page 29
For every sequencertrack exists an individual accenttrack. Accents are programmed the same way<br />
drumaccents are programmed (chapter 5.4, P.17 ). When accent is setted, a velocity of 127 is<br />
putted out via Midi, without accent a velocity of 64.<br />
Maybe at first, it will take a bit of getting used to programm the sequencer but after a short<br />
practicetime you will be familiar with it.<br />
7. SONG MODE<br />
In Song mode prerecorded patterns are chained together and played back as <strong>com</strong>plete songs. To<br />
get into Song play mode, press the SONG button<br />
7.1 Song play mode.<br />
Use the UP/DOWN buttons to select one of ten available song memory slots.<br />
Press the START button to start playback of the selected song. At every song step, the display<br />
will show the pattern number and then switch the display to show how often that pattern will still<br />
be played.<br />
7.2 Song Write mode.<br />
While in Song mode (Song button is lit) press the WRITE button to get into Song Write mode.<br />
Pattern chains are programmed by setting song step numbers, pattern numbers and the number of<br />
pattern reptitions.<br />
Use the instrument buttons to program pattern chains.<br />
7.2.1 Song-Step (BASS DRUM button)<br />
Press the BASS DRUM button. The display reads "Ste".<br />
A song step <strong>com</strong>prises a pattern number and the number of run-throughs of this pattern.<br />
A song always begins with step 001. The maximum number of song steps per song is 100 (001 -<br />
100).<br />
Use the UP/DOWN buttons and the DATA knob to select the song step you wish to edit. Confirm<br />
your choice by pressing ENTER.<br />
Pressing ENTER will automatically switch to the next song step.<br />
7.2.2 Pattern Nr. (SNARE DRUM button)<br />
Press the SNARE DRUM button. The display reads "PAt".<br />
Use the UP/DOWN arrows to choose the pattern you want to assign to the current song step. Press<br />
ENTER.<br />
Page 30 XBase <strong>09</strong> <strong>Operating</strong> <strong>Manual</strong>
7.2.3 Repeat (CLOSED HI HAT button)<br />
Press the CLOSED HIHAT button. The Display reads "rPt"<br />
Use the UP/DOWN buttons or the DATA knob to set how often the pattern should be played.<br />
Confirm your edit by pressing ENTER.<br />
7.2.4 Song End<br />
The end of a song is set by programming a pattern with “0” repeats after the last pattern.<br />
7.2.5 Store Song Step (OPEN HI HAT button)<br />
To store the settings for the song step you have just edited, press the OPEN HIHAT button (the<br />
display reads "Sto") followed by ENTER.<br />
7.3 Song functions<br />
7.3.1 Copy Song<br />
Use this function to copy whole songs.<br />
While in Song mode or Song Write mode, select the song you wish to copy.<br />
Press SHIFT and COPY (SHIFT and COPY buttons will start blinking). Use the UP/DOWN<br />
buttons to select the song memory slot number where you wish to copy the selected song.<br />
Confirm your action by pressing ENTER. Press SHIFT to abort the copy process.<br />
7.3.2 Clear Song<br />
In Song mode, the clear function deletes songs.<br />
Selct the song you wish to delete. Then press SHIFT and Clear. (Both SHIFT and Clear will start<br />
blinking). Confirm your action by pressing ENTER. Pressing SHIFT will abort the clear function.<br />
XBase <strong>09</strong> <strong>Operating</strong> <strong>Manual</strong> Page 31
8. Saving and Restoring the <strong>Xbase</strong><strong>09</strong>'s data via MIDI dump<br />
8.1 Saving the <strong>Xbase</strong><strong>09</strong>’s memory to an external MIDI data recorder<br />
You can save the <strong>Xbase</strong><strong>09</strong>'s memory contents (patterns, kits and songs) to an external MIDI<br />
device (datadisk, sequencer, keyboard etc.) This data can be transmitted back to the <strong>Xbase</strong><strong>09</strong><br />
later, which allows you to clear its memory for new drum kits, patterns and songs.<br />
Saving data to an external MIDI device<br />
Press SHIFT and the Midi Mode button. Press the UP button until the display reads "dMP"<br />
(dump).<br />
Make sure your external MIDI device is ready to receive MIDI SysEx data.<br />
Press ENTER on the <strong>Xbase</strong><strong>09</strong>. This will start MIDI SysEx data transmission from the <strong>Xbase</strong><strong>09</strong> to<br />
the MIDI recording device. While this is in progress, the display will read "bSY" (busy).<br />
After about 20 seconds, the display will read "rDY" (ready) which indicates that all data has been<br />
transmitted.<br />
8.2 Loading <strong>Xbase</strong><strong>09</strong> data from an external MIDI data player.<br />
To load back externally stored <strong>Xbase</strong><strong>09</strong> data into the <strong>Xbase</strong><strong>09</strong>'s memory, press SHIFT and the<br />
Midi Mode button. Press the UP button until the display reads "Ld" (load).<br />
Press ENTER to make the <strong>Xbase</strong><strong>09</strong> ready to receive data.<br />
Start data transmission on the external MIDI device (could also be another <strong>Xbase</strong><strong>09</strong>...) The<br />
display will read "rCV" (receive) to indicate that it is receiving data.<br />
If MIDI data reception has been successful, the display will read "fin" (finished) after a few<br />
seconds.<br />
Page 32 XBase <strong>09</strong> <strong>Operating</strong> <strong>Manual</strong>
9. Controlling the <strong>Xbase</strong><strong>09</strong> via MIDI<br />
Playing the <strong>Xbase</strong> via MIDI<br />
To control the <strong>Xbase</strong><strong>09</strong> from a MIDI keyboard or a MIDI sequencer, connect the <strong>Xbase</strong><strong>09</strong>'s<br />
MIDI In port with the controlling device's MIDI out port.<br />
You can now play the <strong>Xbase</strong><strong>09</strong>'s sounds and synchronize it to a MIDI sequencer.<br />
If you play the <strong>Xbase</strong><strong>09</strong>'s instruments from a MIDI keyboard that transmits key velocity data,<br />
velocity will always influence the accent.<br />
If the XBase gets Midi-Programm-Change orders, the patterns are changed.<br />
Each instruments volume is independantly adjustable and can be controlled individually via<br />
controllers or globaly with MIDI volume (controller 7).<br />
We would like to call to your attention that the <strong>Xbase</strong><strong>09</strong> has to process all MIDI data received via<br />
MIDI In, even when nothing appears to be happening.<br />
All in<strong>com</strong>ing MIDI data has to be checked for channel information or function, which always<br />
costs processing time. If no MIDI filters are in use, the amount of data can be considerable.<br />
Timing-wise, the <strong>Xbase</strong><strong>09</strong>'s internal sequencer is given priority. One should nevertheless, unless<br />
absolutely necessary, disconnect MIDI In or at least reduce the amount of MIDI data transmitted<br />
to the <strong>Xbase</strong><strong>09</strong>'s MIDI In. This will avoid timing problems caused by"clogging" the MIDI bus<br />
with MIDI controllers, MIDI time code or SysEx data that is not even intended for the <strong>Xbase</strong><strong>09</strong>.<br />
We consider timing to be a crucial factor for an instrument like the <strong>Xbase</strong><strong>09</strong>. We have therefore<br />
gone to great lengths to test and optimize timing performance in many "worst case" tests to ensure<br />
that timing problems do not arise.<br />
9.1 MIDI channel<br />
Press SHIFT and "Midi Channel" . Use the UP/DOWN buttons to set the MIDI channel on which<br />
you want the <strong>Xbase</strong><strong>09</strong> to receive and transmit MIDI data.<br />
Confirm your setting by pressing ENTER. Press SHIFT to abort.<br />
9.2 MIDI modes<br />
Press SHIFT and MIDI mode. Use the UP/DOWN buttons to select one of the modes decribed<br />
below: Confirm your selection by pressing ENTER. Press SHIFT to abort.<br />
SM1 (Split mode 1)<br />
In this mode, every sound (including Crash, Ride, Clap/Rim, Noise) is triggered by a single MIDI<br />
note (i.e. a single key on your MIDI keyboard). In Split mode 1 each sound's pitch is controlled<br />
by a MIDI controller.<br />
See the MIDI implementation chart for the exact key assignment.<br />
SM2 (SplitMode 2)<br />
In this mode the <strong>Xbase</strong><strong>09</strong>'s three instruments are spread over the whole keyboard. In split mode 2,<br />
instrument pitch changes are determined by MIDI note number and not via MIDI controllers.<br />
See also the MIDI implementation chart<br />
XBase <strong>09</strong> <strong>Operating</strong> <strong>Manual</strong> Page 33
10 SYNCHRONIZATION WITH OTHER DEVICES<br />
10.1 MIDI Clock<br />
The <strong>Xbase</strong><strong>09</strong> as slave<br />
The <strong>Xbase</strong><strong>09</strong> can be sync'ed to external devices via MIDI clock. The MIDI clock signal has a<br />
resolutiion of 24 ticks or pulses per quarter note (24ppq). This equals 96 ticks over the length of a<br />
bar in 4/4 time. Therefore the <strong>Xbase</strong><strong>09</strong>'s rhythmic resolution is only half as fine when it is<br />
synchronized to MIDI clock (the resolution of the <strong>Xbase</strong><strong>09</strong>'s internal sequencer is 48 ppq).<br />
This means that uneven shuffle settings are quantized to even settings. This can lead to a finely<br />
set groove scheme sounding different when played back by the <strong>Xbase</strong><strong>09</strong> syncing to MIDI clock.<br />
Clock select<br />
To activate the Clock select function, press SHIFT and the clock select button. Use the<br />
UP/DOWN buttons to select between MIDI and internal clock.<br />
"Mid" - the <strong>Xbase</strong><strong>09</strong> will synchronize to external MIDI clock and has to be started and stopped<br />
externally.<br />
Synchronizing with the <strong>Xbase</strong><strong>09</strong> as master<br />
The other way to synchronize the <strong>Xbase</strong> <strong>09</strong> with an external device is to synchronize the external<br />
device to the MIDI clock signal always present at the <strong>Xbase</strong><strong>09</strong>'s MIDI out port.<br />
In this case, nothing needs to be set on the <strong>Xbase</strong><strong>09</strong>. The other device must however be set to<br />
synchronize to MIDI clock.<br />
10.2 DIN-SYNC<br />
All devices that support the Roland DIN Sync format can be synchronized to the <strong>Xbase</strong><strong>09</strong><br />
regardless of the <strong>Xbase</strong><strong>09</strong>'s clock setting.<br />
Clock trigger and Start/Stop signals are transmitted independant of the play modes as long as the<br />
sequencer is running. This means that they are also transmitted when the <strong>Xbase</strong><strong>09</strong> is syncing to<br />
MIDI clock.<br />
This is an additional “MIDI to DIN Sync” interface that can be used at all times.<br />
Page 34 XBase <strong>09</strong> <strong>Operating</strong> <strong>Manual</strong>
11. Midi Implementation<br />
11.1 Sound Parameters<br />
BASS DRUM Controller No. value area internal resolution<br />
Tune 100 0..127 256<br />
Pitch 101 0..127 256<br />
Decay 102 0..127 64<br />
Harmonics 103 0..127 64<br />
Pulse 104 0..127 16<br />
Noise 105 0..127 16<br />
Attack 106 0..127 16<br />
EQ 107 0..127 8<br />
SNARE DRUM<br />
Tune 108 0..127 128<br />
Xsnapp 1<strong>09</strong> 0..127 64<br />
Decay 110 0..127 64<br />
Detune 111 0..127 64<br />
Noise Tune 112 0..127 64<br />
HI HAT<br />
Tune 113 0..127 256<br />
HH Balance 114 0..127 16<br />
CH Decay 115 0..127 64<br />
OH Decay 116 0..127 64<br />
BD Level 117 0..127 255<br />
SD Level 118 0..127 255<br />
HH Level 119 0..127 255<br />
Midi Volume<br />
(Global)<br />
7 0..127 255<br />
XBase <strong>09</strong> <strong>Operating</strong> <strong>Manual</strong> Page 35
11.2 Note Messages<br />
Instrument Split Mode 1 Split Mode 2 **Split Mode 3<br />
Note Number Note Number Note Number<br />
Bass Drum C1 36 C1..D#2 C1..C6 Basic Ch.<br />
Snare Drum E1 40 B2..G3 C1..G3 Basic Ch. +1<br />
Closed Hi Hat F#1 42 G#3..B4 C3..B3 Basic Ch. +1<br />
Open Hi Hat G#1 44 C5..C6 C4..B4 Basic Ch. +1<br />
Rim Shot (HH Sample) C#1 37 G#3..B4* C3..B3 Basic Ch. +1*<br />
Hand Clap (HH Sample) D#1 39 C5..C6* C4..B4 Basic Ch. +1*<br />
Crash short C#2 49 G#3..B4* C3..B3 Basic Ch. +1*<br />
Crash long D2 50 C5..C6* C4..B4 Basic Ch. +1*<br />
Ride short D#2 51 G#3..B4* C3..B3 Basic Ch. +1*<br />
Ride long E2 52 C5..C6* C4..B4 Basic Ch. +1*<br />
Noise short A#1 46 G#3..B4* C3..B3 Basic Ch. +1*<br />
Noise long B1 47 C5..C6* C4..B4 Basic Ch. +1*<br />
*: depending on the current setting of the HH Sample Select in PERForm Mode<br />
11.3 System Exclusive Data<br />
The only type of Sys-Ex data the <strong>Xbase</strong><strong>09</strong> supports is a hex-dump of its <strong>com</strong>plete memory<br />
content. MIDI control of sound parameters is achieved by MIDI controllers.<br />
The Sys-Ex format is as follows:<br />
$F0(SysEx Begin), $31(JoMoX-Manufacturer’s code), $7F(Command Sys Ex Dump),<br />
$55(Header), $00(Header),XX(Data0),XX(Data1),..., $F7(End of SysEx)<br />
The figures of the SysEx-Sequences are, as usual, presented in hexadecimal code.<br />
11.4 Memory Clear / Reset<br />
Switch off the <strong>Xbase</strong><strong>09</strong>. Hold down the step buttons 1, 3 and 8 and switch the <strong>Xbase</strong><strong>09</strong> back on.<br />
CAUTION: This erases and initializes all drum kit, pattern and song memory slots.<br />
To erase all user-programmed drumkits, patterns and songs and to recall the factory patterns,<br />
switch off the XBase<strong>09</strong>, hold down step buttons 4, 6 and 8 and switch power on.<br />
11.5 Software Version Display<br />
Hold down all four instrument buttons (Bass Drum, Snare Drum, Closed HH and Open HH). The<br />
display will show the three digit version number of the units firmware.<br />
Page 36 XBase <strong>09</strong> <strong>Operating</strong> <strong>Manual</strong>
12. Technical Data<br />
Instruments Bass Drum, Snare Drum, Open / Close Hi Hat<br />
A choice of 6 Samples + Noise<br />
Sound production <strong>com</strong>pletely analog with digital control of sound parameters, in the HH<br />
Section digital 8 Bit Sample with analogue VCA-Envelope<br />
Perform Memories 100<br />
Pattern Memories 64<br />
Song Memories 10<br />
Tempo from 38 BPM to 292 BPM in discreet steps<br />
Output level ca. +4 dBu<br />
Beat resolution 192 tick resolution in 16th Step Pattern<br />
Display 3 digit red LED 7-segment display<br />
Buttons 5 Instrument Trigger buttons<br />
16 illuminated Step-buttons,<br />
10 illuminated control buttons<br />
CPU High Performance 8/16-Bit Risc Controller<br />
CPU Speed 16 MHz<br />
Power supply external 12V AC/AC connectable power supply unit<br />
Casing steel sheet body with varnished side panels made of alder wood<br />
Measurements 330mm x 240mm x 75mm<br />
Weight 4.5 k<br />
13. Service, Updates, tips & tricks<br />
You can get it by your local dealer or distributor or by contacting JoMoX GmbH<br />
via Internet http://www.jomox.de<br />
postal adress JoMoX GmbH / Körtestr. 10 / 1<strong>09</strong>67 Berlin / Germany<br />
by FAX +49 - (0)30 / 61 70 25 74<br />
via E-Mail info@jomox.de<br />
We warmly re<strong>com</strong>mend the users of our products, to register to register in the above-mentioned<br />
ways.<br />
We will then automatically inform customers as regards subsequently released updates, specific<br />
features, of tips and tricks, that are reported us from other users.<br />
We wish you lots of fun, creativity, and succes while working with the JoMoX XBase<strong>09</strong>, and<br />
thank you in advance for in<strong>com</strong>ming feedback and messages.<br />
Berlin, may 1999<br />
XBase <strong>09</strong> <strong>Operating</strong> <strong>Manual</strong> Page 37