Manual - Powermatic
Manual - Powermatic
Manual - Powermatic

Create successful ePaper yourself
Turn your PDF publications into a flip-book with our unique Google optimized e-Paper software.
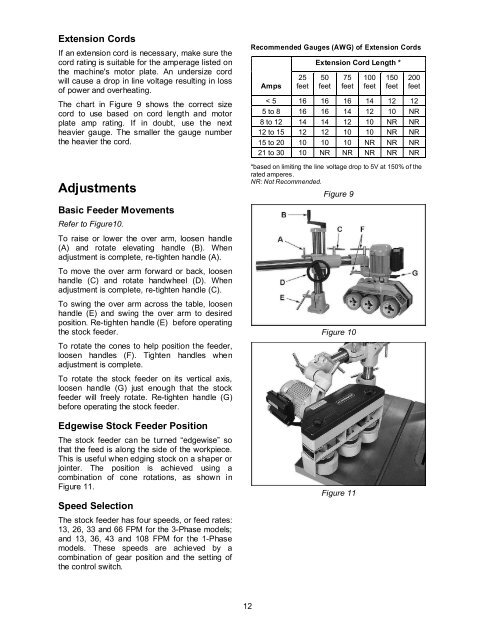
Extension Cords<br />
If an extension cord is necessary, make sure the<br />
cord rating is suitable for the amperage listed on<br />
the machine's motor plate. An undersize cord<br />
will cause a drop in line voltage resulting in loss<br />
of power and overheating.<br />
The chart in Figure 9 shows the correct size<br />
cord to use based on cord length and motor<br />
plate amp rating. If in doubt, use the next<br />
heavier gauge. The smaller the gauge number<br />
the heavier the cord.<br />
Adjustments<br />
Basic Feeder Movements<br />
Refer to Figure10.<br />
To raise or lower the over arm, loosen handle<br />
(A) and rotate elevating handle (B). When<br />
adjustment is complete, re-tighten handle (A).<br />
To move the over arm forward or back, loosen<br />
handle (C) and rotate handwheel (D). When<br />
adjustment is complete, re-tighten handle (C).<br />
To swing the over arm across the table, loosen<br />
handle (E) and swing the over arm to desired<br />
position. Re-tighten handle (E) before operating<br />
the stock feeder.<br />
To rotate the cones to help position the feeder,<br />
loosen handles (F). Tighten handles when<br />
adjustment is complete.<br />
To rotate the stock feeder on its vertical axis,<br />
loosen handle (G) just enough that the stock<br />
feeder will freely rotate. Re-tighten handle (G)<br />
before operating the stock feeder.<br />
Edgewise Stock Feeder Position<br />
The stock feeder can be turned “edgewise” so<br />
that the feed is along the side of the workpiece.<br />
This is useful when edging stock on a shaper or<br />
jointer. The position is achieved using a<br />
combination of cone rotations, as shown in<br />
Figure 11.<br />
Speed Selection<br />
The stock feeder has four speeds, or feed rates:<br />
13, 26, 33 and 66 FPM for the 3-Phase models;<br />
and 13, 36, 43 and 108 FPM for the 1-Phase<br />
models. These speeds are achieved by a<br />
combination of gear position and the setting of<br />
the control switch.<br />
12<br />
Recommended Gauges (AWG) of Extension Cords<br />
Amps<br />
25<br />
feet<br />
Extension Cord Length *<br />
50<br />
feet<br />
75<br />
feet<br />
100<br />
feet<br />
150<br />
feet<br />
200<br />
feet<br />
< 5 16 16 16 14 12 12<br />
5 to 8 16 16 14 12 10 NR<br />
8 to 12 14 14 12 10 NR NR<br />
12 to 15 12 12 10 10 NR NR<br />
15 to 20 10 10 10 NR NR NR<br />
21 to 30 10 NR NR NR NR NR<br />
*based on limiting the line voltage drop to 5V at 150% of the<br />
rated amperes.<br />
NR: Not Recommended.<br />
Figure 9<br />
Figure 10<br />
Figure 11