HHPC-2 Handheld Airborne Particle Counter Operator Manual
HHPC-2 Handheld Airborne Particle Counter Operator Manual
HHPC-2 Handheld Airborne Particle Counter Operator Manual

You also want an ePaper? Increase the reach of your titles
YUMPU automatically turns print PDFs into web optimized ePapers that Google loves.
<strong>HHPC</strong>-2<br />
<strong>Handheld</strong> <strong>Airborne</strong><br />
<strong>Particle</strong> <strong>Counter</strong><br />
<strong>Operator</strong> <strong>Manual</strong><br />
March 2005
<strong>HHPC</strong>-2 <strong>Handheld</strong> <strong>Particle</strong> <strong>Counter</strong><br />
<strong>Operator</strong> <strong>Manual</strong><br />
KSS - March 2005 - Edition 2
KSS - March 2005 - Edition 2<br />
<strong>HHPC</strong>-2 <strong>Handheld</strong> <strong>Particle</strong> <strong>Counter</strong> - Table of Contents 1 of 46<br />
Table of Contents<br />
1 Introduction<br />
1.1 Unpacking the Unit................................................................................... 8<br />
1.2 Understanding the Display and the Keypad........................................... 10<br />
2 Setting up the <strong>HHPC</strong>-2<br />
2.1 Safety Considerations............................................................................ 13<br />
2.2 Selecting an Intake Device .................................................................... 13<br />
2.3 Quick Start ............................................................................................. 14<br />
2.4 Selecting Custom Settings..................................................................... 15<br />
3 Operating the <strong>HHPC</strong>-2<br />
3.1 Verifying the Unit Using a Zero Count Filter .......................................... 21<br />
3.2 Collecting Samples ................................................................................ 21<br />
3.3 Transferring Sample Data to PC............................................................ 22<br />
3.4 Printing Samples.................................................................................... 22<br />
3.5 Storing Samples..................................................................................... 22<br />
4 Data Communications<br />
4.1 Remote Serial Interface (I/O Port) ......................................................... 27<br />
5 Maintenance<br />
5.1 Charging the Battery .............................................................................. 29<br />
5.2 Re-calibrating the <strong>HHPC</strong>-2 .................................................................... 30<br />
5.3 Obtaining Service................................................................................... 30<br />
6 Troubleshooting<br />
6.1 Problems and Recommendations.......................................................... 31<br />
Appendix A:Service Procedures<br />
A.1 Calibration.............................................................................................. 33<br />
A.2 Return Procedures................................................................................. 33<br />
A.3 Technical Support Information ............................................................... 33<br />
Appendix B:Performance Specifications<br />
B.1 Specifications......................................................................................... 39<br />
B.2 Default Settings...................................................................................... 40<br />
Appendix C:Certifications<br />
C.1 Applicable Standards ............................................................................. 41<br />
C.2 Declaration of Conformity ...................................................................... 41<br />
<strong>Operator</strong> <strong>Manual</strong>
2 of 46 Table of Contents - <strong>HHPC</strong>-2 <strong>Handheld</strong> <strong>Particle</strong> <strong>Counter</strong><br />
<strong>Operator</strong> <strong>Manual</strong><br />
KSS - March 2005 - Edition 2
KSS - March 2005 - Edition 2<br />
<strong>HHPC</strong>-2 <strong>Handheld</strong> <strong>Particle</strong> <strong>Counter</strong> - <strong>Manual</strong> Overview 3 of 46<br />
<strong>Manual</strong> Overview<br />
About This <strong>Manual</strong><br />
The information in this manual has been carefully checked and is believed to be accurate.<br />
However, Hach Ultra Analytics assumes no responsibility for any inaccuracies that may be<br />
contained in this manual. In no event will Hach Ultra Analytics be liable for direct, indirect,<br />
special, incidental, or consequential damages resulting from any defect or omission in this<br />
manual, even if advised of the possibility of such damages. In the interest of continued product<br />
development, Hach Ultra Analytics reserves the right to make improvements in this manual and<br />
the products it describes at any time, without notice or obligation.<br />
Published in the United States of America<br />
Hach Ultra Analytics P/N: 701230 Edition 2, March 2005<br />
Copyright © 2003, 2005 by Hach Ultra Analytics<br />
All rights reserved. No part of the contents of this manual may be reproduced or transmitted in<br />
any form or by any means without the written permission of Hach Ultra Analytics.<br />
Safety Conventions<br />
WARNING<br />
A warning is used to indicate a condition which, if not met, could cause serious personal injury<br />
and/or death. Do not move beyond a warning until all conditions have been met.<br />
CAUTION:<br />
A caution is used to indicate a condition which, if not met, could cause damage to the<br />
equipment. Do not move beyond a caution until all conditions have been met.<br />
Note:<br />
A note is used to indicate important information or instructions that should be considered<br />
before operating the equipment.<br />
General Safety Considerations<br />
• All service procedures should be conducted by properly trained service personnel.<br />
• Follow all procedures in “Return Procedures” on page 33 before shipping a unit to a<br />
service center for repair or re-calibration.<br />
• Additional safety information is included in the <strong>Particle</strong> <strong>Counter</strong>s for Air manual. For<br />
additional assistance, contact the Hach Ultra Analytics Technical Support<br />
representatives at 800.866.7889 or +1 541.472.6500.<br />
Electrical Safety<br />
To reduce the risk of electric shock, do not expose the particle counter to rain or moisture.<br />
Failure to use this instrument in a manner intended by Met One may circumvent the protection<br />
provided by this instrument, resulting in personal injury or loss of life.<br />
<strong>Operator</strong> <strong>Manual</strong>
4 of 46 <strong>Manual</strong> Overview - <strong>HHPC</strong>-2 <strong>Handheld</strong> <strong>Particle</strong> <strong>Counter</strong><br />
<strong>Operator</strong> <strong>Manual</strong><br />
Laser safety<br />
• Laser Safety -- Class 1 Laser Product -- Complies with 21 CFR Chapter 1, Subchapter J.<br />
• Evaluated and tested in accordance with EN 61010-1:1993, “Safety requirements for<br />
Electrical Equipment for Measurement, Control, and Laboratory Use” and<br />
IEC 825-1:1993, “Safety of Laser Products.”<br />
WARNING<br />
Use of controls or adjustments, or performance of procedures other than those specified<br />
herein may result in hazardous radiation exposure that may cause blindness.<br />
WARNING<br />
Invisible and visible laser radiation when open. Avoid direct exposure to beam.<br />
Electrostatic Safety<br />
Electrostatic discharge (ESD) can damage or destroy electronic components. Therefore, all<br />
work inside the particle counter should be done at a static-safe workstation. To create a staticsafe<br />
workstation, do the following:<br />
• Use a grounded conductive table mat and resistor-isolated wrist-strap combination.<br />
• Earth-ground all test instruments to prevent a buildup of static charge.<br />
WARNING<br />
Using a wrist strap without an isolation resistor will increase the severity of an electrical shock.<br />
Battery Safety<br />
An explosion can occur if the internal battery is replaced incorrectly. The following label<br />
appears on the battery.<br />
WARNING<br />
Attempts by untrained personnel to disassemble, alter, modify or adjust the electronics may<br />
result in personal injury and damage to the <strong>HHPC</strong>-2 <strong>Handheld</strong> <strong>Particle</strong> <strong>Counter</strong>.<br />
Warranty<br />
Hach Ultra Analytics warrants that this instrument will be free of defects in materials and<br />
workmanship for a period of one (1) year from the shipping date. If any instrument covered<br />
under this warranty proves defective during this period, Hach Ultra Analytics will, at its option,<br />
either repair the defective product without charge for parts and labor, or provide an equivalent<br />
replacement in exchange for the defective product.<br />
KSS - March 2005 - Edition 2
KSS - March 2005 - Edition 2<br />
<strong>HHPC</strong>-2 <strong>Handheld</strong> <strong>Particle</strong> <strong>Counter</strong> - <strong>Manual</strong> Overview 5 of 46<br />
To obtain service under this warranty, the customer must notify the nearest Hach Ultra<br />
Analytics service support center on or before the expiration of the warranty period and follow<br />
their instructions for return of the defective instrument. The customer is responsible for all costs<br />
associated with packaging and transporting the defective unit to the service support center, and<br />
must prepay all shipping charges. Hach Ultra Analytics will pay for return shipping if the<br />
shipment is to a location within the same country as the service support center.<br />
This warranty shall not apply to any defect failure or damage caused by improper use or<br />
maintenance or by inadequate maintenance or care. This warranty shall not apply to damage<br />
resulting from attempts by personnel other than Hach Ultra Analytics representatives, or<br />
factory-authorized and trained personnel, to install, repair or service the instrument; to damage<br />
resulting from improper use or connection to incompatible equipment; or to instruments that<br />
have been modified or integrated with other products when the effect of such modification or<br />
integration materially increases the time or difficulty of servicing the instrument.<br />
THIS WARRANTY IS GIVEN BY HACH ULTRA ANALYTICS WITH RESPECT TO THIS<br />
INSTRUMENT IN LIEU OF ANY OTHER WARRANTIES, EXPRESSED OR IMPLIED. HACH<br />
ULTRA ANALYTICS AND ITS VENDORS DISCLAIM ANY IMPLIED WARRANTIES OF<br />
MERCHANTABILITY OR FITNESS FOR A PARTICULAR NON-CONTRACTUAL PURPOSE.<br />
HACH ULTRA ANALYTICS’ RESPONSIBILITY TO REPAIR OR REPLACE DEFECTIVE<br />
PRODUCTS IS THE SOLE AND EXCLUSIVE REMEDY PROVIDED TO THE CUSTOMER<br />
FOR BREACH OF THIS WARRANTY. HACH ULTRA ANALYTICS AND ITS VENDORS WILL<br />
NOT BE LIABLE FOR ANY INDIRECT, SPECIAL, INCIDENTAL, OR CONSEQUENTIAL<br />
DAMAGES EVEN IF HACH ULTRA ANALYTICS OR ITS VENDORS HAS BEEN GIVEN<br />
ADVANCED NOTICE OF THE POSSIBILITY OF SUCH DAMAGES.<br />
Revision History<br />
• Edition A, August 2003, Hach Ultra Analytics.<br />
Acknowledgements<br />
• Belden is a registered trademark of Belden Inc.<br />
• Microsoft, Excel, Windows and HyperTerminal are registered trademarks of the<br />
Microsoft Corporation.<br />
• PROCOMM is a registered trademark of Symantec, Inc.<br />
<strong>Operator</strong> <strong>Manual</strong>
6 of 46 <strong>Manual</strong> Overview - <strong>HHPC</strong>-2 <strong>Handheld</strong> <strong>Particle</strong> <strong>Counter</strong><br />
<strong>Operator</strong> <strong>Manual</strong><br />
KSS - March 2005 - Edition 2
KSS - March 2005 - Edition 2<br />
<strong>HHPC</strong>-2 <strong>Handheld</strong> <strong>Particle</strong> <strong>Counter</strong> - Introduction 7 of 46<br />
1 Introduction<br />
The <strong>HHPC</strong>-2 <strong>Handheld</strong> <strong>Airborne</strong> <strong>Particle</strong> <strong>Counter</strong> is an intelligent, portable and robust<br />
instrument that measures, counts, stores and reports airborne particulates. The standard<br />
<strong>HHPC</strong>-2 holds 100 sample records in memory. Records include date, time, counts, sample<br />
labels, volume, and alarm flags. Easily download the data to a personal computer using the<br />
included interface cable and software. The internal battery can power the <strong>HHPC</strong>-2 while mobile<br />
or connected to the ac power adapter provided with the unit for extended or stationary<br />
sampling.<br />
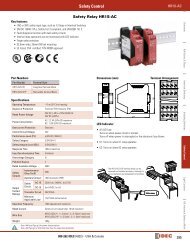
The <strong>HHPC</strong>-2 is commonly used to monitor the air quality in clean rooms, manufacturing<br />
processes, and pharmaceutical production. Front, rear, and bottom views are shown in<br />
Figure 1-1, Figure 1-2, and Figure 1-3.<br />
Fig 1-1 : Front View of the <strong>HHPC</strong>-2 Fig 1-2 : Rear View of the <strong>HHPC</strong>-2<br />
Fig 1-3 : Bottom View of the <strong>HHPC</strong>-2<br />
<strong>Operator</strong> <strong>Manual</strong>
8 of 46 Introduction - <strong>HHPC</strong>-2 <strong>Handheld</strong> <strong>Particle</strong> <strong>Counter</strong><br />
1.1 Unpacking the Unit<br />
<strong>Operator</strong> <strong>Manual</strong><br />
• If there are any signs of damage to the shipping container, immediately notify the carrier<br />
for possible insurance adjustment purposes.<br />
• If the container is intact, carefully open and unpack the contents according to the<br />
following general directions. Compare each item with the shipping list to make sure all<br />
listed items are received. Report any missing or surplus items to a Hach Ultra Analytics<br />
representative immediately, 800.866.7889 or +1 541.472.6500.<br />
Fig 1-4 : <strong>HHPC</strong>-2 Unit in the Optional Carrying Case<br />
• Lift the <strong>HHPC</strong>-2 from the shipping container or the carrying case (shown in Figure 1-4)<br />
and place it on a flat surface.<br />
• Remove the layer of protective plastic from the LCD screen.<br />
The <strong>HHPC</strong>-2 is now ready to set up and operate.<br />
Note:<br />
Although the battery is charged before shipping, it may need to be charged again before<br />
operation, as described in “Charging the Battery” on page 29.<br />
KSS - March 2005 - Edition 2
KSS - March 2005 - Edition 2<br />
<strong>HHPC</strong>-2 <strong>Handheld</strong> <strong>Particle</strong> <strong>Counter</strong> - Introduction 9 of 46<br />
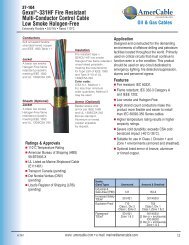
Contents of the Shipment<br />
The <strong>HHPC</strong>-2 includes the standard items shown in Figure 1-5 through Figure 1-13 in a<br />
reusable shipping box.<br />
Fig 1-7 : <strong>HHPC</strong>-2 <strong>Particle</strong> <strong>Counter</strong><br />
Fig 1-10 : RJ-45 to DB-9<br />
Adaptor, SA000070-01<br />
a ) Optional Accessories<br />
Fig 1-5 : Zero Count Filter<br />
Fig 1-8 : AC/DC Power Supply,<br />
VP624005<br />
Fig 1-11 : RS-232<br />
Modular Cable,<br />
VP894408<br />
Fig 1-12 : <strong>HHPC</strong>-2<br />
Utility Software,<br />
CS200025<br />
Fig 1-6 : Intake Nozzle, 1/8” Hose Barb,<br />
MP000026-01<br />
Fig 1-9 : US Power Cord, VP623501<br />
Fig 1-13 : 6” ¼”-OD High<br />
Purity Tubing, VP792002<br />
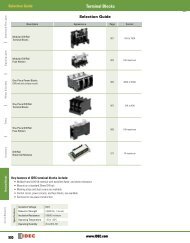
Optional accessories include the items shown in Figure 1-14 through Figure 1-19.<br />
<strong>Operator</strong> <strong>Manual</strong>
10 of 46 Introduction - <strong>HHPC</strong>-2 <strong>Handheld</strong> <strong>Particle</strong> <strong>Counter</strong><br />
Fig 1-14 : Carrying Case, SA000089-01<br />
Fig 1-17 : European Power Cord,<br />
VP625300<br />
1.2 Understanding the Display and the Keypad<br />
<strong>Operator</strong> <strong>Manual</strong><br />
Fig 1-15 : Vinyl Carrying Case,<br />
SA000249-01<br />
Fig 1-18 : Serial Thermal Printer,<br />
SA000094-01<br />
Fig 1-16 : RS-232 Serial Interface<br />
Extension Cable, EP096010<br />
Fig 1-19 : Isokinetic Probe/Hose<br />
Barb, MP000120-01<br />
The <strong>HHPC</strong>-2 features a Liquid Crystal Display (LCD) with a keypad at the bottom. When the<br />
unit is powered on, the Met One Opening Screen displays briefly, followed by the Main Screen,<br />
shown in Figure 1-20.<br />
KSS - March 2005 - Edition 2
KSS - March 2005 - Edition 2<br />
<strong>HHPC</strong>-2 <strong>Handheld</strong> <strong>Particle</strong> <strong>Counter</strong> - Introduction 11 of 46<br />
Note:<br />
If the unit does not power up, double-check the ac connection or the battery power. To charge<br />
the battery, see “Charging the Battery” on page 29.<br />
Screens<br />
Fig 1-20 : <strong>HHPC</strong>-2 Display Main Screen<br />
Press the corresponding button from the bottom keypad to invoke these screens:<br />
• Main Screen<br />
• Select Mode screen<br />
• Select Volume screen<br />
• Buffer Count and Buffer Options screen<br />
• Display Buffer screen<br />
• Contrast screen<br />
• Date and Clock Setup screen<br />
Corresponding functions display at the bottom of the screen above each function key.<br />
<strong>Operator</strong> <strong>Manual</strong>
12 of 46 Introduction - <strong>HHPC</strong>-2 <strong>Handheld</strong> <strong>Particle</strong> <strong>Counter</strong><br />
<strong>Operator</strong> <strong>Manual</strong><br />
Main Screen<br />
The following information displays on the main screen, shown in Figure 1-20.<br />
• Two size channel sizes<br />
• <strong>Particle</strong> counts, only displayed when counting or in Buffer mode<br />
• Status of the counting process (Run or Wait)<br />
• Battery charge indicator (amount of charge remaining, refer to Table 5-1 on page 29)<br />
Keypad<br />
Function keys are used for selecting various selectable screens. The Up and Down arrow<br />
keys are used for scrolling within the selected screen.<br />
• Start/Stop starts and stops the sample<br />
• Mode selects modes and saves data when the unit is counting<br />
• Power key toggles the power on and off<br />
KSS - March 2005 - Edition 2
KSS - March 2005 - Edition 2<br />
<strong>HHPC</strong>-2 <strong>Handheld</strong> <strong>Particle</strong> <strong>Counter</strong> - Setting up the <strong>HHPC</strong>-2 13 of 46<br />
2 Setting up the <strong>HHPC</strong>-2<br />
2.1 Safety Considerations<br />
Read and follow all safety considerations carefully when setting up and operating the <strong>HHPC</strong>-2:<br />
Note:<br />
If the general safety information presented earlier in “General Safety Considerations” on<br />
page 3 has not been reviewed, please do so now.<br />
CAUTION:<br />
Remove the isokinetic probe cover (the black cap) before operating the unit. Leaving the cap<br />
on will damage the pump and other internal electrical components.<br />
• Do not use a wrench to connect or disconnect the intake nozzle or isokinetic probe. This<br />
connection should only be finger-tight.<br />
• Only factory certified personnel should service the <strong>HHPC</strong>-2.<br />
WARNING<br />
Attempts by untrained personnel to disassemble, alter, modify or adjust the electronics may<br />
result in personal injury and damage to the <strong>HHPC</strong>-2.<br />
• Do not operate the unit using a power supply that does not supply the same voltage and<br />
charging current (polarity).<br />
• Do not use the <strong>HHPC</strong>-2 stand during keypad operation.<br />
2.2 Selecting an Intake Device<br />
The <strong>HHPC</strong>-2 is shipped with two different intake devices: the isokinetic probe and the intake<br />
hose barb.<br />
a ) Isokinetic Probe<br />
The isokinetic probe, shown in Figure 2-1, is used when sampling ambient air samples. It is<br />
connected to the <strong>HHPC</strong>-2 for shipping and covered with a black plastic cap to protect the unit<br />
from debris and contamination when not in use. It is ready for use as soon as the unit is<br />
unpacked. Turn intake device counter-clockwise to remove; turn it clockwise to install.<br />
Users may connect longer tubing to the optional isokinetic probe with a hose barb end (not<br />
included, part number MP000120-01) for sampling hard to reach areas.<br />
Note:<br />
Only use a maximum 4 feet of high purity or approved tubing, longer or incorrect size or type of<br />
tubing will affect the sample accuracy.<br />
To connect the zero count filter, connect the 6-inch long high purity tubing provided with the unit<br />
to the intake hose barb and the opposite end to the zero count filter. Airflow direction arrow or<br />
indicator on the zero count filter should be pointing towards the tubing.<br />
<strong>Operator</strong> <strong>Manual</strong>
14 of 46 Setting up the <strong>HHPC</strong>-2 - <strong>HHPC</strong>-2 <strong>Handheld</strong> <strong>Particle</strong> <strong>Counter</strong><br />
<strong>Operator</strong> <strong>Manual</strong><br />
b ) Intake Hose Barb<br />
2.3 Quick Start<br />
The intake hose barb connects tubing to the particle counter for zero counting and purging or<br />
sampling hard to reach areas. To connect the intake hose barb, unscrew the isokinetic probe<br />
from the unit, screw in the hose barb and remove the protective cap intake hose barb.<br />
Fig 2-1 : Isokinetic Probe Attached Directly to the Unit<br />
Fig 2-2 : Isokinetic Probe with Tubing and<br />
Zero Count Filter<br />
Note:<br />
Before attempting to connect any external source to the <strong>HHPC</strong>-2, read and understand the<br />
“General Safety Considerations” on page 3.<br />
Once the unit is unpacked and connected to the appropriate intake device, conduct a<br />
one-minute count cycle using the default settings then download the data to a personal<br />
computer and print the results:<br />
1) Remove the isokinetic probe cover (the black plastic cap).<br />
2) To turn on the unit, press and hold the Power key until two beeps are heard.<br />
3) To begin counting, press the Start/Stop key.<br />
Counting begins and the screen indicates Run. After one minute, the count cycle concludes<br />
and the bottom line of the display clears.<br />
The results are saved automatically in the print buffer.<br />
4) To print the results, connect the particle counter to the communications port on the PC<br />
DB9 to RJ45 converter (SA000070-01).<br />
5) Insert the CSV Download Utility software diskette into the floppy drive.<br />
6) Copy CSVDownloadUtility.exe and CSVDownloadUtility.ini to a working directory on<br />
the PC.<br />
KSS - March 2005 - Edition 2
KSS - March 2005 - Edition 2<br />
<strong>HHPC</strong>-2 <strong>Handheld</strong> <strong>Particle</strong> <strong>Counter</strong> - Setting up the <strong>HHPC</strong>-2 15 of 46<br />
If the Communications port to be used is other than Com1, open <strong>HHPC</strong>2.ini and change<br />
Port=Com1 to Port=ComX (where X represents the number of the port to use.)<br />
7) To open the utility software, double-click the CSVDownloadUtility.exe file.<br />
The CSV Download Utility window appears as shown in Figure 2-3:<br />
8) Follow the instructions in the Readme.txt file on the diskette to download the data from<br />
the buffer to the computer and print the results.<br />
2.4 Selecting Custom Settings<br />
Use the keys to change the settings as required for the sample being collected. To choose a<br />
setting, select from the options that appear at the bottom of the Main Screen when the Mode<br />
key is pressed, then use the Start/Stop and Mode keys to scroll through options or save<br />
selections.<br />
a ) Setting the Date and Time<br />
Fig 2-3 : CSV Download Utility Window<br />
1) On the Main Screen, press the Mode key six times.<br />
The bottom line displays the time and date.<br />
2) Press and hold the Mode key for one second until two beeps are heard.<br />
The Date and Time screen appears with the date selected.<br />
3) To select the digit to modify, use the Mode key. The cursor moves to the next digit.<br />
4) When the date, month, year, or time is set, press the Start/Stop (Inc) key to change the<br />
numbers for that field.<br />
5) To select another unit of time, press the Mode key to select the next field, then press<br />
the Start/Stop (Inc) key to change the numbers.<br />
6) When the date and time are set, press and hold the Mode key for one second to save<br />
the new setting and return to the Main Screen.<br />
<strong>Operator</strong> <strong>Manual</strong>
16 of 46 Setting up the <strong>HHPC</strong>-2 - <strong>HHPC</strong>-2 <strong>Handheld</strong> <strong>Particle</strong> <strong>Counter</strong><br />
<strong>Operator</strong> <strong>Manual</strong><br />
b ) Selecting Count Mode<br />
1) On the Main Screen, press the Mode key once.<br />
The bottom line displays the current mode.<br />
2) To review the modes available (listed in Table 2-1), press either the Start/Stop or the<br />
Mode key.<br />
Table 2-1 : Count Modes<br />
Fig 2-4 : Select Mode Screen<br />
Mode Description Sample Unit<br />
Concentration This mode is useful for taking a quick snapshot of<br />
airborne particulate samples, especially in areas where<br />
particulate levels are unknown and may exceed the<br />
operating levels of the counter. The <strong>HHPC</strong>-2 estimates<br />
count per cubic foot or liter depending on the volume<br />
selected. The unit updates the results by calculating<br />
completed sample counts and volume compared to the<br />
balance of volume remaining.<br />
Rate Counting is continuous. The displayed counts are a ten<br />
sample sliding average.<br />
Totalize The number of counts are displayed as they accumulate<br />
until the end of the sample. When the sample is<br />
completed, the record is stored and the value is displayed<br />
on the screen until the next sample is started.<br />
Volume size<br />
Volume unit<br />
Volume size<br />
KSS - March 2005 - Edition 2
KSS - March 2005 - Edition 2<br />
<strong>HHPC</strong>-2 <strong>Handheld</strong> <strong>Particle</strong> <strong>Counter</strong> - Setting up the <strong>HHPC</strong>-2 17 of 46<br />
3) When the desired mode displays on the screen, press and hold the Mode key for one<br />
second to save the new setting and return to the Main Screen.<br />
c ) Setting the Sample Units and Volume<br />
Sample volume may be measured in either liters or cubic feet. The volume size can range from<br />
0.01 cubic foot or 1 liter up to 1 cubic foot or 28.3 liters.<br />
• In Rate mode, the sample volume’s unit is selected.<br />
• In Totalize or Concentration modes, the volume size is selected.<br />
Rate Mode<br />
1) Make sure the unit is set to Rate mode as described in “Selecting Count Mode” on<br />
page 16.<br />
2) On the Main Screen, press the Mode key twice.<br />
The bottom line displays the current units setting as shown in Figure 2-5.<br />
Fig 2-5 : Select Units Screen<br />
3) Press and hold the Mode key for one second, until two beeps are heard.<br />
The Select Units screen appears and displays the selected units.<br />
4) To select the units, press either the Start/Stop key for cubic feet or the Mode key for<br />
liters.<br />
5) Press and hold the Mode key for one second to save the new setting and return to the<br />
Main Screen.<br />
<strong>Operator</strong> <strong>Manual</strong>
18 of 46 Setting up the <strong>HHPC</strong>-2 - <strong>HHPC</strong>-2 <strong>Handheld</strong> <strong>Particle</strong> <strong>Counter</strong><br />
<strong>Operator</strong> <strong>Manual</strong><br />
The units selected appear in the right column on the Main Screen.<br />
Concentration or Totalize Mode<br />
1) Make sure the unit is set to Concentration or Totalize mode as described in “Selecting<br />
Count Mode” on page 16.<br />
2) On the Main Screen, press the Mode key twice.<br />
The bottom line displays the current volume setting.<br />
3) Press and hold the Mode key for one second, until two beeps are heard.<br />
The Select Volume screen appears and displays the selected volume as shown in<br />
Figure 2-6.<br />
Fig 2-6 : Select Volume Screen<br />
4) To review the sample volume choices, press either the Start/Stop key or the Mode key.<br />
Sample volume choices are listed in Table 2-2.<br />
Table 2-2 : Sample Volume Choices<br />
Volume Time for Sample (MM:SS)<br />
0.01 cubic feet 00:06<br />
28.3 cubic liters 10:00<br />
10.0 cubic liters 03:53<br />
2.83 cubic liters 01:00<br />
KSS - March 2005 - Edition 2
KSS - March 2005 - Edition 2<br />
<strong>HHPC</strong>-2 <strong>Handheld</strong> <strong>Particle</strong> <strong>Counter</strong> - Setting up the <strong>HHPC</strong>-2 19 of 46<br />
5) Once the desired volume choice is displayed, press and hold the Mode key for one<br />
second to save the new setting and return to the Main Screen.<br />
The volume selected appears in the right column on the Main Screen.<br />
Setting the Contrast<br />
Table 2-2 : Sample Volume Choices<br />
Volume Time for Sample (MM:SS)<br />
1.0 cubic liter 00:21<br />
1.0 cubic foot 10:00<br />
0.10 cubic foot 01:00<br />
1) On the Main Screen, press the Mode key five times.<br />
The bottom line displays the contrast.<br />
2) Press and hold the Mode key for one second, until two beeps are heard.<br />
3) The Program Contrast screen appears, as shown in Figure 2-7.<br />
Fig 2-7 : Program Contrast Screen<br />
4) To increase the contrast, press the Start/Stop key; to decrease the contrast, press the<br />
Mode key.<br />
5) Once the desired contrast is achieved, press and hold the Mode key for one second to<br />
save the new setting and return to the Main Screen.<br />
<strong>Operator</strong> <strong>Manual</strong>
20 of 46 Setting up the <strong>HHPC</strong>-2 - <strong>HHPC</strong>-2 <strong>Handheld</strong> <strong>Particle</strong> <strong>Counter</strong><br />
<strong>Operator</strong> <strong>Manual</strong><br />
KSS - March 2005 - Edition 2
KSS - March 2005 - Edition 2<br />
<strong>HHPC</strong>-2 <strong>Handheld</strong> <strong>Particle</strong> <strong>Counter</strong> - Operating the <strong>HHPC</strong>-2 21 of 46<br />
3 Operating the <strong>HHPC</strong>-2<br />
Once the unit configuration is set, verify the unit’s operation using the zero count filter. Then<br />
collect air samples, transfer them to a computer for further analysis and print them. Also, review<br />
the number of samples in the print buffer and, if needed, clear the print buffer.<br />
3.1 Verifying the Unit Using a Zero Count Filter<br />
All particle counters must be verified prior to sampling that the instrument is not falsely counting<br />
due to sensor leakage, internal or external electrical interference or any other reason before the<br />
unit is used for monitoring or verifying cleanroom condition.<br />
Before the <strong>HHPC</strong>-2 is used in a cleanroom or a clean manufacturing environment, it must be<br />
purged with a zero count filter. This process meets the Japanese Industrial Standard B9221-<br />
1997 (JIS). The <strong>HHPC</strong>-2 should also be cleaned using the zero count filter before storage or<br />
shipment.<br />
1) Unscrew the isokinetic probe from the unit.<br />
2) Screw in intake hose barb (MP000026-01).<br />
3) Secure the high purity tubing (VP 792002) to the hose barb.<br />
4) Secure the opposite end of the tubing to zero count filter (VP212808). Make sure the<br />
arrow on the filter is pointing away from the tubing. Now the unit is ready to purge and<br />
zero count.<br />
5) Operate the unit for approximately 15 minutes.<br />
6) Verify the data on the display:<br />
• Not more than one particle greater than 0.3 µm in five minutes on average, or<br />
• Not more than one particle per 0.5 cubic foot.<br />
Note:<br />
Initial counts are typically from particles shedding from components used for zero counting.<br />
Note:<br />
Please continue zero count process or guidelines set forth by applicable industry standard(s).<br />
7) Reverse the previous steps and remove the zero count filter and reattach Isokinetic<br />
probe to resume normal operations.<br />
3.2 Collecting Samples<br />
1) Place the unit upright and remove the intake valve cover (the black plastic cap) so the<br />
intake barb or the isokinetic probe is not obstructed.<br />
2) To turn on the unit, press the Power key.<br />
3) If needed, review the settings on the Main Screen.<br />
To review each setting, press the Mode key to display the current setting on the bottom line<br />
of the Main Screen. Continue to press the Mode key until all settings have been reviewed.<br />
4) On the Main Screen, press the Start/Stop key to start sampling.<br />
<strong>Operator</strong> <strong>Manual</strong>
22 of 46 Operating the <strong>HHPC</strong>-2 - <strong>HHPC</strong>-2 <strong>Handheld</strong> <strong>Particle</strong> <strong>Counter</strong><br />
3.3 Transferring Sample Data to PC<br />
<strong>Operator</strong> <strong>Manual</strong><br />
Copy the <strong>HHPC</strong>-2 utility software files on a hard drive or similar device prior to use. Follow<br />
detailed installation instructions on the Readme.txt file and install the software.<br />
Use the utility software to download particle count data to a PC in comma separated variable<br />
(CSV) file format to be viewed in Microsoft ® Excel ® and other spreadsheet software<br />
applications. All parameters required by the download utility are stored in the initialization file<br />
that is also on the diskette.<br />
1) Connect the <strong>HHPC</strong>-2 to the computer using the RS-232 cable (VP894410)and the DB9<br />
to RJ-45 convertor (SA000070-01).<br />
2) Start the CSV_Download_Utility.exe by double-clicking on it.<br />
3.4 Printing Samples<br />
Print samples at the end of each run or print each sample as it is taken.<br />
Note:<br />
Not all printers are compatible with the <strong>HHPC</strong>-2. Call Hach Ultra Analytics at 800.866.7889 or<br />
+1 541.472.6500 to check with a representative for compatibility information. The portable<br />
printer needs to be configured correctly to function with the <strong>HHPC</strong>-2.<br />
1) Connect the <strong>HHPC</strong>-2 to a serial printer using the RS-232 cable (VP894408) and the<br />
DB9 to RJ-45 convertor (SA000091-01) supplied with the printer (SA000094-01).<br />
2) On the Main Screen of the particle counter, press Mode three times.<br />
The bottom line displays the number of records in the buffer.<br />
3) Press and hold the Mode key for one second until two beeps are heard.<br />
The Buffer Options screen appears and displays the buffer count.<br />
4) To download the buffer records, press the Mode key. The second Buffer Options<br />
screen appears and displays the download options.<br />
5) Choose one of the following options:<br />
• Mode key: prints formatted data<br />
• Start/Stop key: prints unformatted data<br />
6) The Print Buffer screen appears, asking for confirmation. Press Start/Stop to print the<br />
records.<br />
The data from the sample run is printed.<br />
3.5 Storing Samples<br />
The <strong>HHPC</strong>-2 stores each measurement in a 100-record rotating buffer. Data is stored in a ‘firstin,<br />
first-out’ order. Thus, when record 101 is saved, the first record is automatically deleted,<br />
leaving 100 total records.<br />
a ) Determining the Number of Samples<br />
1) On the Main Screen, press the Mode key three times.<br />
The bottom line displays the number of records in the Buff Count field.<br />
KSS - March 2005 - Edition 2
KSS - March 2005 - Edition 2<br />
<strong>HHPC</strong>-2 <strong>Handheld</strong> <strong>Particle</strong> <strong>Counter</strong> - Operating the <strong>HHPC</strong>-2 23 of 46<br />
b ) Displaying Buffer Records<br />
Fig 3-1 : Buffer Count Screen<br />
1) On the Main Screen, press the Mode key four times.<br />
2) Press and hold the Mode key for one second until two beeps are heard.<br />
The most recent record in the buffer is displayed, similar to the one shown in Figure 3-2.<br />
<strong>Operator</strong> <strong>Manual</strong>
24 of 46 Operating the <strong>HHPC</strong>-2 - <strong>HHPC</strong>-2 <strong>Handheld</strong> <strong>Particle</strong> <strong>Counter</strong><br />
<strong>Operator</strong> <strong>Manual</strong><br />
3) To review the buffer records, press either the Mode key or the Start/Stop key:<br />
• Mode key: displays the first record<br />
• Start/Stop key: scrolls backwards through the records from the most recent to the<br />
oldest record<br />
4) To exit the Stored Buffer Record screen and return to the Main Screen, press and hold<br />
the Mode key for one second.<br />
c ) Clearing the Buffer<br />
Fig 3-2 : Stored Buffer Record Screen<br />
1) On the Main Screen, press the Mode key three times.<br />
The bottom line displays the number of records in the Buffer Count field.<br />
KSS - March 2005 - Edition 2
KSS - March 2005 - Edition 2<br />
<strong>HHPC</strong>-2 <strong>Handheld</strong> <strong>Particle</strong> <strong>Counter</strong> - Operating the <strong>HHPC</strong>-2 25 of 46<br />
Fig 3-3 : Buffer Options Screen<br />
2) Press and hold the Mode key for one second, until two beeps are heard.<br />
The Buffer Options screen appears. and displays the buffer count.<br />
3) To delete the buffer records, press the Start/Stop key.<br />
The Delete Buffer screen appears.<br />
<strong>Operator</strong> <strong>Manual</strong>
26 of 46 Operating the <strong>HHPC</strong>-2 - <strong>HHPC</strong>-2 <strong>Handheld</strong> <strong>Particle</strong> <strong>Counter</strong><br />
<strong>Operator</strong> <strong>Manual</strong><br />
Fig 3-4 : Delete Buffer Screen<br />
4) Confirm the deletion by pressing the Start/Stop key.<br />
The Main Screen displays with the buffer count shown on the bottom line. The buffer count<br />
should equal zero.<br />
KSS - March 2005 - Edition 2
KSS - March 2005 - Edition 2<br />
<strong>HHPC</strong>-2 <strong>Handheld</strong> <strong>Particle</strong> <strong>Counter</strong> - Data Communications 27 of 46<br />
4 Data Communications<br />
4.1 Remote Serial Interface (I/O Port)<br />
The <strong>HHPC</strong>-2 comes equipped with a RS232 communications port, an RS232 cable and a<br />
RJ-45 connector. This port is used to communicate with a computer to download data and for<br />
remote operation.<br />
The specifications and wire pin-outs for the I/O port are:<br />
• Baud rate: 9600 baud<br />
• Data bits: 8 bits<br />
• Parity: None<br />
• Stop bits: 1 bit<br />
DB-9 Serial Connection<br />
If the computer or terminal has a 9-pin serial port with a female connector, use the provided<br />
Modular RJ-45 to DB-9 Connector along with the RS232 cable. The <strong>HHPC</strong>-2 is preconfigured<br />
as Data Communication Equipment (DCE), so the use of a null-modem cable is not required.<br />
The cable pin diagram is shown in Figure 4-1.<br />
<strong>HHPC</strong>-2 Adapter PC<br />
RJ-45<br />
Female<br />
RJ-45<br />
Female<br />
DB-9<br />
Female<br />
DB-9<br />
Male<br />
RS485 B 1 1 N/C<br />
RS485 A 2 2 RX<br />
SD 3 3 TX<br />
RD 4 4 DTR<br />
CS 5 5 GND<br />
ER 6 6 N/C<br />
N/C 7 7 N/C<br />
GND 8 8 DSR<br />
N/C 9 9 N/C<br />
Fig 4-1 : Pin Layout for the RJ-45 to DB-9 Connector Cable<br />
<strong>Operator</strong> <strong>Manual</strong>
28 of 46 Data Communications - <strong>HHPC</strong>-2 <strong>Handheld</strong> <strong>Particle</strong> <strong>Counter</strong><br />
<strong>Operator</strong> <strong>Manual</strong><br />
KSS - March 2005 - Edition 2
KSS - March 2005 - Edition 2<br />
<strong>HHPC</strong>-2 <strong>Handheld</strong> <strong>Particle</strong> <strong>Counter</strong> - Maintenance 29 of 46<br />
5 Maintenance<br />
This section describes cleaning and maintenance procedures for the <strong>HHPC</strong>-2 and what to do<br />
when the unit requires service.<br />
CAUTION:<br />
This manual contains no procedures for service of internal parts within the <strong>HHPC</strong>-2. Service<br />
should be performed only by factory-authorized personnel. See “Return Procedures” on<br />
page 33.<br />
5.1 Charging the Battery<br />
The battery status light indicates the relative battery charge status, described in Table 5-1.<br />
The power supply provided with the instrument serves as battery charger and a direct power<br />
source. Connect the power supply for continuous and long-term sampling.<br />
Table 5-1 : Battery Status Indicator<br />
Charging the Battery<br />
Light Charge Mode<br />
Steady green Fast charge<br />
Flashing green Maintenance charging mode<br />
Red Battery is defective and needs to be replaced<br />
No light Battery is fully charged<br />
1) Get the external power supply and applicable power cord from the shipping container.<br />
2) Plug one end of the power cord into the external power supply and the other end into<br />
an electrical wall receptacle.<br />
3) Plug the external power supply jack into the <strong>HHPC</strong>-2 at the power port location shown<br />
in Figure 5-1.<br />
Fig 5-1 : Power Port Location on the <strong>HHPC</strong>-2<br />
4) Turn on the <strong>HHPC</strong>-2.<br />
5) Remove the power supply when no light can be seen.<br />
power port location<br />
<strong>Operator</strong> <strong>Manual</strong>
30 of 46 Maintenance - <strong>HHPC</strong>-2 <strong>Handheld</strong> <strong>Particle</strong> <strong>Counter</strong><br />
<strong>Operator</strong> <strong>Manual</strong><br />
Recharging a Completely Drained Battery<br />
If the <strong>HHPC</strong>-2 will not turn on:<br />
1) Attach the external power supply to the unit.<br />
2) Wait five minutes, then turn on the <strong>HHPC</strong>-2.<br />
3) Leave the unit attached to the power supply until the battery charging indicator light is<br />
extinguished.<br />
5.2 Re-calibrating the <strong>HHPC</strong>-2<br />
The <strong>HHPC</strong>-2 must be returned annually for re-calibration to comply with JIS B 9921-1997<br />
standards. The calibration date is displayed on the manufacturer's decal on the back of the unit.<br />
Follow the instructions in the “Return Procedures” on page 33 to return the <strong>HHPC</strong>-2 for recalibration.<br />
5.3 Obtaining Service<br />
If the <strong>HHPC</strong>-2 requires factory service, follow the instructions in “Return Procedures” on<br />
page 33 to return the <strong>HHPC</strong>-2.<br />
KSS - March 2005 - Edition 2
KSS - March 2005 - Edition 2<br />
<strong>HHPC</strong>-2 <strong>Handheld</strong> <strong>Particle</strong> <strong>Counter</strong> - Troubleshooting 31 of 46<br />
6 Troubleshooting<br />
6.1 Problems and Recommendations<br />
Table 6-1 lists symptoms, possible reasons, and recommended actions.<br />
Table 6-1 : Troubleshooting Symptoms and Recommendations<br />
Symptom Possible reason and recommended action<br />
<strong>HHPC</strong>-2 does not zero count. • Zero count filter or hose barb is not properly attached to the unit. Reattach the filter<br />
or hose barb.<br />
• Internal air leak. Contact the customer service center for repair.<br />
• Cell contamination by excessive dust exposure. Return the unit to a factory<br />
authorized service center.<br />
The <strong>HHPC</strong>-2 doesn’t turn on when<br />
the Power key is pressed.<br />
Battery voltage too low. Connect external power supply to <strong>HHPC</strong>-2 for operation<br />
and charging. Then turn on the power again.<br />
<strong>HHPC</strong>-2 unit does not charge. Disconnect the power jack from the unit and the power cord from the AC power<br />
source (wall receptacle). Disconnect the cord/plug from the power supply and<br />
reconnect the cord/plug to the power supply firmly. Restore all connections to the<br />
unit and power source.<br />
If the problem persists, please contact the customer service center for repair.<br />
Unable to download data in the buffer. • Check to make sure there are records in the buffer.<br />
• Check that the communication parameters of the computer are set to 9600 baud,<br />
8 data bits, no parity, 1 stop bit.<br />
• Check connections between the unit and the computer.<br />
Unable to print data in the buffer. • Check to make sure there are records in the buffer.<br />
• Check that the communication parameters of the printer are set to 9600 baud, 8<br />
data bits, no parity, 1 stop bit.<br />
• Check connections between the unit and the printer.<br />
<strong>HHPC</strong>-2 display shows the message,<br />
“CAL ALM.”<br />
The cell is contaminated. Connect the zero count filter and program the unit to run<br />
for at least five minutes.<br />
If the problem persists, please contact the customer service center for repair.<br />
<strong>Operator</strong> <strong>Manual</strong>
32 of 46 Troubleshooting - <strong>HHPC</strong>-2 <strong>Handheld</strong> <strong>Particle</strong> <strong>Counter</strong><br />
<strong>Operator</strong> <strong>Manual</strong><br />
KSS - March 2005 - Edition 2
KSS - March 2005 - Edition 2<br />
<strong>HHPC</strong>-2 <strong>Handheld</strong> <strong>Particle</strong> <strong>Counter</strong> - Service Procedures 33 of 46<br />
Appendix A: Service Procedures<br />
A.1 Calibration<br />
The <strong>HHPC</strong>-2 must be returned annually for re-calibration to comply with the JIS B 9921-1989<br />
standards.<br />
A.2 Return Procedures<br />
To return the <strong>HHPC</strong>-2 <strong>Handheld</strong> <strong>Airborne</strong> <strong>Particle</strong> <strong>Counter</strong> for service, complete the<br />
appropriate form that appears at the end of this section. For the most recent return procedure<br />
information, including copies of all required forms, call Hach Ultra Analytics at 800.866.7889 or<br />
+1 541.472.6500.<br />
To return an instrument for credit, please contact the local sales representative.<br />
WARNING<br />
The following actions must be performed when returning any unit for any reason to prevent<br />
personal injury and/or damage to the unit.<br />
• Properly decontaminate the unit prior to shipment. If a contaminated unit is received,<br />
Hach Ultra Analytics reserves the right to have the unit removed and destroyed by a<br />
hazardous materials disposal team at the shipper’s expense.<br />
A.3 Technical Support Information<br />
Technical Support Engineers are available to provide high quality advice and<br />
recommendations for applications, product operation, measurement specifications, hardware<br />
and software, factory and customer site training.<br />
Please provide name, company, phone, fax, model number, serial number and comment or<br />
question.<br />
Call +1 (541) 472-6500<br />
Toll Free (800) 866-8854 (US/CA)<br />
Fax +1 (541) 472-6555<br />
6:30 AM to 5:00 PM Pacific Time<br />
Monday through Friday<br />
Email: TechSupportGP@hachultra.com<br />
<strong>Operator</strong> <strong>Manual</strong>
Date:<br />
RETURN AUTHORIZATION / PURCHASE ORDER<br />
RA#___________ MUST BE MARKED ON THE OUTSIDE OF<br />
THE BOX OR YOUR UNIT WILL BE RETURNED.<br />
In order for you to obtain a Return Authorization, this form must be completed<br />
SHIP YOUR UNIT TO: Hach Ultra Analytics, 481 California Avenue, Grants Pass, OR 97526<br />
You are responsible for properly draining and/or decontaminating your unit prior to shipment. If we receive a<br />
contaminated unit we reserve the right to have the unit removed and destroyed by a haz mat team at the owners expense.<br />
TO: Contact Providing Info: Tel:<br />
Fax:<br />
Alternate Contact: Tel:<br />
Fax:<br />
FULL<br />
COMPANY<br />
NAME (do not<br />
abbrev):<br />
BILLING INFORMATION: SHIPPING INFORMATION:<br />
FULL<br />
COMPANY<br />
NAME (do<br />
not abbrev):<br />
Addr 1 Addr 1<br />
Addr 2 Addr 2<br />
City City<br />
State Zip State Zip<br />
Country Country<br />
Contact: Contact:<br />
Tel: Tel:<br />
Fax: Ext:<br />
Model: S/N: Sizes: Problem:<br />
Model: S/N: Sizes: Problem:<br />
“As Received” data required? Fee: $125.00 (No charge<br />
if equipment is covered under Service Contract)<br />
Are services covered under contract? Yes No <br />
Contract # ______________________<br />
NOTE: MINIMUM $150.00 EVALUATION FEE PER UNIT APPLIES FOR REPAIRS.<br />
IF YOUR AUTHORIZATION / APPROVAL TO PROCEED WITH SERVICE IS NOT RECEIVED WITHIN 30 DAYS,<br />
YOUR EQUIPMENT WILL BE RETURNED UNREPAIRED AND YOU WILL BE BILLED THE MINIMUM<br />
EVALUATION FEE ABOVE.<br />
Estimate: Revised:<br />
If the actual cost exceeds the initial estimate, a revised estimate will be faxed for approval.<br />
P.O.# Revised: Taxable: Yes No Reason:<br />
Please provide exempt certificate if applicable<br />
Ship Method: FEDX 3DAY ECON/PPB FOB: Grants Pass, Oregon Payment Terms: Net 30<br />
Visa/MC/AMEX accepted. If paying by credit card, please request credit card form.<br />
Authorization Signature: Date:<br />
NOTE: Upon your approval with your P.O.# denoted above, this form becomes a binding agreement between you, the<br />
customer, for payment of services performed by Hach Ultra Analytics.<br />
From: ________________ Tel: 800-866-7889 Fax: 541-472-6170<br />
Approved: Date to Ship:<br />
1-02-01/Service Admin
IMPORTANT INFORMATION!<br />
INSTRUCTIONS FOR SENDING YOUR PARTICLE<br />
COUNTER IN FOR REPAIRS OR CALIBRATION<br />
1) Enclosed is the “RETURN AUTHORIZATION/PURCHASE ORDER” Form that must be filled out<br />
completely in order to obtain a Return Authorization Number (RA#) from Hach Ultra Analytics.<br />
2) The RA# must be marked on the outside of the box before shipping any unit to us for repair or<br />
calibration. Boxes received with no RA# marked on them will be returned.<br />
3) You are responsible for properly draining and/or decontaminating your unit prior to shipment. If<br />
we receive a contaminated unit we reserve the right to have the unit removed and destroyed by a<br />
haz mat team at the owners expense.<br />
4) Following are Instructions for Filling out RA/PO Form. Please make sure every line is filled out<br />
completely, providing the following information:<br />
a) Main Contact: Full name of contact person; include phone/fax numbers.<br />
b) Billing and Shipping Information: Include addresses, phone/fax numbers, and contact person.<br />
c) Equipment Information: Include model number(s), Serial number(s), and the reason for<br />
sending the equipment in (i.e., calibration and repair). Provide a detailed description of what<br />
is wrong with the unit.<br />
d) Call Customer Service @ 800-866-7889 and ask the Customer Service Rep for a “NOT TO<br />
EXCEED” amount for your RA/PO Form by giving them the model number(s) of the<br />
instrument and the reason for the return.<br />
e) Method of Payment: Mark the appropriate box on the bottom of the form (for credit card<br />
payment, please provide credit card information including signature of the card holder),<br />
f) If you require “As Received Data”, please check the appropriate box.<br />
g) Provide Taxable Information (not applicable for International service).<br />
h) If you want your unit shipped back to you other than FedEx Economy (3 Day), please cross<br />
out this ship method, and provide us with the account number and ship method you wish us to<br />
use when returning your unit.<br />
Once the form is complete, please FAX to 541-472-6170. You will be given a Return Authorization<br />
Number within 24 hours. If you need the RA# immediately, please call after faxing it and the Customer<br />
Service Rep can give you the number verbally.<br />
This form helps us to better serve our customers, and it has reduced turn around time considerably. If<br />
you have any questions filling out this form, please do not hesitate to call our Customer Service Reps<br />
at 1-800-866-7889.<br />
THANK YOU FOR YOUR COOPERATION IN OBTAINING AN RA#
RA Number: Date:<br />
Return Authorization / Service Order (International only)<br />
A. To obtain RA number, complete this form and email/fax it to Service at 541-472-6170.<br />
B. Mark the RA number on outside of the box. Unmarked boxes will be returned with no action.<br />
C. Ship your unit to: HACH Ultra Analytics, 481 California Avenue, Grants Pass, OR 97526<br />
D. If the actual repair cost exceeds your approval, then we will contact you with an estimate.<br />
E. Revise your original approval / purchase order for the new amount. If we don’t receive your revised order<br />
within 60 days, we will return your unit and bill you $ 150 evaluation fee.<br />
Your Information<br />
Your name<br />
Tel, Fax & Email address<br />
Your Company<br />
Company Name<br />
Bill to Address<br />
Tel, Fax, Email,<br />
Contact Person<br />
Ship to Address<br />
Tel, Fax, Email<br />
Contact Person<br />
Your Product<br />
Model number Serial number Problem<br />
Payment & Shipping Information<br />
1) We approve repair/service charges up to $ _________________ on our Purchase order number:_________________<br />
Authorized signature___________________________________________________ Date_____________________<br />
2) Shipment method, your carrier account number and other shipping instructions:<br />
3) Value of the instrument for customs purposes only: $________________________<br />
IMPORTANT NOTE ON CUSTOMS VALUE: Our invoice will include the repair value as the commercial value of the<br />
invoice. This value will be declared in our invoice and shipping documentation. We would also need to declare the value of<br />
the unit itself for customs purposes. This value is for customs only and has no commercial value. Please provide us with the<br />
reasonable value of the instrument for customs purposes.<br />
Tel: 800-866-7889 Fax: 541-472-6170 EMAIL: customerservice@hachultra.com<br />
RA form 001 for International use only reference RA Procedure 001 Form# 011152 09082003
RETURNING UNITS FOR REPAIRS<br />
PROCEDURES<br />
A. To obtain RA number, complete the attached form and email/fax it to Service at 541-472-6170. Please<br />
provide all the information required including your company information (Bill to and ship to addresses), product<br />
information (Model number, serial number and detailed problem statement), your not to exceed amount and<br />
purchase order number, payment method and complete shipping instructions.<br />
B. Mark the RA number on outside of the box. Unmarked boxes will be returned with no action.<br />
C. Ship your unit to: Hach Ultra Analytics, 481 California Avenue, Grants Pass, OR 97526<br />
D. If the actual repair cost exceeds your approval, then we will contact you with an estimate.<br />
E. Revise your original approval / purchase order for the new amount. If we don’t receive your revised<br />
order within 30 days, we will return your unit and bill you $150.00 USD evaluation fee.<br />
RETURNING UNITS<br />
All units should be sent to Hach Ultra Analytics at the address below. AWB should contain the following<br />
information:<br />
Consignee Hach Ultra Analytics<br />
481 California Ave., Grants Pass, Oregon 97526 USA<br />
Notify Expeditors International<br />
2508 North Marine Dr., Portland, OR 97217<br />
Tel: 503-254-3707<br />
Airport of destination Portland Airport, Oregon, USA<br />
COMMERCIAL INVOICE<br />
Please make sure that your commercial invoice clearly states that units are Made in USA by Hach Ultra<br />
Analytics and are being returned for repair or replacement. Customs will hold shipment if no invoice is<br />
included.<br />
FREIGHT CHARGES<br />
If the returned items are not covered under warranty, you are responsible for freight charges. If the item is<br />
covered under warranty, you will pay freight for returning the item to Hach Ultra Analytics. Hach Ultra Analytics<br />
will pay the freight to ship the replaced or repaired item covered under warranty. Hach Ultra Analytics will return<br />
the repaired unit by the same method it was shipped to Hach Ultra Analytics.<br />
IMPORT CHARGES<br />
When you use airfreight to return items, our broker charges an average of $100.00 to $150.00 to clear and<br />
deliver the shipment to us. Hach Ultra Analytics will bill you for these import charges. Attached is a declaration<br />
form that, if completed and included with your shipment to Expeditors International, may reduce or eliminate<br />
these customs fees altogether. Please forward a copy of this form to us as well because there is a similar form<br />
that we need to complete and forward to them verifying your information. As an alternative to using Expeditors<br />
International you can ship via a courier service such as Federal Express or UPS, who deliver directly to us<br />
bypassing the customs broker.<br />
CUSTOM’S VALUE FOR REPAIR OR REPLACED ITEMS<br />
Please provide us with the “Declared value for customs” when completing the RA form. Our invoice will include<br />
the repair value as the commercial value of the invoice. This value will be declared on our invoice and shipping<br />
documentation. We would also need to declare the value of the unit itself for customs purposes. This value is<br />
for customs only and has no commercial value. As the shipper Hach Ultra Analytics bears the burden of proof<br />
for the value, if you do not provide a reasonable value of the instrument, Hach Ultra Analytics will override the<br />
given amount. Hach Ultra Analytics assumes no responsibility for damage to the product during<br />
shipment/transit. Please note that in case of transit damage, the amount you can claim from your insurance will<br />
be limited to the declared value.<br />
RA form 001 for International use only reference RA Procedure 001 Form# 011152 09082003
Declared Value/American Manufacturer’s Affidavit<br />
Goods have no commercial value they are being returned for repair/calibration<br />
Date: _______________________<br />
Name of Manufacturer: Hach Ultra Analytics<br />
Address of Manufacturer: 481 California Avenue<br />
Grants Pass, OR 97526<br />
Description of returned articles:________________________________________<br />
_________________________________________________________________<br />
_________________________________________________________________<br />
_________________________________________________________________<br />
I declare that the information given is true and correct to the best of my knowledge and belief.<br />
That the articles described above are the growth, produce or manufacture of the United States<br />
and have been returned to the United States without having been advanced in value or<br />
improved in condition by any process of manufacture or other means, and that no drawback<br />
has, or will be, claimed on such articles. The article was returned for the sole purpose of<br />
repairing/calibration either under warranty or at the expense of the owner. This value of<br />
$______________ is for customs only and has no commercial value.<br />
Name: _______________________________________________________________<br />
Title: ________________________________________________________________<br />
Signature: ____________________________________________________________<br />
RA form 001 for International use only reference RA Procedure 001 Form# 011152 09082003
KSS - March 2005 - Edition 2<br />
<strong>HHPC</strong>-2 <strong>Handheld</strong> <strong>Particle</strong> <strong>Counter</strong> - Performance Specifications 39 of 46<br />
Appendix B: Performance Specifications<br />
B.1 Specifications<br />
2 Size Channels:<br />
Standard: 0.3, 0.5 µm<br />
0.5, 5.0 µm<br />
IAQ: 0.3, 1.0 µm<br />
Custom: 0.3 to 20 µm available<br />
Flow Rate: 0.1 cfm (2.83 L/min)<br />
Light Source: Laser diode; index guided (26,000 MTBF at 25°C)<br />
Calibration: PSL particles in air (NIST traceable)<br />
Counting Efficiency: 50% @ 0.3 µm; 100% for particles > 0.45 µm (per JIS B9921:1997)<br />
Zero Count: 1 count/5 minute (per JIS B9921:1997)<br />
Coincidence Loss: 5% at 2,000,000 particles per ft3 Data Storage: 100 sample records (rotating buffer)<br />
Data Recorded: Counts, calibration error<br />
Display: LCD, 4 x 16 character display<br />
Alarms: Low battery, calibration error<br />
Measuring Modes: Concentration, particles/liter, particles/cubic feet<br />
Delay Time: 0 to 24 hours<br />
Sample Inlet: Isokinetic probe<br />
User Interface: Three-button keypad<br />
Interface: RS-232 via RJ-45<br />
Vacuum Source: Internal pump, flow controlled<br />
Housing: Injection molded plastic<br />
Dimensions: 4.5" w x 8.25" l x 2.25" d (11.43 x 20.96 x 5.72 cm)<br />
Weight:<br />
Environmental:<br />
2.2 pounds (1.0 kg)<br />
Operating: 10°C to 40°C (50°F to 104°F)<br />
Relative Humidity: 20% to 90%, non-condensing<br />
Storage: –10°C to 50°C (14°F to 122°F)<br />
Relative Humidity: Up to 90%, non-condensing<br />
Power: AC Adapter, 12 VDC at 2.5 A, 90 to 250 VAC, 50 to 60 Hz<br />
Rechargeable Battery: NiMH, 4.8 V at 4.5 Ah; replaceable<br />
Continuous Operating<br />
Time:<br />
8 hours<br />
Recharge Time: 2 hours<br />
Standards: CE, JIS B9921: 1997<br />
<strong>Operator</strong> <strong>Manual</strong>
40 of 46 Performance Specifications - <strong>HHPC</strong>-2 <strong>Handheld</strong> <strong>Particle</strong> <strong>Counter</strong><br />
B.2 Default Settings<br />
<strong>Operator</strong> <strong>Manual</strong><br />
Mode = (R) Rate<br />
Units = (L) Liter<br />
KSS - March 2005 - Edition 2
KSS - March 2005 - Edition 2<br />
<strong>HHPC</strong>-2 <strong>Handheld</strong> <strong>Particle</strong> <strong>Counter</strong> - Certifications 41 of 46<br />
Appendix C: Certifications<br />
C.1 Applicable Standards<br />
The following standards govern various aspects of the performance and use of particle<br />
counters described in this manual.<br />
JIS B 9921-1997<br />
Light Scattering Automatic <strong>Particle</strong> <strong>Counter</strong><br />
Federal Standard 209E<br />
Standard Practice for Defining Size Calibration, Resolution, and Counting Accuracy of an<br />
Air-Borne <strong>Particle</strong> <strong>Counter</strong> Using Near-Monodispersed Spherical Particulate Material.<br />
C.2 Declaration of Conformity<br />
The Declarations of Conformity appears on the next page.<br />
<strong>Operator</strong> <strong>Manual</strong>
KSS - March 2005 - Edition 2<br />
<strong>HHPC</strong>-2 <strong>Handheld</strong> <strong>Particle</strong> <strong>Counter</strong> - Annex 43 of 46<br />
Annex<br />
Tables and illustrations<br />
Fig. 1-1 Front View of the <strong>HHPC</strong>-2................................................................... 7<br />
Fig. 1-2 Rear View of the <strong>HHPC</strong>-2 ................................................................... 7<br />
Fig. 1-3 Bottom View of the <strong>HHPC</strong>-2................................................................ 7<br />
Fig. 1-4 <strong>HHPC</strong>-2 Unit in the Optional Carrying Case ....................................... 8<br />
Fig. 1-5 Zero Count Filter ................................................................................. 9<br />
Fig. 1-6 Intake Nozzle, 1/8” Hose Barb, MP000026-01.................................... 9<br />
Fig. 1-7 <strong>HHPC</strong>-2 <strong>Particle</strong> <strong>Counter</strong> .................................................................... 9<br />
Fig. 1-8 AC/DC Power Supply, VP624005 ....................................................... 9<br />
Fig. 1-9 US Power Cord, VP623501................................................................. 9<br />
Fig. 1-10 RJ-45 to DB-9 Adaptor, SA000070-01................................................ 9<br />
Fig. 1-11 RS-232 Modular Cable, VP894408 ..................................................... 9<br />
Fig. 1-12 <strong>HHPC</strong>-2 Utility Software, CS200025 ................................................... 9<br />
Fig. 1-13 6” ¼”-OD High Purity Tubing, VP792002 ............................................ 9<br />
Fig. 1-14 Carrying Case, SA000089-01 ........................................................... 10<br />
Fig. 1-15 Vinyl Carrying Case, SA000249-01................................................... 10<br />
Fig. 1-16 RS-232 Serial Interface Extension Cable, EP096010 ....................... 10<br />
Fig. 1-17 European Power Cord, VP625300.................................................... 10<br />
Fig. 1-18 Serial Thermal Printer, SA000094-01 ............................................... 10<br />
Fig. 1-19 Isokinetic Probe/Hose Barb, MP000120-01 ...................................... 10<br />
Fig. 1-20 <strong>HHPC</strong>-2 Display Main Screen ........................................................... 11<br />
Fig. 2-1 Isokinetic Probe Attached Directly to the Unit ................................... 14<br />
Fig. 2-2 Isokinetic Probe with Tubing and Zero Count Filter .......................... 14<br />
Fig. 2-3 CSV Download Utility Window .......................................................... 15<br />
Fig. 2-4 Select Mode Screen.......................................................................... 16<br />
Table 2-1 Count Modes..................................................................................... 16<br />
Fig. 2-5 Select Units Screen........................................................................... 17<br />
Fig. 2-6 Select Volume Screen....................................................................... 18<br />
Table 2-2 Sample Volume Choices................................................................... 18<br />
Fig. 2-7 Program Contrast Screen.................................................................. 19<br />
Fig. 3-1 Buffer Count Screen.......................................................................... 23<br />
Fig. 3-2 Stored Buffer Record Screen ............................................................ 24<br />
Fig. 3-3 Buffer Options Screen....................................................................... 25<br />
Fig. 3-4 Delete Buffer Screen......................................................................... 26<br />
Fig. 4-1 Pin Layout for the RJ-45 to DB-9 Connector Cable .......................... 27<br />
Table 5-1 Battery Status Indicator ..................................................................... 29<br />
Fig. 5-1 Power Port Location on the <strong>HHPC</strong>-2................................................. 29<br />
Table 6-1 Troubleshooting Symptoms and Recommendations......................... 31<br />
<strong>Operator</strong> <strong>Manual</strong>
44 of 46 Annex - <strong>HHPC</strong>-2 <strong>Handheld</strong> <strong>Particle</strong> <strong>Counter</strong><br />
<strong>Operator</strong> <strong>Manual</strong><br />
KSS - March 2005 - Edition 2
KSS - March 2005 - Edition 2<br />
<strong>HHPC</strong>-2 <strong>Handheld</strong> <strong>Particle</strong> <strong>Counter</strong> - User Notes 45 of 46<br />
User Notes<br />
<strong>Operator</strong> <strong>Manual</strong>
46 of 46 User Notes - <strong>HHPC</strong>-2 <strong>Handheld</strong> <strong>Particle</strong> <strong>Counter</strong><br />
<strong>Operator</strong> <strong>Manual</strong><br />
end of the book<br />
KSS - March 2005 - Edition 2