STIGA PARK
STIGA PARK
STIGA PARK

Create successful ePaper yourself
Turn your PDF publications into a flip-book with our unique Google optimized e-Paper software.
66<br />
EN<br />
Do not leave the machine with the key<br />
in position 2 or 3. There is a fire risk,<br />
fuel can run into the engine through the<br />
carburettor, and there is a risk of the<br />
battery being discharged and damaged.<br />
Four positions:<br />
1. Stop position – the engine is short-circuited.<br />
The key can be removed.<br />
2. Operating position – headlight activated.<br />
3. Operating position – headlight not activated.<br />
4. Start position – the electric start motor<br />
is activated when the key is turned to the<br />
spring-loaded start position. Once the engine<br />
has started, let the key return to operating<br />
position 3.<br />
Turn the key to position 2 to light the<br />
headlight.<br />
2.4.10 Power take-off (4,5:K)<br />
Switch for engaging/disengaging the electromagnetic<br />
power take-off for operating front-mounted<br />
accessories. Two positions:<br />
1. Press the front part of the switch – the<br />
power take-off is engaged. The symbol<br />
will light up.<br />
2. Press the rear part of the switch – the<br />
power take-off is disengaged.<br />
2.4.11 Hour meter (2:P)<br />
Indicates the number of working hours. Only<br />
works when the engine is running.<br />
2.4.12 Cruise control (5, 6:N)<br />
A switch for activating the cruise control. The<br />
cruise control locks the pedal (3:F) in the desired<br />
position.<br />
1. Press down the pedal (3:F) until the desired<br />
speed is obtained. Then press the<br />
front part of the switch to activate the<br />
cruise control. The symbol will light up.<br />
2. Disengage the cruise control by releasing<br />
it with the pedal (3:B) or pressing the<br />
rear part of the switch.<br />
2.4.13 Cutting height adjustment (4,5:J)<br />
The machine is equipped with a control for using<br />
the cutting deck with electrical cutting height adjustment.<br />
The switch is used to adjust the cutting<br />
height in continuously variable positions.<br />
The cutting deck is connected to the contact (2:Q).<br />
ENGLISH<br />
2.4.14Rear Rake (5:L)<br />
(Pro20, Pro25, Pro Svan)<br />
The machine is fitted with a control for electrical<br />
adjustment of a rear rake (available as an<br />
accessory).<br />
The switch is used to raise and lower the<br />
rear rake.<br />
Cables for connecting the rear rake are found at the<br />
rear of the machine, to the left of the upper side of<br />
the bumper. (Pro16 is prepared for a rear rake,<br />
cables routed).<br />
2.4.15 Sand spreader (6:O)<br />
(Pro20, Pro25, Pro Svan)<br />
The machine has been designed for electrical adjustment<br />
of a sand spreader (accessory).<br />
12V<br />
The switch is used to start and stop the<br />
spreader.<br />
Cables for connecting the sand spreader are at the<br />
rear of the machine. (Pro16 is prepared for a sand<br />
spreader, cables routed).<br />
2.4.16 Clutch release lever (6:R)<br />
A lever for disengaging the variable transmission.<br />
Enables the machine to be moved by hand without<br />
the help of the engine. Two positions:<br />
1. Lever out – transmission engaged<br />
for normal operation.<br />
There is an audible click when<br />
the lever locks in the outer position.<br />
2. Lever in – transmission disengaged.<br />
The machine can be<br />
moved by hand.<br />
The machine may not be towed over long distances<br />
or at high speeds. The transmission could be damaged.<br />
2.4.17 Seat (1:T)<br />
The seat can be folded and adjusted frontrear.<br />
The seat can be adjusted as follows:<br />
1. Move the control lever (1:T) upwards.<br />
2. Set the seat to the desired position.<br />
3. Release the control lever (1:S) to lock<br />
the seat.<br />
The seat is equipped with a safety switch that is<br />
connected to the machine’s safety system. This<br />
means that certain dangerous activities are not possible<br />
when there is nobody sitting on the seat. Also<br />
see 4.3.2.<br />
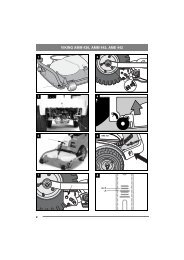
2.4.18 Engine casing (7:U)<br />
In order to access the fuel cock, battery<br />
and engine, the machine has an engine<br />
casing that can be opened. The engine casing<br />
is locked with a rubber strap.