STIGA PARK
STIGA PARK
STIGA PARK

You also want an ePaper? Increase the reach of your titles
YUMPU automatically turns print PDFs into web optimized ePapers that Google loves.
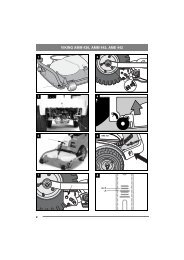
6. Install the filter. First screw in the filter so that<br />
the gasket comes into contact with the engine.<br />
Then screw in the filter a further 2/3-1 turn.<br />
7. Continue with point 7 in accordance with 5.4.2<br />
Engine Oil above.<br />
5.5 Fuel filter<br />
Pro 16, Pro 20 (Briggs & Stratton) and Pro Svan<br />
(Honda)<br />
Replace the fuel filter every season. See fig. 17-<br />
18:Z.<br />
Pro 25 (Kohler)<br />
Replace the fuel filter after 1,500 hours of operation.<br />
See fig. 19:Z.<br />
Check for fuel leaks once the new filter has been<br />
installed.<br />
5.6 Transmission, oil filter<br />
The oil and the filter in the hydraulic power transmission<br />
must be checked/adjusted or replaced at<br />
intervals according to the table below.<br />
1st time Then at<br />
Action<br />
interval<br />
Hours of operation<br />
Check – adjusting level. - 50<br />
Changing oil.<br />
Cleaning tank filter.<br />
5 200<br />
Replace filter in the hydraulic<br />
circuit. Pro20, Pro25<br />
5 200<br />
Oil type: Synthetic oil 5W-50.<br />
Oil volume at change: approx. 4.2 litres.<br />
5.6.1 Check – adjustment<br />
1. Place the machine on a flat surface.<br />
2. Read off the oil level in the reservoir. See fig.<br />
20. The level should be level with the line.<br />
3. If necessary, top up with more oil.<br />
5.6.2 Draining<br />
1. Operate the machine at varying speeds for 10-<br />
20 minutes in order to warm up the transmission<br />
oil.<br />
2. Open the drive shafts’ valves in accordance<br />
with fig. 21.<br />
3. Place one collection trough under the rear axle<br />
and one under the front axle.<br />
4. Remove 2 drainage plugs from each axle. Use a<br />
12 mm socket wrench. See fig. 22.<br />
5. Remove the filler cap from the oil tank.<br />
6. Only Pro20, Pro25 and Pro Svan: Clean the area<br />
around the hydraulic circuit’s filter and dismantle<br />
the filter. See fig. 16:A.<br />
7. Allow all the oil to run out into the collection<br />
trough.<br />
ENGLISH EN<br />
8. Draw out the oil from the deeper section of the<br />
reservoir using an oil extractor. See fig. 20.<br />
9. Hand in the oil for disposal in accordance with<br />
local provisions.<br />
5.6.3 Cleaning tank filter<br />
1. Press the filter casing (24:F)down into the upper<br />
section of the tank and move the casing forwards<br />
to the hole.<br />
2. Pull up the filter casing together with filter and<br />
spring.<br />
3. Pull the filter (24:G) out of the casing.<br />
4. Clean the filter with a suitable solvent and compressed<br />
air.<br />
5. Check that the rubber gasket (24:H) in the bottom<br />
of the filter is intact.<br />
6. Reinstall the filter and spring in the casing. Insert<br />
the filter until it snaps into position in the<br />
casing.<br />
7. Reinstall the unit in the tank. The upper part of<br />
the filter casing must snap into position in the<br />
slot in the upper section of the tank.<br />
5.6.4 Filling<br />
1. Check that the gaskets on the 4 drainage plugs<br />
are intact. See fig. 22. Reinstall the plugs. Tightening<br />
torque: 15-17 Nm.<br />
2. Only applies to Pro20, Pro25 and Pro Svan:<br />
Moisten the new filter’s gasket with oil and install<br />
the filter. See fig. 16:A.<br />
3. Fill the oil reservoir with the new oil.<br />
4. Check that the clutch release lever (6:R) is in<br />
the outer position (drive position).<br />
If the engine is to be run indoors, an exhaust<br />
extraction device must be connected<br />
to the engine’s exhaust pipe.<br />
5. Prepare a suitable vessel with the new oil.<br />
NOTE! The oil is sucked into the system very<br />
quickly. The reservoir must always be kept<br />
topped up. Under no circumstances may air<br />
be sucked in.<br />
6. Fill the oil reservoir with new oil.<br />
7. Start the engine and allow it to idle. Gradually<br />
top up the oil in the reservoir so that the level<br />
constantly reaches the mark.<br />
8. Reinstall the oil filler cap and close the engine<br />
casing.<br />
9. Reset the drive shafts’ valves in accordance<br />
with fig. 25.<br />
71