Field and Control Security - Cost Control Software
Field and Control Security - Cost Control Software
Field and Control Security - Cost Control Software

Create successful ePaper yourself
Turn your PDF publications into a flip-book with our unique Google optimized e-Paper software.
<strong>Field</strong> <strong>and</strong> <strong>Control</strong> <strong>Security</strong><br />
<strong>Field</strong> & <strong>Control</strong> <strong>Security</strong> is a<br />
trigger-based security function. It<br />
can be used to enhance the<br />
<strong>Security</strong> Roles <strong>and</strong> Permissions<br />
provided by Navision, or in<br />
conjunction with any clientspecific<br />
roles, permissions, <strong>and</strong><br />
modifications.<br />
<strong>Field</strong> & <strong>Control</strong> <strong>Security</strong> gives<br />
security control to individual<br />
Navision objects, including<br />
tables, forms, buttons on forms,<br />
<strong>and</strong> even specific fields within a<br />
form.<br />
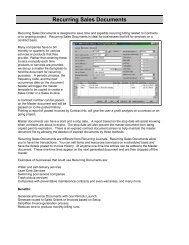
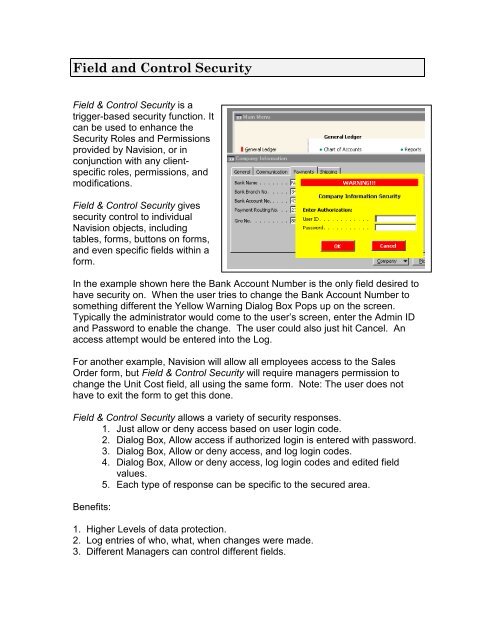
In the example shown here the Bank Account Number is the only field desired to<br />
have security on. When the user tries to change the Bank Account Number to<br />
something different the Yellow Warning Dialog Box Pops up on the screen.<br />
Typically the administrator would come to the user’s screen, enter the Admin ID<br />
<strong>and</strong> Password to enable the change. The user could also just hit Cancel. An<br />
access attempt would be entered into the Log.<br />
For another example, Navision will allow all employees access to the Sales<br />
Order form, but <strong>Field</strong> & <strong>Control</strong> <strong>Security</strong> will require managers permission to<br />
change the Unit <strong>Cost</strong> field, all using the same form. Note: The user does not<br />
have to exit the form to get this done.<br />
<strong>Field</strong> & <strong>Control</strong> <strong>Security</strong> allows a variety of security responses.<br />
1. Just allow or deny access based on user login code.<br />
2. Dialog Box, Allow access if authorized login is entered with password.<br />
3. Dialog Box, Allow or deny access, <strong>and</strong> log login codes.<br />
4. Dialog Box, Allow or deny access, log login codes <strong>and</strong> edited field<br />
values.<br />
5. Each type of response can be specific to the secured area.<br />
Benefits:<br />
1. Higher Levels of data protection.<br />
2. Log entries of who, what, when changes were made.<br />
3. Different Managers can control different fields.
There are three areas within this documentation for your review:<br />
A. Installation – Importing the new objects <strong>and</strong> running the “setup” process.<br />
B. Setup <strong>and</strong> Test Data – Review the test forms <strong>and</strong> security created.<br />
C. Programming – Creating your own security.<br />
Installation Instructions:<br />
PLEASE READ ENTIRE INSTRUCTIONS BEFORE BEGINNING.<br />
THE INSTRUCTIONS AND OBJECTS INCLUDED HERE ARE FOR<br />
USE WITH A 3x <strong>and</strong> 4x Navision DATABASE.<br />
These instructions require a working knowledge of the C/SIDE development system.<br />
Add-on object files will arrive with all objects necessary to run the add-on including the<br />
dependencies. We bundle all add-on products that are needed to work together. This<br />
allows a one time installation of all the necessary objects.<br />
The following is a list of all objects that will be modified when <strong>Field</strong> <strong>and</strong> <strong>Control</strong><br />
<strong>Security</strong> is fully implemented.<br />
1. Import the object “FC <strong>Security</strong>.fob”.<br />
Type Count ID Name<br />
Table 1 14005118 FC <strong>Security</strong> <strong>Control</strong>s<br />
Table 2 14005119 FC Authorized User<br />
Table 3 14005120 FC Where Used<br />
Table 4 14005121 FC <strong>Security</strong> Setup<br />
Table 5 14005122 FC Access Log<br />
Form 6 1 Company Information<br />
Form 8 14005230 FC Authorization Dialog<br />
Form 9 14005231 FC <strong>Security</strong> <strong>Control</strong> Card<br />
Form 10 14005232 FC <strong>Security</strong> <strong>Control</strong> List<br />
Form 11 14005233 FC Authorized Users<br />
Form 12 14005234 FC Where Used<br />
Form 13 14005235 FC Function Test Form<br />
Form 14 14005236 FC Access Log<br />
Form 15 14005237 FC <strong>Security</strong> Setup<br />
Form 16 14005238 FC Access Log (Wide)<br />
Report 17 14005118 Purge Access Log<br />
Report 18 14005119 Access Log Report<br />
P:\Click here for Manuals\<strong>Field</strong>_<strong>Control</strong> <strong>Security</strong> Instructions.doc 10/13/09<br />
2
Instructions for integrating Sales <strong>Field</strong> <strong>and</strong> <strong>Control</strong> <strong>Security</strong> into your<br />
Database—<br />
Before starting, you will need to determine a couple of things about your<br />
database.<br />
• IMPORTANT: Compile ALL existing objects before starting the installation. Resolve<br />
all compiling errors before starting installation. This assures that when you compile<br />
objects after the installation, any compiling errors at that time will be caused by the<br />
installation <strong>and</strong> not something before the installation started.<br />
• Determine if any of the above listed objects have been modified in the database in<br />
which you are going to add <strong>Field</strong> <strong>and</strong> <strong>Control</strong> <strong>Security</strong>. This is easily accomplished<br />
by starting an import of the appropriate fob file <strong>and</strong> looking at the import worksheet.<br />
• Even when there are no conflicts you will need to import the .FOB file in two(2)<br />
passes.<br />
1. Once the Worksheet is open, go to the Action column <strong>and</strong> select SKIP on all the<br />
“base” Navision objects, <strong>and</strong> make sure the Higher numbered objects<br />
(14004000+) have the “Create” or “Replace” action <strong>and</strong> then select OK.<br />
2. Next do the File, Import process again on the same .FOB file. This time use the<br />
“Replace All” Button to flag ALL the objects with the Replace action. This will<br />
guarantee that all of the objects in the .fob actually get imported.<br />
• WE HIGHLY RECOMMEND THAT YOU READ OUR TIPS AND WARNINGS<br />
PAGES LOCATED AT THE BACK OF THIS DOCUMENT BEFORE STARTING.<br />
• If this is the first time that you are importing <strong>Field</strong> <strong>and</strong> <strong>Control</strong> <strong>Security</strong>, then the only<br />
objects that may have conflicts are the base Navision objects. If you find that you<br />
have modified the same base Navision objects then you will need to manually<br />
integrate the <strong>Field</strong> <strong>and</strong> <strong>Control</strong> <strong>Security</strong> changes found in those objects. To assist<br />
the manually integration process we have supplied a detailed Change Log.<br />
• Files available for importing are:<br />
<strong>Field</strong> <strong>and</strong> <strong>Control</strong> <strong>Security</strong> Objects.fob<br />
Start by importing this one file. It contains all the <strong>Field</strong> <strong>and</strong> <strong>Control</strong> <strong>Security</strong><br />
objects <strong>and</strong> all dependant addon objects. If you have conflicts. Then use the<br />
following Change Log to read about where the modifications exist <strong>and</strong> manually<br />
integrate the changes.<br />
1. Copy the supplied “fob(s)”, Documents (This manual), <strong>and</strong> optionally any<br />
provided sample databases to your local hard drive for integration <strong>and</strong> testing.<br />
2. Start Microsoft Business Solutions-Navision.<br />
3. Open the database that you are integrating into.<br />
4. Go to Tools, Object Designer<br />
5. Go to File, Import<br />
P:\Click here for Manuals\<strong>Field</strong>_<strong>Control</strong> <strong>Security</strong> Instructions.doc 10/13/09<br />
3
6. Go to provided “fob” - <strong>Field</strong> <strong>and</strong> <strong>Control</strong> <strong>Security</strong> Objects.fob<br />
7. Select Open<br />
8. You should get the following message.<br />
9. Say NO. Open the Import Worksheet for review. (always)<br />
If none of the objects listed above have been modified in the target database you<br />
can import the object file. When you start the import, you will get a different<br />
message than the one shown above that states that no conflicts were found, select<br />
yes to import the objects immediately or select no to open the Import Worksheet. It<br />
is recommended that you select no so the Import Worksheet will open in all cases.<br />
Once the Worksheet is open, select “Replace All” <strong>and</strong> select OK. This will guarantee<br />
that all of the objects in the .fob actually get imported.<br />
You will get a worksheet that looks like this:<br />
P:\Click here for Manuals\<strong>Field</strong>_<strong>Control</strong> <strong>Security</strong> Instructions.doc 10/13/09<br />
4
If there are conflicting objects the Import Worksheet will indicate which objects are in<br />
conflict. If you have any conflicting objects make a list of these objects. These are the<br />
objects you will have to h<strong>and</strong> integrate the <strong>Field</strong> <strong>and</strong> <strong>Control</strong> <strong>Security</strong> changes into.<br />
Instructions for h<strong>and</strong> integration of individual objects can be found in the Change Log.<br />
If some, but not all, of the above listed objects have been modified in your database you<br />
can import the ones that have NOT been modified by using the Import Worksheet to<br />
indicate which objects to replace <strong>and</strong> which objects to skip. Choosing replace next to an<br />
object in the Import Worksheet will cause that object in your database to be replaced by<br />
the import object of the same number. Choosing skip will prevent the object in your<br />
database from being replaced. Select “replace” for all objects NOT on your conflicting<br />
object list <strong>and</strong> select “skip” for all objects ON your conflicting object list. Using the<br />
merge option is not recommended as a means of dealing with modified objects.<br />
Using this option could make your task much harder.<br />
10. Select OK ONLY after you have decided to Replace All, OR you have edited the<br />
Action column on the import worksheet. (Reminder: Please read our Tips <strong>and</strong><br />
Warnings about Navision’s Import process at end of this manual.) You must<br />
remember the objects that you selected to be skipped due to conflicts, so that<br />
P:\Click here for Manuals\<strong>Field</strong>_<strong>Control</strong> <strong>Security</strong> Instructions.doc 10/13/09<br />
5
you can manually integrate the changes later. (Write them down now or take a<br />
print screen.)<br />
11. After saying OK, the Navision Import dialog box will say: create: X <strong>and</strong> replace<br />
XX.<br />
12. At this stage there are new tables, forms, <strong>and</strong> reports added to your database.<br />
But they have no data in them.<br />
13. If you were able to import <strong>and</strong> replace ALL objects then Compile all the objects.<br />
Problems or objects that were not able to be compiled will be “marked”. Use the<br />
View, Marked only choice from the tool bar at the top of the Navision screen<br />
while still in the Object Designer. If you exiting object designer will remove the<br />
marks!! And you will have to compile again to know which objects failed.<br />
14. If there were Conflicting objects or compile errors, please continue reading <strong>and</strong><br />
compare the Change Log to the database objects.<br />
15. If there are not conflicts or compile errors then you have completed the<br />
installation <strong>and</strong> you can skip the change log area <strong>and</strong> continue on with the Addon<br />
Setup & Workflow section.<br />
WE HIGHLY RECOMMEND THAT YOU READ THE<br />
INSTRUCTIONS ALL THE WAY THROUGH BEFORE STARTING.<br />
P:\Click here for Manuals\<strong>Field</strong>_<strong>Control</strong> <strong>Security</strong> Instructions.doc 10/13/09<br />
6
Initializing <strong>and</strong> Testing <strong>Field</strong> <strong>and</strong> <strong>Control</strong> <strong>Security</strong>:<br />
A. Initialing First:<br />
1. After importing the objects you need to add access to to <strong>Field</strong> <strong>and</strong> <strong>Control</strong> Setup on<br />
the Navigation Pane or Menu Tree. Our suggestion is the following: First select Tools,<br />
Navigation Pane Designer then setup the following.<br />
Company: Administration<br />
General Menu Group:<br />
Right click to action options<br />
Select Create Menu Item – enter as seen below<br />
2. The result will be the following:<br />
P:\Click here for Manuals\<strong>Field</strong>_<strong>Control</strong> <strong>Security</strong> Instructions.doc 10/13/09<br />
7
3. The next step in setting up <strong>Field</strong> & <strong>Control</strong> <strong>Security</strong> is to run Initial Setup. After<br />
saving your menu changes, go into the <strong>Field</strong> & <strong>Control</strong> Setup. On that form you will<br />
find the “Initial Setup” button which reveals a drop down menu with two choices:<br />
• Initial Setup - This choice will run the Initial Setup process described<br />
below.<br />
• About Initial Setup - This choice displays a message window describing<br />
the purpose of the Initial Setup process:<br />
• The Initial Setup will create five permissions records. These<br />
permissions must be added to a universal Group, one that all users<br />
share. By default, the Initial Setup process adds these permissions to<br />
the ALL Group.<br />
• The following permissions include Read <strong>and</strong> Execute permissions<br />
only:<br />
• Table Data 14005118 FC <strong>Security</strong> <strong>Control</strong>s<br />
• Table Data 14005119 FC Authorized User<br />
• Table Data 14005120 <strong>Field</strong> <strong>Security</strong> Setup (Table)<br />
• Table Data 14005121 <strong>Field</strong> <strong>Security</strong> Setup (<strong>Field</strong>)<br />
• Table Data 14005123 FC Where Used<br />
• The following permission includes Read, Insert, <strong>and</strong> Execute:<br />
• Table Data 14005122 FC Access Log<br />
• The Initial Setup process will also create a sample <strong>Field</strong> & <strong>Control</strong><br />
<strong>Security</strong> for use with the <strong>Field</strong> & <strong>Control</strong> Test Form. This form is<br />
provided to offer samples of where to use the <strong>Field</strong> & <strong>Control</strong> <strong>Security</strong><br />
function calls. The User Group that is created for testing purposes with<br />
the sample function is SECURITY.<br />
• After the Initial Setup has been run you will not be able to run it again.<br />
A message will appear stating that the process has already been run.<br />
4. Run the Initial Setup process by clicking the Initial Setup button <strong>and</strong> choosing<br />
Initial Setup. The following window appears:<br />
P:\Click here for Manuals\<strong>Field</strong>_<strong>Control</strong> <strong>Security</strong> Instructions.doc 10/13/09<br />
8
Choose Yes.<br />
4. When the following message appears, click OK.<br />
B. Testing <strong>Field</strong> & <strong>Control</strong> <strong>Security</strong><br />
From this setup form, choose the <strong>Field</strong> <strong>and</strong> <strong>Control</strong> <strong>Security</strong> button, <strong>and</strong> then List. Notice<br />
that the initialize function created two <strong>Security</strong> <strong>Control</strong>s, 1) Company Info <strong>and</strong> 2) <strong>Field</strong><br />
<strong>Control</strong> Test. Select a different control or Esc back to the Card view. The card view<br />
contains the criteria chosen for the security test <strong>and</strong> demonstrates how the options will be<br />
displayed for your security choices.<br />
P:\Click here for Manuals\<strong>Field</strong>_<strong>Control</strong> <strong>Security</strong> Instructions.doc 10/13/09<br />
9
There are three tabs on this form.<br />
• On the General Tab, the following fields are available:<br />
• Function ame - This is the name of the <strong>Field</strong> & <strong>Control</strong> <strong>Security</strong><br />
being created. This is also the primary key that is used when the<br />
function call is referenced from the appropriate object.<br />
• Description - Enter a brief description of the purpose of this <strong>Field</strong> &<br />
<strong>Control</strong> <strong>Security</strong>.<br />
• Dialog Message - When the password prompt appears, the message<br />
entered here will be displayed on that form.<br />
• Error Type - There are three choices:<br />
• User Defined - This allows the user to enter the specific<br />
message to be displayed upon denial of access.<br />
• Generic - The system displays a st<strong>and</strong>ard “You do not have the<br />
correct permissions” error.<br />
• o Message - This option is used with the function call<br />
RestrictedWithoutErrors to allow users to define in code<br />
exactly what happens when unauthorized users try to access<br />
restricted areas.<br />
• Error Message - If a “User Defined” error type is selected, enter the<br />
message to appear when access is denied.<br />
• Log Access – Choose the option for logging entry attempts specific to<br />
this security card:<br />
• Do not log<br />
• Password Access Only<br />
• All Authorized Access<br />
P:\Click here for Manuals\<strong>Field</strong>_<strong>Control</strong> <strong>Security</strong> Instructions.doc 10/13/09<br />
10
• Unauthorized access only<br />
• Password Access <strong>and</strong> all unauthorized attempts<br />
• All Attempts & Accesses<br />
• Secure - This boolean field determines whether the restriction defined<br />
here is active. A check indicates that the security is on; no check<br />
indicates that any user will be considered authorized.<br />
• The Authorized Users Tab displays the list of Groups <strong>and</strong> or individual<br />
users with permission to perform this specific action. The user type field<br />
allows selection of either group or user. Authorized user field looks up to<br />
the Groups List or user list dependent upon the type field. Note that users<br />
who have any of the listed groups in their permissions will be considered<br />
Authorized Users. SUPER users are not restricted at all.<br />
Special Note for Windows Authentication: The popup dialog box has a<br />
login <strong>and</strong> password entry for access. If you wish to use the password<br />
feature you will have to setup a login <strong>and</strong> password in the Database Login<br />
table.<br />
Suggestions: You may wish to setup a “special” windows login that can<br />
be used in the dialog box. The “special” login would be given the<br />
permissions to get through the dialog box for a given area. If the user<br />
knows the “special” login, then they have been given access permission<br />
just like if they were given a password. The difference is that the special<br />
windows user access does not need to enter a password. Of course you<br />
could have a “special” database login access too, <strong>and</strong> with the database<br />
logins you can also have a password.<br />
• The Where Used Tab – This is a manually entered information tab. It<br />
should displays which fields or control buttons are secured on the table<br />
corresponding to the <strong>Field</strong> <strong>and</strong> <strong>Control</strong> <strong>Security</strong> function. This would be<br />
like the Credit limit, Payment terms, <strong>and</strong> the Customer Posting Group for<br />
th Customer function pictured above.<br />
Setup Button:<br />
The setup Button gives you one choice to Tables. This works in a similar<br />
fashion to Navision’s Change Log setup. If the security control will be on certain<br />
fields in certain tables then you will come here to select the Table, fields, <strong>and</strong> the<br />
security type (or security function) that will control the security response. You<br />
will read more about the security functions later in this document.<br />
Access Log Button:<br />
The Access Log Button provides two(2) choices. You can view just the<br />
P:\Click here for Manuals\<strong>Field</strong>_<strong>Control</strong> <strong>Security</strong> Instructions.doc 10/13/09<br />
11
logged entries for this specific control or view logged entries for all security<br />
controls. There will only be logged entries when you choose to use a security<br />
“function” that logs entries. You will see more on the security functions later in<br />
this document.<br />
Testing with F&C Sample Test Form:<br />
Run Form 14005235 to test the security setup created during initial setup. Try entering<br />
into the Test Code field <strong>and</strong> the Test Name field. Are you authorized? Can you enter an<br />
authorized name to allow you entry? What does the log display? There are also test<br />
buttons at the bottom of this form for demonstration purposes.<br />
Testing in the application:<br />
If you have installed the change log changes to form #1, you will also find examples of<br />
using <strong>Field</strong> & <strong>Control</strong> security in the Navision application, Form #1 “Company<br />
Information”. Depending on how you are logged in you will get difference responses. If<br />
you are logged in as a user with “super – all permissions” rights or a group/role that has<br />
been entered into the F&C <strong>Security</strong> Setup area with permission, you will notice no<br />
responses. Set up a user without SUPER or SECURITY group privileges <strong>and</strong> log in<br />
again as that user. Go to General Ledger, Setup then select the company information<br />
form. Select the Company button. Then select Responsibility Centers. You will get the<br />
F&C dialog box. If you continue by typing the unauthorized user name then you will not<br />
get in. If you type the super user name you will. Access <strong>and</strong> unauthorized access is<br />
being recorded in the F&C Log file. Notice that there is code on the OnPush trigger of<br />
the Responsibility Center menu choice that calls F&C <strong>Security</strong>. This code does require a<br />
global variable.<br />
NOTE: You will not want to give out a user ID that has the SUPER - all permissions or<br />
SECURITY group, so you will want to start setuping up new User names that allow<br />
access to secured areas, or give access to specific users. You may want to setup several<br />
“pass word user names” that allow access to different areas so that knowing one areas<br />
access ID does not give you access to another area.<br />
Another area setup with F&C <strong>Security</strong> is on the same Company Information form but on<br />
a field. Go to the Payments Tab <strong>and</strong> try typing in a new Bank Account No.. If you have<br />
permission you will notice nothing. If you do not you will get the dialog box again. In<br />
this case the code trigging the F&C security is on the OnValidate trigger of the field<br />
control box on the form. This code requires the same global variable used for the<br />
Responsibility Center menu choice <strong>and</strong> a local text variable.<br />
The security on the Bank Account No. seems the same as the security on the<br />
responsibility but it has the added feature of recording the values being typed into the<br />
P:\Click here for Manuals\<strong>Field</strong>_<strong>Control</strong> <strong>Security</strong> Instructions.doc 10/13/09<br />
12
field for both authorized <strong>and</strong> unauthorized access. Check the F&C <strong>Security</strong> log to see the<br />
logged information.<br />
NOTE: We put the F&C security code on the form in this sample. If you are securing a<br />
field that appears in several forms <strong>and</strong> you want it secure it in the same way every time<br />
the field is available, then the F&C security code would most appropriately be placed on<br />
the OnValidate of the field at the table level instead of the form.<br />
P:\Click here for Manuals\<strong>Field</strong>_<strong>Control</strong> <strong>Security</strong> Instructions.doc 10/13/09<br />
13
<strong>Field</strong> & <strong>Control</strong> Dialog Form<br />
This is the form displayed when an unauthorized user tries to access an area that has been<br />
restricted. When an authorized user accesses a restricted area the Dialog Box does not<br />
appear.<br />
“The Dialog Message displayed in the Dialog Box” - This dialog is defined on the<br />
<strong>Field</strong> & <strong>Control</strong> <strong>Security</strong> Form in the Dialog Message field. If that field is left blank, the<br />
st<strong>and</strong>ard message “This is a Secure Function!” will appear.<br />
When an unauthorized user accesses a restricted area, the above-pictured Dialog box<br />
appears. The user must enter an ID <strong>and</strong> password. The system then tests the entered data<br />
<strong>and</strong> verifies that it meets the Authorized User requirements for this function. If the data<br />
meets the criteria (has a required User Group or is a required user), access is granted to<br />
this restricted area. The Log form records the unauthorized User ID <strong>and</strong> the Authorized<br />
User that was used to access the restricted area.<br />
If the ID <strong>and</strong> password entered do not meet the criteria, an error message is displayed.<br />
The message that appears is determined by settings in the <strong>Field</strong> & <strong>Control</strong> <strong>Security</strong> Form.<br />
The following message is a result of User-Defined Dialog Type <strong>and</strong> the contents of the<br />
Error Message fields:<br />
P:\Click here for Manuals\<strong>Field</strong>_<strong>Control</strong> <strong>Security</strong> Instructions.doc 10/13/09<br />
14
When an error message is received, the restricted user is denied access.<br />
C. <strong>Field</strong> & <strong>Control</strong> <strong>Security</strong> Function Defined:<br />
Minimal programming is required within the code of each object where security is<br />
needed. Function calls are available to the programmer in Table 14005118 . The<br />
following are brief definitions of the Secruity Functions (also called <strong>Security</strong> Types) <strong>and</strong><br />
the type of security response they will trigger. It is important to underst<strong>and</strong> these<br />
functions because they are what you place at the point of the security. More details on<br />
these functions will come next in the SETUP <strong>and</strong> Programming the Function Locations<br />
sections.<br />
1. gnboUserOK(pcoFunctioname : Code[30]) : Boolean<br />
Checks if the user can access this function.<br />
No authorization dialog is called.<br />
No error message is generated.<br />
No logging occurs with this function.<br />
2. gnbo<strong>Security</strong>OKWithErrMsg(pcoFunctioname : Code[30])<br />
Checks security <strong>and</strong> returns true if user has access<br />
If user does not have access it brings up a dialog box requesting an authorized user<br />
ID <strong>and</strong> password<br />
Then generates an error if access is denied.<br />
3. gnbo<strong>Security</strong>OKoErrMsg(pcoFunctioname : Code[30])<br />
Checks security <strong>and</strong> does not generate it’s own error <strong>and</strong> returns false if access is<br />
Denied <strong>and</strong> the programmer must trap for the error.<br />
4. gnbo<strong>Security</strong>OKTraceWithErrMsg(pcoFunctioname : Code[30];pteTrace :<br />
Text[120])<br />
Checks security <strong>and</strong> generates an error if access is denied, otherwise it returns true.<br />
If user does not have access it brings up a dialog box requesting authorized user ID<br />
<strong>and</strong> password<br />
P:\Click here for Manuals\<strong>Field</strong>_<strong>Control</strong> <strong>Security</strong> Instructions.doc 10/13/09<br />
15
The extra pteTrace parameter allows record specific information to be recorded in the<br />
log whenever access is allowed.<br />
The pteTrace parameter allows a string to be created at the call which could<br />
include record number,line number,doc type,xrec etc.<br />
example: pteTrace could be -- rec.tablename +' '+ rec."no." +' '+<br />
format(rec."line no.") +' '+ xrec.cost +' '+ rec.cost etc.<br />
5. gnbo<strong>Security</strong>OKTraceoErrMsg(pcoFunctioname : Code[30];pteTrace :<br />
Text[120])<br />
Checks security <strong>and</strong> does not generate an error <strong>and</strong> returns false if access is denied<br />
<strong>and</strong> the programmer must trap for the error.<br />
If user does not have access it brings up a dialog box requesting authorized user ID <strong>and</strong><br />
Password.<br />
The extra pteTrace parameter allows record specific information to be recorded in the<br />
log whenever access is allowed.<br />
The pteTrace parameter allows a string to be created at the call which could include<br />
record number,line number,doc type,xrec etc.<br />
example pteTrace could be -- rec.tablename +' '+ rec."no." +' '+ format(rec."line<br />
no.) +' '+ xrec.cost +' '+ rec.cost etc.<br />
6. gnboVisibleOK(pcoFunctioname : Code[30]) : Boolean<br />
Allows a control's visible property to be set according to the security access of the user<br />
No authorization dialog is called.<br />
No error message is generated.<br />
No logging occurs with this function.<br />
P:\Click here for Manuals\<strong>Field</strong>_<strong>Control</strong> <strong>Security</strong> Instructions.doc 10/13/09<br />
16
<strong>Field</strong> & <strong>Control</strong> Test Form<br />
You used the test form above, now lets look at what makes it work.<br />
Form 14005235 F & C Function Test Form was created to provide examples of how the<br />
function calls can be used. It is used in conjunction with the sample <strong>Field</strong> & <strong>Control</strong><br />
<strong>Security</strong> created in the Initial Setup process. Remember that unless additional User<br />
Groups are added to the sample function, only users with the Groups SUPER <strong>and</strong><br />
SECURITY can test the sample function.<br />
A global variable was added to this form as follows:<br />
ame: <strong>Field</strong><strong>Control</strong>T<br />
Datatype: Record<br />
Subtype: FC <strong>Security</strong> <strong>Control</strong>s<br />
The <strong>Field</strong> & <strong>Control</strong> <strong>Security</strong> function calls were placed in the OnValidate trigger of<br />
each field at the form level.<br />
1. <strong>Field</strong>: Test Code<br />
The following code was added to this field at the form level:<br />
OnValidate()<br />
<strong>Field</strong><strong>Control</strong>T.gnbo<strong>Security</strong>OKWithErrMsg('FIELD COTROL TEST');<br />
MESSAGE ('You have Access. Test Code was changed!\'+<br />
'The function "gnbo<strong>Security</strong>OKWithErrMsg" was used\'+<br />
'Check the log <strong>and</strong> the textbox OnValidate code to see what happenned.');<br />
• <strong>Field</strong><strong>Control</strong>T - This is the call to the variable added which looks to the<br />
FC <strong>Security</strong> <strong>Control</strong>s table.<br />
• gnbo<strong>Security</strong>OKWithErrMsg - This function call tells the system that<br />
either a user-defined or generic message will be displayed if the correct<br />
Group record is not found.<br />
• ‘FIELD COTROL TEST’ - This is the primary key, instructing the<br />
system to use this record in the FC <strong>Security</strong> <strong>Control</strong>s table. At least one of<br />
the User Groups listed for this function must be present in the user’s<br />
Groups, or an authorized user, or an error message will be generated.<br />
• MESSAGE ('You have Access. Test Code was changed!\'+<br />
'The function "gnbo<strong>Security</strong>OKWithErrMsg" was used\'+<br />
P:\Click here for Manuals\<strong>Field</strong>_<strong>Control</strong> <strong>Security</strong> Instructions.doc 10/13/09<br />
17
'Check the log <strong>and</strong> the textbox OnValidate code to see what<br />
happenned.'); If this message appears, the user successfully passed<br />
the <strong>Field</strong> & <strong>Control</strong> <strong>Security</strong> test, based on that user’s Groups or user<br />
name.<br />
• Test Boolean <strong>and</strong> Option 3 are setup with the same code as the Test<br />
Code field, however, may have different messages.<br />
2. <strong>Field</strong>: Test ame<br />
The following code was added to this field at the form level:<br />
OnValidate()<br />
oteOldTestame := gteTestame;<br />
IF OT <strong>Field</strong><strong>Control</strong>T.gnbo<strong>Security</strong>OKTraceoErrMsg('FIELD<br />
COTROL TEST',TABLEAME+ ' Testname is '+gteTestame+'<br />
testname was '+ oteOldTestame )<br />
THE BEGI<br />
<strong>Field</strong><strong>Control</strong>T.gnnrLogAccess('FIELD COTROL TEST',USERID,'Tried to<br />
change '+ oteOldTestame );<br />
ERROR('You do not have access\'+<br />
'The error is being h<strong>and</strong>led on the form <strong>and</strong> traced.\'+<br />
'The function "gnbo<strong>Security</strong>TraceoErrMsg" was used\'+<br />
'Check the textbox OnValidate to see what happenned.');<br />
ED;<br />
MESSAGE('You have Access. Test ame was changed!\'+<br />
'The function "gnbo<strong>Security</strong>TraceoErrMsg" was used\'+<br />
'Check the log <strong>and</strong> the textbox OnValidate code to see what<br />
happenned.');<br />
• <strong>Field</strong><strong>Control</strong>T - This is the variable for the FC <strong>Security</strong> <strong>Control</strong>s table.<br />
• <strong>Field</strong><strong>Control</strong>T.gnbo<strong>Security</strong>OKTraceoErrMsg- Notice that when using<br />
this function call, it is necessary to enter the error message the system will<br />
display.<br />
• ‘FIELD COTROL TEST’ is the primary key for the record in the FC<br />
<strong>Security</strong> <strong>Control</strong>s table.<br />
• Error() - Enter the error message to be displayed.<br />
• When using this call, it is possible to enter other code prior to displaying<br />
the error message.<br />
• The Option 2 was setup with same function call as Test ame.<br />
P:\Click here for Manuals\<strong>Field</strong>_<strong>Control</strong> <strong>Security</strong> Instructions.doc 10/13/09<br />
18
3. Test Buttons<br />
When using <strong>Field</strong> & <strong>Control</strong> <strong>Security</strong> on a button, it’s important to make the<br />
following change:<br />
• Move any existing “Push Action” property code into the “On Push”<br />
trigger of the button, making sure to remove all “Push Action” code.<br />
“Push Action” code occurs prior to the “On Push” trigger code. If there is<br />
“Push Action” activity, this will occur before the <strong>Field</strong> & <strong>Control</strong><br />
<strong>Security</strong> call, thereby not restricting any of that activity<br />
Test Button<br />
The Test Button has the following code in the “On Push” trigger. All<br />
“Push Action” code was removed.<br />
OnPush()<br />
<strong>Field</strong><strong>Control</strong>T.gnbo<strong>Security</strong>OKWithErrMsg('FIELD COTROL<br />
TEST');<br />
MESSAGE('You have Access. Test button was pushed!\'+<br />
'The function "gnbo<strong>Security</strong>OKWithErrMsg" was used\'+<br />
'Check the log <strong>and</strong> the Test Button OnPush trigger code to see<br />
what happenned.');<br />
The code entered on this button is the same code used in the Test Code field.<br />
Test Menu<br />
The call for this button was placed in the “On Push” trigger of the Test Menu<br />
Item menu item. All “Push Action” code was removed. The code is the same<br />
code used for the Test ame field.<br />
OnPush()<br />
<strong>Field</strong><strong>Control</strong>T.gnbo<strong>Security</strong>OKWithErrMsg('FIELD COTROL TEST');<br />
MESSAGE('Test Menu Item was selected!');<br />
<strong>Field</strong> & <strong>Control</strong> <strong>Security</strong> is a powerful tool <strong>and</strong> can be used in many ways. Navision<br />
security Roles (Groups) can be created with certain Permissions <strong>and</strong> then used in<br />
conjunction with <strong>Field</strong> & <strong>Control</strong> <strong>Security</strong>. Using this tool, it’s possible to allow or<br />
disallow many users or a single user, access to any part of Navision, no matter how broad<br />
or specific the activity.<br />
P:\Click here for Manuals\<strong>Field</strong>_<strong>Control</strong> <strong>Security</strong> Instructions.doc 10/13/09<br />
19
Check out another Example: You by now have experienced F&C<br />
<strong>Security</strong> on the Company Information form.<br />
Using a Database Login that does NOT have the SUPER or SECURITY Roles, go to the<br />
General Ledger Menu. Click the Setup. Select the Company Information choice. In each<br />
of the following points, go to the code areas <strong>and</strong> find out what F&C <strong>Security</strong> function was<br />
used. Make sure you underst<strong>and</strong> the results in each case.<br />
1. Click on the Company button, then Responsibility Centers. What happens? Enter<br />
the Login ID into the Dialog box. Enter the password if the login has a password. What<br />
happens?<br />
2. Esc out of the Company Information screen <strong>and</strong> then Click back into GL Setup. This<br />
time take the <strong>Field</strong>s & <strong>Control</strong> Setup choice. Click the <strong>Field</strong>s & <strong>Control</strong> <strong>Security</strong> button,<br />
than List. Select the Company Info <strong>Control</strong> then click FC Secured Functions Button <strong>and</strong><br />
then the Access Log. Was the attempted entry into the Responsibility Centers area<br />
logged? What does the log entry tell you?<br />
3. Esc out again <strong>and</strong> Go back to GL Setup <strong>and</strong> Company Information. Go into the<br />
Designer. Can you find where the field <strong>and</strong> <strong>Control</strong> <strong>Security</strong> function call is placed?<br />
Hint: Where is the Responsibility Centers called? If you have an unmodified 3.01<br />
database, compare how Form 1 differs in the way it calls the Responsibility Centers.<br />
4. Next test: Go back to the Company Information form. Go to the Payments Tab <strong>and</strong><br />
attempt to chance the Bank Account No. field. Did you have authorization? Why or<br />
why not? If you had authorization was your entry logged? Check out the access log for<br />
the ‘COMPANY INFO’ FC <strong>Security</strong> <strong>Control</strong>. Try a user id without authorization <strong>and</strong><br />
one with authorization then check out the log. Where is the security function called for<br />
the Bank Account No. field?<br />
This ends the example of FC <strong>Security</strong> on the Company Information form.<br />
P:\Click here for Manuals\<strong>Field</strong>_<strong>Control</strong> <strong>Security</strong> Instructions.doc 10/13/09<br />
20
SET UP:<br />
There are 10 Steps to setting up F & C <strong>Security</strong>.<br />
1. Read the documentation carefully.<br />
2. Setup user logins. At least one needs to be assigned the Super role.<br />
Suggested: Login Roles<br />
SUPER SUPER …..…will get access<br />
RICK ALL<br />
SUPER(Data) ……..will not get access<br />
BOB ALL<br />
SUPER(Data)<br />
SECURITY …..will get access because it was<br />
entered into the F&C Setup<br />
NOTE: We highly suggest that you setup totally new security groups/roles that will give<br />
permissions into specific areas vs using the SECURITY role. In fact the Initialize on the<br />
<strong>Field</strong> & <strong>Control</strong> Setup will add an example of a User Login called ADMIN with a<br />
security role of ADMIN. You can NOT login into the database with this ADMIN login.<br />
It is simply used as a field <strong>and</strong> control access login. We did not give the ADMIN user a<br />
password, but in normal security situations it should have a password.<br />
3. Import the F&C Add-on objects <strong>and</strong> follow the Initial Setup instructions.<br />
4. Test the Sample form <strong>and</strong> study the Sample Test <strong>Control</strong> <strong>and</strong> Functions being used.<br />
5. Select <strong>and</strong> “list” the places that you want security. Use the <strong>Security</strong> worksheet.<br />
6. Setup some new <strong>Security</strong> <strong>Control</strong>s. Practice with two(2) <strong>and</strong> then create more.<br />
7. Select the <strong>Security</strong> Functions that are appropriate for each security location.<br />
8. If the security is on fields then click the Setup/Tables button on the FC<strong>Security</strong><br />
<strong>Control</strong>s Card. Select the table, then select which fields in that table will be secured,<br />
with which <strong>Security</strong> <strong>Control</strong> <strong>and</strong> <strong>Security</strong> Type(security function).<br />
The Starter Database uses the Customer table, <strong>and</strong> secure the Credit Limit (LCY) <strong>and</strong><br />
Payment Terms fields. We use <strong>Security</strong> Type 4 on the Credit Limit field, <strong>and</strong> type 1<br />
on the Payment Terms field.<br />
9. Next add the security trigger code to the table, or form at the secured field’s or<br />
control’s access point. Like the OnPush for menu items, <strong>and</strong> the OnValidate of<br />
fields.<br />
10. Log out then back in as a user that does not have automatic access to the secured<br />
areas. Test entring a new credit limit or payment terms. Check the<br />
P:\Click here for Manuals\<strong>Field</strong>_<strong>Control</strong> <strong>Security</strong> Instructions.doc 10/13/09<br />
21
A database user login that is assigned the SUPER role is always allowed permission.<br />
However, <strong>Security</strong> Functions that log the entries will also log entries for SUPER users.<br />
Report: “Access Log Report” (R14005119) (Found on Access Log Window)<br />
This report is a hard copy for the system administrator of the attempt log.<br />
Report: “Purge Access Log” (R14005118) (Found on <strong>Control</strong> List)<br />
This is a process report that enables you to delete old entries from the Access Log.<br />
The following <strong>Security</strong> Worksheet is a manual log of how you plan to setup <strong>Field</strong> <strong>and</strong><br />
<strong>Control</strong> <strong>Security</strong>. We highly recommend that you start with a plan before addressing the<br />
computer.<br />
P:\Click here for Manuals\<strong>Field</strong>_<strong>Control</strong> <strong>Security</strong> Instructions.doc 10/13/09<br />
22
<strong>Security</strong> Worksheet:<br />
<strong>Security</strong> Location Form ID Table <strong>Security</strong> <strong>Control</strong> <strong>Security</strong> Function<br />
ID ID<br />
GL, Setup, Co. Info, Co.Button #1 COMPANY INFO <strong>Security</strong>OKWithErrMsg<br />
Responsibility Centers Menu Line<br />
(access dialog box only)<br />
GL, Setup, Co. Info, Payment Tab #1 COMPANY INFO <strong>Security</strong>OKTraceWithErrMsg<br />
Bank Account No. field<br />
(dialog box <strong>and</strong> access log)<br />
Sales & Receivables, Customer<br />
#18 COMPANY INFO 4, (access dialog box <strong>and</strong> full<br />
Table, Credit Limit (LCY)<br />
access logging)<br />
Sales & Receivables, Customer<br />
Table, Payment Terms<br />
P:\Click here for Manuals\<strong>Field</strong>_<strong>Control</strong> <strong>Security</strong> Instructions.doc 10/13/09<br />
#18 COMPANY INFO 1, (blocks access to non<br />
authorized logins)<br />
23
<strong>Security</strong> Location Form ID Table<br />
ID<br />
<strong>Security</strong> <strong>Control</strong><br />
ID<br />
P:\Click here for Manuals\<strong>Field</strong>_<strong>Control</strong> <strong>Security</strong> Instructions.doc 10/13/09<br />
<strong>Security</strong> Function<br />
24
Setting up more <strong>Security</strong> <strong>Control</strong> Codes:<br />
How do you decide whether to use an existing <strong>Security</strong> <strong>Control</strong> Code or to create a new<br />
one? There are several factors to consider.<br />
1. One consideration is WHO is given access? If there are several fields on the<br />
Customer Card that will have the “same” user (LOGIN) or user<br />
group(ROLES) access, then you may just want to setup a CUSTOMER<br />
CARD CONTROL.<br />
However, if one field has different authorizations then another field, then you<br />
will need to setup separate <strong>Security</strong> <strong>Control</strong> Codes.<br />
2. Another consideration is if errors <strong>and</strong> messages need to be specific to the<br />
secured area.<br />
3. The third consideration is if you are interested in logging the accesses <strong>and</strong> the<br />
unauthorized attempts.<br />
The security log is maintained by each <strong>Security</strong> <strong>Control</strong>. If you use one<br />
<strong>Security</strong> <strong>Control</strong> for several fields on the Customer Card then the log will comingle<br />
the field access.<br />
If you thing you will want to see all the access or attempts for a particular field<br />
separated from the accesses <strong>and</strong> attempts of other fields then it would be better<br />
to setup separate <strong>Security</strong> <strong>Control</strong>s for those fields.<br />
An Example: <strong>Security</strong> on the Commission % field on the Salesperson List Form.<br />
<strong>Security</strong> <strong>Control</strong> (General Tab)<br />
P:\Click here for Manuals\<strong>Field</strong>_<strong>Control</strong> <strong>Security</strong> Instructions.doc 10/13/09<br />
25
<strong>Security</strong> <strong>Control</strong> (Authorized Users)<br />
Only Users assigned the <strong>Security</strong> or S&R-Setup Role will be allowed access to editing the<br />
Commission percent field on the Salesperson card. You could have selected only the<br />
S&R Setup Role too, or just the <strong>Security</strong> Role, but you must assign at least one<br />
Authorized User or Authorized Group.<br />
Once you have setup the <strong>Security</strong> <strong>Control</strong>s, next you select the tables <strong>and</strong> fields that<br />
need security access. Go to the Setup button <strong>and</strong> select Tables:<br />
P:\Click here for Manuals\<strong>Field</strong>_<strong>Control</strong> <strong>Security</strong> Instructions.doc 10/13/09<br />
26
Next you will see the following screen which is a list of tables:<br />
You will either leave the table blank (no security needed) or you will select “Some fields”<br />
or “All <strong>Field</strong>s”.<br />
The edit assist … box will bring up the list of fields in the table if you have selected<br />
either Some or All fields.<br />
Here you check if security applies <strong>and</strong> what <strong>Security</strong> <strong>Control</strong> to use <strong>and</strong> the <strong>Security</strong><br />
Type. The <strong>Security</strong> Type is directly related to the following information on the <strong>Security</strong><br />
functions.<br />
P:\Click here for Manuals\<strong>Field</strong>_<strong>Control</strong> <strong>Security</strong> Instructions.doc 10/13/09<br />
27
To finish the Setup using the Table <strong>and</strong> <strong>Field</strong>s selection, you need to put the following<br />
code in the OnValidate trigger of the field in the tables. The code is the same regardless<br />
of the field.<br />
First add the following global variables to the table:<br />
Name DataType SubType Length<br />
FC<strong>Security</strong><strong>Control</strong>T Record FC <strong>Security</strong> <strong>Control</strong>s<br />
RecRef RecordRef<br />
xRecRef RecordRef<br />
Then add the following code to the OnValidate trigger of each field secured.<br />
Credit Limit (LCY) - OnValidate<br />
//FC<strong>Security</strong><br />
RecRef.GETTABLE(Rec);<br />
xRecRef.GETTABLE(xRec);<br />
FC<strong>Security</strong><strong>Control</strong>sT.Trigger<strong>Security</strong>(RecRef,xRecRef);<br />
If you want to make the security specific only to certain forms then you don’t put the code<br />
on the at the table level, but instead put the code on the form. If you want the security on<br />
“Credit Limit (LCY)” on the customer card then you open the Customer Card with the<br />
“Designer”. Next click on the Credit Limit (LCY) control box <strong>and</strong> then F9 to the code<br />
area behind the code box. Place the exact same code as above in the OnAfterValidate<br />
trigger as seen below.<br />
First add the following global variables to the form:<br />
Name DataType SubType Length<br />
FC<strong>Security</strong><strong>Control</strong>T Record FC <strong>Security</strong> <strong>Control</strong>s<br />
RecRef RecordRef<br />
xRecRef RecordRef<br />
OnAfterValidate<br />
//FC<strong>Security</strong><br />
RecRef.GETTABLE(Rec);<br />
xRecRef.GETTABLE(xRec);<br />
FC<strong>Security</strong><strong>Control</strong>sT.Trigger<strong>Security</strong>(RecRef,xRecRef);<br />
The code must be placed behind each control box you wish to secure.<br />
P:\Click here for Manuals\<strong>Field</strong>_<strong>Control</strong> <strong>Security</strong> Instructions.doc 10/13/09<br />
28
ALERTS:<br />
1. You can use any <strong>Security</strong> Type Function on almost any field. However there are<br />
some circumstances that you will want to consider. <strong>Security</strong> on a menu item would not<br />
use a logging function since it is just access at that point. No data has been changed.<br />
2. When logging access <strong>and</strong> changes of Option fields, you need to underst<strong>and</strong> that the<br />
option value is returned as a number in the security log when using <strong>Security</strong> Type<br />
Functions 4 <strong>and</strong> 5. The first option choice will appear as a zero, the second option<br />
will appear as a 1, <strong>and</strong> so forth.<br />
3. If you secure fields that have long text values such as Name, Address, <strong>and</strong> email<br />
address then you should use the lower number <strong>Security</strong> type functions that don’t try to<br />
log the entire field’s before <strong>and</strong> after value.<br />
<strong>Security</strong> Type Functions: Types of <strong>Security</strong> Responses:<br />
The following examples represent <strong>Security</strong> Functions. There are five types. These<br />
functions determine how the <strong>Security</strong> <strong>Control</strong> Code will be used <strong>and</strong> the security<br />
response. Each field or control that is being secured only needs to use one of the<br />
following five functions.<br />
These Functions are already programmed. They do the work of checking for<br />
authorization by user(login) or group(role), calling a security dialog box <strong>and</strong> creating the<br />
security log. Your task to setup <strong>Field</strong> <strong>and</strong> <strong>Control</strong> <strong>Security</strong> is to select which <strong>Security</strong><br />
Function to use <strong>and</strong> to place it on the table, form, or control Textbox where security is<br />
needed.<br />
1. gnboUserOK :<br />
2. gnbo<strong>Security</strong>OKoErrMsg :<br />
3. gnbo<strong>Security</strong>OKWithErrMsg :<br />
4. gnbo<strong>Security</strong>OKTraceoErrMsg :<br />
5. gnbo<strong>Security</strong>OKTraceWithErrMsg<br />
6. gnboVisibleOK :<br />
Call the Dialog Box<br />
P:\Click here for Manuals\<strong>Field</strong>_<strong>Control</strong> <strong>Security</strong> Instructions.doc 10/13/09<br />
29
<strong>Security</strong> Function # 1, does not call the dialog box <strong>and</strong> does not log activity. It checks<br />
for authorization only <strong>and</strong> returns a simple ERROR dialog, controlled on the trigger of<br />
the secured area.<br />
<strong>Security</strong> Functions 2 through 5 call a <strong>Security</strong> Form (or Dialog Box) that allows you to<br />
enter an authorized userid <strong>and</strong> password to gain access. It is possible to be logged into<br />
Navision as Joe <strong>and</strong> know that you must type in UserID Mary into the <strong>Security</strong> Form<br />
with no password to gain access. Passwords are an optional requirement. Passwords<br />
however are required if the Database Login (such as Mary) requires a password. The<br />
following is how the <strong>Security</strong> Form appears.<br />
The “Dialog Message displayed in the Dialog Box” is controlled by what is entered on the<br />
<strong>Security</strong> <strong>Control</strong>. The above is what is displayed when you use the sample <strong>Security</strong><br />
<strong>Control</strong> called ‘FIELD CONTROL TEST’.<br />
If the User Login ID has permission the Dialog Box is not activated. The user is just<br />
allowed to continue. Even though the permission was automatically given <strong>and</strong><br />
depending on the <strong>Security</strong> <strong>Control</strong>’s Log Access, a log record of the access will still be<br />
recorded.<br />
TRACE functions: (Functions # 4 <strong>and</strong> 5)<br />
The <strong>Security</strong> Functions with the “Trace” term in the name<br />
[gnbo<strong>Security</strong>OKTraceWithErrMsg] <strong>and</strong> [gnbo<strong>Security</strong>OKTraceNoErrMsg] give more log<br />
information then the Functions without the “Trace” such as [gnbo<strong>Security</strong>OKWithErrMsg]<br />
<strong>and</strong> [gnbo<strong>Security</strong>OKNoErrMsg]. But the “Trace” functions require more code at the form<br />
level which provides the extra information.<br />
All four (4) security functions “offer” (not require) the security feature<br />
of logging the accesses <strong>and</strong> attempts to access a secured area. As<br />
mentioned above the Trace functions offer more information on the log<br />
such as value before <strong>and</strong> after the change.<br />
P:\Click here for Manuals\<strong>Field</strong>_<strong>Control</strong> <strong>Security</strong> Instructions.doc 10/13/09<br />
30
There are some places that it doesn’t make sense to store more access information with<br />
the Trace function. For instance, we did not use a Trace function when setting up the<br />
sample security on the access to the Responsibility Centers on the Company Information<br />
Form. But we did use a Trace function when securing the Bank Account No. field. If<br />
the Bank Account No. field is edited, we wanted to know the Bank Acount No. before the<br />
change <strong>and</strong> the value after it was changed <strong>and</strong> of course when it was changed.<br />
WITH functions: (Functions # 2 <strong>and</strong> 4)<br />
The <strong>Security</strong> Functions that include a “With” term in the name such as<br />
[gnbo<strong>Security</strong>OKWithErrMsg] <strong>and</strong> [gnbo<strong>Security</strong>OKTraceWithErrMsg] are using the<br />
responses setup on the <strong>Security</strong> <strong>Control</strong> Card. The “No” functions<br />
[gnbo<strong>Security</strong>OKNoErrMsg] <strong>and</strong> [gnbo<strong>Security</strong>OKTraceNoErrMsg] are using the<br />
ERROR messages programmed at the point of security where the function is called.<br />
P:\Click here for Manuals\<strong>Field</strong>_<strong>Control</strong> <strong>Security</strong> Instructions.doc 10/13/09<br />
31
Programming <strong>Security</strong> on Buttons:<br />
<strong>Security</strong> on comm<strong>and</strong> buttons will use the following:<br />
As you read previously, fields can be controled by using the Tables<br />
setup form in GL Setup, <strong>Field</strong> & <strong>Control</strong> Setup. However, if you want<br />
more text in messages then you would use Options 3 or 5 <strong>and</strong> place the<br />
security trigger code at the point of security instead of using the tables<br />
setup.<br />
<strong>Control</strong> buttons do not log changed values like can be done with fields.<br />
They also can not be setup using the Tables setup. The following code<br />
must be placed where the security is needed. Options 1, 2 <strong>and</strong> 3 are<br />
typically used for <strong>Control</strong> buttons.<br />
We have provided examples of each of the <strong>Security</strong> Functions. All the examples<br />
below are showing security used on the Credit Limit ($) field on the Customer Card.<br />
First step: is to add a C/AL Global variable to the form that contains the field or control<br />
being secured.<br />
Name DataType SubType Length<br />
<strong>Field</strong><strong>Control</strong>T Record FC <strong>Security</strong> <strong>Control</strong>s<br />
Second Step: Click on the TextBox of the field or control being secured.<br />
Third : F9 or click on the C/AL icon to go to the triggers area of the TextBox<br />
Fourth : Click in the OnValidate trigger area <strong>and</strong> add the appropriate function.<br />
Fifth : Add the following Local Variable to the OnValidate area: (only needed<br />
for the Trace functions #4 <strong>and</strong> #5)<br />
Name DataType SubType Length<br />
oteOldTestName Text 50<br />
We are making the assumption at this point in the documentation that you have already<br />
setup the <strong>Security</strong> <strong>Control</strong> Codes. If you have not, please read the remainder of this<br />
information <strong>and</strong> then go back <strong>and</strong> enter the <strong>Security</strong> <strong>Control</strong> Codes that you plan to be<br />
using.<br />
‘FIELD CONTROL TEST’ represents one of the sample <strong>Security</strong> <strong>Control</strong> Code that<br />
was setup as an example during the initialize stage of the <strong>Field</strong> <strong>and</strong> <strong>Control</strong> installation.<br />
You can use this security control (as seen below) to learn about the <strong>Field</strong> <strong>and</strong> <strong>Control</strong><br />
P:\Click here for Manuals\<strong>Field</strong>_<strong>Control</strong> <strong>Security</strong> Instructions.doc 10/13/09<br />
32
functionality but we highly recommend that you setup security controls specific to your<br />
needs.<br />
Examples of <strong>Security</strong> Functions:<br />
1. gnboUserOK(‘…. Checks for Authorization Only<br />
The very simplest of security setup. o Dialog Box <strong>and</strong> o log.<br />
UserOK security function only checks for authorization to edit the field<br />
value. There is no Dialog Box asking for UserID <strong>and</strong> password. The<br />
error generated is coded on the form.<br />
Just as the other <strong>Security</strong> functions, this one is called on the OnValidate<br />
trigger of the field or control that is being secured. Follow the same<br />
first steps <strong>and</strong> then add the following code to the OnValidate trigger.<br />
Notice that User OK requires that you apply the security function in an IF statement. The<br />
response is coded at the point of security vs using the responses on the <strong>Security</strong> <strong>Control</strong>.<br />
OnValidate<br />
IF NOT <strong>Field</strong><strong>Control</strong>.gnboUserOK('FIELD CONTROL TEST') THEN<br />
ERROR('You do not have Access.')<br />
2. gnbo<strong>Security</strong>OKoErrMsg(.. relies on programmer’s code on form<br />
Has a Dialog Box, Can log entries, logged entries are not detailed.<br />
Very similar to #2 however notice programmed IF statement with a specific error coded<br />
at the OnValidate location. This is coded similar to #1 (UserOK) but calls the security<br />
dialog box <strong>and</strong> can optionally log the access depending on how the <strong>Security</strong> <strong>Control</strong> is<br />
setup.<br />
Message can be User Defined Message if set to be User Defined on<br />
<strong>Control</strong> Card.<br />
Example:<br />
OnValidate<br />
IF NOT <strong>Field</strong><strong>Control</strong>T.gnbo<strong>Security</strong>OKNoErrMsg('FIELD CONTROL TEST') THEN<br />
ERROR('You do not have access');<br />
Type Log text: Authorized Access attempted Customer Credit Limit<br />
change.<br />
P:\Click here for Manuals\<strong>Field</strong>_<strong>Control</strong> <strong>Security</strong> Instructions.doc 10/13/09<br />
33
3. gnbo<strong>Security</strong>OKWithErrMsg(.. gets code from a <strong>Security</strong> <strong>Control</strong><br />
Has a Dialog Box, Can log entries, logged entries are not detailed.<br />
Message is set in code. “You do not have authorization.”<br />
Example:<br />
OnValidate<br />
<strong>Field</strong><strong>Control</strong>T.gnbo<strong>Security</strong>OKWithErrMsg('FIELD CONTROL TEST');<br />
Type Log text: Unauthorized Access attempted Customer Credit Limit<br />
change.<br />
4. gnbo<strong>Security</strong>OKTraceoErrMsg(.. relies on programmer’s code on<br />
form<br />
Has a Dialog Box, Can log entries, logged entries can be detailed.<br />
Very similar to #4 however notice programmed IF statement with a specific error<br />
coded at the OnValidate location.<br />
Message can be User Defined Message if set to be User Defined on<br />
<strong>Control</strong> Card.<br />
Example:<br />
OnValidate<br />
oteOldTestName := FORMAT(xRec."Credit Limit ($)");<br />
//oteOldTestName is a local varable which is text. So secured fields that are not<br />
// a text datatype must be converted to a text format.<br />
IF NOT <strong>Field</strong><strong>Control</strong>T.gnbo<strong>Security</strong>OKTraceNoErrMsg('FIELD CONTROL TEST',TABLENAME+<br />
' Credit Limit to '+FORMAT("Credit Limit ($)")+' CreditLimit was '+ oteOldTestName )<br />
THEN BEGIN<br />
IF oteOldTestName = '' THEN<br />
oteOldTestName := 'Blank';<br />
<strong>Field</strong><strong>Control</strong>T.gnnrLogAccess('FIELD CONTROL TEST',USERID,'Tried to change Credit Limit '+<br />
oteOldTestName + ' to ' + FORMAT("Credit Limit ($)") );<br />
ERROR('You do not have access');<br />
END;<br />
Results: This actually triggers a response but the response comes from the<br />
programmer’s code on the form as seen above.<br />
P:\Click here for Manuals\<strong>Field</strong>_<strong>Control</strong> <strong>Security</strong> Instructions.doc 10/13/09<br />
34
5. gnbo<strong>Security</strong>OKTraceWithErrMsg(.. gets code from a <strong>Security</strong><br />
<strong>Control</strong><br />
Has a Dialog Box, Can log entries, logged entries can be detailed.<br />
Message is set in code. “You do not have authorization.”<br />
Example:<br />
OnValidate<br />
oteOldTestName := FORMAT(xRec."Credit Limit ($)");<br />
//oteOldTestName is a local variable which is text. So secured fields that are not<br />
// a text datatype must be converted to a text format.<br />
<strong>Field</strong><strong>Control</strong>T.gnbo<strong>Security</strong>OKTraceWithErrMsg('FIELD CONTROL TEST',TABLENAME+<br />
' Credit Limit to '+FORMAT("Credit Limit ($)")+' CreditLimit was '+ oteOldTestName );<br />
Results: Triggers a response that comes from what has been setup on the <strong>Security</strong><br />
<strong>Control</strong>.<br />
Log Access: This method also responds to the “Log Access” setup on the <strong>Security</strong><br />
<strong>Control</strong>. If the Log Access is set to trap Unauthorized only or All attempts then the Log<br />
entry looks like this:<br />
Type Log text: Tried to change Customer Credit Limit from 20,000<br />
CreditLimit to 0<br />
Log Access: The text sent to the log also comes from what is coded on the form. The<br />
following log text came from the above code. This choice has limited control by the Log<br />
Access setup on the <strong>Security</strong> <strong>Control</strong> that it calls. It responds to All Authorized Accesses,<br />
Unauthorized attempts <strong>and</strong> All Attempts <strong>and</strong> accesses. It will log entries regardless of all<br />
the other Log Access options.<br />
Type Log text: Authorized Access attempted Customer Credit Limit<br />
from 20,000 CreditLimit to 0<br />
P:\Click here for Manuals\<strong>Field</strong>_<strong>Control</strong> <strong>Security</strong> Instructions.doc 10/13/09<br />
35
Some examples of how the Log tracks security access.<br />
Other ways to use the <strong>Security</strong> <strong>Control</strong>s <strong>and</strong> Functions:<br />
Setting up the <strong>Security</strong> <strong>Control</strong>s will be the same. However, WHERE you place the call<br />
to the <strong>Security</strong> Function will make a difference. So far we have referenced putting the<br />
<strong>Security</strong> Function call on the OnValidate of the <strong>Field</strong> control, or on the OnPush of a<br />
Comm<strong>and</strong> Button or a Menu Button / Menu item.<br />
• <strong>Security</strong> on Forms:<br />
Placing a <strong>Security</strong> Function on the OnModify trigger on a form can also control<br />
who can edit. By placing the function on the form, than if any field is changed the<br />
security will be called. You can use Navision’s security to give a role read <strong>and</strong> not<br />
modify rights however Navision doesn’t give you the ability to call a dialog box.<br />
How this works: A user enters an editable form like Customer Card. They attempt to<br />
change any of the fields, it appears to let them change the values, but upon exiting the<br />
form, the authorization is checked <strong>and</strong> a dialog box is called (depends on the function<br />
used). If the user does not have authorization, all fields on the record reverts to the<br />
original values.<br />
• <strong>Security</strong> on <strong>Field</strong>s at the Table Level:<br />
Placing the <strong>Security</strong> Function call on the OnValidate trigger on the field within a<br />
table will cause the access to that table’s field to be secured on every form where that<br />
table’s field is called.<br />
• <strong>Security</strong> on the Table:<br />
Placing a <strong>Security</strong> Function on the OnModify trigger on a Table can also control<br />
who can edit the table records. By placing the function on the table, than if any field is<br />
changed on any form view of the table then the security will be called.<br />
P:\Click here for Manuals\<strong>Field</strong>_<strong>Control</strong> <strong>Security</strong> Instructions.doc 10/13/09<br />
36
It may appear like the user is allowed to edit, but upon leaving the record the security is<br />
triggered <strong>and</strong> the edited information reverts everything back if authorization is denied.<br />
You can use F&C <strong>Security</strong> on the OnInsert <strong>and</strong> OnDelete triggers of tables too. For an<br />
example you could setup one <strong>Security</strong> <strong>Control</strong> called ‘TABLE DELETE’. Use the<br />
generic message or create a user defined one that would work for several tables. Decide<br />
on the function to use <strong>and</strong> place the same security function call on the delete trigger on<br />
any table where you would like the security. Remember F&C <strong>Security</strong> not only controls<br />
the authorization but can log who is trying what.<br />
• <strong>Security</strong> on the VISIBLE <strong>Control</strong>:<br />
This controls WHO can change the VISIBLE properties of fields <strong>and</strong> controls.<br />
For instance, let us say that the Commission % field is designed onto the Salesperson<br />
form but has a property of VISIBLE “No”. In this condition, the Commission % field<br />
will be available on the View Menu bar for Show Column. You may want to give a user<br />
access to the form, but you do not want them to have the ability to make the Commission<br />
% field Visible. The <strong>Field</strong> <strong>and</strong> <strong>Control</strong> <strong>Security</strong> Advanced Function for controlling the<br />
Visible property will control this situation. Be aware that when a user is denied the right<br />
to make a field or control VISIBLE then they are also denied access to a Form that<br />
already has the secured field or control displayed (Visible).<br />
Set up the Visible <strong>Control</strong> as follows:<br />
1. Go to the form that contains the field or control that needs security.<br />
2. Go into the Designer mode on the form.<br />
3. Add the following Global variable to the C/AL Globals of the form.<br />
Name DataType SubType Length<br />
<strong>Field</strong><strong>Control</strong>T Record FC <strong>Security</strong> <strong>Control</strong>s<br />
4. Click on the TextBox of the field you wish to secure. The example below is using the<br />
Zip Code field on the Customer List form. F9 or click the C/AL icon to go to the<br />
triggers of the field. In the OnFormat trigger put the following code.<br />
OnFormat<br />
IF CurrForm."ZIP Code".VISIBLE(TRUE) THEN<br />
IF NOT <strong>Field</strong><strong>Control</strong>T.gnboVisibleOK(‘FIELD CONTROL TEST’) THEN<br />
CurrForm."ZIP Code".VISIBLE(FALSE);<br />
5. Esc out <strong>and</strong> save your changes compiled.<br />
P:\Click here for Manuals\<strong>Field</strong>_<strong>Control</strong> <strong>Security</strong> Instructions.doc 10/13/09<br />
37
6. Test the control by logging in as someone that is not in the SUPER or SECURITY<br />
Roles. Go to the Customer List. Select View from the menu bar <strong>and</strong> then Show<br />
Column. Click on Zip Code. You should get the You do not have access message.<br />
If you get the “You do not have access” message just trying to view the Customer<br />
List, then that means the Zip Code is already Visible on the form. Normally by<br />
Navision default, the Zip Code is not Visible but can be made visible by clicking it on<br />
the Show Column choices.<br />
P:\Click here for Manuals\<strong>Field</strong>_<strong>Control</strong> <strong>Security</strong> Instructions.doc 10/13/09<br />
38
Time for you to setup security:<br />
Secure the “Credit Limit ($)” field on the Customer Card - Hint: The<br />
code used in the explaination of each security functions above was using the Customer<br />
Credit Limit ($) field as the example.<br />
1—Go to Form 21: Customer Card.<br />
2—Click on the TextBox control for the Credit Limit ($) field.<br />
3—F9, or click the C/AL icon to go to the trigger area of the field.<br />
4—Have this document open during this operation. Go to the section above where you<br />
see the samples of the <strong>Security</strong> Functions code. Copy the function code that you have<br />
selected from this document <strong>and</strong> then paste the code into the OnValidate() trigger of the<br />
Credit Limit ($) field. Depending on the security function that you selected you may need<br />
to edit the code to make it specific to Credit Limit ($).<br />
5—Exit <strong>and</strong> save complied. Exit the Customer Card form <strong>and</strong> return. Now try editing<br />
the Credit Limit ($) field. If you do not have access, where did the Error message come<br />
from? Was there a log entry to trace the edit attempt? What did the log tell you?<br />
If you had access, where did the messages come from? Was there a log of the edit?<br />
What controls if logs are made or not? What does the log entry tell you?<br />
What was it about your login that gave you access?<br />
6—Notice that we used the existing “Sample” <strong>Security</strong> <strong>Control</strong> Code called FIELD<br />
CONTROL TEST vs. setting up an entirely new <strong>Security</strong> <strong>Control</strong> called CUSTOMER<br />
CREDIT LIMIT.<br />
How do you decide whether to use an existing <strong>Control</strong> Code or to create a new<br />
one? Please review the section above that discusses the reasons for setting up new<br />
<strong>Security</strong> <strong>Control</strong>s.<br />
P:\Click here for Manuals\<strong>Field</strong>_<strong>Control</strong> <strong>Security</strong> Instructions.doc 10/13/09<br />
39
Support on this product:<br />
Your local Navision Solution Center will provide support. Please contact them with any<br />
questions or comments.<br />
Thank you for following the procedures. We certainly hope you will find great benefit in<br />
the functionality that this add-on products provides. On behalf of Navision <strong>Software</strong>, all<br />
Navision Solution Centers (NSCs) <strong>and</strong> Navision Service Providers (NSPs) we thank you<br />
for your business. Do not hesitate to contact your NSC if you are considering<br />
modifications or are in need of new software functionality. There may just be another<br />
add-on product that will work for you. Ask your NSC about getting a complete list of<br />
add-on available.<br />
Abbreviated list of other Add-on products:<br />
Business Snap Shot<br />
Calendar Views<br />
Defaults Setup<br />
Executive Summary<br />
Fast Find<br />
<strong>Field</strong> <strong>and</strong> <strong>Control</strong> <strong>Security</strong><br />
Line Comments<br />
Quote Management<br />
Pop-up Notes<br />
Posted Line Lookup<br />
Purchase Resources<br />
Reports Pack (36 Reports)<br />
Status Views<br />
P:\Click here for Manuals\<strong>Field</strong>_<strong>Control</strong> <strong>Security</strong> Instructions.doc 10/13/09<br />
40
CHANGE LOG:<br />
Form # 1—Company Information:<br />
1—Add a Global Variable as shown below.<br />
Name DataType Subtype Length<br />
<strong>Field</strong><strong>Control</strong>T Record FC <strong>Security</strong> <strong>Control</strong>s<br />
2—In design mode, click on the Company Menu Button. Go to View, Menu. Then<br />
select the Responsibility Centers menu item. Remove the RunObject Action property<br />
<strong>and</strong> (F9) to go to the C/AL code area of the menu item. Add the following code to the<br />
OnPush() trigger:<br />
OnPush()<br />
//<strong>Field</strong> <strong>and</strong> <strong>Control</strong> <strong>Security</strong><br />
IF <strong>Field</strong><strong>Control</strong>T.READPERMISSION THEN<br />
<strong>Field</strong><strong>Control</strong>T.gnbo<strong>Security</strong>OKWithErrMsg('COMPANY INFO');<br />
FORM.RUN(FORM::"Responsibility Center Card");<br />
3—Esc back to the form still in design mode <strong>and</strong> go to the Payments tab <strong>and</strong> click on<br />
the “Bank Account No.” field TextBox. Next (F9) to the C/AL code area of the TextBox<br />
<strong>and</strong> add the following code to the OnValidate() trigger:<br />
OnValidate()<br />
//<strong>Field</strong> <strong>and</strong> <strong>Control</strong> <strong>Security</strong><br />
oteOldTestName := xRec."Bank Account No.";<br />
//oteOldTestName is a local variable which is text. So secured fields that are not<br />
// a text datatype must be converted to a text format.<br />
IF <strong>Field</strong><strong>Control</strong>T.READPERMISSION THEN<br />
<strong>Field</strong><strong>Control</strong>T.gnbo<strong>Security</strong>OKTraceWithErrMsg('Company Info',TABLENAME+<br />
' Bank Acct # to '+"Bank Account No."+' Bank Acct # was '+<br />
oteOldTestName );<br />
P:\Click here for Manuals\<strong>Field</strong>_<strong>Control</strong> <strong>Security</strong> Instructions.doc 10/13/09<br />
41
Navigation Pane:<br />
1—Go into Navigation Pane Designer.<br />
2—Click on Administration.<br />
3—Click on application Setup.<br />
4—Click General.<br />
4—Insert the <strong>Field</strong> <strong>and</strong> <strong>Control</strong> Menu choice as shown.<br />
5—Use the following properties:<br />
P:\Click here for Manuals\<strong>Field</strong>_<strong>Control</strong> <strong>Security</strong> Instructions.doc 10/13/09<br />
42
Once all the changes have been made, COMPILE ALL objects again. If compile errors<br />
still exist, Navision will mark the problem objects <strong>and</strong> you will need to double check the<br />
integration in your database with the change log. If you are sure that all changes are in<br />
the database <strong>and</strong> compile errors continue please contact you NSC immediately.<br />
P:\Click here for Manuals\<strong>Field</strong>_<strong>Control</strong> <strong>Security</strong> Instructions.doc 10/13/09<br />
43