N57QK_manual.pdf filesize - Maplin Electronics
N57QK_manual.pdf filesize - Maplin Electronics
N57QK_manual.pdf filesize - Maplin Electronics
Create successful ePaper yourself
Turn your PDF publications into a flip-book with our unique Google optimized e-Paper software.
Basic Setup<br />
22<br />
English<br />
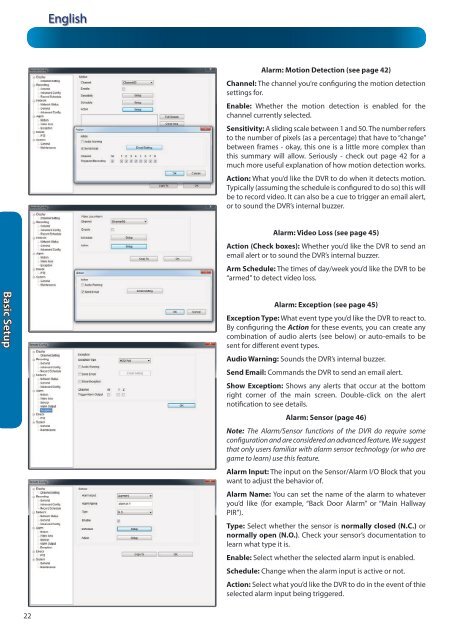
Alarm: Motion Detection (see page 42)<br />
Channel: The channel you’re configuring the motion detection<br />
settings for.<br />
Enable: Whether the motion detection is enabled for the<br />
channel currently selected.<br />
Sensitivity: A sliding scale between 1 and 50. The number refers<br />
to the number of pixels (as a percentage) that have to “change”<br />
between frames - okay, this one is a little more complex than<br />
this summary will allow. Seriously - check out page 42 for a<br />
much more useful explanation of how motion detection works.<br />
Action: What you’d like the DVR to do when it detects motion.<br />
Typically (assuming the schedule is configured to do so) this will<br />
be to record video. It can also be a cue to trigger an email alert,<br />
or to sound the DVR’s internal buzzer.<br />
Alarm: Video Loss (see page 45)<br />
Action (Check boxes): Whether you’d like the DVR to send an<br />
email alert or to sound the DVR’s internal buzzer.<br />
Arm Schedule: The times of day/week you’d like the DVR to be<br />
“armed” to detect video loss.<br />
Alarm: Exception (see page 45)<br />
Exception Type: What event type you’d like the DVR to react to.<br />
By configuring the Action for these events, you can create any<br />
combination of audio alerts (see below) or auto-emails to be<br />
sent for different event types.<br />
Audio Warning: Sounds the DVR’s internal buzzer.<br />
Send Email: Commands the DVR to send an email alert.<br />
Show Exception: Shows any alerts that occur at the bottom<br />
right corner of the main screen. Double-click on the alert<br />
notification to see details.<br />
Alarm: Sensor (page 46)<br />
Note: The Alarm/Sensor functions of the DVR do require some<br />
configuration and are considered an advanced feature. We suggest<br />
that only users familiar with alarm sensor technology (or who are<br />
game to learn) use this feature.<br />
Alarm Input: The input on the Sensor/Alarm I/O Block that you<br />
want to adjust the behavior of.<br />
Alarm Name: You can set the name of the alarm to whatever<br />
you’d like (for example, “Back Door Alarm” or “Main Hallway<br />
PIR”).<br />
Type: Select whether the sensor is normally closed (N.C.) or<br />
normally open (N.O.). Check your sensor’s documentation to<br />
learn what type it is.<br />
Enable: Select whether the selected alarm input is enabled.<br />
Schedule: Change when the alarm input is active or not.<br />
Action: Select what you’d like the DVR to do in the event of thie<br />
selected alarm input being triggered.


