N57QK_manual.pdf filesize - Maplin Electronics
N57QK_manual.pdf filesize - Maplin Electronics
N57QK_manual.pdf filesize - Maplin Electronics
Create successful ePaper yourself
Turn your PDF publications into a flip-book with our unique Google optimized e-Paper software.
Advanced Configuration<br />
32<br />
English<br />
Important Guidelines<br />
The schedule presented on-screen applies to one channel on<br />
one specific day of the week only.<br />
Use the Copy To functions to quickly assign identical schedule<br />
layouts to multiple days/channels at once.<br />
Be careful when programming your schedule. It’s one of the<br />
most important aspects of setting up your DVR, and if it’s<br />
wrong in any way, it could lead to disastrous complications<br />
later.<br />
Copy To: There are two Copy To buttons on the Schedule<br />
Menu screen.<br />
Copy To (Week/Day): This is located above the schedule itself,<br />
next to the Week drop down menu where you can select a day<br />
of the week to edit the schedule for.<br />
This button will allow you to copy your settings from one day<br />
to other days. It won’t affect any other channels.<br />
Copy To (Channel): Located at the base of the screen, with<br />
Default on one side and Apply on the other. This will allow<br />
you to copy the schedule from the channel you’re editing to<br />
another channel or channels.<br />
Note: The Action Options for Motion Detection and the<br />
External Sensors will affect the way the schedule works.<br />
By default, all channels are armed to use Motion<br />
Detection as their recording mode, but not to use<br />
external sensors (not included).<br />
Any adjustments in the Alarm -> Action menus will<br />
change the DVRs behavior, even if it is set to Motion or<br />
Sensor Recording mode (see Advanced Configuration:<br />
“Alarm: Motion Detection - Action” on page 45 and<br />
“Alarm: Sensor” on page 46).<br />
Recording: Schedule<br />
Recording Modes:<br />
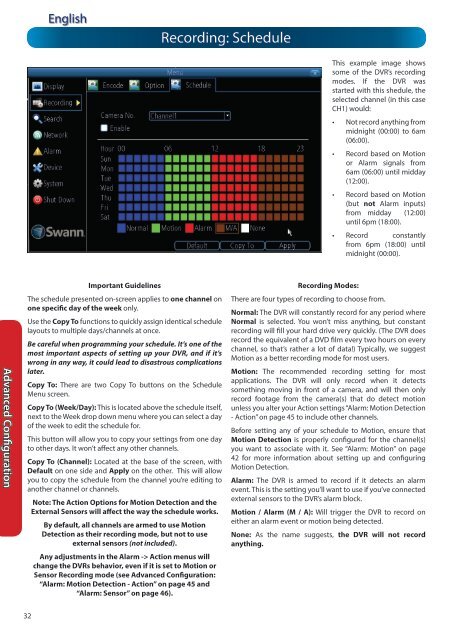
This example image shows<br />
some of the DVR’s recording<br />
modes. If the DVR was<br />
started with this shedule, the<br />
selected channel (in this case<br />
CH1) would:<br />
• Not record anything from<br />
midnight (00:00) to 6am<br />
(06:00).<br />
• Record based on Motion<br />
or Alarm signals from<br />
6am (06:00) until midday<br />
(12:00).<br />
• Record based on Motion<br />
(but not Alarm inputs)<br />
from midday (12:00)<br />
until 6pm (18:00).<br />
• Record constantly<br />
from 6pm (18:00) until<br />
midnight (00:00).<br />
There are four types of recording to choose from.<br />
Normal: The DVR will constantly record for any period where<br />
Normal is selected. You won’t miss anything, but constant<br />
recording will fill your hard drive very quickly. (The DVR does<br />
record the equivalent of a DVD film every two hours on every<br />
channel, so that’s rather a lot of data!) Typically, we suggest<br />
Motion as a better recording mode for most users.<br />
Motion: The recommended recording setting for most<br />
applications. The DVR will only record when it detects<br />
something moving in front of a camera, and will then only<br />
record footage from the camera(s) that do detect motion<br />
unless you alter your Action settings “Alarm: Motion Detection<br />
- Action” on page 45 to include other channels.<br />
Before setting any of your schedule to Motion, ensure that<br />
Motion Detection is properly configured for the channel(s)<br />
you want to associate with it. See “Alarm: Motion” on page<br />
42 for more information about setting up and configuring<br />
Motion Detection.<br />
Alarm: The DVR is armed to record if it detects an alarm<br />
event. This is the setting you’ll want to use if you’ve connected<br />
external sensors to the DVR’s alarm block.<br />
Motion / Alarm (M / A): Will trigger the DVR to record on<br />
either an alarm event or motion being detected.<br />
None: As the name suggests, the DVR will not record<br />
anything.


