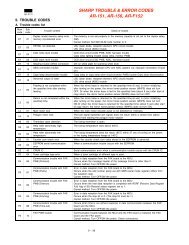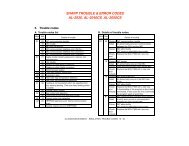
ML-4512ND Manual - OlsonBros
ML-4512ND Manual - OlsonBros
ML-4512ND Manual - OlsonBros

Create successful ePaper yourself
Turn your PDF publications into a flip-book with our unique Google optimized e-Paper software.
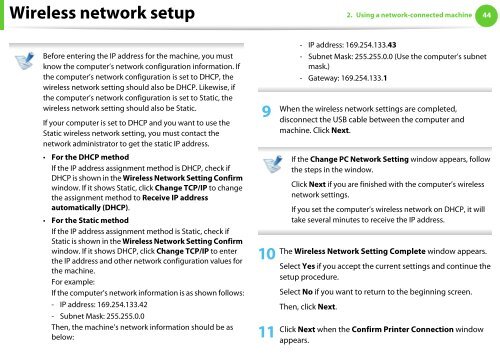
Wireless network setup 2. Using a network-connected machine 44<br />
Before entering the IP address for the machine, you must<br />
know the computer’s network configuration information. If<br />
the computer’s network configuration is set to DHCP, the<br />
wireless network setting should also be DHCP. Likewise, if<br />
the computer’s network configuration is set to Static, the<br />
wireless network setting should also be Static.<br />
If your computer is set to DHCP and you want to use the<br />
Static wireless network setting, you must contact the<br />
network administrator to get the static IP address.<br />
• For the DHCP method<br />
If the IP address assignment method is DHCP, check if<br />
DHCP is shown in the Wireless Network Setting Confirm<br />
window. If it shows Static, click Change TCP/IP to change<br />
the assignment method to Receive IP address<br />
automatically (DHCP).<br />
• For the Static method<br />
If the IP address assignment method is Static, check if<br />
Static is shown in the Wireless Network Setting Confirm<br />
window. If it shows DHCP, click Change TCP/IP to enter<br />
the IP address and other network configuration values for<br />
the machine.<br />
For example:<br />
If the computer’s network information is as shown follows:<br />
- IP address: 169.254.133.42<br />
- Subnet Mask: 255.255.0.0<br />
Then, the machine’s network information should be as<br />
below:<br />
9<br />
10<br />
11<br />
- IP address: 169.254.133.43<br />
- Subnet Mask: 255.255.0.0 (Use the computer’s subnet<br />
mask.)<br />
- Gateway: 169.254.133.1<br />
When the wireless network settings are completed,<br />
disconnect the USB cable between the computer and<br />
machine. Click Next.<br />
If the Change PC Network Setting window appears, follow<br />
the steps in the window.<br />
Click Next if you are finished with the computer’s wireless<br />
network settings.<br />
If you set the computer’s wireless network on DHCP, it will<br />
take several minutes to receive the IP address.<br />
The Wireless Network Setting Complete window appears.<br />
Select Yes if you accept the current settings and continue the<br />
setup procedure.<br />
Select No if you want to return to the beginning screen.<br />
Then, click Next.<br />
Click Next when the Confirm Printer Connection window<br />
appears.


![[10] TEST COMMAND, TROUBLE CODES - OlsonBros](https://img.yumpu.com/18824764/1/190x245/10-test-command-trouble-codes-olsonbros.jpg?quality=85)