- Page 1 and 2:
User’s Guide Basic imagine the po
- Page 3 and 4:
Contents 5. Appendix 106 Specificat
- Page 5 and 6:
Key benefits Environmentally friend
- Page 7 and 8:
Features by models Some features an
- Page 9 and 10:
About this user’s guide This user
- Page 11 and 12:
Safety information Caution Do not r
- Page 13 and 14: Safety information Do not place the
- Page 15 and 16: Safety information When toner gets
- Page 17 and 18: Machine overview 10 14 13 12 11 1
- Page 19 and 20: Control panel overview 12 This co
- Page 21 and 22: Turning on the machine 1 2 Connect
- Page 23 and 24: Reinstalling the driver If the prin
- Page 25 and 26: Menu overview The control panel pro
- Page 27 and 28: Menu overview Network Items Options
- Page 29 and 30: Menu overview Items Options Setup (
- Page 31 and 32: Printing a demo page Print a demo p
- Page 33 and 34: Media and tray This chapter provide
- Page 35 and 36: Media and tray 6 Squeeze the paper
- Page 37 and 38: Media and tray 2 3 Adjust the multi
- Page 39 and 40: Media and tray To print an envelope
- Page 41 and 42: Media and tray - Curl: Must lie fla
- Page 43 and 44: Media and tray ML-5015 Series/ ML-5
- Page 45 and 46: Basic printing 13 Canceling a pri
- Page 47 and 48: Basic printing Using a favorite set
- Page 49 and 50: Basic printing Eco options • Pri
- Page 51 and 52: Using USB memory device 18 Printi
- Page 53 and 54: 3. Maintenance This chapter provide
- Page 55 and 56: Available supplies When supplies re
- Page 57 and 58: Available accessories Accessory Fun
- Page 59 and 60: Redistributing toner When the toner
- Page 61 and 62: Replacing the toner cartridge Click
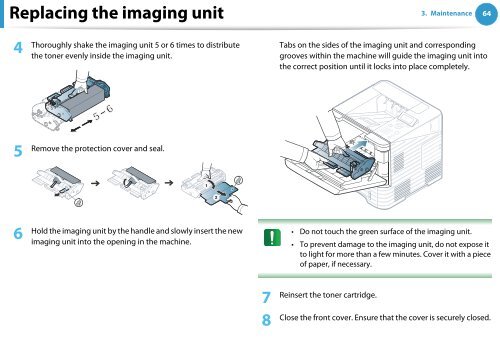
- Page 63: Replacing the imaging unit Click th
- Page 67 and 68: Replacing the stapler cartridge The
- Page 69 and 70: Setting the toner low alert If the
- Page 71 and 72: Cleaning the machine 3. Maintenance
- Page 73 and 74: 4. Troubleshooting This chapter giv
- Page 75 and 76: Clearing paper jams 1 To avoid te
- Page 77 and 78: Clearing paper jams 3 In the mult
- Page 79 and 80: Clearing paper jams 4. Troubleshoot
- Page 81 and 82: Clearing paper jams 5 In the exit
- Page 83 and 84: Clearing paper jams 4. Troubleshoot
- Page 85 and 86: Clearing paper jams 7 In the opti
- Page 87 and 88: Clearing paper jams Paper jam at th
- Page 89 and 90: Clearing paper jams Paper jam insid
- Page 91 and 92: Understanding the status LED The co
- Page 93 and 94: Understanding display messages Mess
- Page 95 and 96: Understanding display messages Tone
- Page 97 and 98: Understanding display messages •
- Page 99 and 100: Understanding display messages •
- Page 101 and 102: Understanding display messages Tray
- Page 103 and 104: Understanding display messages Erro
- Page 105 and 106: 5. Appendix This chapter provides p
- Page 107 and 108: Specifications Power consumption It
- Page 109 and 110: Specifications Envelope Type Size D
- Page 111 and 112: Specifications 3 Type Size Dimensio
- Page 113 and 114: Specifications Linux Operating syst
- Page 115 and 116:
Specifications Network operating sy
- Page 117 and 118:
Regulatory information 7 8 Ozone sa
- Page 119 and 120:
Regulatory information 13 Radio fre
- Page 121 and 122:
Regulatory information If you cut o
- Page 123 and 124:
Regulatory information 20 China onl
- Page 125 and 126:
Index
- Page 127 and 128:
User’s Guide Advanced imagine the
- Page 129 and 130:
Contents 6. Troubleshooting 110 Pap
- Page 131 and 132:
Installation for Macintosh 1 2 3 4
- Page 133 and 134:
Reinstallation for Macintosh If the
- Page 135 and 136:
Installation for Linux 3 4 5 1 2 3
- Page 137 and 138:
2. Using a network-connected machin
- Page 139 and 140:
Wired network setup You must set up
- Page 141 and 142:
Wired network setup 2. Using a netw
- Page 143 and 144:
Installing driver over the network
- Page 145 and 146:
Installing driver over the network
- Page 147 and 148:
Installing driver over the network
- Page 149 and 150:
Installing driver over the network
- Page 151 and 152:
Installing driver over the network
- Page 153 and 154:
Installing driver over the network
- Page 155 and 156:
IPv6configuration 10 1 2 3 4 5 IP
- Page 157 and 158:
IPv6configuration 13 4 5 6 1 2 3
- Page 159 and 160:
Wireless network setup 2. Using a n
- Page 161 and 162:
Wireless network setup 2. Using a n
- Page 163 and 164:
Wireless network setup 2. Using a n
- Page 165 and 166:
Wireless network setup 2. Using a n
- Page 167 and 168:
Wireless network setup 2. Using a n
- Page 169 and 170:
Wireless network setup 2. Using a n
- Page 171 and 172:
Wireless network setup 2. Using a n
- Page 173 and 174:
Wireless network setup 2. Using a n
- Page 175 and 176:
Wireless network setup 2. Using a n
- Page 177 and 178:
Wireless network setup 2. Using a n
- Page 179 and 180:
Wireless network setup 2. Using a n
- Page 181 and 182:
Wireless network setup 2. Using a n
- Page 183 and 184:
Wireless network setup 2. Using a n
- Page 185 and 186:
Information Item Description Menu M
- Page 187 and 188:
Paper Item Description Copies Selec
- Page 189 and 190:
System setup Item Description Date
- Page 191 and 192:
System setup Export Setting Toner S
- Page 193 and 194:
Network Option Description TCP/IP (
- Page 195 and 196:
Eco Item Description Eco-On You can
- Page 197 and 198:
4. Special features This chapter ex
- Page 199 and 200:
Changing the font setting Your mach
- Page 201 and 202:
Setting your machine as a default m
- Page 203 and 204:
Using advanced print features 2 Und
- Page 205 and 206:
Using advanced print features Doubl
- Page 207 and 208:
Using advanced print features Overl
- Page 209 and 210:
Using advanced print features Print
- Page 211 and 212:
Using Direct Printing Utility (Wind
- Page 213 and 214:
Macintosh printing 8 Some features
- Page 215 and 216:
Linux printing 13 Some features may
- Page 217 and 218:
Linux printing 4 • Jobs: Shows th
- Page 219 and 220:
Unix printing • Orientation: Sele
- Page 221 and 222:
Storing the toner cartridge (or ima
- Page 223 and 224:
Tips for moving & storing your mach
- Page 225 and 226:
Useful management tools SyncThru We
- Page 227 and 228:
Useful management tools 6 1 2 3 4 5
- Page 229 and 230:
Useful management tools Alert Sett
- Page 231 and 232:
Useful management tools Smart Panel
- Page 233 and 234:
Useful management tools Printers t
- Page 235 and 236:
6. Troubleshooting This chapter giv
- Page 237 and 238:
Power and cable connecting problems
- Page 239 and 240:
Printing problems Condition Possibl
- Page 241 and 242:
Printing problems Condition Possibl
- Page 243 and 244:
Printing quality problems Toner spe
- Page 245 and 246:
Printing quality problems Vertical
- Page 247 and 248:
Printing quality problems Wrinkles
- Page 249 and 250:
Printing quality problems Curl If t
- Page 251 and 252:
Operating system problems 2 Common
- Page 253 and 254:
Operating system problems 4 Refer t
- Page 255 and 256:
Contact SAMSUNG worldwide Country/R
- Page 257 and 258:
Contact SAMSUNG worldwide Country/R
- Page 259 and 260:
Glossary BOOTP Bootstrap Protocol.
- Page 261 and 262:
Glossary Duty Cycle Duty cycle is t
- Page 263 and 264:
Glossary IP address An Internet Pro
- Page 265 and 266:
Glossary MH Modified Huffman (MH) i
- Page 267 and 268:
Glossary PPM Pages Per Minute (PPM)
- Page 269 and 270:
Glossary Toner Cartridge A kind of
- Page 271 and 272:
Index C Changing 73 D direct printi


![[10] TEST COMMAND, TROUBLE CODES - OlsonBros](https://img.yumpu.com/18824764/1/190x245/10-test-command-trouble-codes-olsonbros.jpg?quality=85)