
Create successful ePaper yourself
Turn your PDF publications into a flip-book with our unique Google optimized e-Paper software.
Playing back a Main Story directly<br />
This function skips warnings, precautions, etc., initially displayed<br />
when you play back a DVD, and goes straight to the main Story.<br />
Setting item: MAIN STORY<br />
Setting content: OFF (Initial setting) / ON<br />
If you want to play back the main Story directly, set to ON.<br />
• The function may not be available depending on the disc.<br />
Selecting the Button on the Image Screen automatically<br />
You can automatically select the buttons displayed on the top menu/<br />
menu image screen by setting time (seconds) without setting<br />
<strong>manual</strong>ly.<br />
Setting item: AUTO DVD MENU<br />
Setting content: OFF (Initial setting) / SET TIME (1~15 sec)<br />
SET TIME: Set your desired duration (1 to 15 seconds) using<br />
the numeric keypad. After the set time has<br />
passed, the buttons are automatically selected.<br />
(For example, if 8 seconds is set, press 8, and<br />
then press ENT.)<br />
SYSTEM SETUP<br />
• When settings are changed, old settings are overwritten. Make a<br />
note of the current settings before making changes. The settings are<br />
not cleared even when the vehicle’s battery is disconnected.<br />
Switching the Background Colour<br />
You can select the background colours from 2 types preset or colour 4<br />
types.<br />
Setting item: BACK PICTURE<br />
Setting contents: TYPE-1 (Initial setting) / TYPE-2 / COLOR *<br />
∗ COLOR → BLACK / GRAY / BLUE / GREEN<br />
Setting the TV Screen<br />
Use the procedure described below to set the output screen according<br />
to the type of TV monitor being used.<br />
Setting items: TV SCREEN → ASPECT<br />
Setting contents: 16:9 (WIDE) (Initial setting) / 4:3 (LETTER<br />
BOX) / 4:3 (PAN SCAN)<br />
• For some discs, the picture may not be set to the selected screen<br />
size. (For details, refer to the explanation on the disc’s jacket.)<br />
• Pressing RETURN will return to the previous screen.<br />
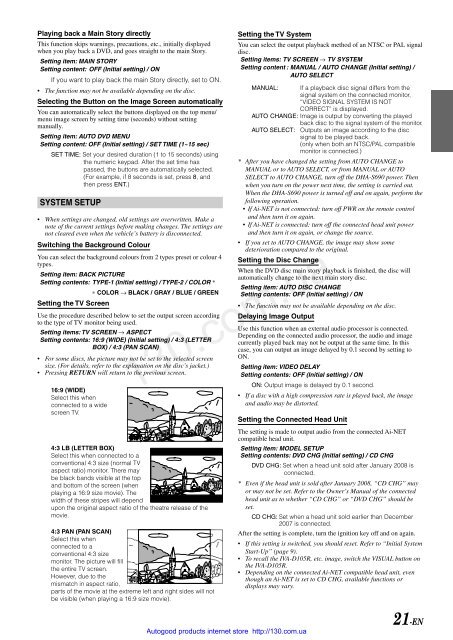
16:9 (WIDE)<br />
Select this when<br />
connected to a wide<br />
screen TV.<br />
4:3 LB (LETTER BOX)<br />
Select this when connected to a<br />
conventional 4:3 size (normal TV<br />
aspect ratio) monitor. There may<br />
be black bands visible at the top<br />
and bottom of the screen (when<br />
playing a 16:9 size movie). The<br />
width of these stripes will depend<br />
upon the original aspect ratio of the theatre release of the<br />
movie.<br />
4:3 PAN (PAN SCAN)<br />
Select this when<br />
connected to a<br />
conventional 4:3 size<br />
monitor. The picture will fill<br />
the entire TV screen.<br />
However, due to the<br />
mismatch in aspect ratio,<br />
parts of the movie at the extreme left and right sides will not<br />
be visible (when playing a 16:9 size movie).<br />
Setting the TV System<br />
You can select the output playback method of an NTSC or PAL signal<br />
disc.<br />
Setting items: TV SCREEN → TV SYSTEM<br />
Setting content : MANUAL / AUTO CHANGE (Initial setting) /<br />
AUTO SELECT<br />
MANUAL: If a playback disc signal differs from the<br />
signal system on the connected monitor,<br />
“VIDEO SIGNAL SYSTEM IS NOT<br />
CORRECT” is displayed.<br />
AUTO CHANGE: Image is output by converting the played<br />
back disc to the signal system of the monitor.<br />
AUTO SELECT: Outputs an image according to the disc<br />
signal to be played back.<br />
(only when both an NTSC/PAL compatible<br />
monitor is connected.)<br />
* After you have changed the setting from AUTO CHANGE to<br />
MANUAL or to AUTO SELECT, or from MANUAL or AUTO<br />
SELECT to AUTO CHANGE, turn off the DHA-S690 power. Then<br />
when you turn on the power next time, the setting is carried out.<br />
When the DHA-S690 power is turned off and on again, perform the<br />
following operation.<br />
• If Ai-NET is not connected: turn off PWR on the remote control<br />
and then turn it on again.<br />
• If Ai-NET is connected: turn off the connected head unit power<br />
and then turn it on again, or change the source.<br />
• If you set to AUTO CHANGE, the image may show some<br />
deterioration compared to the original.<br />
Setting the Disc Change<br />
When the DVD disc main story playback is finished, the disc will<br />
automatically change to the next main story disc.<br />
Setting item: AUTO DISC CHANGE<br />
Setting contents: OFF (Initial setting) / ON<br />
• The function may not be available depending on the disc.<br />
Delaying Image Output<br />
Use this function when an external audio processor is connected.<br />
Depending on the connected audio processor, the audio and image<br />
currently played back may not be output at the same time. In this<br />
case, you can output an image delayed by 0.1 second by setting to<br />
ON.<br />
Setting item: VIDEO DELAY<br />
Setting contents: OFF (Initial setting) / ON<br />
ON: Output image is delayed by 0.1 second.<br />
• If a disc with a high compression rate is played back, the image<br />
and audio may be distorted.<br />
130.com.ua<br />
Setting the Connected Head Unit<br />
Autogood products internet store http://130.com.ua<br />
The setting is made to output audio from the connected Ai-NET<br />
compatible head unit.<br />
Setting item: MODEL SETUP<br />
Setting contents: DVD CHG (Initial setting) / CD CHG<br />
DVD CHG: Set when a head unit sold after January 2008 is<br />
connected.<br />
* Even if the head unit is sold after January 2008, “CD CHG” may<br />
or may not be set. Refer to the Owner’s Manual of the connected<br />
head unit as to whether “CD CHG” or “DVD CHG” should be<br />
set.<br />
CD CHG: Set when a head unit sold earlier than December<br />
2007 is connected.<br />
After the setting is complete, turn the ignition key off and on again.<br />
• If this setting is switched, you should reset. Refer to “Initial System<br />
Start-Up” (page 9).<br />
• To recall the IVA-D105R, etc. image, switch the VISUAL button on<br />
the IVA-D105R.<br />
• Depending on the connected Ai-NET compatible head unit, even<br />
though an Ai-NET is set to CD CHG, available functions or<br />
displays may vary.<br />
21-EN