Create successful ePaper yourself
Turn your PDF publications into a flip-book with our unique Google optimized e-Paper software.
Preparation<br />
1<br />
2<br />
3<br />
2<br />
3<br />
4<br />
5<br />
Park the vehicle in a flat, safe place. Apply the<br />
parking brake, then remove the ignition key.<br />
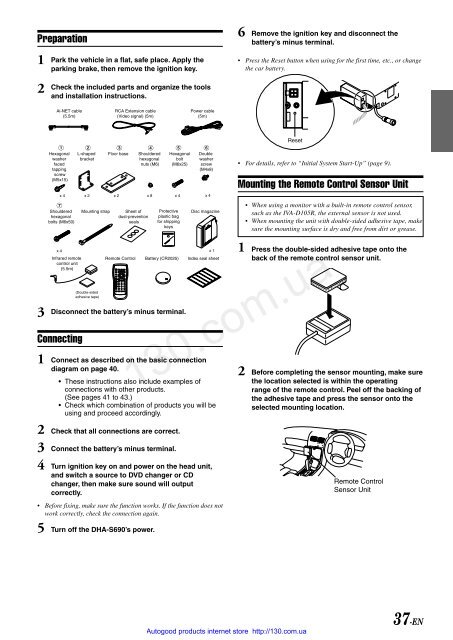
Check the included parts and organize the tools<br />
and installation instructions.<br />
Ai-NET cable<br />
(5.5m)<br />
Hexagonal<br />
washer<br />
faced<br />
tapping<br />
screw<br />
(M5x15)<br />
2<br />
L-shaped<br />
bracket<br />
RCA Extension cable<br />
(Video signal) (5m)<br />
Floor base Shouldered<br />
hexagonal<br />
nuts (M6)<br />
Hexagonal<br />
bolt<br />
(M6x25)<br />
7<br />
Shouldered Mounting strap Sheet of Protective Disc magazine<br />
hexagonal<br />
dust-prevention plastic bag<br />
bolts (M6x50)<br />
seals for shipping<br />
keys<br />
x 4 x 1<br />
Infrared remote<br />
control unit<br />
(5.5m)<br />
Remote Control Battery (CR2025) Index seal sheet<br />
(Double-sided<br />
adhesive tape)<br />
Disconnect the battery’s minus terminal.<br />
Power cable<br />
(5m)<br />
1 3 4 5 6<br />
Double<br />
washer<br />
screw<br />
(M4x8)<br />
x 4 x 2 x 2 x 8 x 4 x 4<br />
Connecting<br />
1<br />
Connect as described on the basic connection<br />
diagram on page 40.<br />
• These instructions also include examples of<br />
connections with other products.<br />
(See pages 41 to 43.)<br />
• Check which combination of products you will be<br />
using and proceed accordingly.<br />
Check that all connections are correct.<br />
Connect the battery’s minus terminal.<br />
Turn ignition key on and power on the head unit,<br />
and switch a source to DVD changer or CD<br />
changer, then make sure sound will output<br />
correctly.<br />
• Before fixing, make sure the function works. If the function does not<br />
work correctly, check the connection again.<br />
Turn off the DHA-S690’s power.<br />
6<br />
1<br />
2<br />
Remove the ignition key and disconnect the<br />
battery’s minus terminal.<br />
• Press the Reset button when using for the first time, etc., or change<br />
the car battery.<br />
Reset<br />
• For details, refer to “Initial System Start-Up” (page 9).<br />
Mounting the Remote Control Sensor Unit<br />
• When using a monitor with a built-in remote control sensor,<br />
such as the IVA-D105R, the external sensor is not used.<br />
• When mounting the unit with double-sided adhesive tape, make<br />
sure the mounting surface is dry and <strong>free</strong> from dirt or grease.<br />
Press the double-sided adhesive tape onto the<br />
back of the remote control sensor unit.<br />
130.com.ua<br />
Autogood products internet store http://130.com.ua<br />
Before completing the sensor mounting, make sure<br />
the location selected is within the operating<br />
range of the remote control. Peel off the backing of<br />
the adhesive tape and press the sensor onto the<br />
selected mounting location.<br />
Remote Control<br />
Sensor Unit<br />
37-EN


