
Create successful ePaper yourself
Turn your PDF publications into a flip-book with our unique Google optimized e-Paper software.
User Guide<br />
English<br />
<strong>HS</strong> <strong>280</strong> / <strong>HS</strong> <strong>210</strong><br />
2 x 65W 2.1-channel integrated<br />
Home-Theater System<br />
Designed to Entertain.
<strong>HS</strong> <strong>280</strong>/<strong>HS</strong> <strong>210</strong> Integrated Home-Theater System Owner's Manual<br />
Table of Contents<br />
Important Safety Instructions<br />
Verify Line Voltage Before Using<br />
Unpacking<br />
Installation Location<br />
Cleaning<br />
Moving the Unit<br />
Introduction<br />
Thank You for Choosing the <strong>Harman</strong> <strong>Kardon</strong>® <strong>HS</strong> <strong>280</strong>/<strong>HS</strong> <strong>210</strong>!<br />
<strong>HS</strong> <strong>280</strong>/<strong>HS</strong> <strong>210</strong> Two-Channel DVD Receiver<br />
SAT TS60/SAT TS11 Satellite Speakers<br />
HKTS200SUB Subwoofer<br />
Supplied Accessories (for <strong>HS</strong> <strong>280</strong>)<br />
Supplied Accessories (for <strong>HS</strong> <strong>210</strong>)<br />
Receiver Front-Panel Controls<br />
Receiver Information Display<br />
Receiver Rear-Panel Connections<br />
Subwoofer Controls and Connections<br />
Remote Control Functions<br />
Placing the Speakers<br />
Placing the Left and Right Satellite Speakers<br />
Placing the Subwoofer<br />
Satellite Speaker Mounting Options<br />
Shelf Placement<br />
Wall-Mounting the <strong>HS</strong> <strong>280</strong> Satellite Speakers<br />
Wall-Mounting the <strong>HS</strong> <strong>210</strong> Satellite Speakers<br />
Connections<br />
Connecting the Satellite Speakers<br />
Connecting the Subwoofer<br />
Connecting the FM Antenna<br />
Connecting a TV or Video Display<br />
Connecting the SCART Cable<br />
Connecting Audio Sources<br />
Connecting an Audio Recorder<br />
Connecting to a Local Area Network (LAN)<br />
Connecting the AC Power<br />
Preparing the Remote Control<br />
Installing the Batteries<br />
Using the Remote Control<br />
Programming the Remote Control<br />
Teaching Codes to the Remote Control<br />
Using the Remote Control After it is Programmed<br />
Setting Up the Receiver<br />
Using the On-Screen Menu System<br />
Settings Menu<br />
Video Settings<br />
Audio Settings<br />
Network Setings<br />
Preferences<br />
Activity Menu<br />
Bookmarks<br />
Using the DVD Player<br />
Using the FM Tuner<br />
Listening to Audio Sources<br />
Playing Files from USB Devices<br />
Playing Files from Networked Devices<br />
Troubleshooting<br />
DVD Language Code List<br />
Specifications<br />
3<br />
3<br />
3<br />
3<br />
3<br />
3<br />
4<br />
4<br />
4<br />
4<br />
4<br />
5<br />
5<br />
6<br />
7<br />
8<br />
9<br />
10<br />
12<br />
12<br />
12<br />
12<br />
12<br />
12<br />
13<br />
14<br />
14<br />
15<br />
16<br />
16<br />
16<br />
16<br />
17<br />
17<br />
17<br />
17<br />
17<br />
17<br />
17<br />
18<br />
18<br />
18<br />
18<br />
19<br />
19<br />
19<br />
20<br />
20<br />
21<br />
21<br />
21<br />
23<br />
24<br />
24<br />
25<br />
27<br />
28<br />
31<br />
2
Important Safety Instructions<br />
1 Read these instructions<br />
2 Keep these instructions<br />
3 Heed all warnings<br />
4 Follow all instructions<br />
5 Do not use this apparatus near water<br />
6 Clean only with a dry cloth<br />
7 Do not block any ventilation openings Install in accordance with the manufacturer’s instructions<br />
8 Do not install near any heat sources such as radiators, heat registers, stoves or other apparatus<br />
(including amplifiers) that produce heat<br />
9 Do not defeat the safety purpose of the polarized or grounding-type plug A polarized plug has two<br />
blades with one wider than the other A grounding-type plug has two blades and a third grounding<br />
prong The wide blade or the third prong is provided for your safety If the provided plug does not fit<br />
into your outlet, consult an electrician for replacement of the obsolete outlet<br />
10 Protect the power cord from being walked on or pinched, particularly at plugs, convenience<br />
receptacles and the point where they exit from the apparatus<br />
11 Only use attachments/accessories specified by the manufacturer<br />
12 Use only with the cart, stand, tripod, bracket or table specified by the manufacturer<br />
or sold with the apparatus When a cart is used, use caution when moving the cart/<br />
apparatus combination to avoid injury from tip-over<br />
13 Unplug this apparatus during lightning storms or when unused for long periods of time<br />
Verify Line Voltage Before Using<br />
Your <strong>HS</strong> <strong>280</strong>/<strong>HS</strong> <strong>210</strong> receiver has been designed for use with 100 – 240 volt ~<br />
50/60Hz AC power Your HKTS200SUB subwoofer has been designed for use with<br />
220 – 240 volt ~50/60Hz AC current Connection to a line voltage other than that<br />
for which the unit is intended can create a safety and fire hazard, and may damage<br />
the unit If you have any questions about the voltage requirements for your specific<br />
model, or about the line voltage in your area, contact your selling dealer before<br />
plugging the unit into a wall outlet<br />
Unpacking<br />
The carton and shipping materials used to protect your new receiver during shipment<br />
were specially designed to cushion it from shock and vibration We suggest that you<br />
save the carton and packing materials for use in shipping if you move or if the unit<br />
ever needs repair<br />
To minimize the size of the carton in storage, you may wish to flatten it You can do<br />
it by carefully slitting the tape seams on the carton’s bottom and collapsing it You<br />
can store cardboard inserts in the same manner Packing materials that cannot be<br />
collapsed should be saved along with the carton in a plastic bag<br />
If you do not wish to save the packaging materials, please note that the carton and<br />
other sections of the shipping-protection materials are recyclable Please respect the<br />
environment and discard those materials at a local recycling center<br />
Remove the protective plastic film from the front-panel lens Leaving the film in place<br />
will affect the performance of your remote control<br />
Installation Location<br />
• To ensure proper operation and to avoid the potential for safety hazards, place the<br />
unit on a firm and level surface When placing the unit on a shelf, be certain that<br />
the shelf and any mounting hardware can support the weight of the product<br />
• Provide proper space both above and below the unit for ventilation If this product<br />
will be installed in a cabinet or other enclosed area, make certain that there is<br />
sufficient air movement within the cabinet Under some circumstances, a fan may<br />
be required<br />
3<br />
14 Refer all servicing to qualified service personnel Servicing is required when the apparatus has<br />
been damaged in any way, such as power supply cord or plug is damaged, liquid has been spilled<br />
or objects have fallen into the apparatus, the apparatus has been exposed to rain or moisture, does<br />
not operate normally, or has been dropped<br />
15 Do not expose this apparatus to dripping or splashing and ensure that no objects filled with liquids,<br />
such as vases, are placed on the apparatus<br />
16 To completely disconnect this apparatus from the AC Mains, disconnect the power supply cord plug<br />
from the AC receptacle<br />
17 The mains plug of the power supply cord shall remain readily operable<br />
18 Do not expose batteries to excessive heat such as sunshine, fire or the like<br />
THE LIGHTNING FLASH WITH AN ARROWHEAD SYMBOL,<br />
WITHIN AN EQUILATERAL TRIANGLE, IS INTENDED TO ALERT<br />
THE USER TO THE PRESENCE OF UNINSULATED “DANGEROUS<br />
VOLTAGE” WITHIN THE PRODUCT’S ENCLOSURE THAT MAYBE<br />
OF SUFFICIENT MAGNITUDE TO CONSTITUTEA RISK OF ELECTRIC<br />
SHOCK TO PERSONS.<br />
CAUTION<br />
RISK OF ELECTRIC SHOCK<br />
DO NOT OPEN<br />
WARNING: TO REDUCE THE RISK OF<br />
FIRE OR ELECTRIC SHOCK, DO NOT<br />
EXPOSE THIS APPARATUS TO RAIN<br />
OR MOISTURE.<br />
SEE MARKING ON BACK OF PRODUCT.<br />
THE EXCLAMATION POINT WITHIN AN EQUILA-TERAL<br />
TRIANGLE IS INTENDED TO ALERT THE USERTO THE PRESENCE<br />
OF IMPORTANT OPERATING AND MAINTENANCE (SERVICING)<br />
INSTRUCTIONS IN THE LITERATURE ACCOMPANYING THE<br />
PRODUCT.<br />
This product incorporates copyright protection technology that is protected by U S patents and other intellectual property rights Use of this copyright protection technology<br />
must be authorized by Macrovision, and is intended for home and other limited viewing uses only unless otherwise authorized by Macrovision Reverse engineering or<br />
disassembly is prohibited<br />
• Do not place the unit directly on a carpeted surface<br />
• Avoid installation in extremely hot or cold locations, or in an area that is exposed<br />
to direct sunlight or heating equipment<br />
• Avoid moist or humid locations<br />
• Do not obstruct the ventilation slots on the top and sides of the unit or place<br />
objects directly over or next to them<br />
• Due to the weight of the <strong>HS</strong> <strong>280</strong>/<strong>HS</strong> <strong>210</strong> receiver and the heat that its amplifier<br />
generates, there is the remote possibility that the rubber padding on the bottom<br />
of the unit’s feet may leave marks on certain wood or wood veneer materials<br />
Use caution when placing the unit on soft woods or other materials that heat or<br />
heavy objects may damage Some surface finishes may be particularly sensitive<br />
to absorbing such marks, due to a variety of factors beyond <strong>Harman</strong> <strong>Kardon</strong>'s<br />
control, including the nature of the finish, cleaning materials used, normal heat<br />
and vibration caused by the use of the product, or other factors Exercise caution<br />
in choosing an installation location for the component and in performing normal<br />
maintenance practices, as your warranty will not cover this type of damage to<br />
furniture<br />
Cleaning<br />
When the unit gets dirty, wipe it with a clean, soft, dry cloth If necessary, and only<br />
after unplugging the AC power cord, wipe it with a soft cloth dampened with mild<br />
soapy water, then a fresh cloth with clean water Wipe it dry immediately with a dry<br />
cloth NEVER use benzene, aerosol cleaners, thinner, alcohol or any other volatile<br />
cleaning agent Do not use abrasive cleaners, as they may damage the finish of metal<br />
parts Avoid spraying insecticide near the unit<br />
Moving the Unit<br />
Before moving the unit, disconnect any interconnection cords with other components,<br />
and disconnect the unit from the AC outlet<br />
ENGLISH
Introduction<br />
Please register your product on our Web site at<br />
www harmankardon com<br />
Note: You’ll need the product’s serial number At the same time, you can choose<br />
to be notified about our new products and/or special promotions<br />
www.harmankardon.com<br />
Thank you for choosing the <strong>Harman</strong> <strong>Kardon</strong>® <strong>HS</strong> <strong>280</strong>/<br />
<strong>HS</strong> <strong>210</strong>!<br />
In the years since <strong>Harman</strong> <strong>Kardon</strong> invented the high-fidelity receiver, we have taken<br />
to heart this philosophy: Bring the joy of home entertainment to as many people as<br />
possible, adding performance and ease-of-use features that enhance the experience<br />
With the introduction of the <strong>HS</strong> series of home-entertainment systems, <strong>Harman</strong><br />
<strong>Kardon</strong> offers a complete home-entertainment solution with a wealth of listening<br />
and viewing options in one sleek component Each <strong>HS</strong> series system also includes a<br />
5 1-channel or 2 1-channel loudspeaker system, a system remote control and all the<br />
cables and accessories you need to enjoy movies and music in your own home, when<br />
you use them with your television or video display<br />
1<br />
To get the maximum enjoyment from your new <strong>HS</strong> system, we urge you to read this<br />
manual thoroughly and refer back to it as you become more familiar with your new<br />
system’s features and their operation<br />
If you have any questions about this product, its installation or its operation, please<br />
contact your retailer or custom installer, or visit our Web site at www harmankardon<br />
com<br />
NOTE: The built-in DVD player is designed and manufactured for<br />
compatibility with Region Management Information that is<br />
2 encoded on most DVDs This player is designed only for playback<br />
of discs with Region Code 2 information or discs that do not<br />
contain Region Code information If there is any other Region Code on a disc, it<br />
will not play in the <strong>HS</strong> <strong>280</strong>/<strong>HS</strong> <strong>210</strong><br />
<strong>HS</strong> <strong>280</strong>/<strong>HS</strong> <strong>210</strong> Two-Channel DVD Receiver<br />
Audio Section<br />
•<br />
65 watts x 2 continuous power at 6 ohms (both channels driven), 20Hz – 20kHz,<br />
Supplied Accessories (for <strong>HS</strong> <strong>280</strong>)<br />
The following accessory items are supplied with the <strong>HS</strong> <strong>280</strong> system If any of these<br />
items are missing, please contact <strong>Harman</strong> <strong>Kardon</strong> Customer Service via<br />
www harmankardon com<br />
• System remote control<br />
• HDMI cable<br />
•<br />
Power cable<br />
• SCART cable<br />
• FM wire antenna<br />
• Two speaker wall-mount brackets • Two five-meter (16 4-foot) speaker<br />
cables<br />
• One combination LFE (lowfrequency<br />
effects) and trigger cable<br />
for connection to the subwoofer<br />
•<br />
Two TS-60 satellite speakers<br />
5<br />
Supplied Accessories (for <strong>HS</strong> <strong>210</strong>)<br />
The following accessory items are supplied with the <strong>HS</strong> <strong>210</strong> system If any of these<br />
items are missing, please contact <strong>Harman</strong> <strong>Kardon</strong> Customer Service via<br />
www harmankardon com<br />
• System remote control<br />
• HDMI cable<br />
•<br />
Power cable<br />
• SCART cable<br />
• FM wire antenna<br />
• Two TS-11 satellite speakers • Two wall-mount brackets<br />
• One combination LFE (lowfrequency<br />
effects) and trigger cable<br />
for connection to the subwoofer<br />
• Two five-meter (16 4-foot) speaker<br />
cables<br />
ENGLISH
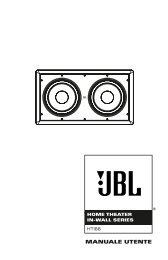
Receiver Front-Panel Controls<br />
Disc Slot Information<br />
Display<br />
TOP<br />
FRONT<br />
Disc Slot: Insert a compatible disc into the slot The <strong>HS</strong> <strong>280</strong>/<strong>HS</strong> <strong>210</strong>’s disc player will<br />
accept five-inch (12cm) and three-inch (8cm) discs<br />
Information Display: Various messages appear on this display in response to<br />
commands In addition, a variety of indicators will light at various times to show the<br />
current source, settings or other aspects of the <strong>HS</strong> <strong>280</strong>/<strong>HS</strong> <strong>210</strong>’s status as described<br />
throughout this manual See Receiver Information Display, on page 7, for details<br />
Volume Control: Rotate the disc clockwise to raise the volume; rotate<br />
counterclockwise to lower the volume The volume level will appear on the<br />
Information Display and on the on-screen menu (if the menu is enabled, see<br />
Preferences – Volume Bar, on page 20)<br />
Eject Button (on top of unit): Press this button to eject a disc from the <strong>HS</strong> <strong>280</strong>/<br />
<strong>HS</strong> <strong>210</strong>’s built-in DVD player Before pressing this button, make sure that no objects<br />
are blocking the disc slot NOTE: If you do not remove the ejected disc within 20<br />
seconds, it will automatically re-load back into the DVD player for protection<br />
Standby Button (on top of unit): This button turns the <strong>HS</strong> <strong>280</strong>/<strong>HS</strong> <strong>210</strong> on for<br />
playback or leaves it in the Standby mode for quick turn-on using this button or the<br />
remote control<br />
Power Indicator: This LED (light-emitting diode) surrounds the Standby switch<br />
When the <strong>HS</strong> <strong>280</strong>/<strong>HS</strong> <strong>210</strong> is plugged into AC power, the LED turns red to indicate that<br />
the <strong>HS</strong> <strong>280</strong>/<strong>HS</strong> <strong>210</strong> is in Standby mode (ready to be turned on) When you turn the<br />
<strong>HS</strong> <strong>280</strong>/<strong>HS</strong> <strong>210</strong> on (by the Standby switch or the remote control), the LED turns white<br />
Phones (headphones) Jack (on side of unit): Insert the 3 5mm stereo miniconnector<br />
from a set of headphones into this jack NOTE: When a plug is inserted into<br />
the Phones jack, the <strong>HS</strong> <strong>280</strong>/<strong>HS</strong> <strong>210</strong>’s speaker outputs automatically mute; the HDMI<br />
audio output, coaxial output and line output remain active<br />
USB 2.0 Port (on side of unit):<br />
Gently insert a flash drive, card reader, digital camera or other USB device, or a USB<br />
Standard-A cable connected to a USB device, to this port<br />
6<br />
Eject<br />
Button<br />
Standby<br />
Button<br />
Power<br />
Indicator<br />
Volume Control Headphone<br />
Jack<br />
SIDE<br />
USB<br />
Port<br />
IMPORTANT: DO NOT connect a PC or other USB host/controller to this port, or you<br />
may damage both the <strong>HS</strong> <strong>280</strong>/<strong>HS</strong> <strong>210</strong> and your other device<br />
Orient the other device’s plug so it fits all the way into the <strong>HS</strong> <strong>280</strong>/<strong>HS</strong> <strong>210</strong>’s USB<br />
connector You may insert or remove the device at any time — there is no installation<br />
or ejection procedure<br />
The <strong>HS</strong> <strong>280</strong>/<strong>HS</strong> <strong>210</strong> can play MP3 and Windows Media® Audio WMA audio files that<br />
are stored on the device The <strong>HS</strong> <strong>280</strong>/<strong>HS</strong> <strong>210</strong> can also display JPEG-format still-image<br />
files
Receiver Information Display<br />
Source<br />
Indicators<br />
Source<br />
Indicators<br />
Disc Type<br />
Indicators<br />
Disc Type<br />
Indicators<br />
VCD Playback<br />
Playback Control<br />
Mode<br />
Playback Indicator Control Mode Indicators<br />
Indicator Indicators<br />
Random Play<br />
Indicator<br />
Random Play<br />
Indicator<br />
Title<br />
Indicators<br />
Indicators<br />
Source Indicators: Indicate which source is currently playing<br />
Disc Type Indicators: Indicate the type of disc that is currently playing<br />
Dolby Digital<br />
Dolby Digital Indicator<br />
Indicator<br />
Chapter/Track Number<br />
Chapter/Track Indicators Number<br />
Indicators<br />
Random Play Indicator: Indicates that the disc player is in the Random Play mode<br />
Dolby Digital Indicator: Indicates that the soundtrack of the currently-playing disc<br />
is Dolby Digital-encoded<br />
Progressive Scan Indicator: Indicates that the disc player is outputting a<br />
progressive-scan video signal<br />
Repeat Play Indicators: Indicate that the disc player is in one of the Repeat Play<br />
modes: Rep = repeat all; Rep 1 = repeat track; A–B = A/B repeat<br />
Video Output Indicators: Indicate which type of video output is currently active<br />
Angle Indicator: Indicates when alternative viewing angles are available on the<br />
currently-playing DVD<br />
Video Format Indicators: Indicate which video format is currently playing<br />
VCD Playback Control Indicator: Indicates that the playback-control function is<br />
turned on when the <strong>HS</strong> <strong>280</strong>/<strong>HS</strong> <strong>210</strong> is playing a VCD<br />
Progressive Scan<br />
Progressive Scan<br />
Indicator<br />
7<br />
Indicator<br />
Repeat Play<br />
Indicators<br />
Repeat Play<br />
Indicators<br />
Time<br />
Indicators<br />
Video Output<br />
Indicators<br />
Video Output<br />
Indicators<br />
Angle<br />
Angle Indicator<br />
Indicator<br />
Video Format<br />
Video Format<br />
Indicators<br />
Indicators<br />
Playback Mode Indicators: Indicate the current disc playback mode:<br />
B Indicates normal playback<br />
H Indicates that the disc is in the forward fast-search mode The video display<br />
will indicate the selected speed<br />
1 Indicates that the disc is paused The video display will also indicate that the<br />
disc is paused<br />
G Indicates that the disc is in the reverse fast-search mode The video display<br />
will indicate the selected speed<br />
Title Indicators: Show the title number of a DVD that is playing<br />
Chapter/Track Number Indicators: Show the current chapter when a DVD is<br />
playing; show the current track number when a CD is playing<br />
Time Indicators: Show the running time when a DVD is playing; show elapsed time<br />
when a CD is playing<br />
NOTE: The Title, Chapter/Track Number and Time Indicators will also display the radio<br />
station name when Radio is the selected input When a DVD or CD is playing, the<br />
indicators will display various text messages about the disc’s status<br />
ENGLISH
Receiver Rear-Panel Connections<br />
AC Power<br />
AC Power<br />
Input<br />
Speaker Speaker<br />
Outputs<br />
MODEL: <strong>HS</strong> 2X0SO/230<br />
Coaxial<br />
Digital<br />
Inputs<br />
See the Connections section, on page 14, for detailed information about making<br />
connections<br />
Optical<br />
Digital<br />
Inputs<br />
AC Power Input: After you have made and confirmed all other connections, plug the<br />
supplied AC power cord into this input and into an unswitched AC outlet<br />
Speaker Outputs: Use the speaker wires supplied with the SAT TS60 speakers to<br />
connect the satellite speakers to the proper terminals<br />
Be sure to connect the positive (+, colored red) connector on the speaker to the<br />
positive (+, colored red and white) connector on the <strong>HS</strong> <strong>280</strong>/<strong>HS</strong> <strong>210</strong>, and the<br />
negative (– , colored black) connectors on the speakers to the negative (–, colored<br />
black) connectors on the <strong>HS</strong> <strong>280</strong>/<strong>HS</strong> <strong>210</strong> See Connecting the Satellite Speakers, on<br />
page 14, for more information about making connections<br />
Coaxial Digital Inputs: Connect the coaxial digital output of an audio-only source<br />
component here The signal may be a Dolby Digital bitstream or a standard PCM<br />
digital audio bitstream<br />
NOTE: Use only one type of digital connection for each source component<br />
Optical Digital Inputs: Connect the optical digital output of an audio-only source<br />
component here The signal may be a Dolby Digital bitstream or a standard PCM<br />
digital audio bitstream<br />
NOTE: Use only one type of digital connection for each source component<br />
Coaxial Digital Output: Connect this output to the coaxial digital input of a digital<br />
recording device such as a CD-R or MiniDisc recorder<br />
Sub Trigger Output: Use the black mini-cable connector of the supplied<br />
combination LFE and trigger cable to connect this jack to the HKTS200SUB<br />
subwoofer’s External Trigger Input See Connecting the Subwoofer, on page 15, for<br />
more details about making connections<br />
Whenever the <strong>HS</strong> <strong>280</strong>/<strong>HS</strong> <strong>210</strong> is turned on, it will send a trigger signal that will turn<br />
the subwoofer’s amplifier on Turning the <strong>HS</strong> <strong>280</strong>/<strong>HS</strong> <strong>210</strong> off removes the trigger<br />
signal, and the subwoofer’s amplifier will turn off (This change will occur even when<br />
the subwoofer’s Power On Mode switch – see page 9 – is in the Auto position )<br />
8<br />
Coaxial<br />
Coaxial<br />
Digital Digital<br />
Output<br />
Sub<br />
Trigger<br />
Output<br />
Ethernet Ethernet<br />
Port<br />
Subwoofer<br />
Output<br />
USB<br />
USB<br />
Port<br />
Line<br />
Outputs<br />
Line 1<br />
Inputs<br />
HDMI<br />
HDMI<br />
Output<br />
Line 2 2<br />
Inputs<br />
Remote Control<br />
Remote Control<br />
Input/Output<br />
SCART<br />
Connection<br />
Composite<br />
Composite Video<br />
Video<br />
Output Output<br />
S-video<br />
S-Video<br />
Output<br />
FM<br />
Antenna<br />
Connection<br />
Subwoofer Output: Use the LFE (purple) connector of the supplied combination LFE<br />
and trigger cable to connect this jack to the HKTS200SUB subwoofer’s Line-Level In<br />
LFE jack See Connecting the Subwoofer, on page 15, for more details about making<br />
connections<br />
Ethernet Port: Connect this port to your local area network (LAN) using a CAT 5 RJ45<br />
network cable See Connecting to a Local Area Network (LAN), on page 17, for details<br />
Line Outputs: Use the Line Outputs to connect to an audio-only recorder, such as a<br />
CD-R recorder or tape deck<br />
USB 2.0 Port: Gently insert a flash drive, card reader, digital camera or other USB<br />
device, or a USB Standard-A cable connected to a USB device, to this port<br />
IMPORTANT: DO NOT connect a PC or other USB host/controller to this port, or you<br />
may damage both the <strong>HS</strong> <strong>280</strong>/<strong>HS</strong> <strong>210</strong> and the other device Orient the device’s plug<br />
so it fits all the way into the <strong>HS</strong> <strong>280</strong>/<strong>HS</strong> <strong>210</strong>’s USB connector You may insert or remove<br />
the device at any time – there is no installation or ejection procedure<br />
The <strong>HS</strong> <strong>280</strong>/<strong>HS</strong> <strong>210</strong> can display JPEG-format still-image files stored on the device and<br />
can also play MP3 and Windows Media® Audio (WMA) files and MPEG4 and AVI video<br />
files that are stored on the device<br />
Line 1 Input/Line 2 Inputs: Use these inputs to connect to an audio-only source<br />
component (such as a tape deck) Do not connect a turntable to these jacks without a<br />
phono preamp<br />
HDMI Output (HDMI version 1.2): If your video display is HDMI-capable, connect<br />
it to the <strong>HS</strong> <strong>280</strong>/<strong>HS</strong> <strong>210</strong>’s HDMI output for improved video performance Since the<br />
HDMI cable transmits both video and audio to the video display, we recommend that<br />
you disable your display’s HDMI audio function to take full advantage of the <strong>HS</strong> <strong>280</strong>/<br />
<strong>HS</strong> <strong>210</strong> system’s superior audio performance (See page 19)<br />
IMPORTANT: The <strong>HS</strong> <strong>280</strong>/<strong>HS</strong> <strong>210</strong> is in compliance with HDCP (High-Definition Copy<br />
Protection) A video display must also be HDCP-compliant to be used with the <strong>HS</strong> <strong>280</strong>/<br />
<strong>HS</strong> <strong>210</strong>’s HDMI output For best results, we do not recommend HDMI connections in<br />
excess of ten feet without a repeater If your video display has a DVI input, you may<br />
use an optional HDMI-to-DVI cable or adapter for the video connection to the display<br />
(The DVI connection is video-only )
Remote Control Input/Output: If the <strong>HS</strong> <strong>280</strong>/<strong>HS</strong> <strong>210</strong>’s front-panel IR sensor is<br />
blocked, such as when it is placed inside of a cabinet, connect an external IR receiver<br />
(such as the <strong>Harman</strong> <strong>Kardon</strong> HE 1000 – not included) to the Remote Control In<br />
connector You can then place the external IR receiver in a location where it can<br />
receive the signals from the <strong>HS</strong> <strong>280</strong>/<strong>HS</strong> <strong>210</strong> remote control<br />
You can connect the <strong>HS</strong> <strong>280</strong>/<strong>HS</strong> <strong>210</strong>’s Remote Control Out connector to the remote IR<br />
input of a compatible device, allowing it to be controlled through the <strong>HS</strong> <strong>280</strong>/<strong>HS</strong> <strong>210</strong><br />
(and through an external IR receiver, if connected) You can even connect several such<br />
compatible devices together in “daisy-chain” fashion<br />
SCART Connection: Connect it to a compatible TV or set-top box using the included<br />
SCART cable The SCART cable carries composite (CVBS) video or S-Video from the<br />
<strong>HS</strong> <strong>280</strong>/<strong>HS</strong> <strong>210</strong> to a TV or set-top box (as well as a control signal for automatically<br />
controlling picture aspect ratio and other parameters) It also carries stereo audio<br />
from the TV or set-top box back to the <strong>HS</strong> <strong>280</strong>/<strong>HS</strong> <strong>210</strong><br />
Composite-Video Output: Connect it to the composite-video input of a TV or video<br />
projector<br />
S-Video Output: Connect it to the S-Video input of a TV or video projector<br />
FM Antenna Connection: Connect the supplied FM antenna to this terminal<br />
Subwoofer Controls and Connections<br />
Subwoofer Subwoofer<br />
Level Control Level Control<br />
Bass Boost Bass Boost<br />
Switch<br />
Switch<br />
Phase Switch Phase Switch<br />
Power On Power On<br />
Mode Switch Mode Switch<br />
External External Trigger Trigger<br />
Input Connector Input Connector<br />
Line-Level Line-Level In In<br />
LFE Connector LFE Connector<br />
Line-Level Line-Level In In<br />
L/R Connectors L/R Connectors<br />
Power Switch Power Switch<br />
AC Power AC Cord Power Cord<br />
<br />
Subwoofer Level Control: Use this control to adjust the HKTS200SUB subwoofer’s<br />
volume Turn clockwise to increase the volume; turn counterclockwise to decrease the<br />
volume<br />
Bass Boost Switch: Set this switch to On to enhance the subwoofer’s low-frequency<br />
performance Set this switch to Off for normal low-frequency performance<br />
Phase Switch: This switch determines whether the subwoofer driver’s piston-like<br />
action moves in and out in phase with the satellite speakers If the subwoofer were<br />
to play out of phase with the satellite speakers, the sound waves from the satellite<br />
speakers could cancel out the sound waves from the subwoofer, reducing bass<br />
performance and sonic impact This phenomenon depends in part on the relative<br />
placement of all the speakers in the room<br />
9<br />
Although in most cases the Phase Switch should be left in the Normal position, there<br />
is no absolutely correct setting for it When the subwoofer is properly in phase with<br />
the satellite speakers, the sound will be clearer and have maximum impact It will<br />
make percussive sounds like drums, piano and plucked strings sound more lifelike<br />
The best way to set the Phase Switch is to listen to music that you know well and set<br />
the switch in the position that gives drums and other percussive sounds maximum<br />
impact<br />
Power On Mode Switch: When this switch is set in the Auto position and when the<br />
Power switch is set to On, the HKTS200SUB will automatically turn itself On whenever<br />
it receives an audio signal It will enter the standby mode if it receives no audio<br />
signal for 20 minutes When the Power On Mode switch is set in the On position, the<br />
subwoofer will remain on whether or not it is receiving an audio signal<br />
An LED on the subwoofer’s top panel indicates whether the subwoofer is in the on or<br />
standby mode:<br />
• When the LED is illuminated white, the subwoofer is turned on<br />
• When the LED is not illuminated, the subwoofer is in standby mode<br />
When the Power switch is set to Off, the LED will not be illuminated, no matter what<br />
setting the Power On Mode switch is in<br />
External Trigger Input Connector: Use the mini-plug of the supplied combination<br />
LFE and trigger cable to connect the External Trigger Input to the trigger output<br />
of another compatible component Whenever the subwoofer detects a trigger<br />
signal between 3V and 30V (AC or DC), the subwoofer’s amplifier will turn on The<br />
subwoofer’s amplifier will turn off after the trigger signal ceases (This change will<br />
occur even when the Power On Mode switch is in the Auto position )<br />
Line-Level In LFE Connector: Use the LFE (purple) connector of the supplied<br />
combination LFE and trigger cable to connect the Line-Level In LFE connector to the<br />
dedicated subwoofer output of a receiver or preamp/processor This input bypasses<br />
the subwoofer’s internal crossover circuitry, so use it only with a subwoofer output<br />
that is low-pass filtered (Check the receiver or preamp/processor’s documentation<br />
to confirm that its subwoofer output is low-pass filtered ) If your receiver or preamp/<br />
processor does not have a dedicated subwoofer output that is low-pass filtered, use<br />
the subwoofer’s Line-Level In L/R connectors instead<br />
Line-Level In L/R Connectors: Use these connectors if your receiver or preamp/<br />
processor does not have digital surround-sound decoding or a low-pass-filtered<br />
subwoofer output<br />
• If your receiver or preamp/processor has a separate subwoofer output, use the<br />
LFE (purple) connector of the supplied combination LFE and trigger cable to<br />
connect the receiver or preamp/processor’s subwoofer output to either one of the<br />
subwoofer’s Line-Level In L/R connectors<br />
• If your receiver or preamp/processor does not have a separate subwoofer output,<br />
use two Y-adapters (not supplied) Connect one adapter’s single end to the unit’s<br />
preamp output for that channel Connect one of this adapter’s dual ends to the<br />
main amp input for that channel, and connect the adapter’s other dual end to<br />
one of the subwoofer’s Line-Level In L/R Connectors Repeat this process with the<br />
other Y-adapter, the preamp channel, the main amp input and the subwoofer’s<br />
other Line-Level In L/R connector<br />
Power Switch: Set this switch in the On position to turn the subwoofer on The<br />
subwoofer will then either be on or in Standby mode, depending on the setting of the<br />
subwoofer’s Power On Mode switch<br />
AC Power Cord: After you have made and verified all subwoofer and speaker<br />
connections described in this manual, plug the Power Cord into an active, unswitched<br />
electrical outlet (that is, an outlet not connected to a light switch) for proper<br />
operation of the subwoofer DO NOT plug this cord into the accessory outlets found in<br />
some audio components<br />
ENGLISH
Remote Control Functions<br />
System System Power<br />
Button<br />
Radio Radio Button Button USB Button Button<br />
Disc Disc Button<br />
Activity Button Button<br />
Learn Learn Button<br />
TV Button<br />
Network Network Button<br />
Video Video Button Button<br />
Settings Settings Button<br />
Bookmark Button<br />
Options Options Button Button<br />
Enter Enter Button<br />
Cursor Cursor Controls Controls<br />
Disc Menu Disc Menu Button<br />
Audio Audio Button<br />
Exit Button Button<br />
Eject Eject Button<br />
Display Button Button<br />
Repeat Repeat Button<br />
Random Random Button<br />
Disc Transport Transport<br />
Buttons<br />
Channel Channel + / + – / –<br />
Buttons<br />
Mute Mute Button<br />
System Power Button: Switches the <strong>HS</strong> <strong>280</strong>/<strong>HS</strong> <strong>210</strong> into the Standby mode<br />
Screen Power Button: Switches your video display on and off<br />
Disc Button: Selects the <strong>HS</strong> <strong>280</strong>/<strong>HS</strong> <strong>210</strong>’s built-in DVD player as the system’s active<br />
sound source and plays a disc that has been inserted into the player Pressing this<br />
button also puts the remote control into the disc player control mode See Using the<br />
DVD Player, on page 21, for details NOTE: Pressing this button when the <strong>HS</strong> <strong>280</strong>/<br />
<strong>HS</strong> <strong>210</strong> is in the Standby mode will switch it on<br />
Radio Button: Selects the <strong>HS</strong> <strong>280</strong>/<strong>HS</strong> <strong>210</strong>’s built-in FM radio as the system’s active<br />
sound source Pressing this button also puts the remote control into the control mode<br />
for the radio See Using the FM Tuner, on page 23, for details NOTE: Pressing this<br />
button when the <strong>HS</strong> <strong>280</strong>/<strong>HS</strong> <strong>210</strong> is in the Standby mode will switch it on<br />
USB Button: Selects a device connected to the front- or rear-panel USB ports as the<br />
system’s active sound source The <strong>HS</strong> <strong>280</strong>/<strong>HS</strong> <strong>210</strong>’s on-screen menu system lets you<br />
navigate through the files stored on the device See Playing Files from USB Devices,<br />
on page 24, for details NOTE: Pressing this button when the <strong>HS</strong> <strong>280</strong>/<strong>HS</strong> <strong>210</strong> is in the<br />
Standby mode will switch it on<br />
Activity Button: Switches the on-screen menu to the Activity menu from any other<br />
active screen or menu See Activity Button, on page 21, for details NOTE: Pressing this<br />
button when the <strong>HS</strong> <strong>280</strong>/<strong>HS</strong> <strong>210</strong> is in the Standby mode will switch it on<br />
Learn Button: Places the remote control in the learning mode See Programming the<br />
Remote Control, on page 17, for details<br />
Network Button: Switches to the local area network (LAN) that is connected to<br />
the <strong>HS</strong> <strong>280</strong>/<strong>HS</strong> <strong>210</strong>’s rear-panel Network connector See Playing Files from Networked<br />
Devices, on page 25, for details NOTE: Pressing this button when the <strong>HS</strong> <strong>280</strong>/<strong>HS</strong> <strong>210</strong> is<br />
in the Standby mode will switch it on<br />
10<br />
Screen Power Power<br />
Button<br />
Volume + / – + / –<br />
Buttons<br />
Numeric Buttons Buttons<br />
Video Button: Puts the remote control into the video-control mode, allowing it to<br />
control a video source component with codes that you have programmed into the<br />
remote See Programming the Remote Control, on page 17, for details If you have<br />
designated one of the <strong>HS</strong> <strong>280</strong>/<strong>HS</strong> <strong>210</strong>’s analog-audio inputs as a video-component<br />
audio input, pressing the Video button will also make that input the system’s active<br />
sound source See Connecting Audio Sources/Line 1, Line 2 In, on page 16, for details<br />
TV Button: Puts the remote control into the TV-control mode, allowing it to control<br />
your TV or video display with codes that you have programmed-into the remote See<br />
Programming the Remote Control, on page 17, for details If you have designated one<br />
of the <strong>HS</strong> <strong>280</strong>/<strong>HS</strong> <strong>210</strong>’s analog-audio inputs as the TV-audio input, pressing the TV<br />
button will also make that input the system’s active sound source See Connecting<br />
Audio Sources/Line 1, Line 2 In, on page 16, for details<br />
Settings Button: Displays the <strong>HS</strong> <strong>280</strong>/<strong>HS</strong> <strong>210</strong>’s Settings menu See Settings Menu,<br />
on page 19, for details<br />
Bookmark Button: Displays the list of your stored bookmarks for easy access See<br />
Bookmarks, on page 21, for details<br />
Options Button: Displays any available options for a menu item that is selected in<br />
the on-screen menu<br />
Cursor Controls: Use these controls – the up cursor, down cursor, left cursor and<br />
right cursor – to navigate through items on the on-screen menu<br />
Enter Button: Press it to select items highlighted on the on-screen menu<br />
Audio Button: Lets you select from the different listening modes that are available<br />
for the source that you have selected Pressing the Audio button while you are playing<br />
a DVD will display the on-screen audio-mode menu
Use the up cursor/down cursor buttons to select from these audio options:<br />
Stereo: Standard stereo sound<br />
Dolby VS (Dolby Virtual Speaker) Reference Music: Dolby Virtual Speaker mode<br />
that simulates a realistic 5 1-speaker surround-sound music-listening environment<br />
from just two stereo speakers<br />
Dolby VS Reference Movie: Dolby Virtual Speaker mode that simulates a realistic<br />
5 1-speaker surround-sound movie-listening environment from just two stereo<br />
speakers<br />
Dolby VS Wide Music: The same as the DVS Reference Music mode, but widens the<br />
front audio image for a more realistic surround-sound experience when the front<br />
speakers are located relatively close to each other<br />
Dolby VS Wide Movie: The same as the DVS Reference Movie mode, but widens<br />
the front audio image for a more realistic surround-sound experience when the front<br />
speakers are located relatively close to each other<br />
Press the remote’s Exit button to turn off the on-screen audio mode menu<br />
Pressing the Audio button while listening to any source other than a DVD will<br />
cycle through the above modes Each press of the Audio button will change to the<br />
next mode in line The <strong>HS</strong> <strong>280</strong>/<strong>HS</strong> <strong>210</strong> will display the modes on its front-panel<br />
Information Display<br />
Disc Menu Button: Displays the menu of the disc that has been inserted into the<br />
<strong>HS</strong> <strong>280</strong>/<strong>HS</strong> <strong>210</strong>’s built-in DVD-player slot<br />
Exit Button: Exits the current on-screen menu and displays the previous screen<br />
Eject Button: Ejects the disc from the <strong>HS</strong> <strong>280</strong>/<strong>HS</strong> <strong>210</strong>’s built-in DVD player<br />
NOTE: If you do not remove the ejected disc within 20 seconds, it will automatically<br />
re-load back into the DVD player for protection<br />
Repeat Button: When you are playing a DVD, this button cycles through the<br />
following repeat modes: Title, Chapter, Off When you are playing a CD or listening<br />
to media stored on a USB device or accessed via the local area network, this button<br />
cycles through the following repeat modes: Track, All, Off<br />
Display Button: Cycles the <strong>HS</strong> <strong>280</strong>/<strong>HS</strong> <strong>210</strong>’s front-panel Information Display<br />
between full brightness, half brightness and off<br />
11<br />
Disc Transport Buttons:<br />
I Press this button once to skip to the beginning of the current track Press the<br />
button twice to skip to the beginning of the previous track<br />
0 Press this button to stop playback at the current point<br />
J Press this button to skip to the beginning of the next track<br />
G Press this button to move backward through the current disc track For DVDs,<br />
each press cycles through at 1x, 2x, 4x, 8x, 16x and 32x normal speed in<br />
reverse Pressing the button while a DVD is paused will make the DVD go<br />
backwards through the track in slow motion Each press cycles through at<br />
1x, 2x, 4x and 8x slow speed<br />
B/1 Press this button to play a disc loaded into the <strong>HS</strong> <strong>280</strong>/<strong>HS</strong> <strong>210</strong>’s DVD player<br />
When the disc is playing, press the button to pause the disc Pressing the<br />
button while a DVD is playing will freeze-frame on the current frame<br />
H Press this button to move forward through the current disc track For DVDs,<br />
each press of the button cycles through at 1x, 2x, 4x, 8x, 16x and 32x normal<br />
speed Pressing the button while a DVD is paused will move the DVD forward<br />
through the track in slow motion Each press of the button cycles through at<br />
1x, 2x, 4x and 8x slow speed<br />
Channel +/– Buttons: When Radio is the source selected on the remote control, the<br />
Channel +/– buttons tune the <strong>HS</strong> <strong>280</strong>/<strong>HS</strong> <strong>210</strong>’s FM radio to the next higher or lower<br />
FM station When TV is the source selected on the remote control, the Channel +/–<br />
buttons tune your TV to the next higher or lower channel<br />
Mute Button: Press this button to mute the sound from the <strong>HS</strong> <strong>280</strong>/<strong>HS</strong> <strong>210</strong>’s speaker<br />
outputs Press the button again to un-mute the sound<br />
NOTE: The Mute button does not mute the HDMI audio outputs<br />
Volume +/– Buttons: Press these buttons to increase or decrease the volume of the<br />
<strong>HS</strong> <strong>280</strong>/<strong>HS</strong> <strong>210</strong>’s speaker outputs NOTE: The Volume +/– buttons do not change the<br />
volume of the HDMI audio outputs or the Line Outputs<br />
Numeric Buttons: Use for entering names for various items (bookmarks, input<br />
connections, FM stations, etc )<br />
ENGLISH
Placing the Speakers<br />
Placing the Left and Right Satellite Speakers<br />
Left<br />
Front<br />
Speaker<br />
Right<br />
Front<br />
Speaker<br />
Placing the Subwoofer<br />
Left Front<br />
Speaker<br />
Right Front<br />
Speaker<br />
Subwoofer<br />
Place the left and right satellite speakers at the<br />
same distance from each other as from the<br />
listening position (the place where you will be<br />
when listening to the speakers) Put them at<br />
about the same height from the floor as the<br />
listener’s ears will be You can also angle them<br />
toward the listener<br />
Since our ears do not detect the sources of<br />
sounds at the low frequencies where the<br />
subwoofer operates, the subwoofer will perform<br />
well from just about any location in your room<br />
However, you will probably hear the best bass<br />
reproduction when you place it in a corner along<br />
the same wall as the front left and right<br />
speakers<br />
You can experiment with subwoofer placement by temporarily placing the subwoofer<br />
in the listening position and playing music with strong bass content Move around<br />
to various locations in the room while the system is playing Listen until you find<br />
the location where the bass performance sounds best Place the subwoofer in that<br />
location<br />
Satellite Speaker Mounting Options<br />
Shelf Placement<br />
You can place the left and right satellite speakers on shelves using the speakers’ builtin<br />
bases You can also remove the bases if you like<br />
To remove a speaker’s base, pull it straight off the speaker, as shown in the<br />
illustration Apply even pressure to both sides of the base, and the base should slide<br />
off smoothly<br />
Lift Base Straight<br />
off Speaker<br />
Apply Pressure Evenly<br />
to Both Sides of Base<br />
12<br />
Wall-Mounting the <strong>HS</strong> <strong>280</strong> Satellite Speakers<br />
IMPORTANT: Read the Connecting the Satellite Speakers section, on page 14, before<br />
wall-mounting the left and right speakers using the supplied mounting hardware<br />
You will need to insert the supplied speaker wires through the wall mounts and<br />
connect the wires to the speakers during the process of installing the mounts<br />
NOTE: If you are using your own speaker wire, it must be no thicker than the wire<br />
supplied with the speakers Thicker wire will prevent the wall-mount bracket from<br />
sliding onto the speaker<br />
1 Decide on the location for the speaker (see Placing the Left and Right Satellite<br />
Speakers, on this page)<br />
2 Remove the speaker’s base as explained in Shelf Placement, on this page<br />
3 Disassemble the wall-mount bracket by sliding the two sections apart, as shown<br />
in the illustration below<br />
Pull Sections Apart<br />
4 Attach the wall portion of the wall mount onto the wall using hardware that<br />
is appropriate for the wall’s construction and materials We recommend first<br />
anchoring the mount using its keyhole, then attaching it with another anchor<br />
through its top opening, as shown in the illustration Note that the satellite<br />
speakers weigh 3 3 lb (1 5kg) Be sure to use hardware that can support this<br />
weight<br />
Top Opening<br />
Keyhole Opening<br />
Bottom Opening<br />
NOTE: If you’re running the speaker wire through the wall, you can bring it out directly<br />
behind the bracket location and insert it through the bottom opening in the wall<br />
portion of the wall mount, as shown in the illustration below This arrangement will<br />
hide the wire from view once the installation is complete<br />
Insert Wire into<br />
Bottom Opening<br />
Bring Wire out<br />
through Here
5<br />
6<br />
If you’re not running the speaker wire through the wall, insert it through the wall<br />
portion of the wall-mount bracket, as shown in the illustration below<br />
Pass the speaker wire through the speaker portion of the wall mount, as shown in<br />
the illustration below<br />
Bring Wire in<br />
through Here<br />
Bring Wire cut<br />
through Here<br />
7 If you have not already removed the speaker’s base, do so by pulling it straight off<br />
the speaker, as shown in the illustration below Apply even pressure to both sides<br />
of the base, and it should slide off smoothly<br />
Apply Pressure Evenly to<br />
Both Sides of Base<br />
Lift Base<br />
Straight off<br />
Speaker<br />
CAUTION: Before making speaker connections, ensure that the receiver is<br />
turned off and the receiver’s AC cord is unplugged from the receiver and the<br />
AC outlet.<br />
8 Connect the speaker wire to the speaker terminals, as shown in the illustration<br />
below:<br />
a)<br />
b)<br />
c)<br />
Press down on the top of the terminal to open the connection hole<br />
Insert the wire’s bare end all the way into the hole<br />
Release the terminal to secure the wire<br />
Insert the conductor with the colored band into the speaker’s red ( + ) terminal Insert<br />
the other conductor into the speaker’s black ( – ) terminal<br />
A Push Down on Cap<br />
to Open Hole<br />
+<br />
–<br />
B Insert Base Wire into<br />
Open Hole<br />
C Release Cap to Secure<br />
Wire<br />
13<br />
IMPORTANT: Make sure the ( + ) and ( – ) bare wires do not touch each other or the<br />
other terminal Touching wires can cause a short circuit that can damage the receiver<br />
9 Slide the speaker portion of the wall mount onto the speaker, as shown in the<br />
illustration below Fit the grooves of the mount onto the rails in the speaker<br />
Apply even pressure on both sides of the mount, and it should slide straight onto<br />
the speaker<br />
• Push the mount all the way onto the speaker until it snaps into place<br />
• Pull any slack speaker wire back through the mount as you slide the mount onto<br />
the speaker<br />
Fit Bracket Grooves<br />
Push Down Evenly<br />
onto Speaker Rails<br />
on Both Sides of Bracket<br />
10 Slide the speaker onto the mount’s wall section, as shown in the illustration<br />
below Pull any slack speaker wire back through the mount’s wall section<br />
Slide Speaker<br />
onto Wall Mount<br />
11 Fit the metal stop plate into the recess on the bottom of the wall mount with<br />
the pad facing the mount Fasten the stop plate to the mount using two of the<br />
supplied screws The stop plate will prevent the speaker from detaching from the<br />
bracket and will help hold the speaker in position as you rotate it on the mount<br />
Stop Plate<br />
Supplied Screws<br />
Wall-Mounting the <strong>HS</strong> <strong>210</strong> Satellite Speakers<br />
Unscrew the bolt that attaches the black shelf stand to the bottom of the speaker<br />
Store the stand and bolt in a safe place in case you need them for a future installation<br />
Remove<br />
Stand<br />
15 mm (M6-1 25P<br />
Wall Plate<br />
or 1 4"-20)<br />
Mount the wall-bracket attachment plate on the wall<br />
If possible, position the speakers so that the mounting screws (not included; use<br />
size #8) may be installed directly into a wooden wall stud If that is not possible, use<br />
optional wall anchors that are rated to support at least twenty-five pounds<br />
The customer is responsible for proper selection and use of mounting<br />
hardware, available through hardware stores, to wall-mount the speakers<br />
properly and safely.<br />
ENGLISH
For the speaker-connection instructions on pages 6 through 9, thread the appropriate<br />
speaker cable through the opening in the bottom of the attachment plate and then<br />
through the back of the bracket, as shown in the diagram<br />
Overhead View<br />
Wires to Speaker<br />
Terminal Cover<br />
Wire<br />
From<br />
Wall<br />
Plate<br />
Connections<br />
CAUTION: Before connecting anything to the <strong>HS</strong> <strong>280</strong>/<strong>HS</strong> <strong>210</strong>, ensure that the<br />
<strong>HS</strong> <strong>280</strong>/<strong>HS</strong> <strong>210</strong> receiver is turned Off and the receiver’s AC cord is unplugged<br />
from the receiver and the AC outlet.<br />
Connecting the Satellite Speakers<br />
The bracket has two openings on top: a round<br />
screw hole and an arc-shaped opening in front of<br />
it Thread the speaker cable through the arcshaped<br />
opening, not the screw hole<br />
Attach the bracket to the wall plate by inserting<br />
the tab at the top of the attachment plate into<br />
the slot on top of the bracket and snapping the<br />
bracket onto the attachment plate<br />
Thread the cable through the round opening in the terminal cover Insert the speaker<br />
wires into the terminals on the underside of the speaker, remembering to observe the<br />
correct polarity (see “Speaker Connections”)<br />
Place the terminal cover over the opening on the underside of the speaker so that<br />
it fits flush against the speaker and covers the terminals, with its round opening<br />
exposing the threaded insert The bracket fits through the round opening in the<br />
terminal cover<br />
Wall Bracket<br />
Insert the supplied bracket bolt up through the<br />
bottom of the bracket and terminal cover Screw it<br />
into the threaded insert on the underside of the<br />
speaker The bolt should be snug, but not so tight<br />
as to prevent the bracket from pivoting<br />
The wall-mounted speaker may be pivoted from side to side; however, the bracket is<br />
not designed to tilt up or down, and attempting to tilt it will damage the bracket and<br />
possibly the wall Your warranty will not cover the damage<br />
23 mm<br />
Wall<br />
(M6-1 25P<br />
or 1 4"-20)<br />
Speakers and receivers/amplifiers have corresponding ( + ) and ( – ) connection<br />
terminals<br />
• Your system’s SAT TS60 left and right speakers use red to denote the ( + )<br />
terminal and black for the ( – ) terminal<br />
• The <strong>HS</strong> <strong>280</strong>/<strong>HS</strong> <strong>210</strong> receiver uses white to denote the left channel ( + ) terminal<br />
and red for the right channel ( + ) terminal<br />
• Black is used to denote the ( – ) terminal of both channels<br />
The speaker wires included with your system have colored bands at both ends of<br />
the ( + ) conductor; the colors correspond to the receiver’s ( + ) terminal colors The<br />
subwoofer cable has purple connectors that correspond to the color of the receiver’s<br />
subwoofer output and the color of the HKTS200SUB subwoofer’s LFE jack This system<br />
helps you connect each speaker to the correct receiver or amplifier terminals In<br />
addition to the colored bands at each end, each speaker wire’s ( + ) terminal has ribs<br />
molded into its insulation to help you identify it<br />
14<br />
It is very important to connect each speaker identically: ( + ) on the speaker<br />
to ( + ) on the receiver or amplifier, and ( – ) on the speaker to ( – ) on the<br />
receiver or amplifier. Miswiring one or more speakers results in thin sound, weak<br />
bass and a poor stereo image<br />
To connect the speaker wire to the terminals on the satellite speakers:<br />
1<br />
Press down on the top of the terminal to open the connection hole<br />
2 Insert the wire’s bare end all the way into the hole Insert the conductor with the<br />
colored band into the speaker’s red ( + ) terminal, and insert the other conductor<br />
into the speaker’s black ( – ) terminal<br />
3<br />
Release the terminal to secure the wire to the terminals<br />
A Push Down on Cap<br />
to Open Hole<br />
+<br />
–<br />
B Insert Base Wire into<br />
Open Hole<br />
C Release Cap to Secure<br />
Wire<br />
IMPORTANT: Make sure the ( + ) and ( – ) bare wires do not touch each other or the<br />
other terminal Touching wires can cause a short circuit that can damage the receiver<br />
To connect the speaker wire to the terminals on the receiver:<br />
1<br />
Unscrew the connector sleeve to expose the hole in the connector post<br />
CAUTION: Take care not to unscrew the sleeve completely off the post<br />
2 Insert the wire’s bare end through the hole in the post Insert the conductor with<br />
the red colored band into the receiver’s red ( + ) terminal Insert the conductor<br />
with the white colored band into the receiver’s white ( + ) terminal Insert the<br />
unmarked conductors into the receiver’s black ( – ) terminals<br />
3<br />
Tighten the connector sleeve to secure the wire<br />
A Unscrew Cap B Insert Bare Wire C Tighten Cap<br />
IMPORTANT: Make sure the ( + ) and ( – ) bare wires do not touch each other or the<br />
other terminal Touching wires can cause a short circuit that can damage the receiver<br />
Connect the left and right speakers with<br />
supplied bases:<br />
1 Remove the speaker’s base (see Shelf Placement, on page 12)<br />
2<br />
Pass the speaker wire through the opening in the speaker base<br />
3 Connect the speaker wire as described above<br />
4<br />
5<br />
Reattach the speaker’s base as shown in the illustration<br />
Slide Base Straight<br />
onto Speaker Rails
To connect satellite speakers mounted on the<br />
supplied brackets:<br />
Follow the instructions in Wall-Mounting the Satellite Speakers, on page 12<br />
Connecting the Subwoofer<br />
Use the LFE (purple) connectors of the supplied combination LFE and trigger cable<br />
to connect the HKTS200SUB subwoofer’s Line-Level LFE In connector to the <strong>HS</strong> <strong>280</strong>/<br />
<strong>HS</strong> <strong>210</strong> receiver’s Subwoofer Output Use the trigger (black) connectors of the<br />
supplied combination LFE and trigger cable to connect the subwoofer’s External<br />
Trigger Input Connector to the <strong>HS</strong> <strong>280</strong>/<strong>HS</strong> <strong>210</strong> receiver’s Sub Trigger Output<br />
IMPORTANT: Do not plug the subwoofer’s AC power cord into an AC outlet at this time<br />
Front Right<br />
Satellite Cable<br />
Front Right Satellite<br />
(Red Cable Bands)<br />
(Red Bands)<br />
AC INPUT 100-240v~<br />
50 / 60Hz 300W<br />
Right Satellite<br />
Left Left Satellite<br />
– +<br />
– +<br />
SERIAL NO.<br />
COAXIAL 2 IN<br />
CLASS 1 LASER PRODUCT<br />
KLASSE 1 LASER PRODUKT<br />
LOUKAN 1 LASER LAITE<br />
KLASS 1 LASER APPARAT<br />
+<br />
FRONT R<br />
CAUTION<br />
RISK OF ELECTRIC SHOCK<br />
DO NOT OPEN<br />
ATTENTION<br />
– –<br />
SPEAKER OUTPUTS<br />
FRONT L<br />
+ Caution: Laser radiation when open.<br />
Do not start into beam.<br />
RISQUE D’ ELECTROCUTION<br />
NE PAS OUVRIR<br />
WARNING: SHOCK HAZARD. - DO NOT OPEN<br />
AVIS: RISQUE DE CHOCK ELECTRIQUE - NE PAS OUVRIR<br />
COAXIAL 1 IN<br />
2<br />
LFE/ Trigger<br />
LFE/ Trigger Cable<br />
(Black Ends)<br />
(Black Ends)<br />
LFE/ LFE/ Trigger Cable Trigger<br />
(Purple<br />
Cable<br />
Ends)<br />
(Purple Ends)<br />
OPTICAL 1<br />
IN<br />
OPTICAL 2<br />
IN<br />
SUB TRIGGER SUBWOOFER<br />
15<br />
ETHERNET<br />
COAXIAL OUT LINE OUT LINE 1 IN LINE 2 IN<br />
Front Left<br />
Satellite Cable<br />
Front Left Satellite Cable<br />
(White (White Bands)<br />
HDMI OUT<br />
L L L<br />
R R R<br />
IN OUT<br />
REMOTE<br />
CONTROL<br />
TV<br />
COMPOSITE<br />
Apparatus Claims of U.S.Patent Nos.<br />
4,631.603, 4.577.216; 4,819,098;<br />
4,907,093: 5, 315,448 and 6,516,132<br />
licensed for limited viewing uses only.<br />
SCART ANTENNA<br />
Receiver<br />
Subwoofer<br />
PL0004-01001<br />
S-VIDEO<br />
FM<br />
Receiver<br />
ENGLISH
Connecting the FM Antenna<br />
Connect the supplied antenna to the FM Antenna Connection, as shown in the<br />
illustration Fully extend the antenna wire and move it to different positions until you<br />
get the best reception of your favorite stations<br />
FM Antenna<br />
(supplied)<br />
To improve the quality of reception further, you can instead use an inside powered<br />
antenna, an outdoor rooftop FM antenna or an FM connection from a cable<br />
system Refer to the documentation included with the antenna for installation and<br />
connection instructions<br />
NOTE: If the antenna or FM connection uses 300-ohm (300Ω) twin-lead cable, use a<br />
300Ω-to-75Ω adapter to make the connection to the <strong>HS</strong> <strong>280</strong>/<strong>HS</strong> <strong>210</strong>’s FM Antenna<br />
Connection<br />
Connecting a TV or Video Display<br />
The <strong>HS</strong> <strong>280</strong>/<strong>HS</strong> <strong>210</strong> can connect to a TV/video display using HDMI, S-Video or<br />
composite-video connections If your TV/video display has an HDMI connection,<br />
we recommend using it, since it will deliver better video quality than the other<br />
connection types<br />
HDMI: Use the supplied HDMI cable to connect the <strong>HS</strong> <strong>280</strong>/<strong>HS</strong> <strong>210</strong>’s HDMI output to<br />
your TV/video display’s HDMI input The <strong>HS</strong> <strong>280</strong>/<strong>HS</strong> <strong>210</strong> uses HDMI version 1 2<br />
NOTE: The HDMI connection will deliver both video and audio to your TV or video<br />
display We suggest disabling your TV or video display’s audio system to take full<br />
advantage of the <strong>HS</strong> <strong>280</strong>/<strong>HS</strong> <strong>210</strong> system’s superior audio reproduction<br />
S-Video and Composite Video: If your TV/video display does not have an HDMI<br />
connection, connect it to the <strong>HS</strong> <strong>280</strong>/<strong>HS</strong> <strong>210</strong> by either the S-Video or composite-video<br />
connection<br />
NOTE: S-Video and composite-video cables are not included<br />
Video Display<br />
Receiver<br />
Cpmposite Video Cable<br />
(not supplied)<br />
HDMI Cable<br />
(supplied)<br />
S-Video Cable<br />
(not supplied)<br />
–OR– –OR–<br />
16<br />
Connecting the SCART Cable<br />
If your TV/video display or set-top box has a SCART connection, you can attach it to<br />
the <strong>HS</strong> <strong>280</strong>/<strong>HS</strong> <strong>210</strong>’s SCART connection using the supplied SCART cable The SCART<br />
cable carries composite video (CVBS), S-Video and a control signal for automatically<br />
controlling picture aspect ratio and other parameters from the <strong>HS</strong> <strong>280</strong>/<strong>HS</strong> <strong>210</strong> to the<br />
TV or set-top box The cable also carries stereo audio from the TV or set-top box back<br />
to the <strong>HS</strong> <strong>280</strong>/<strong>HS</strong> <strong>210</strong><br />
Video Display<br />
Connecting Audio Sources<br />
To<br />
Rec In<br />
CD-R Recorder<br />
To<br />
Play Out<br />
To<br />
Play Out<br />
SCART Cable<br />
(supplied)<br />
Receiver<br />
To<br />
Rec In<br />
Receiver<br />
Tape Deck<br />
MiniDisc Recorder<br />
To<br />
Play Out<br />
Line 1/Line 2 In: If you have an audio-only analog source component such as a tape<br />
deck or MiniDisc recorder, connect its left and right analog outputs to the Line 1 In or<br />
Line 2 In jacks as shown in the illustration<br />
NOTE: To hear a TV show through your <strong>HS</strong> <strong>280</strong>/<strong>HS</strong> <strong>210</strong> system, you need to connect<br />
the audio output of your TV to the <strong>HS</strong> <strong>280</strong>/<strong>HS</strong> <strong>210</strong> receiver If you are using an HDMI,<br />
S-Video or composite-video connection between the <strong>HS</strong> <strong>280</strong>/<strong>HS</strong> <strong>210</strong> and your TV/<br />
video display, you will need to connect the TV’s stereo audio output to the <strong>HS</strong> <strong>280</strong>/<br />
<strong>HS</strong> <strong>210</strong>’s Line 1 In or Line 2 In jacks If you are using the supplied SCART cable to<br />
connect the <strong>HS</strong> <strong>280</strong>/<strong>HS</strong> <strong>210</strong> to your TV, you don’t need to connect any additional<br />
wires – the SCART cable transmits a stereo audio signal from the TV to the <strong>HS</strong> <strong>280</strong>/<br />
<strong>HS</strong> <strong>210</strong> receiver
Coaxial 1/Coaxial 2 In and Optical 1/Optical 2 In: If you have an audio-only<br />
digital source component (such as a CD changer or video game), you can connect it to<br />
one of these inputs, as shown in the illustration under Connecting Audio Sources, on<br />
page 16 When using the Optical 1 and Optical 2 digital connections, gently push the<br />
cable connector through the panel connector’s built-in shutter until it is firmly seated<br />
in the connector<br />
NOTE: Use only one type of digital connection for each source component<br />
Connecting an Audio Recorder<br />
Line Out: If you have an analog recorder such as a cassette deck, connect its record<br />
inputs to the <strong>HS</strong> <strong>280</strong>/<strong>HS</strong> <strong>210</strong>’s Line Out jacks NOTE: You should connect the recorder’s<br />
analog outputs to the <strong>HS</strong> <strong>280</strong>/<strong>HS</strong> <strong>210</strong>’s Line 1 In or Line 2 In jacks<br />
Coaxial Out: If you have a digital recorder such as a CD-R or MiniDisc, connect its<br />
coaxial input to the <strong>HS</strong> <strong>280</strong>/<strong>HS</strong> <strong>210</strong>’s Coaxial Out jack<br />
Connecting to a Local Area Network (LAN)<br />
Use a CAT 5 RJ45 network cable (not supplied) to connect the <strong>HS</strong> <strong>280</strong>/<strong>HS</strong> <strong>210</strong>’s<br />
Ethernet port directly to a network router, a network switch or an Ethernet network<br />
wall jack<br />
NOTE: For the <strong>HS</strong> <strong>280</strong>/<strong>HS</strong> <strong>210</strong> to interface with a networked computer, that computer<br />
must be running UPnP (Universal Plug and Play)-compliant media software such as<br />
Windows Media Player, MediaLink or EyeConnect<br />
Laptop<br />
Computer<br />
Receiver<br />
CAT 5 RJ45 Cable<br />
(not supplied)<br />
Desktop<br />
Computer<br />
Network<br />
Modem<br />
Local-Area<br />
Network (LAN)<br />
IMPORTANT: The <strong>HS</strong> <strong>280</strong>/<strong>HS</strong> <strong>210</strong>’s Ethernet connection will not support a proxy<br />
network<br />
Connecting the AC Power<br />
The <strong>HS</strong> <strong>280</strong>/<strong>HS</strong> <strong>210</strong> receiver comes with a detachable AC power cord This type of cord<br />
makes it easier for you to install and connect all other system wiring to the receiver’s<br />
rear panel The HKTS200SUB subwoofer has a non-detachable power cord Plug the<br />
subwoofer’s power cord into a working, unswitched AC outlet<br />
NOTES:<br />
• The power requirement for the <strong>HS</strong> <strong>280</strong>/<strong>HS</strong> <strong>210</strong> receiver is 100–240V AC ~<br />
50/60Hz, 300W The power requirement for the HKTS200SUB subwoofer is<br />
220–240V AC ~ 50/60Hz, 200W<br />
• Connecting to a power source other than the ones listed above may damage the<br />
receiver or subwoofer, or cause abnormal operation<br />
• Before connecting the AC power cords to a wall outlet, confirm that all of the<br />
speaker connections, video connections and audio-component connections have<br />
been made correctly<br />
17<br />
• Connect the female end of the receiver’s detachable power cord to the receiver’s<br />
AC Power Input connector Plug the other end into a working, unswitched AC<br />
outlet<br />
•<br />
•<br />
Power Chord Cord<br />
(female end)<br />
The receiver’s Power Indicator will turn red, indicating that the receiver is in the<br />
standby mode<br />
The subwoofer’s LED will not illuminate until it receives a turn-on signal See<br />
Subwoofer Controls and Connections, on page 9, for details<br />
Preparing the Remote Control<br />
Installing the Batteries<br />
The <strong>HS</strong> <strong>280</strong>/<strong>HS</strong> <strong>210</strong>’s system remote control uses three AAA batteries (supplied)<br />
Insert the batteries as shown in the illustration, making sure to observe the correct<br />
polarity<br />
A Remove<br />
Cover<br />
B Insert 3 AAA<br />
Batteries<br />
– + –<br />
–<br />
+ +<br />
Using the Remote Control<br />
C Replace Cover<br />
When using the remote, remember to aim it toward the <strong>HS</strong> <strong>280</strong>/<strong>HS</strong> <strong>210</strong>’s front panel<br />
Make sure that no objects, such as furniture, block the remote’s view of the receiver<br />
Bright lights, fluorescent lights, and plasma-video displays may interfere with the<br />
function of the remote<br />
• The remote has a range of about 20 feet (6 1m), depending on the lighting<br />
conditions<br />
• You can use the remote at an angle of up to 30° to either side of the <strong>HS</strong> <strong>280</strong>/<br />
<strong>HS</strong> <strong>210</strong><br />
• If the remote seems to operate intermittently, or if pressing a button on the<br />
remote does not cause one of the source buttons to illuminate, make sure that the<br />
batteries are inserted correctly, or replace all three batteries with new ones<br />
Programming the Remote Control<br />
You can also program the remote so it will control two additional components –<br />
typically your TV and a video source such as a satellite or cable receiver – in addition<br />
to controlling the <strong>HS</strong> <strong>280</strong>/<strong>HS</strong> <strong>210</strong> receiver<br />
To control the TV and video component, you can teach codes from the TV and videocomponent<br />
remotes onto the <strong>HS</strong> <strong>280</strong>/<strong>HS</strong> <strong>210</strong> remote buttons shown shaded in the<br />
following illustration:<br />
ENGLISH
= Learning-Capable<br />
Learning-Capable<br />
Teaching Codes to the Remote Control<br />
1 Place the <strong>HS</strong> <strong>280</strong>/<strong>HS</strong> <strong>210</strong> remote head to head with the remote from which<br />
you want it to learn codes Put them about 1 inch (2 5cm) apart, with their IR<br />
transmitter windows facing each other<br />
2 Press and hold either the TV or Video button on the <strong>HS</strong> <strong>280</strong>/<strong>HS</strong> <strong>210</strong> remote<br />
Learn Button<br />
TV Button<br />
Video Button<br />
3 While pressing the TV or Video button, press and hold the Learn button until its<br />
LED begins flashing amber (The TV or Video button will not flash but will remain<br />
steadily illuminated ) The flashing indicates that the remote is in the learning<br />
mode<br />
4 Press the <strong>HS</strong> <strong>280</strong>/<strong>HS</strong> <strong>210</strong> remote button to which you want to teach the<br />
command The Learn button’s LED will then illuminate continuously The learning<br />
mode will remain active for 20 seconds after the button is pushed<br />
NOTE: If you accidentally press a button that is not learning-capable, the Learn<br />
button's LED will continue to flash amber and the remote will remain in the learning<br />
mode<br />
5 Press the button on the other remote that you want to “teach” the <strong>HS</strong> <strong>280</strong>/<strong>HS</strong> <strong>210</strong><br />
remote When the <strong>HS</strong> <strong>280</strong>/<strong>HS</strong> <strong>210</strong> remote has received and stored the other<br />
remote's IR code, the Learn button’s LED will change to green, and the <strong>HS</strong> <strong>280</strong>/<br />
<strong>HS</strong> <strong>210</strong> remote will remain in the learning mode, ready to learn another code<br />
NOTE: If the <strong>HS</strong> <strong>280</strong>/<strong>HS</strong> <strong>210</strong> remote can’t read the IR code from the other remote,<br />
the Learn button’s LED will flash red rapidly three times, and the remote will remain<br />
in the learning mode Resume programming from Step 4 If the <strong>HS</strong> <strong>280</strong>/<strong>HS</strong> <strong>210</strong>’s<br />
18<br />
remote control does not receive an IR code within five seconds, the Learn button's LED<br />
will flash red rapidly three times, and the remote will remain in the learning mode<br />
Resume programming from Step 4<br />
6 Repeat Step 3 and Step 4 for each command you want to teach the <strong>HS</strong> <strong>280</strong>/<strong>HS</strong> <strong>210</strong><br />
remote You can switch between programming TV and video component codes<br />
by pressing the TV or Video button before resuming Step 4 NOTE: If the Learn<br />
button’s LED goes out at any time, you will need to repeat Step 2 through Step 6<br />
Using the Remote Control After it is Programmed<br />
Pressing the remote’s TV button will put the remote into the TV-control mode It will<br />
control the TV via the codes you have programmed into it Pressing the remote’s Video<br />
button will put the remote into the video-control mode, and it will control the video<br />
component via the codes you have programmed into it<br />
To switch the remote control back to the <strong>HS</strong> <strong>280</strong>/<strong>HS</strong> <strong>210</strong> receiver-control mode from<br />
the TV-control or video-control mode, press any of these buttons: Disc, Radio, USB,<br />
Network, Activity or Bookmark<br />
Setting up the Receiver<br />
NOTE: The on-screen menus shown in this manual are for illustrative purposes and<br />
may differ slightly from the actual displays<br />
Using the On-Screen Menu System<br />
When you turn your <strong>HS</strong> <strong>280</strong>/<strong>HS</strong> <strong>210</strong> receiver on for the first time, the on-screen menu<br />
will display the Activity menu This menu acts as the <strong>HS</strong> <strong>280</strong>/<strong>HS</strong> <strong>210</strong>’s “home” screen<br />
All of the <strong>HS</strong> <strong>280</strong>/<strong>HS</strong> <strong>210</strong>’s on-screen functions originate in the Activity menu<br />
To operate your <strong>HS</strong> <strong>280</strong>/<strong>HS</strong> <strong>210</strong> system, you will use the remote control to navigate<br />
through all of the on-screen menus and make selections from them<br />
Enter Button Cursor Buttons
• Use the up cursor/down cursor buttons to navigate through the menu list When<br />
an item is highlighted, its icon will turn bright and its name will become larger<br />
• To select a highlighted item, press the Enter button The screen will change<br />
depending on your selection<br />
• To display choices for the current screen (if available), press the right cursor<br />
button<br />
• To return to the previous screen, press the left cursor button<br />
Settings Menu<br />
Before using the <strong>HS</strong> <strong>280</strong>/<strong>HS</strong> <strong>210</strong>, you will need to set the receiver’s various<br />
video, audio and other functions Scroll down the Activity menu until Settings is<br />
highlighted, then select it The Settings menu will appear You will use the various<br />
Settings menu items to configure your <strong>HS</strong> <strong>280</strong>/<strong>HS</strong> <strong>210</strong> to work as you want it to with<br />
your TV and other components<br />
Video Settings<br />
Aspect ratio: Select the aspect ratio of your TV or video display (16:9 or 4:3)<br />
TV standard: Select your TV or video display’s TV standard (automatic or PAL)<br />
If you have an NTSC or multi-standard TV, use the Automatic setting NOTE: If you<br />
make an incorrect setting in this menu, the signal to your TV will be temporarily lost,<br />
but you can change to the correct setting by using the <strong>HS</strong> <strong>280</strong>/<strong>HS</strong> <strong>210</strong>’s front-panel<br />
Information Display<br />
Output: Select which video connection (HDMI or analog) you are using between the<br />
<strong>HS</strong> <strong>280</strong>/<strong>HS</strong> <strong>210</strong> and your TV NOTE: The <strong>HS</strong> <strong>280</strong>/<strong>HS</strong> <strong>210</strong> does not output both HDMI and<br />
analog video simultaneously<br />
Resolution (HDMI only): Select the highest resolution your TV can handle (480p<br />
(NTSC), 576p (PAL), 720p, 1080i or 1080p) NOTE: This setting is available only if you<br />
selected HDMI as the output type<br />
SCART (analog only): Select the type of video output that your TV will receive<br />
via the SCART cable (S-Video or composite – CVBS – video) NOTE: This setting is<br />
available only if you selected Analog as the output type<br />
19<br />
Audio Settings<br />
Bass, Treble: Increases or decreases the level of bass (low frequencies) or treble<br />
(high frequencies) You can select from –10dB to +10dB in 1dB increments<br />
Subwoofer: Increases or decreases the subwoofer volume You can select from<br />
–10dB to +10dB in 1dB increments<br />
Dynamic range: This setting brings the loud and quiet parts of a movie or music<br />
closer to the same volume This setting lets you turn up the volume so the quiet parts<br />
are audible but the loud parts won't disturb others NOTE: This feature works only<br />
with Dolby Digital programs that have been specially encoded Three settings are<br />
available:<br />
• Min: Does not change the original playback You should use it when the volume<br />
setting in the listening room may be as loud as you desire<br />
• Half: Applies a moderate amount of compression so that louder passages are a<br />
little bit quieter<br />
• Max: Applies more compression so that louder passages are much quieter<br />
Delay: This setting indicates the amount of delay of the audio output relative to the<br />
video output, which eliminates the “out-of-sync” quality that sometimes occurs when<br />
the video source component or the video display processes a video signal The default<br />
setting of 90ms (90 milliseconds) should be correct for most programs However, if<br />
you wish to improve synchronization for a particular program, you can change the<br />
setting to anywhere between 0ms (no delay) and 150ms, in 10ms increments<br />
HDMI Audio to TV: This setting turns the HDMI audio output to your TV on and<br />
off We recommend turning this function off, so you can take full advantage of the<br />
superior audio capability of your <strong>HS</strong> <strong>280</strong>/<strong>HS</strong> <strong>210</strong> system’s receiver and speakers<br />
TV audio input: Set this function to the input to which you have connected your TV’s<br />
audio output When you press the remote’s TV button, TV will become the active audio<br />
input and you can use the remote to control your TV See Connecting Audio Sources,<br />
Line 1/Line 2 In, on page 16<br />
NOTE: If you’ve connected the TV to the <strong>HS</strong> <strong>280</strong>/<strong>HS</strong> <strong>210</strong> using the SCART cable, set this<br />
function to SCART Whenever the TV is turned on, it will send a signal to the <strong>HS</strong> <strong>280</strong>/<br />
<strong>HS</strong> <strong>210</strong>, which will then automatically switch to the SCART input<br />
ENGLISH
Video audio input: Set this function to the input to which you have connected the<br />
audio output of the video component that you’ve programmed the remote to control<br />
(NOTE: If you’ve connected the video component using the SCART cable, set this<br />
function to SCART ) When you press the remote’s Video button, video will become the<br />
active audio input, and you can use the remote to control the video component See<br />
Connecting Audio Sources, Line 1/Line 2 In, on page 16<br />
Network Settings<br />
IP address: This is the <strong>HS</strong> <strong>280</strong>/<strong>HS</strong> <strong>210</strong>’s unique address on the network The network<br />
automatically assigns the <strong>HS</strong> <strong>280</strong>/<strong>HS</strong> <strong>210</strong> an IP address, so unless your network<br />
administrator or Internet Service Provider (ISP) instructs you to use a static IP address,<br />
you should leave this function set to Automatic<br />
If you are required to use a static IP address, select IP address, then select Set, and use<br />
the numeric keys to enter the IP address and subnet mask address numbers that you<br />
are given on the screen that appears Press Enter when you’re finished<br />
Gateway: The gateway address connects your local area network to the Internet The<br />
ISP and/or network administrator automatically assigns this address, so unless your<br />
ISP or network administrator instructs you to use a static gateway address, you should<br />
leave this function set to Automatic<br />
If you are required to use a static gateway address, then select Gateway, select Set,<br />
and use the numeric keys to enter the gateway address numbers that you are given<br />
on the screen that appears Press Enter when you’re finished<br />
DNS: Is the network’s domain name server The ISP and/or network administrator<br />
automatically assigns the DNS, so unless your ISP or network administrator instructs<br />
you to use a static DNS, you should leave this function set to Automatic<br />
If you are required to use a static DNS, then select DNS, select Set, and use the<br />
numeric keys to enter the DNS numbers that you are given on the screen that appears<br />
Press Enter when you’re finished<br />
MAC: This is the unique identifier address that the manufacturer assigned to the<br />
<strong>HS</strong> <strong>280</strong>/<strong>HS</strong> <strong>210</strong> The user cannot modify it<br />
Wired: If your ISP or network administrator instructs you to use a static IP address,<br />
gateway or DNS for the <strong>HS</strong> <strong>280</strong>/<strong>HS</strong> <strong>210</strong>, you must set this function to Enable after<br />
entering the static numbers in the appropriate screens The Wired (Disabled) listing<br />
will change to Wired (Connected)<br />
20<br />
Preferences<br />
OSD Language: Sets the language for the <strong>HS</strong> <strong>280</strong>/<strong>HS</strong> <strong>210</strong>’s on-screen display (OSD)<br />
The default language is English, but you can change it to French, German, Italian,<br />
Russian or Spanish<br />
Audio Language and Subtitle Language: Sets the default audio language and<br />
subtitle language for DVDs played on the <strong>HS</strong> <strong>280</strong>/<strong>HS</strong> <strong>210</strong>’s built-in DVD player The<br />
default language is English, but you can change it to French, German, Italian, Russian<br />
or Spanish To change to a language not listed on this menu, select Other and use the<br />
10-key screen to enter the language’s 3-character code from the code list on page 28<br />
NOTE: If the selected language is not available on the particular DVD being played,<br />
press the remote’s Disc Menu button and change the language using the disc’s menu<br />
Volume Bar: The <strong>HS</strong> <strong>280</strong>/<strong>HS</strong> <strong>210</strong> can display a volume bar on the TV screen<br />
whenever you change its volume level Select Shown to display the volume bar<br />
(see illustration below)<br />
Panel Timeout: When the panel brightness is set to Off (see below), you can set the<br />
length of time that the <strong>HS</strong> <strong>280</strong>/<strong>HS</strong> <strong>210</strong>’s Information Display remains lit after each<br />
command (Some people find the display distracting while watching a movie ) You<br />
can have the Information Display remain on for 0, 5, 10 or 15 seconds<br />
Panel Brightness: You can set the brightness of the <strong>HS</strong> <strong>280</strong>/<strong>HS</strong> <strong>210</strong>’s Information<br />
Display<br />
PBC Support: Activates PBC (Play-Back Control) for VCD discs
Screen Saver: Activates the <strong>HS</strong> <strong>280</strong>/<strong>HS</strong> <strong>210</strong>’s screen saver to prevent image burn-in<br />
on a video display If you connect the <strong>HS</strong> <strong>280</strong>/<strong>HS</strong> <strong>210</strong> to a plasma display or CRT-based<br />
TV or video projector, we recommend that you activate the screen saver<br />
Show Angle Icon: Determines if the Angle icon will appear on the screen when the<br />
currently-playing DVD has different picture angles available<br />
About: Contains information about the versions of software installed in your <strong>HS</strong> <strong>280</strong>/<br />
<strong>HS</strong> <strong>210</strong><br />
Activity Menu<br />
The Activity menu is the <strong>HS</strong> <strong>280</strong>/<strong>HS</strong> <strong>210</strong>’s “home” menu screen, listing its major<br />
functions: Bookmarks, Play Disc, Radio, Audio inputs, USB, Network and Settings<br />
No matter what on-screen menu is active, pressing the remote control’s Activity<br />
button will bring you back to the Activity menu<br />
Bookmarks<br />
The <strong>HS</strong> <strong>280</strong>/<strong>HS</strong> <strong>210</strong>’s Bookmark function lets you store the locations of frequentlyused<br />
media so you can quickly recall them later with a minimum of button-pushing<br />
This function can be especially useful if you are connected to a network that has<br />
media located on several devices Items that you can bookmark include:<br />
• MP3, JPEG, AVI, or MP4 media on a networked device or a docked USB device<br />
• Preset FM radio stations<br />
• Audio input connections<br />
To bookmark an item, right-click on it to display its options, and select Add to<br />
Bookmark<br />
To select a bookmarked item<br />
• Press the bookmark button<br />
– or –<br />
• Press the Activity button and select Bookmark<br />
A list of your bookmarked items will appear on screen Scroll to the item you want<br />
and press the Enter button<br />
21<br />
NOTE: If you select a bookmarked item from a source that is not currently connected<br />
to the <strong>HS</strong> <strong>280</strong>/<strong>HS</strong> <strong>210</strong>, the OSD will display an “invalid” icon near the upper-right<br />
corner<br />
Using the DVD Player<br />
Disc handling precautions<br />
• To keep the disc clean, handle the disc by its edge Do not touch the surface<br />
• Do not stick paper or tape on the disc If there is glue (or a similar substance) on<br />
the disc, remove the substance completely before using the disc<br />
• Do not expose the disc to direct sunlight or sources such as hot- air ducts<br />
• Do not leave it in a car parked in direct sunlight, as there can be a considerable<br />
rise in temperature inside the car<br />
• After playing the disc, store it in its case<br />
• Do not write on the label side with a ball-point pen or any other sharp writing<br />
utensil<br />
• Be careful not to drop or bend the disc<br />
Disc cleaning precautions<br />
•<br />
•<br />
Before playing, clean the disc with a cleaning cloth Wipe the disc from the center<br />
out<br />
Do not use solvents such as benzene, thinner, commercially available cleaners or<br />
anti-static spray intended for vinyl LPs<br />
Regional coding<br />
The <strong>HS</strong> <strong>280</strong>/<strong>HS</strong> <strong>210</strong> will play only discs with coding from Region 2 or discs with no<br />
region coding (Region 0) It will not play discs with any other region coding<br />
Copyright<br />
Audio-visual material may consist of copyrighted works that must not be recorded<br />
without the permission of the owner of the copyright Please refer to relevant laws<br />
covering copyright protection<br />
Copy protection<br />
The <strong>HS</strong> <strong>280</strong>/<strong>HS</strong> <strong>210</strong> is in compliance with HDCP (High-Definition Copy Protection) A<br />
video display connected via HDMI must also be HDCP-compliant<br />
The <strong>HS</strong> <strong>280</strong>/<strong>HS</strong> <strong>210</strong>’s DVD player supports Macrovision® copy protection On DVDs that<br />
include a copy-protection code, if the contents of the DVD are copied using a VCR, the<br />
copy-protection code prevents the videotape copy from playing normally<br />
ENGLISH
Supported disc formats<br />
The <strong>HS</strong> <strong>280</strong>/<strong>HS</strong> <strong>210</strong> can play the following disc formats in 5" (12 cm) and 3" (8 cm)<br />
size: DVD, DVD-R, DVD-RW, DVD+R, DVD+RW, CD, CD-R, CD-RW, VCD, S-VCD, MP3,<br />
and WMA (v7-v8) It can also play discs with JPEG picture files<br />
NOTE: Some discs may include features that are not compatible with the <strong>HS</strong> <strong>280</strong>/<br />
<strong>HS</strong> <strong>210</strong>'s DVD player Similarly, although DVDs are capable of a wide range of features,<br />
not all discs include every feature that the DVD system can offer For example, the<br />
DVD player is compatible with multi-angle discs, but some discs are not specially<br />
encoded for multiple-angle play To make certain that a specific feature or soundtrack<br />
option is available on a disc, please check the options noted on the disc's jacket<br />
Playback capability for CD-R, CD-RW, WMA, JPEG, MP3, VCD/SVCD, DVD-R, DVD+R,<br />
DVD-RW and DVD+RW discs may vary due to variations in the quality of the disc and<br />
the recorder used to create the disc<br />
Loading a disc<br />
Hold the disc horizontally when loading it Insert it gently into the Disc Slot The discloading<br />
mechanism will take the disc and slide it into the unit<br />
• Do not load more than one disc into the disc slot<br />
• Do not load the disc upside down<br />
You can load a disc while watching or listening to another source (such as the radio)<br />
without interruption The disc will not automatically play<br />
When there is no disc is loaded in the <strong>HS</strong> <strong>280</strong>/<strong>HS</strong> <strong>210</strong>, the Activity menu’s Play Disc<br />
listing will have a prohibition icon<br />
Play Disc<br />
When a disc is loaded in the <strong>HS</strong> <strong>280</strong>/<strong>HS</strong> <strong>210</strong>, the Activity menu’s Play Disc listing will<br />
not have a prohibition icon<br />
Play Disc<br />
Playing discs<br />
Once you’ve loaded a disc, you can play it by:<br />
• Pressing the Disc button on the remote control<br />
– or –<br />
• Pressing the Activity button on the remote and selecting Play Disc<br />
Use these buttons on the remote to control playback functions:<br />
22<br />
= Disc Player Operation<br />
Disc button: Selects the <strong>HS</strong> <strong>280</strong>/<strong>HS</strong> <strong>210</strong>’s DVD player as the active source and plays<br />
the inserted disc NOTE: Pressing this button when the <strong>HS</strong> <strong>280</strong>/<strong>HS</strong> <strong>210</strong> is in the<br />
Standby mode will switch it on<br />
Options button: Lets you set the following options when playing a DVD:<br />
• Audio: Lets you select between the different audio tracks that are available on the<br />
disc<br />
• Subtitle: Lets you activate subtitles and select the subtitle language<br />
• Status: Cycles the status display (see illustration below) between the following<br />
modes: Off, On (remains on for five seconds) and Sticky (remains on until you turn<br />
it off)<br />
• Random: Turns Random Play on and off<br />
• Repeat: Cycles the player between the following Repeat modes: Off, All, Title,<br />
Chapter<br />
• A–B: Turns A – B Repeat on and off, and lets you set the A and B points on the disc<br />
• Time Mode: Lets you advance to any point in time on the disc Use the keypad to<br />
enter the time, or use the left and right cursor arrows (see Cursor Controls, page<br />
10) to select between hours, minutes and seconds, and use the up and down<br />
cursor arrows to set the time When you finish entering the time, press the Enter<br />
button, and the <strong>HS</strong> <strong>280</strong>/<strong>HS</strong> <strong>210</strong> will skip to that point on the disc
• Angle: Lets you select between the different camera angles that are available on<br />
the disc<br />
NOTE: Options are disc-dependent Some options may not be available on all discs<br />
Cursor controls: Use them to navigate through items on the on-screen menus<br />
Enter button: Press it to select items highlighted on the on-screen menus<br />
Disc Menu button: Displays the menu of a DVD (or the track list of a CD) that is<br />
inserted into the <strong>HS</strong> <strong>280</strong>/<strong>HS</strong> <strong>210</strong><br />
Eject button: Ejects the disc NOTE: If you do not remove the ejected disc within 20<br />
seconds, it will automatically re-load back into the DVD player for protection<br />
Repeat button: When the <strong>HS</strong> <strong>280</strong>/<strong>HS</strong> <strong>210</strong> is playing a DVD, this button cycles<br />
through the following repeat modes: All, Title, Chapter, Off When playing a CD or<br />
listening to media stored on a USB device or accessed via the network, this button<br />
cycles through the following repeat modes:<br />
Repeat-1, All, Off<br />
Random button: When the <strong>HS</strong> <strong>280</strong>/<strong>HS</strong> <strong>210</strong> is playing a disc, this button will play all<br />
the tracks on the disc in random order<br />
I Press once to skip to the beginning of the current track Press twice to<br />
skip to the beginning of the previous track The I icon will temporarily<br />
appear in the upper-right part of the screen<br />
0 Press to stop playback at the current point<br />
J Press to skip to the beginning of the next track<br />
G Press to move backward through the current disc track For DVDs, each<br />
press cycles through at 1x, 2x, 4x, 8x, 16x and 32x normal speed in reverse<br />
Pressing the button while a DVD is paused will move backward through the<br />
track in slow motion Each press cycles through at 1x, 2x, 4x and 8x slow<br />
speed<br />
B/1 Press to play the currently loaded disc When playing, press to pause the<br />
disc Pressing the button while a DVD is playing will freeze-frame on the<br />
current frame<br />
H Press to move forward through the current disc track For DVDs, each press<br />
cycles through at 1x, 2x, 4x, 8x, 16x and 32x normal speed Pressing the<br />
button while a DVD is paused will go forward through the track in slow<br />
motion Each press cycles through at 1x, 2x, 4x and 8x slow speed<br />
Numeric Buttons: Use them to skip to a specific track number during disc playback<br />
Using the FM Tuner<br />
To listen to the FM radio:<br />
• Press the Radio button on the remote control<br />
– or –<br />
• Press the Activity button on the remote and select Radio<br />
Before you can listen to the radio, the <strong>HS</strong> <strong>280</strong>/<strong>HS</strong> <strong>210</strong> must first find the available<br />
radio stations in your area Press the right cursor button (see Cursor Controls, page 10)<br />
to display the radio options<br />
23<br />
Select Automatic Search The <strong>HS</strong> <strong>280</strong>/<strong>HS</strong> <strong>210</strong> will search for all receivable FM stations<br />
in your area and display a list of their broadcast frequencies<br />
This list will become your station-preset list Use the up and down cursor buttons to<br />
scroll through the station list As you scroll, the radio will tune to each highlighted<br />
station<br />
After approximately 20 seconds (or if you press the Enter button), the radio will<br />
remain tuned to the station, and the display will change to the radio dial<br />
To change stations while the radio dial is displayed, press the Channel +/– or the up<br />
and down cursor buttons The radio will tune in to the next higher or lower station on<br />
the list<br />
To display the station preset list while the radio dial is on screen, press the left cursor<br />
button<br />
ENGLISH
Radio Station Options<br />
To show options for a highlighted station while the <strong>HS</strong> <strong>280</strong>/<strong>HS</strong> <strong>210</strong> displays the radiostation<br />
list, press the right cursor button<br />
Highlight the option you want, then press the Enter button<br />
Search Up: Searches for the next receivable station above the highlighted station<br />
Search Down: Searches for the next receivable station below the highlighted<br />
station<br />
Step Up: Changes the highlighted station frequency up by 0 1MHz each time you<br />
press the Enter button<br />
Step Down: Changes the highlighted station frequency down by 0 1MHz each time<br />
you press the Enter button<br />
Capture Name: Captures the highlighted station’s name and assigns it to the<br />
station’s listing (if the station is broadcasting the data)<br />
New: Creates a copy of the current preset (with the name “New”)<br />
Rename: Lets you use the remote’s numeric buttons to assign your own name to the<br />
highlighted station<br />
Delete: Deletes the highlighted station from the list<br />
NOTE: To delete all of the stations from the list:<br />
1 Press the Activity button<br />
2 Highlight Radio and press the right cursor button<br />
3 Select Delete All and press the Enter button<br />
Add to Bookmark: Adds the highlighted station to your list of Bookmarks (see<br />
Bookmarks, on page 21, for more information)<br />
Listening to Audio Sources<br />
If you used the Settings menu to assign input connections to the remote’s TV and<br />
Video buttons, the <strong>HS</strong> <strong>280</strong>/<strong>HS</strong> <strong>210</strong> will automatically switch to those connections<br />
every time you press the remote’s TV or Video button See Settings Menu: Audio<br />
Settings: TV Audio Input and Video Audio Input, on page 19 and 20, for more<br />
information<br />
You can also manually select an audio component that you connected to any of the<br />
<strong>HS</strong> <strong>280</strong>/<strong>HS</strong> <strong>210</strong>’s line inputs or digital inputs:<br />
1<br />
2<br />
Press the Activity button<br />
Select Audio Inputs The input-connection list will appear<br />
24<br />
3<br />
Highlight the input to which you connected the component and press the Enter<br />
button<br />
NOTE: If you connected your TV to the receiver using the SCART connection, the<br />
<strong>HS</strong> <strong>280</strong>/<strong>HS</strong> <strong>210</strong> will automatically switch to the SCART input when the TV is turned on<br />
See Audio Settings/TV Audio Input, on page 19<br />
If an audio input is selected when you put the receiver in the standby mode, it will<br />
automatically be the selected input the next time you turn the receiver on<br />
To make it easier to identify which component is connected to which input, you can<br />
rename any of the inputs On the input connection list screen, (see above), highlight<br />
the input you want to rename, and press the right cursor button (see Cursor Controls,<br />
page 10) The options menu will appear<br />
Select Rename, and use the remote’s numeric buttons to enter a different name for<br />
any of the inputs<br />
Playing Files from USB Devices<br />
The <strong>HS</strong> <strong>280</strong>/<strong>HS</strong> <strong>210</strong> can display JPEG picture files, play MP3 (up to 320kbps bit rate)<br />
audio files and show AVI, MP4 (up to 4Mbps bitrate) format video files stored on a<br />
USB device To access files on a device connected to one of the <strong>HS</strong> <strong>280</strong>/<strong>HS</strong> <strong>210</strong>’s USB<br />
ports:<br />
• Press the USB button on the remote<br />
– or –<br />
• Press the Activity button on the remote and select USB If you have more than one<br />
USB device connected, both device names will appear
Select the device you want, and then navigate through the folders on the device to<br />
the media you want to view or hear<br />
To play an item, highlight and select the item from the list<br />
Viewing Pictures<br />
Selecting a JPEG file displays the image on the TV (A Pause indicator (1) appears<br />
near the screen’s upper-right corner)<br />
• To skip to the next or previous JPEG file, press the J or I button<br />
• To exit and return to the file list screen, press the 0 button<br />
Pressing the B button while the <strong>HS</strong> <strong>280</strong>/<strong>HS</strong> <strong>210</strong> displays an image initiates a slide<br />
show that displays each subsequent JPEG in the current folder, in alphabetical order<br />
by file name The I , J and 0 buttons work in slideshow mode the same as<br />
when displaying individual JPEGs<br />
Note: You can change the amount of time each picture stays on screen during a slide<br />
show by pressing the right cursor button during the show<br />
Playing Music<br />
Selecting an MP3 file plays the file If other MP3s appear on the screen, the <strong>HS</strong> <strong>280</strong>/<br />
<strong>HS</strong> <strong>210</strong> will play each one, in order as they appear on the screen<br />
25<br />
If the selected MP3 file has an album-cover-art ID3 tag, the <strong>HS</strong> <strong>280</strong>/<strong>HS</strong> <strong>210</strong> will<br />
display the art on the screen<br />
NOTE: If the folder contains a combination of MP3 and JPEG files, selecting an MP3 file<br />
without an album-cover-art ID3 tag will display the folder’s JPEG files as a slideshow<br />
in the screen area reserved for showing album cover art<br />
Playing Videos<br />
Selecting a video file plays the file If other video files are listed on the screen, the<br />
<strong>HS</strong> <strong>280</strong>/<strong>HS</strong> <strong>210</strong> will play each one, in order as they appear on the screen<br />
Playing Files from Networked Devices<br />
The <strong>HS</strong> <strong>280</strong>/<strong>HS</strong> <strong>210</strong> can display JPEG picture files, play MP3 audio files (up to 320kbps<br />
bitrate) and show AVI, MP4 (up to 4Mbps bitrate) video files stored on compatible<br />
devices that are on the network connected to the <strong>HS</strong> <strong>280</strong>/<strong>HS</strong> <strong>210</strong>’s Ethernet jack<br />
For the <strong>HS</strong> <strong>280</strong>/<strong>HS</strong> <strong>210</strong> to interface with a networked device on the LAN, the device<br />
must be running UPnP-compliant media software such as Windows Media Player,<br />
MediaLink or EyeConnect The <strong>HS</strong> <strong>280</strong>/<strong>HS</strong> <strong>210</strong> does not support Ethernet connection<br />
through a proxy<br />
Sharing Files<br />
Before you can access files located on other devices via the network, each device must<br />
first give permission to share files with the <strong>HS</strong> <strong>280</strong>/<strong>HS</strong> <strong>210</strong> On a computer running<br />
Windows, you would use Windows Media Player:<br />
1<br />
On your computer, open Windows Media Player<br />
2 Open the Library menu and select Media Sharing<br />
The Media Sharing window will appear<br />
ENGLISH
3 Click in the Share My Media box, then click on the <strong>HS</strong> <strong>280</strong>/<strong>HS</strong> <strong>210</strong> icon and select<br />
Allow, then select OK<br />
The device’s media should now be available to the <strong>HS</strong> <strong>280</strong>/<strong>HS</strong> <strong>210</strong><br />
NOTE: To enable media sharing with other types of computers, operating systems or<br />
UPnP media software, check the instructions for the computer, operating system or<br />
media player<br />
To access files on networked devices:<br />
Press the Network button on the remote<br />
– or –<br />
Press the Activity button on the remote and select Network The names of all devices<br />
on the network that have given file-sharing permission will appear on the OSD Select<br />
the device that has the media you want to access<br />
Select the type of media you want to view or hear<br />
Viewing Pictures<br />
Selecting Pictures displays a list of all the different ways to access the picture media<br />
on the networked device<br />
Select a way to access pictures; then navigate to the pictures you want to view<br />
26<br />
Selecting a JPEG file displays the image on the TV (A Pause indicator appears near the<br />
screen’s upper-right corner )<br />
• To skip to the next or previous JPEG file, press the J or I button<br />
• To exit and return to the file list screen, press the 0 button<br />
Pressing the Bbutton while an image is being displayed initiates a slide show that<br />
displays each subsequent JPEG in the current folder in order as they appear on the<br />
OSD screen The J, I and 0 buttons work in slideshow mode the same as when<br />
viewing individual JPEGs<br />
Note: You can change the amount of time each picture stays on screen during a slide<br />
show by pressing the right cursor button during the show The available options are<br />
between one second and ten seconds<br />
Playing Music<br />
Selecting Music displays a list of all the different ways to access the MP3 media on the<br />
networked device<br />
Select a way to access music; then navigate to the music you want to hear<br />
Selecting an MP3 file plays the file
Troubleshooting<br />
27<br />
If there are other MP3s in the folder with the one that you've selected, the <strong>HS</strong> <strong>280</strong>/<br />
<strong>HS</strong> <strong>210</strong> will play each one, in order as they appear on the OSD screen<br />
• To skip to the next or previous MP3 file, press the J or I button To pause<br />
play, press the B/1 button To resume play, press the B/1button again<br />
• To exit and return to file list screen, press the 0 button<br />
Playing Videos<br />
Selecting a video file plays the file If there are other video files in the folder, the<br />
<strong>HS</strong> <strong>280</strong>/<strong>HS</strong> <strong>210</strong> will play each one, in order as they appear on the OSD screen<br />
If your <strong>HS</strong> <strong>280</strong>/<strong>HS</strong> <strong>210</strong> system isn’t performing the way you think it should, check to see if the problem is covered in this section before calling your dealer or contacting <strong>Harman</strong><br />
<strong>Kardon</strong><br />
The receiver won’t power up (the Power Indicator is not lit):<br />
•<br />
•<br />
Check that the receiver’s AC Power Cord is properly plugged into the receiver’s<br />
AC Power Input connector<br />
Check that the AC power cord is plugged into a working AC outlet and that the<br />
AC outlet is not controlled by a switch<br />
Sound plays through the <strong>HS</strong> <strong>280</strong>/<strong>HS</strong> <strong>210</strong> speakers, but there is no TV picture:<br />
•<br />
•<br />
•<br />
Check the connection between the receiver and the TV<br />
Check that the TV is turned on and is set to the proper input source<br />
Confirm that all of the choices made in the Settings: Video menu are correct for<br />
your TV<br />
• If you’re using the HDMI connection, be sure that the TV or video display is<br />
HDCP-compliant If the TV is not HDCP-compliant, disconnect the HDMI cable<br />
and use the receiver’s S-Video or composite-video connection<br />
There is no sound coming from the subwoofer:<br />
•<br />
•<br />
•<br />
•<br />
•<br />
Check that the subwoofer’s power cord is plugged into a working AC outlet<br />
Check that the subwoofer’s Power Switch is in the on position<br />
Check that the Subwoofer Level Control is not turned all the way down (fully<br />
counterclockwise)<br />
Check the audio connection between the receiver and the subwoofer<br />
Check the receiver’s Settings: Audio: Subwoofer menu to make sure that the<br />
subwoofer volume has not been set at -10dB<br />
There is a constant hum in the sound:<br />
• Check that all input cables are plugged all the way into their connectors<br />
• Check that all cables are at least 3m (9 8 ft ) from fluorescent lights<br />
• Check that all cable connectors are clean If necessary, wipe them with a cloth<br />
slightly moistened with alcohol<br />
• Turn the subwoofer’s Power switch off If the hum goes away, there is a ground<br />
loop between the subwoofer and the receiver Plugging the subwoofer’s Power<br />
Cord into the same AC outlet that the receiver is plugged into should eliminate<br />
the ground loop<br />
The disc does not play:<br />
•<br />
•<br />
•<br />
Check that the disc is inserted correctly (label-side up)<br />
Check that the disc is the correct type: DVD, DVD-R, DVD-RW, DVD+R/RW, VCD,<br />
SVCD, CD, CD-R/RW, MP3, WMA (v7and v8) Other disc types will not play<br />
Check that the disc surface is clean and not scratched<br />
There is noise or other interference in the picture while the <strong>HS</strong> <strong>280</strong> is playing<br />
a DVD:<br />
• Check that the disc surface is clean and not scratched<br />
• If you have the receiver’s video output connected to your TV through your<br />
VCR, the copy-protection program on some DVDs could affect picture quality<br />
Connect the receiver’s video output directly to your TV’s video input<br />
The sound and picture are out of sync:<br />
• Check the Audio: Settings: Delay menu and change the Delay setting to put the<br />
sound back in sync with the picture<br />
The <strong>HS</strong> <strong>280</strong>/<strong>HS</strong> <strong>210</strong> cannot tune in radio stations:<br />
• Check that the FM antenna is correctly connected<br />
• Adjust the antenna’s position If necessary, use a powered FM antenna or an<br />
outdoor FM antenna<br />
The receiver does not respond to remote control commands:<br />
• Replace all three of the remote control’s batteries with fresh ones, and make<br />
sure to install them correctly<br />
• Hold the remote control closer to the receiver<br />
• Check that the receiver’s remote sensor is in line of sight with the remote<br />
control If necessary, use an optional <strong>Harman</strong> <strong>Kardon</strong> HE 1000 external IR<br />
receiver<br />
The remote does not control programmed components (TV or Video):<br />
•<br />
•<br />
Check that you have pressed the remote’s TV or Video button before trying to<br />
operate the component<br />
Re-learn the component’s commands into the remote<br />
The Ø symbol appears on the screen when you press a remote control button:<br />
•<br />
The selected function is not permitted at the time the button is pressed<br />
The receiver does not respond to commands, or behaves in an erratic way:<br />
•<br />
Unplug the receiver’s power cord from the AC outlet, wait 30 seconds, then<br />
plug it back in<br />
You can find additional troubleshooting information in the FAQs link on the Support<br />
page at www harmankardon com<br />
ENGLISH
DVD Language Code List<br />
The availability of specific languages for a DVD’s main audio track or subtitles is dependent on the choices made by the disc’s producer You should always consult the disc’s<br />
jacket for information on languages for any disc You may be required to enter a code from the list below to access a particular language<br />
Language Code<br />
Abkhazian ABK<br />
Afar AAR<br />
Afrikaans AFR<br />
Albanian ALB<br />
Amharic AMH<br />
Arabic ARA<br />
Armenian ARM<br />
Assamese ASM<br />
Aymara AYM<br />
Azerbaijani AZE<br />
Bashkir BAK<br />
Basque BAQ<br />
Bengali BEN<br />
Bihari languages BIH<br />
Bislama BIS<br />
Bosnian BOS<br />
Breton BRE<br />
Bulgarian BUL<br />
Burmese BUR<br />
Catalan CAT<br />
Central Khmer KHM<br />
Chinese CHI<br />
Corsican COS<br />
Croatian SCR<br />
Czech CZE<br />
Danish DAN<br />
Dutch DUT<br />
Dzongkha DZO<br />
English ENG<br />
Esperanto ESP<br />
Estonian EST<br />
Faroese FAO<br />
Fijian FIJ<br />
Finnish FIN<br />
French FRE<br />
Gaelic GAE<br />
Galician GLG<br />
Georgian GEO<br />
German GER<br />
Greek, Modern (post 1453) GRE<br />
Guarani GRN<br />
Gujarati GUJ<br />
Hausa HAU<br />
Hebrew HEB<br />
Hindi HIN<br />
Hungarian HUN<br />
Icelandic ICE<br />
Indonesian IND<br />
Interlingua INA<br />
Inuktitut IKU<br />
Inupiaq IPK<br />
Irish IRI<br />
Italian ITA<br />
Japanese JPN<br />
Javanese JAV<br />
Kalaallisut KAL<br />
Kannada KAN<br />
Kashmiri KAS<br />
Kazakh KAZ<br />
Kinyarwanda KIN<br />
Korean KOR<br />
Kurdish KUR<br />
Kyrgyz KIR<br />
Lao LAO<br />
Latin LAT<br />
Latvian LAV<br />
Lingala LIN<br />
Language Code<br />
Lithuanian LIT<br />
Macedonian MAC<br />
Malagasy MLG<br />
Malay MAY<br />
Maltese MLT<br />
Maori MAO<br />
Marathi MAR<br />
Moldavian MOL<br />
Mongolian MON<br />
Nauru NAU<br />
Nepali NEP<br />
Norwegian NOR<br />
Occitan (post 1500) OCI<br />
Oriya ORI<br />
Oromo ORM<br />
Panjabi PAN<br />
Persian PER<br />
Polish POL<br />
Portuguese POR<br />
Pushto PUS<br />
Quechua QUE<br />
Romanian RON<br />
Romansh ROH<br />
Rundi RUN<br />
Russian RUS<br />
Samoan SMO<br />
Sango SAG<br />
Sanskrit SAN<br />
Serbian SCC<br />
Shona SNA<br />
Sindhi SND<br />
Sinhala SIN<br />
Slovak SLO<br />
Slovenian SLV<br />
Somali SOM<br />
Sotho, Southern SOT<br />
Spanish SPA<br />
Sundanese SUN<br />
Swahili SWA<br />
Swati SSW<br />
Swedish SWE<br />
Tagalog TGL<br />
Tajik TGK<br />
Tamil TAM<br />
Tatar TAT<br />
Telugu TEL<br />
Thai THA<br />
Tibetan TIB<br />
Tigrinya TIR<br />
Tonga (Nyasa) TOG<br />
Tsonga TSO<br />
Tswana TSN<br />
Turkish TUR<br />
Turkmen TUK<br />
Twi TWI<br />
Ukrainian UKR<br />
Urdu URD<br />
Uzbek UZB<br />
Vietnamese VIE<br />
Volapük VOL<br />
Welsh WEL<br />
Western Frisian FRY<br />
Wolof WOL<br />
Xhosa XHO<br />
Yiddish YID<br />
Yoruba YOR<br />
Zulu ZUL<br />
28
Specifications<br />
<strong>HS</strong> <strong>280</strong>/<strong>HS</strong> <strong>210</strong> Receiver<br />
Audio Section<br />
Continuous average power, stereo mode (FTC):<br />
65 watts per channel, 120Hz – 20kHz, @
<strong>Harman</strong> Consumer Group, Inc<br />
8500 Balboa Boulevard, Northridge, CA 91329 USA<br />
516 255 4545 (USA only)<br />
www harmankardon com<br />
Made in P R C<br />
©2010 <strong>Harman</strong> International Industries, Incorporated All rights reserved<br />
Features, specifications and appearance are subject to change without notice<br />
<strong>Harman</strong> <strong>Kardon</strong> and CMMD are trademarks of <strong>Harman</strong> International Industries, Incorporated, registered in the United States and/or other countries<br />
Designed to Entertain is a trademark of <strong>Harman</strong> International Industries, Incorporated<br />
Dolby and the double-D symbol are registered trademarks of Dolby Laboratories<br />
EyeConnect is a trademark of Elgato Systems<br />
HDMI, the HDMI logo and High-Definition Multimedia Interface are trademarks of HDMI Licensing LLC<br />
Macintosh is a trademark of Apple Inc , registered in the United States and other countries<br />
This product incorporates copyright protection technology that is protected by U S patents and other intellectual property rights<br />
Use of this copyright protection technology must be authorized by Rovi Corporation, and is intended for home and other limited viewing<br />
uses only unless otherwise authorized by Rovi Corporation Reverse engineering or disassembly is prohibited<br />
Windows and Windows Media are registered trademarks of Microsoft Corporation in the United States and/or other countries<br />
WMA (Windows Media Audio) is a proprietary file format developed by Microsoft Corporation<br />
Part# 01 00 YS SM1 E2589<br />
30