
You also want an ePaper? Increase the reach of your titles
YUMPU automatically turns print PDFs into web optimized ePapers that Google loves.
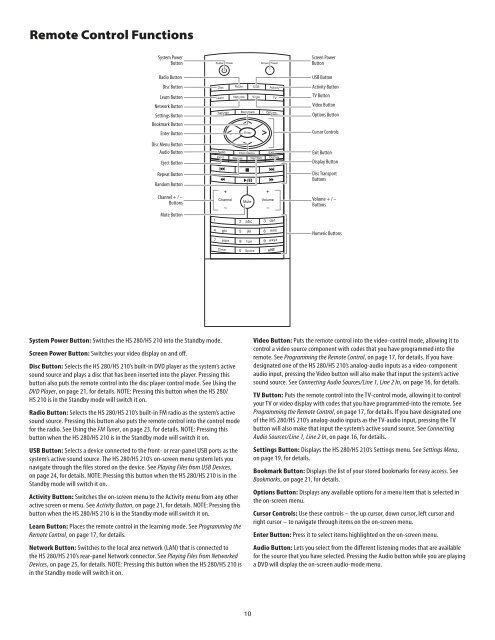
Remote Control Functions<br />
System System Power<br />
Button<br />
Radio Radio Button Button USB Button Button<br />
Disc Disc Button<br />
Activity Button Button<br />
Learn Learn Button<br />
TV Button<br />
Network Network Button<br />
Video Video Button Button<br />
Settings Settings Button<br />
Bookmark Button<br />
Options Options Button Button<br />
Enter Enter Button<br />
Cursor Cursor Controls Controls<br />
Disc Menu Disc Menu Button<br />
Audio Audio Button<br />
Exit Button Button<br />
Eject Eject Button<br />
Display Button Button<br />
Repeat Repeat Button<br />
Random Random Button<br />
Disc Transport Transport<br />
Buttons<br />
Channel Channel + / + – / –<br />
Buttons<br />
Mute Mute Button<br />
System Power Button: Switches the <strong>HS</strong> <strong>280</strong>/<strong>HS</strong> <strong>210</strong> into the Standby mode<br />
Screen Power Button: Switches your video display on and off<br />
Disc Button: Selects the <strong>HS</strong> <strong>280</strong>/<strong>HS</strong> <strong>210</strong>’s built-in DVD player as the system’s active<br />
sound source and plays a disc that has been inserted into the player Pressing this<br />
button also puts the remote control into the disc player control mode See Using the<br />
DVD Player, on page 21, for details NOTE: Pressing this button when the <strong>HS</strong> <strong>280</strong>/<br />
<strong>HS</strong> <strong>210</strong> is in the Standby mode will switch it on<br />
Radio Button: Selects the <strong>HS</strong> <strong>280</strong>/<strong>HS</strong> <strong>210</strong>’s built-in FM radio as the system’s active<br />
sound source Pressing this button also puts the remote control into the control mode<br />
for the radio See Using the FM Tuner, on page 23, for details NOTE: Pressing this<br />
button when the <strong>HS</strong> <strong>280</strong>/<strong>HS</strong> <strong>210</strong> is in the Standby mode will switch it on<br />
USB Button: Selects a device connected to the front- or rear-panel USB ports as the<br />
system’s active sound source The <strong>HS</strong> <strong>280</strong>/<strong>HS</strong> <strong>210</strong>’s on-screen menu system lets you<br />
navigate through the files stored on the device See Playing Files from USB Devices,<br />
on page 24, for details NOTE: Pressing this button when the <strong>HS</strong> <strong>280</strong>/<strong>HS</strong> <strong>210</strong> is in the<br />
Standby mode will switch it on<br />
Activity Button: Switches the on-screen menu to the Activity menu from any other<br />
active screen or menu See Activity Button, on page 21, for details NOTE: Pressing this<br />
button when the <strong>HS</strong> <strong>280</strong>/<strong>HS</strong> <strong>210</strong> is in the Standby mode will switch it on<br />
Learn Button: Places the remote control in the learning mode See Programming the<br />
Remote Control, on page 17, for details<br />
Network Button: Switches to the local area network (LAN) that is connected to<br />
the <strong>HS</strong> <strong>280</strong>/<strong>HS</strong> <strong>210</strong>’s rear-panel Network connector See Playing Files from Networked<br />
Devices, on page 25, for details NOTE: Pressing this button when the <strong>HS</strong> <strong>280</strong>/<strong>HS</strong> <strong>210</strong> is<br />
in the Standby mode will switch it on<br />
10<br />
Screen Power Power<br />
Button<br />
Volume + / – + / –<br />
Buttons<br />
Numeric Buttons Buttons<br />
Video Button: Puts the remote control into the video-control mode, allowing it to<br />
control a video source component with codes that you have programmed into the<br />
remote See Programming the Remote Control, on page 17, for details If you have<br />
designated one of the <strong>HS</strong> <strong>280</strong>/<strong>HS</strong> <strong>210</strong>’s analog-audio inputs as a video-component<br />
audio input, pressing the Video button will also make that input the system’s active<br />
sound source See Connecting Audio Sources/Line 1, Line 2 In, on page 16, for details<br />
TV Button: Puts the remote control into the TV-control mode, allowing it to control<br />
your TV or video display with codes that you have programmed-into the remote See<br />
Programming the Remote Control, on page 17, for details If you have designated one<br />
of the <strong>HS</strong> <strong>280</strong>/<strong>HS</strong> <strong>210</strong>’s analog-audio inputs as the TV-audio input, pressing the TV<br />
button will also make that input the system’s active sound source See Connecting<br />
Audio Sources/Line 1, Line 2 In, on page 16, for details<br />
Settings Button: Displays the <strong>HS</strong> <strong>280</strong>/<strong>HS</strong> <strong>210</strong>’s Settings menu See Settings Menu,<br />
on page 19, for details<br />
Bookmark Button: Displays the list of your stored bookmarks for easy access See<br />
Bookmarks, on page 21, for details<br />
Options Button: Displays any available options for a menu item that is selected in<br />
the on-screen menu<br />
Cursor Controls: Use these controls – the up cursor, down cursor, left cursor and<br />
right cursor – to navigate through items on the on-screen menu<br />
Enter Button: Press it to select items highlighted on the on-screen menu<br />
Audio Button: Lets you select from the different listening modes that are available<br />
for the source that you have selected Pressing the Audio button while you are playing<br />
a DVD will display the on-screen audio-mode menu