
Create successful ePaper yourself
Turn your PDF publications into a flip-book with our unique Google optimized e-Paper software.
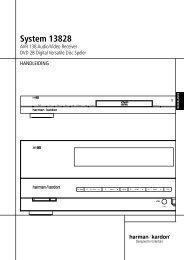
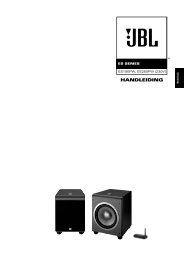
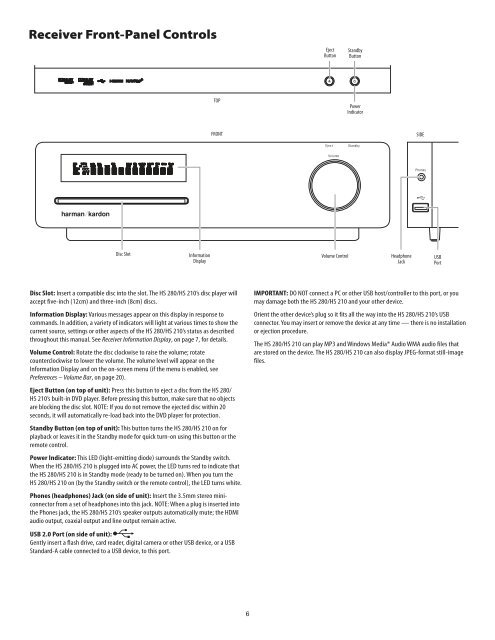
Receiver Front-Panel Controls<br />
Disc Slot Information<br />
Display<br />
TOP<br />
FRONT<br />
Disc Slot: Insert a compatible disc into the slot The <strong>HS</strong> <strong>280</strong>/<strong>HS</strong> <strong>210</strong>’s disc player will<br />
accept five-inch (12cm) and three-inch (8cm) discs<br />
Information Display: Various messages appear on this display in response to<br />
commands In addition, a variety of indicators will light at various times to show the<br />
current source, settings or other aspects of the <strong>HS</strong> <strong>280</strong>/<strong>HS</strong> <strong>210</strong>’s status as described<br />
throughout this manual See Receiver Information Display, on page 7, for details<br />
Volume Control: Rotate the disc clockwise to raise the volume; rotate<br />
counterclockwise to lower the volume The volume level will appear on the<br />
Information Display and on the on-screen menu (if the menu is enabled, see<br />
Preferences – Volume Bar, on page 20)<br />
Eject Button (on top of unit): Press this button to eject a disc from the <strong>HS</strong> <strong>280</strong>/<br />
<strong>HS</strong> <strong>210</strong>’s built-in DVD player Before pressing this button, make sure that no objects<br />
are blocking the disc slot NOTE: If you do not remove the ejected disc within 20<br />
seconds, it will automatically re-load back into the DVD player for protection<br />
Standby Button (on top of unit): This button turns the <strong>HS</strong> <strong>280</strong>/<strong>HS</strong> <strong>210</strong> on for<br />
playback or leaves it in the Standby mode for quick turn-on using this button or the<br />
remote control<br />
Power Indicator: This LED (light-emitting diode) surrounds the Standby switch<br />
When the <strong>HS</strong> <strong>280</strong>/<strong>HS</strong> <strong>210</strong> is plugged into AC power, the LED turns red to indicate that<br />
the <strong>HS</strong> <strong>280</strong>/<strong>HS</strong> <strong>210</strong> is in Standby mode (ready to be turned on) When you turn the<br />
<strong>HS</strong> <strong>280</strong>/<strong>HS</strong> <strong>210</strong> on (by the Standby switch or the remote control), the LED turns white<br />
Phones (headphones) Jack (on side of unit): Insert the 3 5mm stereo miniconnector<br />
from a set of headphones into this jack NOTE: When a plug is inserted into<br />
the Phones jack, the <strong>HS</strong> <strong>280</strong>/<strong>HS</strong> <strong>210</strong>’s speaker outputs automatically mute; the HDMI<br />
audio output, coaxial output and line output remain active<br />
USB 2.0 Port (on side of unit):<br />
Gently insert a flash drive, card reader, digital camera or other USB device, or a USB<br />
Standard-A cable connected to a USB device, to this port<br />
6<br />
Eject<br />
Button<br />
Standby<br />
Button<br />
Power<br />
Indicator<br />
Volume Control Headphone<br />
Jack<br />
SIDE<br />
USB<br />
Port<br />
IMPORTANT: DO NOT connect a PC or other USB host/controller to this port, or you<br />
may damage both the <strong>HS</strong> <strong>280</strong>/<strong>HS</strong> <strong>210</strong> and your other device<br />
Orient the other device’s plug so it fits all the way into the <strong>HS</strong> <strong>280</strong>/<strong>HS</strong> <strong>210</strong>’s USB<br />
connector You may insert or remove the device at any time — there is no installation<br />
or ejection procedure<br />
The <strong>HS</strong> <strong>280</strong>/<strong>HS</strong> <strong>210</strong> can play MP3 and Windows Media® Audio WMA audio files that<br />
are stored on the device The <strong>HS</strong> <strong>280</strong>/<strong>HS</strong> <strong>210</strong> can also display JPEG-format still-image<br />
files