
Create successful ePaper yourself
Turn your PDF publications into a flip-book with our unique Google optimized e-Paper software.
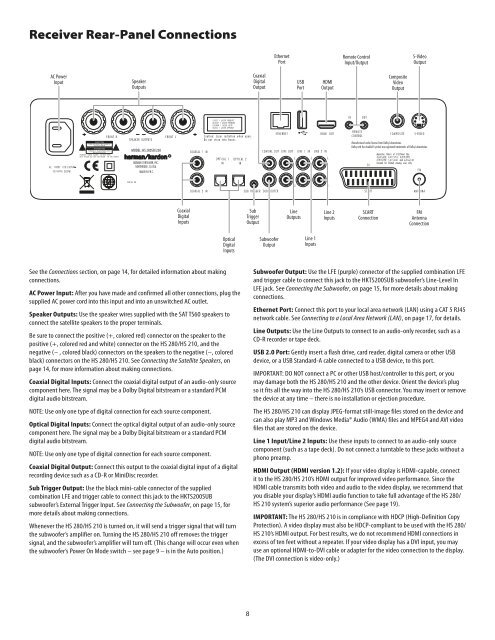
Receiver Rear-Panel Connections<br />
AC Power<br />
AC Power<br />
Input<br />
Speaker Speaker<br />
Outputs<br />
MODEL: <strong>HS</strong> 2X0SO/230<br />
Coaxial<br />
Digital<br />
Inputs<br />
See the Connections section, on page 14, for detailed information about making<br />
connections<br />
Optical<br />
Digital<br />
Inputs<br />
AC Power Input: After you have made and confirmed all other connections, plug the<br />
supplied AC power cord into this input and into an unswitched AC outlet<br />
Speaker Outputs: Use the speaker wires supplied with the SAT TS60 speakers to<br />
connect the satellite speakers to the proper terminals<br />
Be sure to connect the positive (+, colored red) connector on the speaker to the<br />
positive (+, colored red and white) connector on the <strong>HS</strong> <strong>280</strong>/<strong>HS</strong> <strong>210</strong>, and the<br />
negative (– , colored black) connectors on the speakers to the negative (–, colored<br />
black) connectors on the <strong>HS</strong> <strong>280</strong>/<strong>HS</strong> <strong>210</strong> See Connecting the Satellite Speakers, on<br />
page 14, for more information about making connections<br />
Coaxial Digital Inputs: Connect the coaxial digital output of an audio-only source<br />
component here The signal may be a Dolby Digital bitstream or a standard PCM<br />
digital audio bitstream<br />
NOTE: Use only one type of digital connection for each source component<br />
Optical Digital Inputs: Connect the optical digital output of an audio-only source<br />
component here The signal may be a Dolby Digital bitstream or a standard PCM<br />
digital audio bitstream<br />
NOTE: Use only one type of digital connection for each source component<br />
Coaxial Digital Output: Connect this output to the coaxial digital input of a digital<br />
recording device such as a CD-R or MiniDisc recorder<br />
Sub Trigger Output: Use the black mini-cable connector of the supplied<br />
combination LFE and trigger cable to connect this jack to the HKTS200SUB<br />
subwoofer’s External Trigger Input See Connecting the Subwoofer, on page 15, for<br />
more details about making connections<br />
Whenever the <strong>HS</strong> <strong>280</strong>/<strong>HS</strong> <strong>210</strong> is turned on, it will send a trigger signal that will turn<br />
the subwoofer’s amplifier on Turning the <strong>HS</strong> <strong>280</strong>/<strong>HS</strong> <strong>210</strong> off removes the trigger<br />
signal, and the subwoofer’s amplifier will turn off (This change will occur even when<br />
the subwoofer’s Power On Mode switch – see page 9 – is in the Auto position )<br />
8<br />
Coaxial<br />
Coaxial<br />
Digital Digital<br />
Output<br />
Sub<br />
Trigger<br />
Output<br />
Ethernet Ethernet<br />
Port<br />
Subwoofer<br />
Output<br />
USB<br />
USB<br />
Port<br />
Line<br />
Outputs<br />
Line 1<br />
Inputs<br />
HDMI<br />
HDMI<br />
Output<br />
Line 2 2<br />
Inputs<br />
Remote Control<br />
Remote Control<br />
Input/Output<br />
SCART<br />
Connection<br />
Composite<br />
Composite Video<br />
Video<br />
Output Output<br />
S-video<br />
S-Video<br />
Output<br />
FM<br />
Antenna<br />
Connection<br />
Subwoofer Output: Use the LFE (purple) connector of the supplied combination LFE<br />
and trigger cable to connect this jack to the HKTS200SUB subwoofer’s Line-Level In<br />
LFE jack See Connecting the Subwoofer, on page 15, for more details about making<br />
connections<br />
Ethernet Port: Connect this port to your local area network (LAN) using a CAT 5 RJ45<br />
network cable See Connecting to a Local Area Network (LAN), on page 17, for details<br />
Line Outputs: Use the Line Outputs to connect to an audio-only recorder, such as a<br />
CD-R recorder or tape deck<br />
USB 2.0 Port: Gently insert a flash drive, card reader, digital camera or other USB<br />
device, or a USB Standard-A cable connected to a USB device, to this port<br />
IMPORTANT: DO NOT connect a PC or other USB host/controller to this port, or you<br />
may damage both the <strong>HS</strong> <strong>280</strong>/<strong>HS</strong> <strong>210</strong> and the other device Orient the device’s plug<br />
so it fits all the way into the <strong>HS</strong> <strong>280</strong>/<strong>HS</strong> <strong>210</strong>’s USB connector You may insert or remove<br />
the device at any time – there is no installation or ejection procedure<br />
The <strong>HS</strong> <strong>280</strong>/<strong>HS</strong> <strong>210</strong> can display JPEG-format still-image files stored on the device and<br />
can also play MP3 and Windows Media® Audio (WMA) files and MPEG4 and AVI video<br />
files that are stored on the device<br />
Line 1 Input/Line 2 Inputs: Use these inputs to connect to an audio-only source<br />
component (such as a tape deck) Do not connect a turntable to these jacks without a<br />
phono preamp<br />
HDMI Output (HDMI version 1.2): If your video display is HDMI-capable, connect<br />
it to the <strong>HS</strong> <strong>280</strong>/<strong>HS</strong> <strong>210</strong>’s HDMI output for improved video performance Since the<br />
HDMI cable transmits both video and audio to the video display, we recommend that<br />
you disable your display’s HDMI audio function to take full advantage of the <strong>HS</strong> <strong>280</strong>/<br />
<strong>HS</strong> <strong>210</strong> system’s superior audio performance (See page 19)<br />
IMPORTANT: The <strong>HS</strong> <strong>280</strong>/<strong>HS</strong> <strong>210</strong> is in compliance with HDCP (High-Definition Copy<br />
Protection) A video display must also be HDCP-compliant to be used with the <strong>HS</strong> <strong>280</strong>/<br />
<strong>HS</strong> <strong>210</strong>’s HDMI output For best results, we do not recommend HDMI connections in<br />
excess of ten feet without a repeater If your video display has a DVI input, you may<br />
use an optional HDMI-to-DVI cable or adapter for the video connection to the display<br />
(The DVI connection is video-only )