N6891 : Barbie® Doll'd Up Nails™ Digital Nail Printer - US - Mattel
N6891 : Barbie® Doll'd Up Nails™ Digital Nail Printer - US - Mattel
N6891 : Barbie® Doll'd Up Nails™ Digital Nail Printer - US - Mattel

Create successful ePaper yourself
Turn your PDF publications into a flip-book with our unique Google optimized e-Paper software.
Please remove everything from the package and compare to the contents shown on page 4.<br />
If any items are missing, please call 1-800-524-8697.<br />
Keep these instructions for future reference as they contain important information.<br />
<strong>N6891</strong>-0920<br />
DANGER – To prevent electric shock, do not immerse in water; wipe clean with damp cloth.<br />
Electrical rating (Input: AC 120V 60 Hz; Output: DC 24V 0.5A)<br />
<strong>Mattel</strong>, Inc.<br />
<strong>N6891</strong><br />
Z102<br />
Immersing this toy can result in an electric shock.<br />
N83<br />
Adults Note: Adult supervision required. Periodically examine this product for damage to the cord, housing or<br />
other parts that may result in the risk of fire, electric shock or injury. If the product is damaged, do not use it.<br />
This power unit is intended to be correctly orientated in a vertical or floor mount position.<br />
CAUTION – ELECTRIC – OPERATED PRODUCT – Not recommended for children under 8 years of age. As<br />
with all electrical products, precautions should be observed during handling and use to reduce the risk<br />
of electric shock.<br />
If the printer experiences a loss of function or decrease in performance, reset the printer by holding down the<br />
power button for three seconds. Wait a few seconds, and press the power button again to turn it on.<br />
DOLL’D UP NAILS C<strong>US</strong>TOMER SUPPORT<br />
For questions about Doll’d up nails, call:<br />
<strong>US</strong> and Canada: service.mattel.com or call 877 3BARBIE (877-322-7243), M-F 9am - 7pm, Sat 11am - 5pm, Eastern<br />
Time.<br />
UK: service.mattel.com/uk or Call 01628 500303, M-F 9am - 5pm<br />
Australia: 1300 135 312 or 1800 674 753 M-F 8am - 4:30pm, EST.<br />
New Zealand: 0800 174 063 M-F 10am - 6:30pm, Australia EST.<br />
© 2009 <strong>Mattel</strong>, Inc., All Rights Reserved.<br />
Macromedia is a trademark of Adobe Systems Incorporated. Pentium is a trademark or registered trademark of<br />
Intel Corporation or its subsidiaries in the United States and other countries.<br />
2<br />
WARNING FOR PRE-PRINT COAT, TOP COAT AND WHITE POLISH: Flammable. Keep away from heat and<br />
flame. Avoid contact with eyes.<br />
<strong>Nail</strong> Ink, TOP COAT, PRE-PRINT COAT and WHITE POLISH containers in this product have been sealed with tamperevident<br />
seals. If a seal is broken, do not use this product and call 1-800-524-8697 for a replacement. These items<br />
may stain fabrics and other surfaces. Avoid contact with carpet, clothing, walls and furniture.<br />
Always use nail polish in a well ventilated area.<br />
CONSUMER INFORMATION<br />
Need Assistance? Visit service.mattel.com or call 1-800-524-8697<br />
(<strong>US</strong> and Canada only), M-F 9AM - 7PM & SAT 11AM - 5PM, Eastern.<br />
SERVICE.MATTEL.COM<br />
Protect the environment by not<br />
disposing of this product with<br />
household waste (2002/96/EC).<br />
Check your local authority for<br />
recycling advice and facilities.<br />
8+<br />
<strong>Mattel</strong> Canada Inc., Mississauga, Ontario L5R 3W2. You<br />
may call us free at 1-800-524-8697.<br />
<strong>Mattel</strong> U.K. Ltd., Vanwall Business Park, Maidenhead SL6<br />
4UB. Helpline 01628 500303.<br />
<strong>Mattel</strong> Australia Pty., Ltd., Richmond, Victoria. 3121.<br />
Consumer Advisory Service - 1300 135 312.<br />
<strong>Mattel</strong> East Asia Ltd., Room 1106, South Tower, World<br />
Finance Centre, Harbour City, Tsimshatsui, HK, China.<br />
Diimport & Diedarkan Oleh: <strong>Mattel</strong> SEA Ptd Ltd.(993532-<br />
P) Lot 13.5, 13th Floor, Menara Lien Hoe, Persiaran<br />
Tropicana Golf Country Resort, 47410 PJ. Tel:03-78803817,<br />
Fax:03-78803867.<br />
<strong>Mattel</strong>, Inc. 636 Girard Avenue, East Aurora NY 14052.<br />
U.S.A. Consumer Relations 1 (800) 524-8697.<br />
®
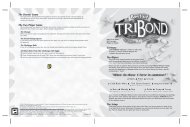
Table of Contents<br />
What’s in the Box .................................................................................................4<br />
Introduction ..........................................................................................................5<br />
System Requirements .........................................................................................5<br />
Installation of Software ......................................................................................6<br />
Installation of ink cartridge ..............................................................................6<br />
Connect ................................................................................................................7<br />
Alignment of Camera and <strong>Printer</strong> ..................................................................8<br />
Interface Overview .............................................................................................9<br />
Design & Print .................................................................................................... 10<br />
Favorite Designs ............................................................................................... 12<br />
Import Your Own Images ............................................................................... 13<br />
Helpful Tips..........................................................................................................14<br />
Refill Orders ........................................................................................................14<br />
Settings ............................................................................................................... 15<br />
Maintenance .....................................................................................................16<br />
Cleaning the Finger Holder .................................................................................. 16<br />
Changing the Ink Cartridge ................................................................................. 16<br />
How Much Ink Do I Have Left? ............................................................................. 16<br />
What Do the Lights Mean? .................................................................................... 16<br />
Troubleshooting .................................................................................................17<br />
3
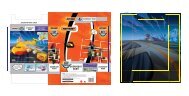
Power adapter<br />
CD-ROM<br />
4<br />
© 2008 <strong>Mattel</strong>, Inc. All Rights Reserved.<br />
What’s in the Box<br />
White Polish<br />
<br />
Pre-print Coat Top Coat<br />
<strong>Printer</strong><br />
alignment<br />
card<br />
<strong>Printer</strong><br />
<strong>US</strong>B cable<br />
Quick Start guide Instruction manual<br />
Quick Start Guide<br />
Ink Cartridge inside<br />
foil pouch<br />
Manual
Lid<br />
Finger Slot<br />
Introduction<br />
On/Off<br />
Camera/Print Button<br />
<strong>US</strong>B port Power<br />
System Requirements<br />
•PC (Windows XP and Vista only)<br />
•Pentium III 800 MHz or above (Intel Core 1.8 GHz or above recommended)<br />
•512 MB of RAM (1GB of RAM or above recommended)<br />
•Screen resolution 1024 x 768<br />
•800 MB free hard drive space<br />
•Direct X 9.0 or above<br />
•<strong>US</strong>B 2.0<br />
•Internet Explorer 6.0 or later with SP1 and Macromedia Flash Plug In.<br />
•Internet Connection recommended (Internet connection required for updates only.)<br />
5
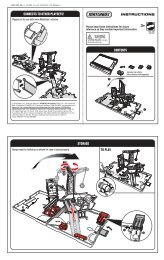
IMPORTANT NOTE: Install the software<br />
before connecting the printer to your<br />
computer.<br />
1. Insert the CD-ROM into your CD drive to<br />
launch the installer. (If it doesn’t launch<br />
automatically, double-click “My Computer”<br />
on your Desktop, then double-click on the<br />
CD drive.) Double click “setup.exe.”<br />
2. Follow the on screen prompts to install<br />
the software.<br />
3. After the software is installed, connect<br />
the power cord.<br />
Remove the printhead from the<br />
foil package, as shown here.<br />
Remove the tape. Do not touch<br />
the contacts.<br />
6<br />
Any other printers you have<br />
can stay connected.<br />
1. Open top lid, allow a few seconds for the ink cartridge carrier to move to the<br />
right and then open the lid.<br />
2. Insert nail ink cartridge.<br />
3. Close the ink cartridge carrier.<br />
4. Close the top lid.<br />
1<br />
1<br />
2<br />
Software<br />
Ink Cartridge<br />
Installation<br />
2 3 4
3<br />
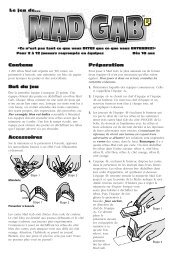
Connect<br />
1. Connect the printer to your computer with the <strong>US</strong>B cable.<br />
2. “Found New Hardware Wizard” appears. Select “No, not at this time”<br />
and click “Next”.<br />
3. Select “Install the software automatically.” Click “Next”.<br />
4. Please read the Software License Agreement and click “Yes”.<br />
5. Click “Finish” to complete the installation.<br />
<strong>US</strong>B cable<br />
<strong>US</strong>B port<br />
Power adapter<br />
Power<br />
7
4<br />
1. After installing the<br />
software, click the<br />
icon to<br />
launch the<br />
program.<br />
2. The program<br />
launches and<br />
automatically opens<br />
the Camera Settings<br />
window.<br />
3. Follow the directions<br />
on screen to align the<br />
camera.<br />
4. When you have<br />
finished aligning the<br />
camera, the <strong>Printer</strong><br />
Alignment window<br />
opens.<br />
5. Follow the directions<br />
on screen to align the<br />
printer.<br />
8<br />
Alignment of Camera and <strong>Printer</strong>
Interface Overview<br />
Here is the screen where you start.<br />
Here are the buttons and icons explained.<br />
SIZING TOOL<br />
COLOR BAR<br />
ZOOM TOOL<br />
FLIP TOOL<br />
MIRROR TOOL<br />
SHOW/HIDE TOOL<br />
CAMERA ICON<br />
PRINT ICON<br />
DESIGN WINDOW<br />
CATEGORY MENU<br />
LAST TEN DESIGNS<br />
CLOSE<br />
MINIMIZE<br />
HOME<br />
SCROLL BAR<br />
9
1<br />
2<br />
10<br />
After the software<br />
launches, click on<br />
DESIGN & PRINT.<br />
Design & Print<br />
Follow these steps to use your Doll’d <strong>Up</strong> <strong>Nail</strong>s nail printer.<br />
3<br />
4<br />
Apply a thin layer of WHITE POLISH to your<br />
fingernails. Let dry.<br />
Important: Ensure WHITE POLISH is applied prior to printing the design. Ink<br />
staining may occur on the fingernail if WHITE POLISH is not applied.<br />
Note: If you already have a colored nail polish<br />
(not included) on your nail, you can skip this step.<br />
Apply a thin layer of PRE-PRINT COAT to your fingernails. Let dry.<br />
Note: Doll’d <strong>Up</strong> <strong>Nail</strong>s PRE-PRINT COAT is specially formulated to allow<br />
the cosmetic nail ink to stick to your nails. Doll’d <strong>Up</strong> <strong>Nail</strong>s PRE-PRINT<br />
COAT must be applied before adding nail designs to prevent smearing<br />
when the TOP COAT is applied. When using other nail polish (not<br />
included), Doll’d <strong>Up</strong> <strong>Nail</strong>s PRE-PRINT COAT* must be applied over nail<br />
polish before adding nail designs.<br />
*Pre-Print Coat available through <strong>Mattel</strong> only.<br />
Click the camera icon on your computer.
5<br />
6<br />
7<br />
8<br />
Insert a finger into the finger slot. Press all the way in, until the back wall<br />
moves and the mechanism raises up. Your finger will be held securely in<br />
the up position, ready to be photographed.<br />
The left button on the printer will<br />
flash. Press that button to take a<br />
snapshot of your finger.<br />
Press down on the finger slot until it<br />
clicks, then remove your finger.<br />
Click on a nail design. Use the scaling and sizing tools to fit the design to<br />
your finger. Click on the image and drag to move if necessary.<br />
Mix it <strong>Up</strong> Spelling B My Favorites Swatch Book<br />
Click the print icon on your computer. Put your<br />
finger back into the finger slot (as in step 5), making<br />
sure it lines up with the image on the computer<br />
screen.<br />
*Not actual camera view.<br />
* Scroll to see more nail designs.<br />
11
9<br />
10<br />
11<br />
12<br />
Press the flashing button on the printer to<br />
print.<br />
Press down on the finger slot until it clicks,<br />
then remove your finger carefully.<br />
Give the design a few seconds to dry, then<br />
apply TOP COAT if you want to keep the<br />
design. Allow 5 minutes for TOP COAT to dry.<br />
The nail design washes off easily with soap<br />
and water if you do not apply the TOP COAT.<br />
LONGER NAILS: For nails longer than 1/2”, position designs in lower portion of<br />
nail for a French manicure look.<br />
<strong>Nail</strong> Design Print Size<br />
0.56” maximum length<br />
0.22” minimum length<br />
THUMB POSITION: When inserting thumb into printer, do not bend your knuckle.<br />
CREATIVE TIP: Print different designs on the same<br />
finger to get a cool layering effect!<br />
1<br />
2<br />
3<br />
Favorite Designs<br />
From the Design & Print screen, pick<br />
a favorite design by clicking and<br />
dragging it to the Pink Star at the<br />
lower right hand side of the category.<br />
The Pink Star pulses, indicating that it<br />
has accepted the design.<br />
Scroll through the categories and<br />
click on “My Favorites”.
4<br />
5<br />
6<br />
7<br />
The design that was just dragged to the star appears in the “My Favorites”<br />
category.<br />
Remove the design by clicking and dragging it to the trash can in the<br />
lower right hand side of the category.<br />
Trash can pulses, indicating that it has removed the design. This does<br />
not delete that design from the program. This only removes it from “My<br />
Favorites”.<br />
The design that was just dragged to the trash can disappears from the<br />
“My Favorites” category.<br />
Import Your Own Images<br />
1<br />
2<br />
3<br />
4<br />
5<br />
6<br />
7<br />
8<br />
9<br />
Click on the Import menu. Import pop-up<br />
window will appear.<br />
Click Browse. Find image file on computer<br />
and click OPEN.<br />
File name will appear in Import text box.<br />
Image will appear in the nail window below.<br />
Use the scroll bars at the top and left side to find the area of the image<br />
desired.<br />
Slide the bar up and down on the zoom tool<br />
at the right to zoom in and zoom out until<br />
desired design has been achieved in the nail<br />
window.<br />
Click Save.<br />
Scroll through design categories and click on<br />
“Mani By Me”.<br />
Imported design will appear in this category.<br />
13
IMPORTANT: Make sure white polish is applied prior to printing the design.<br />
Ink staining may occur on the fingernail if white polish is not applied. NOTE:<br />
your own colored polish may also be used instead of white polish.<br />
PRE-PRINT POLISH: Apply a thin coat of pre-print coat to your fingernail. Allow<br />
to dry completely.<br />
TOP COAT: Give the design a few seconds to dry, then apply top coat if you<br />
want to keep the design. Allow 5 minutes for top coat to dry. The nail design<br />
washes off easily with soap and water if it is still wet, but if it has dried use nail<br />
polish remover (not included).<br />
IMPORTANT: Do not print designs on acrylic nails.<br />
14<br />
Helpful Tips<br />
Refill Orders<br />
To order refills of the pre-print coat, top coat and white polishes or replacement<br />
ink cartridges, please order on the website or call the telephone number.<br />
service.mattel.com 1-888-892-6123<br />
NOTE: Specially formulated Pre-Print Coat and <strong>Nail</strong> Ink Cartridge are available through<br />
<strong>Mattel</strong> only. Refills available while supplies last.
Settings<br />
Camera settings<br />
Camera brightness: Drag the slider to<br />
adjust the image brightness.<br />
Camera contrast: Drag the slider to adjust<br />
the image contrast.<br />
Camera alignment: Follow instructions on<br />
computer screen.<br />
<strong>Printer</strong> settings<br />
Ink levels: Click to display the amount of<br />
ink left in the ink cartridge.<br />
Clean cartridge: Click to run the ink<br />
cartridge through a cleaning cycle.<br />
Use this if the colors of your nail designs<br />
are printing faintly, or if one color is not<br />
printing at all.<br />
<strong>Printer</strong> alignment: Follow instructions on<br />
computer screen.<br />
Audio<br />
Adjust volume: Drag the slider to adjust the volume.<br />
Check for updates<br />
To get automatic software updates, check the box in the application.<br />
The software will check for updates the next time it is launched. (Internet<br />
connection is required for updates. See System Requirements on page 5 for<br />
specs.)<br />
15
16<br />
Maintenance<br />
Cleaning the Finger Holder<br />
To clean the finger holder if it gets ink on it, turn off the printer. Use a dab of<br />
nail polish remover (not included) on a clean rag to carefully clean off the ink.<br />
Changing the Ink Cartridge<br />
See Installation of Ink Cartridge section.<br />
NOTE: Dispose of the used ink cartridge responsibly. Ink cartridges can be<br />
recycled through many retailers. Check the web sites of office supply retailers<br />
to find out if they accept used ink cartridges. Recycling helps to conserve<br />
natural resources and prevents more useable items from filling landfills.<br />
How Much Ink Do I have Left?<br />
Go to Settings > <strong>Printer</strong> and select “ink level.”<br />
What Do the Lights Mean?<br />
Left button = Camera/Print Button<br />
Light off - idle<br />
Light blinking - waiting for you to press to take a photo or print a design<br />
Light on - printing<br />
Right button = power button<br />
Light on – power on<br />
Light off – power off<br />
Light blinking rapidly – the printer has stalled. If a ink cartridge carrier<br />
stall happens, open the top cover and check the carrier for any obstruction.<br />
Then hold the power button down for 3 seconds to turn off the printer. Press the<br />
power button again to restart.<br />
To turn the printer on – plug in the power adapter, or press the power button.<br />
To turn the printer off – hold down the power button for 3 seconds if already<br />
plugged in.
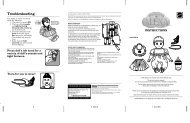
Troubleshooting<br />
PROBLEM SOLUTION<br />
Pre-print coat takes a long time to dry. Apply only a thin layer of pre-print polish.<br />
Pre-print coat gets ripples in it if I blow<br />
on it.<br />
For best results, let the polish air dry. Don’t blow on it.<br />
Left to right “streaks” in the design. In Settings, click <strong>Printer</strong> Settings, then click Clean<br />
Cartridge. If streaks still appear, remove the ink<br />
cartridge from the printer (see page. 6). Using a<br />
cotton swab (not included), carefully clean the ink<br />
jets on the underside of the cartridge. Reinstall the<br />
ink cartridge.<br />
The design is printing on my skin, outside<br />
of the nail.<br />
Use the sizing tool to scale the image to your nail.<br />
When printing, make sure to align your nail directly<br />
under the design in the design window.<br />
After applying top coat and letting dry completely,<br />
wash your hands with soap and warm water to<br />
remove any ink from your skin<br />
The printed design “bleeds”. Use less pre-print coat.<br />
Image doesn’t cover the entire length of<br />
my nail.<br />
Maximum image length is 0.56”. Be creative! Center<br />
the design in the middle of your nail. Leave tip<br />
white for a French-style manicure. Try printing two<br />
images, layering them for a cool effect!<br />
Out of focus image in design window. Open top cover of printer. Camera lens is under<br />
camera cover; lens is black. Rotate lens to adjust<br />
focus. You will see focus adjustment in design<br />
window.<br />
The design is scratched by the brush<br />
when I apply the top coat.<br />
The designs are hard to remove from my<br />
nails.<br />
The printer ink has stained my skin or<br />
nails.<br />
Apply more top coat to the brush. A thicker coat<br />
helps keep the design intact.<br />
For best results, use nail polish remover (not<br />
included). Wash with soap and warm water.<br />
1. Soak the stained area in a solution of hydrogen<br />
peroxide for 1-2 minutes (commercially available<br />
3%).<br />
2. Wash the stained area with light-duty liquid hand<br />
soap in warm water, then rinse thoroughly. Repeat<br />
steps 1 and 2 as necessary. Repeat these steps as<br />
necessary.<br />
Using a base coat, like the provided WHITE POLISH,<br />
will prevent your nails from being stained.<br />
17
This equipment has been tested and found to comply with the limits for a Class B<br />
digital device, pursuant to part 15 of the FCC rules. These limits are designed to provide<br />
reasonable protection against harmful interference in a residential installation. This<br />
equipment generates, uses and can radiate radio frequency energy and, if not<br />
installed and used in accordance with the instructions, may cause harmful interference<br />
to radio communications. However, there is no guarantee that interference will not<br />
occur in a particular installation. If this equipment does cause harmful interference to<br />
radio or television reception, which can be determined by turning the equipment off<br />
and on, the user is encouraged to try to correct the interference by one or more of the<br />
following measures:<br />
•Reorient or relocate the receiving antenna.<br />
•Increase the separation between the equipment and receiver.<br />
•Connect the equipment into an outlet on a circuit different from that to which<br />
the receiver is connected.<br />
•Consult the dealer or an experienced radio/TV technician for help.<br />
Note: Changes or modifications not expressly approved by the manufacturer<br />
responsible for compliance could void the user’s authority to operate the equipment.<br />
This device complies with Part 15 of the FCC Rules. Operation is subject to the following<br />
two conditions: (1) This device may not cause harmful interference, and (2) this<br />
device must accept any interference received, including interference that may cause<br />
undesired operation.<br />
THIS CLASS B DIGITAL APPARAT<strong>US</strong> COMPLIES WITH CANADIAN ICES-003. Operation is<br />
subject to the following two conditions: (1) this device may not cause interference, and<br />
(2) this device must accept any interference, including interference that may cause<br />
undesired operation of the device.<br />
CET APPAREIL NUMÉRIQUE DE LA CLASSE B EST CONFORME À LA NORME NMB-003 DU<br />
CANADA. L’utilisation de ce dispositif est autorisée seulement aux conditions suivantes<br />
: (1) Il ne doit pas produire de brouillage et (2) il doit pouvoir tolérer tout brouillage<br />
radioélectrique reçu, même si ce brouillage est susceptible de compromettre son<br />
fonctionnement.<br />
18