ECOi 2 Way Installation Manual - Panasonic
ECOi 2 Way Installation Manual - Panasonic
ECOi 2 Way Installation Manual - Panasonic

Create successful ePaper yourself
Turn your PDF publications into a flip-book with our unique Google optimized e-Paper software.
Request concerning recording the indoor/outdoor unit combination Nos.<br />
After automatic address setting has been completed, be sure to record them for future reference.<br />
List the outdoor main unit system address and the addresses of the indoor units in that system in an easily visible location (next to<br />
the nameplate), using a permanent marking pen or similar means that cannot be abraded easily.<br />
Example: (Outdoor) 1 – (Indoor) 1-1, 1-2, 1-3… (Outdoor) 2 – (Indoor) 2-1, 2-2, 2-3…<br />
These numbers are necessary for later maintenance. Please be sure to indicate them.<br />
Checking the indoor unit addresses<br />
Use the remote controller to check the indoor unit address.<br />
<br />
1. Press and hold the button and button for 4 seconds or longer (simple settings mode).<br />
2. The address is displayed for the indoor unit that is connected to the remote controller.<br />
(Only the address of the indoor unit that is connected to the remote controller can be checked.)<br />
3. Press the button again to return to normal remote control mode.<br />
<br />
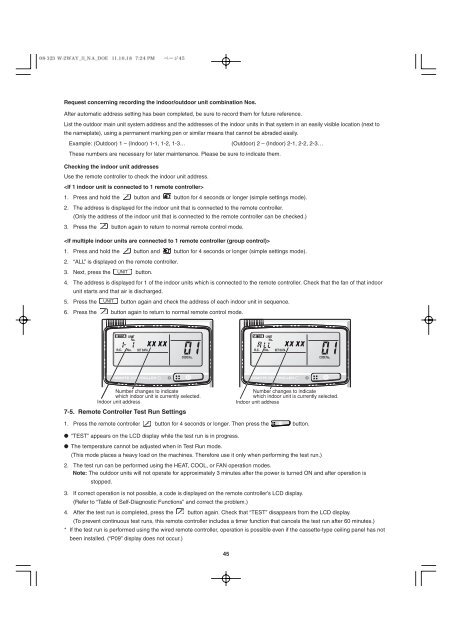
1. Press and hold the button and button for 4 seconds or longer (simple settings mode).<br />
2. “ALL” is displayed on the remote controller.<br />
3. Next, press the button.<br />
4. The address is displayed for 1 of the indoor units which is connected to the remote controller. Check that the fan of that indoor<br />
unit starts and that air is discharged.<br />
5. Press the button again and check the address of each indoor unit in sequence.<br />
6. Press the button again to return to normal remote control mode.<br />
Number changes to indicate<br />
which indoor unit is currently selected.<br />
Indoor unit address<br />
7-5. Remote Controller Test Run Settings<br />
1. Press the remote controller button for 4 seconds or longer. Then press the button.<br />
● “TEST” appears on the LCD display while the test run is in progress.<br />
● The temperature cannot be adjusted when in Test Run mode.<br />
(This mode places a heavy load on the machines. Therefore use it only when performing the test run.)<br />
2. The test run can be performed using the HEAT, COOL, or FAN operation modes.<br />
Note: The outdoor units will not operate for approximately 3 minutes after the power is turned ON and after operation is<br />
stopped.<br />
3. If correct operation is not possible, a code is displayed on the remote controller’s LCD display.<br />
(Refer to “Table of Self-Diagnostic Functions” and correct the problem.)<br />
4. After the test run is completed, press the button again. Check that “TEST” disappears from the LCD display.<br />
(To prevent continuous test runs, this remote controller includes a timer function that cancels the test run after 60 minutes.)<br />
* If the test run is performed using the wired remote controller, operation is possible even if the cassette-type ceiling panel has not<br />
been installed. (“P09” display does not occur.)<br />
45<br />
Number changes to indicate<br />
which indoor unit is currently selected.<br />
Indoor unit address