
You also want an ePaper? Increase the reach of your titles
YUMPU automatically turns print PDFs into web optimized ePapers that Google loves.
<strong>HTS”</strong><br />
EXCELLENCE BY DESIGN,<br />
90 Inverness Circle East<br />
Englewood, Colorado 80112<br />
(303) 790-4445<br />
Printed in China<br />
Copyright Q 1995, Houston Tracker Systems / EchoSphere Corporation,<br />
Englewood, Colorado 80112<br />
All rights reserved.<br />
The information contained herein is subject to change without<br />
notice.<br />
Revisions may be issued to advise of such changes and/or<br />
additions.<br />
Correspondence regarding this publication should be addressed<br />
directly to HTS, Technical Publications, 90 Inverness Circle East,<br />
P.O. Box 6552, Englewood, Colorado 80155.<br />
Tracker, HTS, and XPERT are trademarks of Houston<br />
Satellite Systems, <strong>Inc</strong>orporated. Echostar Is a registered<br />
trademark of Echophere Corporation.<br />
03/01/95<br />
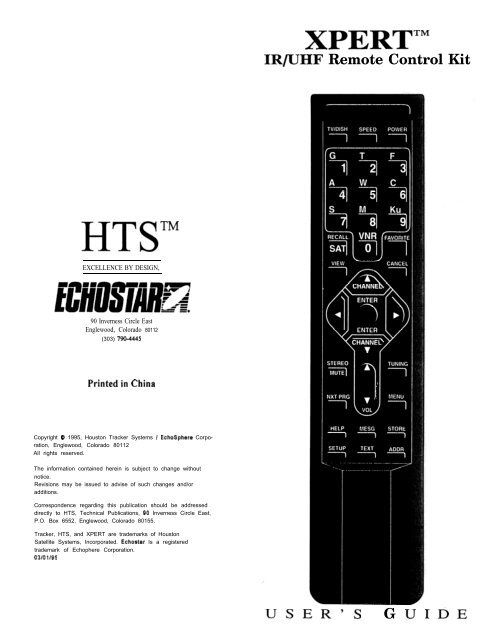
XPERT’”<br />
IR/UHF <strong>Remote</strong> Control Kit<br />
USER’S G U I 0 E
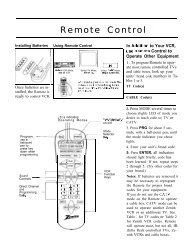
XPERT IRlUHF Universal <strong>Remote</strong><br />
important Regulatory Factors<br />
Wireless <strong>Remote</strong> Control<br />
NOTE: This equipment has been tested and found to comply<br />
with the limits for a Class B digital device, pursuant to Part 15<br />
of the FCC Rules. These limits are designed to provide<br />
reasonable protection against harmful interference in a<br />
residential installation. This equipment generates, uses, and can<br />
radiate radio frequency energy and, if not installed and used in<br />
accordance with the instnrctions, may cause harmful<br />
interference to radio communications. However, there is no<br />
guarantee that interference will not occur in a particular<br />
installation. If this equipment does cause harmful interference<br />
to radio or television reception, which can be determined by<br />
turning the equipment ON and OFF, the user is encouraged to<br />
try to correct the interference by performing one or more of the<br />
following measures: (1) Reorient or relocate the receiving<br />
antenna, (2) <strong>Inc</strong>rease the separation between the equipment and<br />
receiver, (2) Connect the equipment into an outlet on a circuit<br />
different from that to which the receiver is connected, (3)<br />
Consult the dealer or an experienced radiom technician for<br />
help. Unauthorized equipment changes may void FCC<br />
Important Safety Instructions<br />
For your protection, please read and observe all<br />
safety instructions before operating your XPERTTM<br />
remote control. Keep these and any additional<br />
instructions for future reference.<br />
Installation<br />
Observe Warnings:<br />
Heat:<br />
Care and Use<br />
Cleaning:<br />
When Not In Use:<br />
Carefully follow all warnings<br />
on the unit and in the operating<br />
instructions.<br />
DO NOT place the unit near<br />
heat sources such as radiators,<br />
stoves, heat registers, or other<br />
appliances that produce heat.<br />
DO NOT use liquid or aerosol<br />
cleaners. Use a damp cloth for<br />
cleaning.<br />
Remove the batteries from the<br />
unit if left unattended or<br />
unused for long periods of<br />
time,<br />
WARNINGI Refer servicing to qualified<br />
service personnel when a<br />
solid object or liquid has<br />
fallen onto or into the unit,<br />
Opening or removing covers<br />
other than the battery cover<br />
will void the user’s warranty<br />
and authority to operate the<br />
equipment.<br />
2 123478638.AA Rev.AA<br />
Contents<br />
User’s Guide<br />
Introduction . . . . . . . . . . . . . .4<br />
1. - Choosing an Overlay ... .4<br />
Green Overlay ...... .5<br />
Orange Overlay ..... .6<br />
Gold Overlay. ....... .7<br />
Red Overlay ........ .8<br />
Blue Overlay. ....... .9<br />
Yellow Overlay ...... 10<br />
2 - Attaching the Overlay. . . II<br />
3 - Powering the XPERT . . .I3<br />
Battery Installation . . . 13<br />
4 - Switch Settings. . . . . . . .I4<br />
5 - Resetting the XPERT. . . 14<br />
6-Speed Button.. . . . . . . .I6<br />
123470638.AA Rev.AA 3
I-- v.. . . . . . - . . . UI~I~UI uuu v~uvvvVCF<br />
Introduction<br />
Congratulations on your purchase of the<br />
XPERTrM UHF/IR Universal <strong>Remote</strong><br />
Control. The XPERT remote control is a<br />
full-function remote designed to be simple<br />
and easy to operate. The XPERT can<br />
control both UHF and IR based HTS and<br />
EchoStar satellite receivers.<br />
The XPERT UHF/IR Universal <strong>Remote</strong><br />
includes the following features:<br />
an arrow cluster design for maximum ease<br />
of operation:<br />
a battery saving time-out which automatically<br />
shuts off the remote if a key is continuously<br />
depressed for more than 3 minutes<br />
(as if stuck between sofa cushions);<br />
a SPEED button which allows you to program<br />
a frequently used button sequence to<br />
be controlled by a single button.<br />
1 - Choosing an Overlay<br />
The XPERT Universal <strong>Remote</strong> comes with<br />
an assortment of different colored remote<br />
keypad overlays, one of which you will<br />
attach to the remote. Each overlay has been<br />
designed to be compatible with one or more<br />
HTS or EchoStar satellite receivers. On the<br />
following pages, the provided overlay<br />
“colors” are shown with a list of compatible<br />
receivers, the required internal dip switch<br />
settings for the remote, and any special<br />
instructions needed to use the XPERT<br />
<strong>Remote</strong> with your receiver.<br />
The rest of this manual consists of:<br />
attaching the overlay<br />
dip switch settings<br />
installing the batteries<br />
resetting the XPERT <strong>Remote</strong><br />
Speed Button function<br />
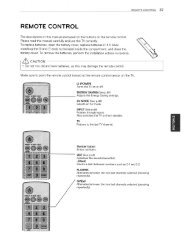
Green Overlay<br />
Use this overlay with:<br />
EchoStar SRD 3000<br />
EchoStar SRD 4000<br />
User’s Guide<br />
SPEED POWER<br />
n n n<br />
Dip Switch Setting<br />
See page 14<br />
SAT TUNING<br />
OFF ON<br />
Special Instructions<br />
Use the m m buttons for volume adjustment.<br />
4 123470638-AA Rev.AA 1234706380AA Rev.AA 5
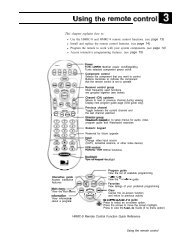
XPERT IRIUHF Universal <strong>Remote</strong> User’s Guide<br />
Use this overlay with:<br />
Orange Overlay<br />
EchoStar SRD 5/6000 Legend IR I UHF<br />
Tracker 4 Memorex<br />
EchoStar 310 I41 0 Legend II<br />
SPEED POWER<br />
El I cl<br />
-7) , VNR, il”“‘i<br />
VIEW- CANCEL<br />
;TEREO<br />
)<br />
1<br />
- - --I- _.- _ . .--<br />
HELP ’ MESG<br />
z~ nI<br />
SETUP TEXT<br />
I ---. -..- --- _-- - --. n]<br />
.- _-.____<br />
Dip Switch Setting<br />
See page 14<br />
TUNING<br />
El<br />
STORE<br />
I I<br />
L I<br />
OFF ON<br />
Special instructions:<br />
Not all units above support all the features printed<br />
on the overlay. Refer to the receiver’s Operation<br />
Manual for instructions on features for a specific<br />
receiver.<br />
6 123470638.AA Rev.AA<br />
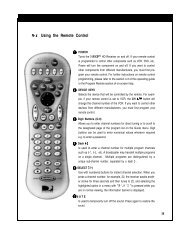
Use this overlay with:<br />
Gold Overlay<br />
EchoStar ES 400 I600 I500 IRIUHF I710 *<br />
Tracker 20/30/40/50/70 Elite/HDTV<br />
TV/DISH SPEED POWER<br />
--k, ““i’r]<br />
VIEW<br />
TEREO<br />
II<br />
--- -_<br />
I(T PRG<br />
1<br />
CANCEL<br />
I I<br />
TUNING<br />
0<br />
MENU<br />
/<br />
II 0<br />
Q<br />
JELP<br />
VOL<br />
. - -. -------- _-_<br />
MESG STORE<br />
1 L__J) 0<br />
iETUP TEXT ; ADDR<br />
Dip Switch Seeing<br />
See page 14<br />
Special Instructions: OFF ON<br />
ENTER button = SELECT button$%k40O/Ts<br />
In view mode, use the m @j buttons to select a<br />
new satellite east or west. Not all units above support<br />
all the features printed on the overlay. Refer to<br />
the receiver’s Operation Manual for instructions on<br />
features for a specific receiver. * Use Gold Overlay<br />
for software versions 1.91 and greater.<br />
7 23470638.AA Rev.AA 7
XPERT IRIUHF Universal <strong>Remote</strong> User’s Guide<br />
Red Overlay<br />
Use this overlay with:<br />
Tracker5*/8+*/10*/9*/10+*<br />
EchoStar510/710*<br />
SPEED POWER<br />
I I El<br />
El b tl<br />
b tl tl<br />
.<br />
STEREO<br />
II<br />
._ _ _ _ - _ _ __<br />
NXT PRG<br />
HELP -a<br />
I I I<br />
1..<br />
El<br />
I TUNING<br />
VOL<br />
._--es--_ - -.A--,<br />
MESG 1 STORE<br />
czl<br />
I I I<br />
SETUP TEXT<br />
I I, n<br />
I<br />
Dip Switch Setting<br />
See page 14<br />
OFF<br />
Special Instructions: -<br />
* For Tracker 5 (only), set dip switch 4 to ON. For<br />
Tracker 8+ I 10 / 9 I IO+, the setting of dip switch 4<br />
is dependent on your IRD configuration. If you have<br />
selected MAX compatible, dip switch 4 should be<br />
OFF, if MINI is selected, set dip switch 4 to ON.<br />
* Use Red Overlay w/software versions less than or<br />
below I .91.<br />
ON<br />
Blue Overlay<br />
Use this overlay with:<br />
Tracker718<br />
EchoStar<br />
SPEED POWER<br />
II Lzl El<br />
G T F<br />
1 L-J L----J<br />
Ku<br />
:‘“:,, ““II’<br />
VIEW<br />
STEREO<br />
II<br />
_--__----<br />
‘IXT PRG<br />
I<br />
1<br />
i-<br />
HELP - --_--__--<br />
MESG<br />
0 I<br />
SETUP TEXT<br />
I 0<br />
Dip Switch Setting<br />
See page 14<br />
E l<br />
FAVOWTE<br />
TUNING<br />
El<br />
STORE<br />
I 1<br />
I 1<br />
OFF ON<br />
Not all units above support all thstures ps<br />
on the overlay. Refer to the receiver’s Operation<br />
Manual for instructions on features for a specific receiver,<br />
8 123470638-AA Rev.AA 123470638,AA Rev.AA 9
XPERT IRlUHF Universal <strong>Remote</strong><br />
Use this overlay with:<br />
Tracker 6<br />
s-1<br />
![<br />
I<br />
//<br />
I<br />
![<br />
._.<br />
Yellow Overlay<br />
SPEED POWER<br />
El E l E l<br />
n<br />
SETUP TEXT f<br />
I I/<br />
Switch Setting<br />
See page 15<br />
TUNING<br />
MENU<br />
El<br />
STORE<br />
I I<br />
I 1<br />
OFF ON<br />
User’s Guide<br />
2 - Attaching the Overlay<br />
1 . Starting from the top of the overlay,<br />
peal back the paper backing from<br />
approximately the top two-thirds of<br />
the overlay.<br />
2. Gently position and center the overlay<br />
over the top three remote buttons.<br />
Align and center over top three buttons<br />
\ 7<br />
3. Gently press your finger once<br />
directly above the SPEED button to<br />
attach the overlay to the remote at<br />
one point (see below). (If the overlay<br />
requires additional alignment, this<br />
point can easily be detached.)<br />
Gently press here7<br />
4. Gently position and center the overlay<br />
over the keypad, and center arrow<br />
cluster. If necessary, lift overlay and<br />
start again with step 2.<br />
5. Gently press your finger directly<br />
above the CHANNEL A button to<br />
attach the overlay to the remote at a<br />
second point (see Figure next page).<br />
10 123470638.AA Rev.AA 123470638-AA Rev,AA<br />
/
wtK I IKIUHF Universal <strong>Remote</strong> User’s Guide<br />
Gently press here<br />
6. Remove the paper backing<br />
completely from the overlay.<br />
7 . Gently position and center the overlay<br />
over the VOLUME and VideoCipher<br />
buttons. If necessary, lift<br />
overlay and start again with step 2.<br />
8. Gently press your finger directly<br />
above the MESG button to attach the<br />
overlay to the remote at a third point.<br />
Note: Check the overlay’s alignment<br />
over the entire remote, Ensure<br />
that the overlay is centered over<br />
each button.<br />
9. Rub your finger over the overlay to<br />
permanently attach it to the remote.<br />
12 123470638-AA Rev.AA<br />
3 - Powering the XPERT<br />
The XPERT remote control requires four<br />
“AAA” batteries for power.<br />
Note: For longest battery life, we<br />
recommend using alkaline<br />
type batteries.<br />
To install new batteries, remove the plastic<br />
cover located on the bottom side of the<br />
remote by gently pressing the arrow down<br />
with your thumb and sliding the cover off.<br />
Remove old batteries (if applicable) and<br />
install new batteries into the compartment<br />
as indicated by battery figures located<br />
inside the compartment (negative (-)<br />
termina! of battery is pressed against one<br />
of the springs in the battery compartment).<br />
See Figure for proper battery orientation.<br />
Push down on the Arrow<br />
and slide the cover off. Slide<br />
Off<br />
Install four ‘AAA” batteries<br />
orientated as shown at<br />
rig ht.<br />
123470638.AA Rev.AA<br />
-
:<br />
L<br />
XPERT IRAJHF Universal <strong>Remote</strong><br />
4 - Dip Switch Settings<br />
The XPERT’s dip switches are located in<br />
the battery compartment (shown below).<br />
Depending on the overlay selected, you<br />
may need to change these settings<br />
according to dip switch setting shown with<br />
the overlay illustration.<br />
0 orientate the remote as shown<br />
use a pen tip to move the switch<br />
setting(s)<br />
reset (clear) the remote as<br />
described below.<br />
OFF ON<br />
+ + /<br />
-<br />
5 - Resetting the<br />
<strong>Remote</strong> Control<br />
The XPERT <strong>Remote</strong> Control will<br />
require resetting if the remote appears<br />
inoperative, or may require resetting<br />
when replacing the batteries. When<br />
reset is initiated, the LEDs briefly<br />
illuminate sequentially from left to<br />
.<br />
right *<br />
NOTE: Pressing [Reset] clears your<br />
remote’s memory. All user<br />
defined [SPEED] programming is<br />
cleared from memory. The<br />
XPERT remote’s address is set to<br />
“0” when resetting the remote.<br />
14 123470638.AA Rev.AA<br />
i<br />
-<br />
User’s Guide<br />
1 . Using a soft-tipped object, press the<br />
RESET button lo<br />
[Channel v 1, , and ITUNING] buttons.<br />
STEREO TUNING<br />
1234706380AA Rev,AA 15
XPERT IRNHF Universal <strong>Remote</strong><br />
6 - Speed Button<br />
The Speed Button is used to program the<br />
system to perform a series of button<br />
pushes by pressing the m button<br />
followed by a numeric button. You can<br />
program up to 10 macro-instruction sets,<br />
each set containing up to 6 keystrokes.<br />
To program a speed button:<br />
1, Press The LED above<br />
the current mode begins to flash.<br />
2 .<br />
3 .<br />
4 .<br />
5 9<br />
press me<br />
Press one of the numeric buttons<br />
~ LI ~, The LEDs<br />
flash twice.<br />
Enter a button sequence, up to a<br />
maximum of 6 keystrokes.<br />
If you entered less than 6 keystrokes,<br />
press m. Otherwise,<br />
the system will<br />
automatically store and terminate<br />
the instruction set. The LEDs<br />
flash twice indicating the successful<br />
programming of the speed<br />
button.<br />
To use a programmed speed button:<br />
1 . press mm<br />
2. Press the desired programmed<br />
numeric buttons ~ -<br />
~, The receiver will automatically<br />
perform the programmed<br />
sequence of<br />
keystrokes.<br />
To erase a programmed speed button:<br />
1<br />
2:<br />
press Lra.<br />
press m,<br />
3. Press the numeric button N<br />
~ -It’lii:~~ of the program<br />
4 .<br />
to be erased.<br />
press m,<br />
NOTES:<br />
User’s Guide<br />
16 123470638.AA Rev.AA 123470638.AA Rev.AA 17
nrt:~ I IKNHP Universal <strong>Remote</strong><br />
NOTES:<br />
18 123470638.AA Rev,AA<br />
Warranty<br />
User’s Guide<br />
Your XPERT remote control is manufactured to<br />
HTS’ specifications. The remote control warranty<br />
is limited to parts and labor for a period of one<br />
year.<br />
The warranty extends only to the original<br />
purchaser of the equipment and is limited to the<br />
purchase price of each component. All claims<br />
under this warranty must be accompanied by<br />
proof of purchase.<br />
This warranty does not cover damage due to fire,<br />
flood or other acts of God, improper use, repair, or<br />
alteration by other than HTS or one of its<br />
authorized repair centers, abuse, negligence, or<br />
improper installation or operation.<br />
In no event shall the manufacturer be held liable<br />
for any incidental or consequential damage<br />
resulting from the use of the equipment. The<br />
manufacturer reserves the right to refuse to extend<br />
this warranty if any of the above exceptions are<br />
determined to have caused the equipment not to<br />
have performed properly. Replacement parts<br />
supplied under this warranty are warranted for the<br />
remaining portion of the original warranty period.<br />
Equipment must be properly packaged and<br />
returned to HTS, 90 Inverness Circle East,<br />
Englewood, Colorado 80112, or to one of its<br />
authorized service centers, Prior to returning any<br />
equipment to HTS, the purchaser must obtain a<br />
“return authorization number” from the HTS<br />
Service Center. Cost of removal, transportation to<br />
the service center, and reinstallation will be paid<br />
by the purchaser.<br />
An evaluation fee, plus shipping charges, may be<br />
assessed the purchaser by HTS if the returned<br />
merchandise is deemed by HTS to be operating<br />
properly.<br />
This warranty gives you specific legal rights<br />
which may vary from state to state. Some states do<br />
not allow the exclusion or limitations of incidental<br />
or consequential damages, or allow limitations on<br />
the duration of an implied warranty, so the above<br />
limitations may not apply to you.<br />
Service information can be obtained by either<br />
calling your dealer or TVRO Service Department<br />
at (303) 790-7878.<br />
123470638.AA Rev.AA