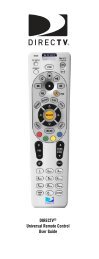
Using the remote control to operate VCRs,. cable boxes and other ...
Using the remote control to operate VCRs,. cable boxes and other ...
Using the remote control to operate VCRs,. cable boxes and other ...

You also want an ePaper? Increase the reach of your titles
YUMPU automatically turns print PDFs into web optimized ePapers that Google loves.
<strong>Using</strong> <strong>the</strong> <strong>remote</strong> <strong>control</strong> <strong>to</strong> <strong>operate</strong> <strong>VCRs</strong>,. <strong>cable</strong><br />
<strong>boxes</strong> <strong>and</strong> o<strong>the</strong>r equipment<br />
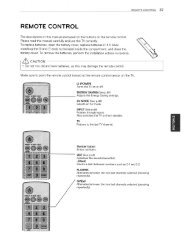
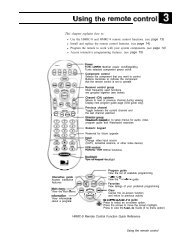
about your <strong>remote</strong> <strong>control</strong><br />
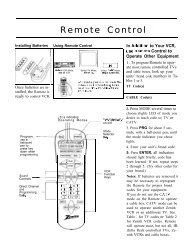
This TV’s <strong>remote</strong> <strong>control</strong> has four i’layers”: <strong>the</strong> TV layer, <strong>the</strong> VCR-A<br />
layer, <strong>the</strong> VCR-B layer, <strong>and</strong> <strong>the</strong> CABLE layer. Each layer can be<br />
used <strong>to</strong> <strong>operate</strong> a different component in your A/V system. You<br />
select <strong>the</strong> layer you want <strong>to</strong> use by setting <strong>the</strong> “select” switch across<br />
<strong>the</strong> <strong>to</strong>p of <strong>the</strong> <strong>remote</strong> <strong>control</strong>.<br />
When you first receive your <strong>remote</strong> <strong>control</strong>, <strong>the</strong> TV layer is set up<br />
<strong>to</strong> <strong>operate</strong> your Mitsubishi TV, <strong>the</strong> VCR-A <strong>and</strong> VCR-B layers are<br />
programmed <strong>to</strong> <strong>operate</strong> Mitsubishi <strong>VCRs</strong>, <strong>and</strong> <strong>the</strong> CABLE layer is<br />
set <strong>to</strong> <strong>operate</strong> a RCA DSS satellite receiver.<br />
You can use <strong>the</strong> following but<strong>to</strong>ns <strong>to</strong> <strong>operate</strong> your TV.<br />
power but<strong>to</strong>n<br />
pause but<strong>to</strong>n<br />
mute <strong>control</strong><br />
super quick view but<strong>to</strong>n<br />
quick view but<strong>to</strong>n<br />
volume <strong>control</strong><br />
input but<strong>to</strong>n<br />
channel <strong>control</strong><br />
enter but<strong>to</strong>n<br />
audio <strong>and</strong> video <strong>control</strong>s<br />
menu but<strong>to</strong>n<br />
cancel but<strong>to</strong>n<br />
information but<strong>to</strong>n<br />
home but<strong>to</strong>n<br />
sleep timer but<strong>to</strong>n<br />
number but<strong>to</strong>ns<br />
PIP <strong>control</strong>s<br />
If you have a <strong>cable</strong> box (including <strong>the</strong> digital satellite box), a non-<br />
Mitsubishi VCR, a Mitsubishi laserdisc player, an A/V receiver, or<br />
a compact disc, you can set up <strong>the</strong> layers in <strong>the</strong> <strong>remote</strong> <strong>control</strong> <strong>to</strong><br />
<strong>operate</strong> <strong>the</strong>se components.<br />
The VCR-A layer can be set up <strong>to</strong> <strong>operate</strong> a non-Mitsubishi VCR;<br />
<strong>the</strong> VCR-B layer can be set <strong>to</strong> <strong>operate</strong> a VCR, <strong>cable</strong> box, Mitsubishi<br />
laserdisc player; <strong>the</strong> CABLE layer can be set up <strong>to</strong> <strong>operate</strong> a <strong>cable</strong><br />
box, laserdisc player, A/V receiver; <strong>and</strong> <strong>the</strong> TV layer can be set up<br />
<strong>to</strong> <strong>operate</strong> an A/V receiver.<br />
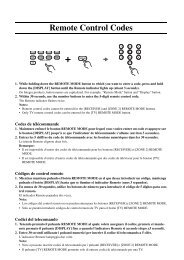
setting up <strong>the</strong> <strong>remote</strong> <strong>control</strong> <strong>to</strong> <strong>operate</strong> your VCR<br />
@ Turn off your VCR.<br />
Q Sc:t <strong>the</strong> select, switch on <strong>the</strong> <strong>remote</strong> <strong>to</strong> choose <strong>the</strong> layer you<br />
want <strong>to</strong> set up: VCR-A or VCR-B.<br />
0 While holding in <strong>the</strong> POWER but<strong>to</strong>n on <strong>the</strong> <strong>remote</strong> <strong>control</strong>,<br />
enter <strong>the</strong> code number listed in <strong>the</strong> chart on <strong>the</strong> following page<br />
fix . your br<strong>and</strong> of VCR. Be sure <strong>to</strong> enter both digits of <strong>the</strong> code<br />
number. If more than one number is listed, try <strong>the</strong> first one.<br />
Getting Sarted
<strong>Using</strong> <strong>the</strong> <strong>remote</strong> <strong>control</strong> <strong>to</strong> <strong>operate</strong> <strong>VCRs</strong>,‘<strong>cable</strong><br />
<strong>boxes</strong> <strong>and</strong> o<strong>the</strong>r components (cont.)<br />
i If your VCR I . ..enter this<br />
I<br />
If your VCR . ..enter this 1 If your VCR . ..enter this<br />
code<br />
I<br />
IS rnrs orana... code I IS Inls orana... I code I<br />
Wsubishi (A)<br />
--__- --_-_ I<br />
Magnavo)<br />
nr I ,t+;+fifi1? : - 03, 10, 11 Scot -.- .-- -.-______<br />
15<br />
Mitsubishi (B)<br />
-<br />
fir+<br />
~~~<br />
I<br />
Ub<br />
Sf -‘r\nP ldlP~-- 16<br />
Zanon<br />
03<br />
N __-_<br />
43<br />
-_- 6 I $;;,,i, Ccmt / 17,18<br />
Emerson<br />
04,05 Pi&sonic<br />
-__ 03, 10, 11<br />
Funai<br />
06<br />
Philco<br />
03,lO Symphonic ----<br />
06<br />
1 General Electric<br />
- _. Philips<br />
03, 10, 11 Teknika --_- 04,06<br />
1 Goldstar . . . . . . 1 07 1 Quasar - - - --<br />
03 Toshiba 15<br />
08<br />
- - -- -- -.__ 08, 13, 20 Totevision_-----___ 07<br />
09<br />
i Zenith 19<br />
,<br />
Sanyo<br />
@ Release <strong>the</strong> POWER but<strong>to</strong>n.<br />
@ Press <strong>the</strong> POWER but<strong>to</strong>n again. Your VCR should turn on. If<br />
<strong>the</strong> VCR turns on, your <strong>remote</strong> <strong>control</strong> is now set up <strong>to</strong> <strong>operate</strong><br />
your VCR. (See “using your <strong>remote</strong> <strong>control</strong> <strong>to</strong> <strong>operate</strong> your<br />
VCR” in this chapter for <strong>remote</strong> <strong>control</strong> VCR functions.)<br />
If your VCR does not turn on, repeat <strong>the</strong> instructions, trying each<br />
code number listed for your br<strong>and</strong> of VCR. If none of <strong>the</strong>se code<br />
numbers work, try each number, 01 through 20.<br />
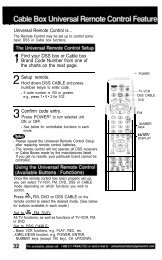
setting up <strong>the</strong> <strong>remote</strong> <strong>control</strong> <strong>to</strong> <strong>operate</strong> your <strong>cable</strong> or<br />
satellite box<br />
@ Turn on your <strong>cable</strong> box.<br />
@ Set <strong>the</strong> select switch on <strong>the</strong> <strong>to</strong>p of <strong>the</strong> <strong>remote</strong> <strong>to</strong> choose <strong>the</strong><br />
layer you want <strong>to</strong> set up: CABLE or VCR-B.<br />
@ While holding in <strong>the</strong> POWER but<strong>to</strong>n on <strong>the</strong> <strong>remote</strong> <strong>control</strong>,<br />
enter <strong>the</strong> code number listed in <strong>the</strong> chart below for your br<strong>and</strong><br />
of <strong>cable</strong> box. Be sure <strong>to</strong> enter both digits of <strong>the</strong> code number. If<br />
more than one number is listed, try <strong>the</strong> first one.<br />
@ Release <strong>the</strong> POWER but<strong>to</strong>n. (See “using your <strong>remote</strong> <strong>control</strong> <strong>to</strong><br />
<strong>operate</strong> your <strong>cable</strong> box” in this chapter for <strong>remote</strong> <strong>control</strong> <strong>cable</strong><br />
box functions.)<br />
If your <strong>cable</strong> . ..enter this If your <strong>cable</strong> box/satellite . ..enter this<br />
If your <strong>cable</strong>/satellite . ..enter this<br />
box is this br<strong>and</strong>...<br />
code<br />
is this br<strong>and</strong>... code<br />
box is this br<strong>and</strong>... code<br />
ABC Color Voice 73 57, 59, 74 62, 67, 89 Oak--<br />
__ 61, 62, _._-______.- 82 Scientific Atlantic -~-.---_- ---..- __ .-.. .-_ --2 ’ 66 88 ’ 89 91 92-<br />
98<br />
’<br />
----.-- ----- .-_-. -____L___. - - ---- Panasonic<br />
- . 63,70 Signature 57<br />
Gemini<br />
~_I__-.--<br />
Comtronics - _ _ __ _ 93<br />
Paragon<br />
31 - - -_sog -less -. 47 -__<br />
- - - - - -.--. -^_.-- 55<br />
Philips 73, 74, 75, 76, 77 Sprucar 63<br />
General Electric 66 - ---<br />
93 94 .-L--L-1----_ 98 99 _ -<br />
General ln&uments<br />
-_ Starcom 54, 55, 56, 87<br />
- - - - 52, 53, 6955,56,57 Pioneer R-ime ______.-- SW -<br />
--<br />
Hamlin<br />
64,~~5~ _ 84 -Stargate - - 55 -<br />
Hitachi -.- _<br />
--..-. ___. -48 ___ ~ Tocom -.^ - __.___ __.__ 67, 68, 72<br />
_..-__<br />
57 Pulsar --_ .<br />
51<br />
Jerrold<br />
54, 55, 56, 57, 58 RCA _ 63 Toshiba _ -- Untied - Artists - --------. 51 ----- 62 _<br />
59, 60, 7185, 87 RCA dSs<br />
49 United Cable<br />
Macom<br />
_.____-..---- . -- ~-.-. ----P--M-<br />
54<br />
Magnavox -------<br />
94 Regal - --<br />
53 ~-~------- Viewstar ----.---- -------<br />
-<br />
93,94p-y<br />
__ Memorex .---.- ~. -. -- 51 Regency<br />
-~-_ _. . 79 Zenith<br />
51<br />
Samsung<br />
-- ----<br />
-65, 84<br />
ChaptIer 3: Operating Your TV
<strong>Using</strong> <strong>the</strong> <strong>remote</strong> <strong>control</strong> <strong>to</strong> <strong>operate</strong> <strong>VCRs</strong>, <strong>cable</strong><br />
<strong>boxes</strong> <strong>and</strong> o<strong>the</strong>r components (cont.)<br />
@ Press <strong>the</strong> POWER but<strong>to</strong>n again. Your <strong>cable</strong> box should turn off. If<br />
<strong>the</strong> cabI box turns off, your <strong>remote</strong> <strong>control</strong> is now set up <strong>to</strong> <strong>operate</strong><br />
your <strong>cable</strong> box. If your <strong>cable</strong> box does not turn off, repeat <strong>the</strong><br />
instructions above, trying each code number listed for your br<strong>and</strong> of<br />
<strong>cable</strong> box. If none of <strong>the</strong>se numbers work, try each number, 51<br />
through 99.<br />
DImportant: After setting up vour <strong>remote</strong>, be sure that vour <strong>cable</strong> box can be<br />
turned on w&h t.he POWER but<strong>to</strong>n. Some if <strong>the</strong> <strong>cable</strong> <strong>boxes</strong> can be<br />
turned on with <strong>the</strong> CHANNEL but<strong>to</strong>ns or <strong>the</strong> number but<strong>to</strong>ns.<br />
setting up <strong>the</strong> <strong>remote</strong> <strong>control</strong> <strong>to</strong> <strong>operate</strong> your Mitsubishi<br />
audio component (laserdisc player or A/V receiver)<br />
@ Turn off your audio component.<br />
@ Set <strong>the</strong> select switch on <strong>the</strong> <strong>to</strong>p of <strong>the</strong> <strong>remote</strong> <strong>to</strong> choose <strong>the</strong><br />
layer you want <strong>to</strong> set up. For a laserdisc player, choose CABLE<br />
or VCR-B. For an A/V receiver, or CD player, choose CABLE.<br />
L<br />
@ While holding in <strong>the</strong> POWER but<strong>to</strong>n on <strong>the</strong> <strong>remote</strong> <strong>control</strong>,<br />
enter one of <strong>the</strong>se code numbers:<br />
For a Mitsubishi A/V receiver, compact disc: 30, 31 or 35<br />
For a Mitsubishi laserdisc player: 32 or 33<br />
For a Yamaha A/V receiver, compact disc: 36 or 37<br />
Be sure <strong>to</strong> enter both digits of <strong>the</strong> code number. If more than<br />
one number is listed, try <strong>the</strong> first one.<br />
@ Release <strong>the</strong> POWER but<strong>to</strong>n.<br />
@ Press <strong>the</strong> POWER but<strong>to</strong>n again. Your audio component should<br />
turn on. If it does, your <strong>remote</strong> <strong>control</strong> is now set up <strong>to</strong> <strong>operate</strong><br />
your <strong>cable</strong> box. If it does not turn on, repeat <strong>the</strong> instructions<br />
above, trying <strong>the</strong> o<strong>the</strong>r code number listed for your component.<br />
(See “using your <strong>remote</strong> <strong>control</strong> <strong>to</strong> <strong>operate</strong> your Mitsubishi<br />
laserdisc player” . <strong>and</strong> “using your <strong>remote</strong> <strong>control</strong> <strong>to</strong> <strong>operate</strong><br />
your Mitsubishi audio prwducts” in thi $5 chp1er‘ fi,r* infb-mation<br />
on using 1 he r*emot,tt <strong>to</strong> opwate your A, V corn po~wnts. 1<br />
Getting Started<br />
‘
<strong>Using</strong> <strong>the</strong> <strong>remote</strong> <strong>control</strong> <strong>to</strong> <strong>operate</strong> <strong>VCRs</strong>, <strong>cable</strong><br />
<strong>boxes</strong> <strong>and</strong> o<strong>the</strong>r components (cont.)<br />
notes about your <strong>remote</strong> <strong>control</strong><br />
DImportant: Sometimes manufacturers will change <strong>the</strong>ir products, or <strong>the</strong>y may<br />
use more than one code. If this is <strong>the</strong> case, your <strong>remote</strong> may not be<br />
able <strong>to</strong> <strong>operate</strong> your VCR or <strong>cable</strong> box.<br />
DImportant: When you replace <strong>the</strong> batteries in your <strong>remote</strong> <strong>control</strong>, <strong>the</strong> <strong>remote</strong><br />
will usually return <strong>to</strong> its initial setting. You may need <strong>to</strong> set up<br />
your <strong>remote</strong> again.<br />
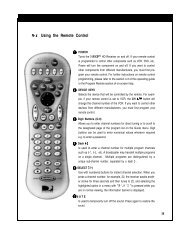
using your <strong>remote</strong> <strong>control</strong> <strong>to</strong> <strong>operate</strong> your VCR<br />
After you have set up your <strong>remote</strong> <strong>control</strong> for your particular br<strong>and</strong><br />
of VCR, you can use <strong>the</strong> <strong>remote</strong> <strong>to</strong> <strong>operate</strong> your VCR.<br />
0 Use <strong>the</strong> select switch on <strong>the</strong> <strong>remote</strong> <strong>control</strong> <strong>to</strong> choose <strong>the</strong> layer<br />
that you set up <strong>to</strong> <strong>operate</strong> your VCR: VCR-A or VCR-B.<br />
@ Point <strong>the</strong> <strong>remote</strong> <strong>control</strong> at <strong>the</strong> VCR <strong>and</strong> press <strong>the</strong> desired<br />
but<strong>to</strong>ns.<br />
If you are using a Mitsubishi VCR, you will be able <strong>to</strong> use all of <strong>the</strong><br />
but<strong>to</strong>ns on <strong>the</strong> <strong>remote</strong> <strong>control</strong> <strong>to</strong> <strong>operate</strong> your VCR except for MUTE,<br />
VOLUME <strong>and</strong> <strong>the</strong> PIP function but<strong>to</strong>ns, which will always <strong>operate</strong><br />
<strong>the</strong> TV itself.<br />
If you are using ano<strong>the</strong>r br<strong>and</strong> of VCR, you can use <strong>the</strong> POWER,<br />
CHANNEL, REC, STOP, PAUSE, REW, PLAY, <strong>and</strong> FF<br />
but<strong>to</strong>ns <strong>to</strong> <strong>operate</strong> your VCR.<br />
using your <strong>remote</strong> <strong>control</strong> <strong>to</strong> <strong>operate</strong> your <strong>cable</strong> box<br />
After you have set up your <strong>remote</strong> <strong>control</strong> for your particular br<strong>and</strong><br />
of <strong>cable</strong> box, you can use <strong>the</strong> <strong>remote</strong> <strong>to</strong> <strong>operate</strong> your <strong>cable</strong> box.<br />
@ Use <strong>the</strong> select switch on <strong>the</strong> <strong>remote</strong> <strong>control</strong> <strong>to</strong> choose <strong>the</strong> layer<br />
that you set up <strong>to</strong> <strong>operate</strong> your <strong>cable</strong> box: CABLE or VCR-B.<br />
@ Point <strong>the</strong> <strong>remote</strong> <strong>control</strong> at <strong>the</strong> <strong>cable</strong> box <strong>and</strong> press <strong>the</strong> desired<br />
but<strong>to</strong>ns.<br />
You can use <strong>the</strong> POWER, CHANNEL, numbers (O-9), <strong>and</strong> ENTER<br />
but<strong>to</strong>ns <strong>to</strong> <strong>operate</strong> your <strong>cable</strong> box. If you are using an RCA DSS or<br />
PRIMESTAR”receiver, you may be able <strong>to</strong> use additional but<strong>to</strong>ns.<br />
Chapter 3: Operating Your TV
<strong>Using</strong> <strong>the</strong> <strong>remote</strong> <strong>control</strong> <strong>to</strong> <strong>operate</strong> <strong>VCRs</strong>, <strong>cable</strong><br />
<strong>boxes</strong> <strong>and</strong> o<strong>the</strong>r components (cont.)<br />
using your <strong>remote</strong> <strong>control</strong> <strong>to</strong> <strong>operate</strong> your Mitsubishi<br />
laserdisc player<br />
After you have set up your <strong>remote</strong> <strong>control</strong> for your laserdisc player,<br />
you can use <strong>the</strong> <strong>remote</strong> <strong>to</strong> <strong>operate</strong> <strong>the</strong> player.<br />
@ Use <strong>the</strong> select switch on <strong>the</strong> <strong>remote</strong> <strong>control</strong> <strong>to</strong> choose <strong>the</strong> <strong>cable</strong><br />
layer.<br />
@ Point <strong>the</strong> <strong>remote</strong> <strong>control</strong> at <strong>the</strong> laserdisc player <strong>and</strong> press <strong>the</strong><br />
desired but<strong>to</strong>ns.<br />
You can use <strong>the</strong> POWER, CHANNEL, numbers (O-9), INFO,<br />
MENU, CANCEL, STOP, PAUSE, REW, PLAY, <strong>and</strong> FF but<strong>to</strong>ns <strong>to</strong><br />
<strong>operate</strong> your laserdisc player.<br />
using your <strong>remote</strong> <strong>control</strong> <strong>to</strong> <strong>operate</strong> your Mitsubishi audio<br />
products<br />
After you have set up your <strong>remote</strong> <strong>control</strong> for your A/V receiver, you<br />
can use <strong>the</strong> <strong>remote</strong> <strong>to</strong> <strong>operate</strong> it.<br />
@ Use <strong>the</strong> select switch on <strong>the</strong> <strong>remote</strong> <strong>control</strong> <strong>to</strong> choose <strong>the</strong> layer<br />
that you set up <strong>to</strong> <strong>operate</strong> your receiver: TV or CABLE.<br />
@ Point <strong>the</strong> <strong>remote</strong> <strong>control</strong> at <strong>the</strong> A/V receiver <strong>and</strong> press <strong>the</strong><br />
desired but<strong>to</strong>ns.<br />
If you are using a Mitsubishi HTS-100, you can use <strong>the</strong> POWER,<br />
VOLUME, <strong>and</strong> MUTE but<strong>to</strong>ns <strong>to</strong> <strong>operate</strong> <strong>the</strong> receiver.<br />
If you are using a Mitsubishi HTS-300, you can use <strong>the</strong> POWER,<br />
CHANNEL, INPUT, VOLUME, ENTER, numbers (O-9), INFO,<br />
MENU, CANCEL, AUDIO, VIDEO, ADJUST, <strong>and</strong> MUTE but<strong>to</strong>ns<br />
<strong>to</strong> <strong>operate</strong> <strong>the</strong> receiver.<br />
If you are using a Mitsubishi M-VR400 or M-VR600, you can use<br />
<strong>the</strong> POWER, VOLUME, numbers (O-9), <strong>and</strong> MUTE but<strong>to</strong>ns <strong>to</strong><br />
<strong>operate</strong> <strong>the</strong> receiver.<br />
If you are using <strong>the</strong> LNlitsuhishi M-CD500 CD changer, you can use<br />
<strong>the</strong> PAUSE, STOP, FF, <strong>and</strong> REW but<strong>to</strong>ns <strong>to</strong> <strong>operate</strong> <strong>the</strong> CD<br />
changer.<br />
Getting Started
Turning <strong>the</strong> TV on/off<br />
DImportant: Before using <strong>the</strong> <strong>remote</strong> <strong>control</strong> <strong>to</strong> <strong>operate</strong> <strong>the</strong> TV, set <strong>the</strong> select<br />
switch on <strong>the</strong> <strong>to</strong>p <strong>the</strong> <strong>remote</strong> <strong>control</strong> <strong>to</strong> TV.<br />
Use <strong>the</strong> POWER but<strong>to</strong>n on ei<strong>the</strong>r <strong>the</strong> <strong>control</strong> panel or <strong>the</strong> <strong>remote</strong><br />
<strong>control</strong> <strong>to</strong> turn <strong>the</strong> TV on <strong>and</strong> off. The power indica<strong>to</strong>r will light up<br />
in green when you turn <strong>the</strong> TV on.<br />
DImportant: There is always a small amount of current flowing in<strong>to</strong> <strong>the</strong><br />
TV, even when <strong>the</strong> power is turned off. This maintains any changes<br />
<strong>to</strong> <strong>the</strong> TV’s settings <strong>and</strong> <strong>operate</strong>s <strong>the</strong> built-in clock <strong>and</strong> timing<br />
functions. Unplugging <strong>the</strong> set will erase <strong>the</strong>se settings, requiring<br />
you <strong>to</strong> set <strong>the</strong>m again. Unplug <strong>the</strong> TV only when it won’t be used<br />
for a long time.<br />
Chapter 3: Operating Your TV
Selecting <strong>the</strong> input source<br />
If you connected components such as <strong>VCRs</strong>, camcorders, or<br />
laserdisc players <strong>to</strong> your TV, you will need <strong>to</strong> change <strong>the</strong> input<br />
source <strong>to</strong> view <strong>the</strong> signals from <strong>the</strong>se components.<br />
To select an input source, press <strong>the</strong> input but<strong>to</strong>n (INPUT) on <strong>the</strong><br />
<strong>control</strong> panel or on <strong>the</strong> <strong>remote</strong> <strong>control</strong>.<br />
/ / INPUT . \<br />
-3<br />
O -<br />
‘1j-8.<br />
-I<br />
0<br />
~kl3Kl<br />
~3LxzA3<br />
3-Q<br />
@ita@<br />
AMfTsuBlsHl<br />
You can choose between <strong>the</strong> following input sources:<br />
TV channels<br />
The source connected <strong>to</strong> <strong>the</strong> Input ES-32207, CS-3X207), or <strong>the</strong><br />
sources connected <strong>to</strong> Input 1 <strong>and</strong> Input 2 (all o<strong>the</strong>r models)<br />
The name of <strong>the</strong> input you have selected will display briefly in <strong>the</strong><br />
corner of <strong>the</strong> screen.<br />
Getting Started
Changing channels<br />
Your TV offers you four ways of changing channels once <strong>the</strong>ir<br />
numbers have been programmed in<strong>to</strong> channel memory:<br />
selecting channels one-by-one with <strong>the</strong> channel <strong>control</strong>s,<br />
directly accessing a channel by pressing <strong>the</strong> number but<strong>to</strong>ns,<br />
using <strong>the</strong> QuickView option <strong>to</strong> recall <strong>the</strong> last channel,<br />
using <strong>the</strong> special QuickView option <strong>to</strong> switch t.o a particular<br />
memorized channel, <strong>and</strong><br />
using <strong>the</strong> SuperQuickView function <strong>to</strong> alternate between<br />
channels on a user-chosen list.<br />
DImportant: To change channels faster, use ei<strong>the</strong>r of <strong>the</strong> following procedures:<br />
Enter three digits for every channel number, using zeros w-here<br />
needed. For example, enter 004 <strong>to</strong> view channel 4 <strong>and</strong> 028 <strong>to</strong><br />
view channel 28 or,<br />
Press <strong>the</strong> ENTER but<strong>to</strong>n after selecting <strong>the</strong> number of <strong>the</strong><br />
channel. For example, press 4 <strong>and</strong> ENTER <strong>to</strong> view<br />
channel 4.<br />
DImportant: Cable channel numbers 0 <strong>and</strong> greater than 126 are not used.<br />
TV stations 0, 1, <strong>and</strong> 70 through 999 are not used. If you select one<br />
of <strong>the</strong>se channel numbers, your TV will not change channels.<br />
DImportan~ If you memorized channels using <strong>the</strong> Indoor/Outdoor Antenna, your<br />
TV can receive antenna channels 2-13 (VHF) <strong>and</strong> 14-69 (UHF). If<br />
you memorized channels using <strong>the</strong> Cable Antenna, your TV can<br />
receive <strong>cable</strong> channels l-125. If you select a channel outside of <strong>the</strong><br />
memorized range, your TV will not change channels.<br />
Chapter 3: Operating Your TV
Changing channels (cont.)<br />
changing channels one-by-one<br />
To change channels:<br />
@ Press one of <strong>the</strong> channel scan<br />
<strong>control</strong>s (CHANNEL) on <strong>the</strong><br />
<strong>control</strong> panel or on <strong>the</strong> <strong>remote</strong><br />
<strong>control</strong>. The TV will au<strong>to</strong>matically<br />
tune <strong>to</strong> <strong>the</strong> next memorized<br />
channel.<br />
Mmportant: You cannot change channels one-by-one until available channels<br />
have been programmed in<strong>to</strong> memory. (See “Memorizing channels”<br />
in this chapter.)<br />
Getting Started<br />
changing channels directly<br />
To move directly <strong>to</strong> a particular<br />
channel without going through <strong>the</strong><br />
programmed channels in between:<br />
@ Use <strong>the</strong> number but<strong>to</strong>ns on <strong>the</strong><br />
<strong>remote</strong> <strong>control</strong> <strong>to</strong> select <strong>the</strong><br />
number of <strong>the</strong> channel you<br />
want <strong>to</strong> view.<br />
@ Press <strong>the</strong> ENTER but<strong>to</strong>n.
Changing channels (cont.)<br />
T---i-<br />
- .----1<br />
---c:<br />
j:<br />
(2 ‘2 /3 ‘-- /<br />
I,<br />
9 2 ,J -; j<br />
3<br />
c,‘jIJ .,<br />
\s,- :<br />
>*;<br />
I- 2-3 j<br />
0<br />
I i<br />
QV \ :{gj-J 1<br />
-3 .- .2<br />
I /<br />
,-J-II-IL -<br />
I c--.p---2<br />
‘xl -3 ;=t ’ 3<br />
F$ -m (3<br />
Y$J 33<br />
A?vllTwasHI<br />
u<br />
Setting <strong>the</strong> QuickView memory<br />
@ Tune <strong>to</strong> <strong>the</strong> channel you wish <strong>to</strong> memorize.<br />
using <strong>the</strong> QuickView”’ option<br />
The “QuickView” feature can<br />
work in two ways: <strong>to</strong> recall <strong>the</strong> last<br />
channel viewed (Last Channel<br />
Recall), or <strong>to</strong> recall a channel you<br />
put in<strong>to</strong> QuickView memory.<br />
If you have not memorized any<br />
channels in<strong>to</strong> QuickView<br />
Memory, “Last Channel<br />
Recall” allows you <strong>to</strong> use <strong>the</strong><br />
QV but<strong>to</strong>n <strong>to</strong> switch back <strong>and</strong><br />
forth between <strong>the</strong> last two<br />
channels viewed.<br />
“QuickView Memory” allows<br />
you <strong>to</strong> use <strong>the</strong> QV but<strong>to</strong>n <strong>to</strong><br />
switch back <strong>and</strong> forth between<br />
<strong>the</strong> last channel you were<br />
watching <strong>and</strong> <strong>the</strong> channel you<br />
put in<strong>to</strong> QuickView memory.<br />
Q Press <strong>and</strong> hold <strong>the</strong> QV but<strong>to</strong>n for about 2 seconds. The channel<br />
numbers will appear on <strong>the</strong> screen, indicating that you have<br />
memorized that channel.<br />
@ After changing <strong>to</strong> ano<strong>the</strong>r channel, press <strong>the</strong> QV but<strong>to</strong>n <strong>to</strong><br />
immediately return <strong>to</strong> <strong>the</strong> memorized channel.<br />
@ If you press <strong>the</strong> QV but<strong>to</strong>n while watching <strong>the</strong> memorized<br />
channel, you will return <strong>to</strong> <strong>the</strong> last channel viewed.<br />
Hmportant: The memorized QV channel will remain in memory until you<br />
replace it with a new channel using <strong>the</strong> procedure above.<br />
Chapter 3: Operating Your TV
Changing channels (cont.)<br />
\ -\ /. -<br />
1: 2; I / kI<br />
,-Y -? J<br />
$00<br />
r-c3 El<br />
I D 3<br />
czi.3,<br />
Jd. SW<br />
CJ<br />
‘J:zr /<br />
Ix5=3 L--Jil<br />
j<br />
cv :a m Kd<br />
\3 3.9<br />
Getting Started<br />
A-<br />
!_1<br />
using <strong>the</strong> SuperQuickView”’<br />
option<br />
To view selected channels<br />
programmed in<strong>to</strong> SuperQuickView<br />
memory:<br />
@ Enter <strong>the</strong> desired channel in<strong>to</strong><br />
SuperQuickView memory. (See<br />
“<strong>Using</strong> Super-QuickView ))) in<br />
this chapter.)<br />
@ Press <strong>the</strong> SQV but<strong>to</strong>n<br />
repeatedly <strong>to</strong> view <strong>the</strong> SQV<br />
channels in sequence.