Musical Instrument Digital Interface, - Hol.gr
Musical Instrument Digital Interface, - Hol.gr
Musical Instrument Digital Interface, - Hol.gr

You also want an ePaper? Increase the reach of your titles
YUMPU automatically turns print PDFs into web optimized ePapers that Google loves.
<strong>Musical</strong> <strong>Instrument</strong> <strong>Digital</strong> <strong>Interface</strong>,<br />
Antony’s Web Site: http://users.hol.<strong>gr</strong>/~antony07<br />
is a digital communications protocol. In August of 1983, music manufacturers a<strong>gr</strong>eed on a document that<br />
is called "MIDI 1.0 Specification". Any device that has MIDI capabilities must adhere to this specific data<br />
structure to ensure that all MIDI devices are capable of working together. This protocol is a language that<br />
allows interworking between instruments from different manufacturers by providing a link that is capable<br />
of transmitting and receiving digital data. It is important to remember that MIDI transmits commands, but<br />
it does not transmit an audio signal.<br />
The MIDI specification includes a common language that provides information about events, such as note<br />
on and off, preset changes, sustain pedal, pitch bend, and timing information. The specification has been<br />
updated more recently with specific data structures for handling sample dumps, MIDI time code, general<br />
MIDI and standard MIDI files. To see a complete listing of all MIDI data, go to: Types of Data<br />
Transmitted through MIDI<br />
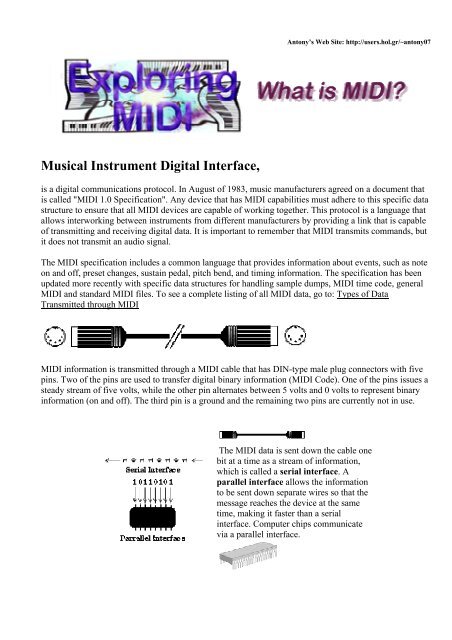
MIDI information is transmitted through a MIDI cable that has DIN-type male plug connectors with five<br />
pins. Two of the pins are used to transfer digital binary information (MIDI Code). One of the pins issues a<br />
steady stream of five volts, while the other pin alternates between 5 volts and 0 volts to represent binary<br />
information (on and off). The third pin is a <strong>gr</strong>ound and the remaining two pins are currently not in use.<br />
The MIDI data is sent down the cable one<br />
bit at a time as a stream of information,<br />
which is called a serial interface. A<br />
parallel interface allows the information<br />
to be sent down separate wires so that the<br />
message reaches the device at the same<br />
time, making it faster than a serial<br />
interface. Computer chips communicate<br />
via a parallel interface.
The serial interface<br />
was chosen by MIDI<br />
manufacturers because<br />
it is less expensive and<br />
more efficient than a<br />
parallel interface. The<br />
speed of a MIDI serial<br />
interface is 31,250 bits<br />
per second. There are<br />
10 bits needed for<br />
every MIDI digital<br />
word or 3125<br />
messages per second.<br />
Snap your finger and<br />
think about how many<br />
many events could be<br />
transmitted during that<br />
time. Consequently,<br />
the serial interface<br />
speed is more than<br />
adequate for most<br />
music applications.<br />
There are many different<br />
types of MIDI connections.<br />
The MIDI Out sends<br />
digital messages from one<br />
MIDI device and into the<br />
MIDI In of another MIDI<br />
device.<br />
In order to really<br />
understand the concept<br />
of digital information,<br />
we must be familiar<br />
with the decimal, binary<br />
and hexadecimal<br />
counting systems.<br />
Understanding Decimal,<br />
Binary,& Hexadecimal,<br />
will help us to learn<br />
about the three counting<br />
systems and how they<br />
are applied to MIDI<br />
The MIDI Thru connector receives a copy of any digital message coming into the MIDI In connection<br />
and sends a duplicate of this information out of the MIDI Thru port into the MIDI In of a third MIDI<br />
device. This allows the user to have more than two MIDI devices connected as a studio. The MIDI Out<br />
port from the second or third device in the dia<strong>gr</strong>am below would not work because it is sending MIDI<br />
information from that particular synthesizer. The MIDI Thru port is receiving the MIDI In information<br />
and passing it on to the next device.<br />
When MIDI devices are linked together by a series of MIDI In and MIDI Thru connections, it is referred<br />
to as a Daisy-Chain Network.<br />
A MIDI interface may only<br />
have two connections, a<br />
MIDI In and a MIDI Out.<br />
Copies of MIDI In information may be sent to numerous<br />
devices by using MIDI Thru Boxes, known as Star<br />
Networks.<br />
Example of a MIDI Echo / MIDI<br />
Merger
This gives the user the<br />
ability to send information<br />
to a computer, while the<br />
computer sends MIDI<br />
information out from a<br />
software pro<strong>gr</strong>am. Some<br />
music software pro<strong>gr</strong>ams<br />
will have a MIDI Echo<br />
device that allows a copy of<br />
the information to be<br />
merged with the information<br />
that is leaving the computer<br />
from the MIDI Out ports.<br />
This enables the sequencing<br />
software to simultaneously<br />
record the information that it<br />
is receiving at the MIDI In<br />
port, while sending a copy<br />
of that information out of<br />
the MIDI Out port along<br />
with previously recorded<br />
tracks of MIDI events.<br />
Return to MIDI Connections Menu<br />
Now it is time to try connecting a few different MIDI studios. After each example there is a answer page<br />
to see the complete connections.<br />
All three keyboards have<br />
MIDI connections.<br />
Synthesizer A is the<br />
Master keyboard and<br />
Synthesizer B & C are the<br />
MIDI slave devices.<br />
Studio A<br />
Studio B<br />
Both keyboards have<br />
MIDI connections.<br />
Synthesizer A is the<br />
Master keyboard and<br />
Synthesizer B is the<br />
MIDI slave device.<br />
Which connections<br />
would you use so that<br />
synthesizer A is<br />
sending MIDI<br />
information to<br />
synthesizer B.<br />
To see the Answer
Which connections would<br />
you use so that synthesizer<br />
A is sending MIDI<br />
information to synthesizer<br />
B and synthesizer C.<br />
To see the Answer<br />
Studio C<br />
In this example we have added a computer and MIDI interface. The<br />
first order of business is to connect the master keyboard to the computer<br />
so they can communicate with each other.<br />
Next connect the three tone generators (synthesizers without keyboards)<br />
The MIDI Out on the MIDI interface may also act as a MIDI Thru that<br />
relays a copy of the MIDI In information. This will allow the keyboard<br />
to communicate with the computer and the three tone generators. Use<br />
the concept of the daisy-chain network set-up from the MIDI Thru<br />
port of the keyboard.<br />
To see the Answer<br />
Studio D<br />
A multi-port Star <strong>Interface</strong> receives MIDI data at the MIDI In ports<br />
and then copies the information and sends it out to two or more Thru<br />
ports. Each MIDI In port may be assigned to specific MIDI Thru ports.<br />
Again, try connecting the keyboard controller so that it sends<br />
information to the MIDI interface.
Then connect the MIDI interface to the Keyboard. Finally, connect the<br />
three remaining Tone Generators using a star set-up. Do not use a daisychain<br />
set-up for these connections.<br />
To see the Answer<br />
Return to MIDI Connections Menu<br />
MIDI <strong>Interface</strong>s<br />
The pictures below are MIDI interfaces for the<br />
Macintosh computer. <strong>Interface</strong>s may be<br />
purchased in many different styles and varying<br />
de<strong>gr</strong>ees of complexity.<br />
pictures from Opcode and Apple Computer<br />
The pictures below<br />
are MIDI interfaces<br />
for Windows based<br />
computers. Possible<br />
interfaces may be<br />
an external device<br />
or inserted into the<br />
computer as an<br />
add-on card.<br />
pictures from Music Quest Inc. and Dell Computer Corporation
We will explore three basic numbering systems, called decimal, binary, and hexadecimal.<br />
A base 10 number system, the decimal system, is based on ten numbers: 0, 1, 2, 3, 4, 5, 6, 7, 8, and 9.<br />
The next number in the sequence is a combination of two digits, where the second digit is multiplied by<br />
10. 10 is equal to (1 X 10) + 0. Two digits may go as high as 99, and then a third digit is needed for the<br />
next number. The third digit is multiplied by 100. This concept continues with the next digit multiplied by<br />
1000, the next by 10,000, and so on. A number like 6594 would be calculated as (6 X 1000) + (5 X 100) +<br />
(9 X 10) + (4 X 1). This concept is easy to <strong>gr</strong>asp, because we use the decimal system in every day<br />
applications.<br />
Computers work in a digital environment that<br />
has only two variables, 0 and 1. All numbers in<br />
the decimal system may be translated into 0's<br />
and 1's of the binary system. By having only<br />
one digit or box, there are two possibilities.<br />
This binary system is a base 2 numbering<br />
system that uses only two numbers, 0 and 1.<br />
By having two digits or boxes, there are four<br />
possibilities. The upper number is the decimal<br />
counting system and the bottom numbers<br />
represent the binary counting system. In binary,<br />
the first digit (right box) corresponds to a<br />
decimal value of 0 or 1, while the second digit<br />
(left box) corresponds to a decimal value of 0 or<br />
2. The multiples of the decimal counting system<br />
are 1, 10, 100, 1000, etc. The multiples of the<br />
binary counting system are 1, 2, 4, 8, 16, 32, 64,<br />
128, etc.<br />
By having three digits or boxes, there are eight possibilities. The upper<br />
number is the decimal counting system and the bottom numbers<br />
represent the binary counting system. The first digit (right box) may<br />
have a value of 0 or 1. The second digit (middle box) may have a value<br />
of 2 or 0 and the last digit (left box) may have a value of 4 or 0.
(Remember that 0 is a number, 0-15) The upper number is<br />
the decimal counting system and the boxes represent the<br />
binary possibilities.<br />
This is the<br />
same dia<strong>gr</strong>am,<br />
but now you<br />
only see the<br />
binary<br />
representation.<br />
By having<br />
four digits<br />
or boxes,<br />
there are<br />
sixteen<br />
possibilities.<br />
The first digit (right box) may have a value of 0 or 1, and the second<br />
digit may have a value of 2 or 0, the third digit may have a value of 4 or<br />
0, and the last digit (left box) may have a value of 8 or 0.<br />
Finally, we see all the combinations, with the upper numbers<br />
representing the decimal counting system followed by the<br />
[hexadecimal counting system]. The bottom number is the binary<br />
equivalent of the upper numbers.<br />
The hexadecimal counting system is a base 16 system. Each digit or slot may be represented by sixteen<br />
possible numbers. Hexadecimal uses the first ten numbers of the decimal system: 0, 1, 2, 3, 4, 5, 6, 7, 8,<br />
and 9. The number 10 has two digits so in hexadecimal it is represented by the letter A. The number 11,<br />
by B, 12 by C, 13 by D, 14 by E and 15 by F.<br />
0, 1, 2, 3, 4, 5, 6, 7, 8, 9, A, B, C, D, E, F, 10, 11, 12, 13, 14, 15, 16, 17, 18, 19, 1A, 1B,<br />
1C, 1D, 1E, 1F, 20, 21, 22, 23, 24, 25, 26, 27, 28, 29, 2A ........etc.<br />
Two digits or slots are needed to represent the next number in the sequence. The decimal number 16<br />
would equal 10 in hexadecimal. (1 X 16) + 0. Continuing in the series, 17(decimal) would equal<br />
11(hexadecimal), 18(decimal) would equal 12(hexadecimal), and so on until 31(decimal), which would<br />
equal 1F(hexadecimal). The next hexadecimal number would be 20, (2 X 16) + 0, which would equal 32<br />
in decimal. The hexadecimal number 9C would equal (9 X 16) + 12 = 156 in decimal.
multiple of each digit 1286432168421<br />
binary counting system 1 0 1 1 0110<br />
The binary number 10110110 is the equivalent of 182 in decimal. That is, (128 x 1) + (64 x 0) + (32 x 1)<br />
+ (16 x 1) + (8x0) + (4 x 1) + (2 x 1) + (1 x 0).<br />
multiple of each digit 256 16 1<br />
hexadecimal counting system 1 A F<br />
The hexadecimal number 1AF is the equivalent of 431 in decimal. That is (256 x 1) + (16 x 10) + (1 x<br />
15). The multiples of the digits in the hexadecimal counting system are 1, 16, 256, etc.<br />
So why do we have to learn all these numbers to understand MIDI?<br />
Remember that MIDI digital information is transmitted using the binary system. The serial interface<br />
translates musical actions or events into binary numbers that it receives and sends one at a time down a<br />
MIDI cable. By understanding the binary counting system, we can look at MIDI information and<br />
understand what is being transmitted through a MIDI cable. The binary number 10010000 is not easy to<br />
calculate, but reading the number in the hexadecimal equivalent 90 makes more sense when it is applied to<br />
a MIDI message.<br />
10010000, 00110111, 01111011 = 90, 37, 7B, which may be interpreted as;<br />
Note ON, MIDI channel 1, play the 55th note, at a velocity of 123 out of 127 possibilities.<br />
multiple of each digit 1286432168421<br />
binary counting system 1 0 1 1 0110<br />
If we look at the binary number above there is an easier way to add up the number. Instead of counting the<br />
binary number as (128 x 1) + (64 x 0) + (32 x 1) + (16 x 1) + (8x0) + (4 x 1) + (2 x 1) + (1 x 0) = 182<br />
(Decimal), split the binary number into two sections.<br />
multiple of each digit 8421 8421<br />
binary counting system 1011 0110<br />
hexadecimal counting system B 6<br />
(8 X 1) + (4 X 0) + (2 X 1) + (1 X 1) = 11 or B in hexadecimal<br />
(8 X 0) + (4 X 1) + (2 X 1) + (1 X 0) = 6 in hexadecimal<br />
B6 hexadecimal number (11[B] x 16) + 6 = 182 in decimal<br />
If we use eight binary digits we have 256 possible numbers. 00000000 to 11111111. We can use two<br />
hexadecimal numbers to represent 256 numbers, 00 to FF. All MIDI events may be represented with eight<br />
binary or two hexadecimal numbers.<br />
You may download a document,Conversion of Numbers, that was created using the pro<strong>gr</strong>am Max. This<br />
document compares the similarities between the decimal, binary and hexadecimal counting systems.By<br />
clicking on the document your browser should download the file. The document may be changed back to
its original version by using the pro<strong>gr</strong>am StuffIt Expander. If your browser is set up to recognize StuffIt<br />
Expander, it may have already unstuffed the document. If not, you will need to obtain a copy of the<br />
pro<strong>gr</strong>am StuffIt Expander from Aladdin.<br />
The pro<strong>gr</strong>am MAXplay is needed to run the document Conversion of Numbers. If you would like<br />
information about the application Max, please contact Opcode Systems, Inc.. You may download a free<br />
copy of this application by clicking on the MAXplay icon below. This is a run-time only version of the<br />
application Max; it may not be used to create new Max documents. MAXplay will work only on a<br />
Macintosh computer.<br />
Specific examples of MIDI data structures<br />
The MIDI language is represented with binary code. Each 0 or 1 is called a bit. Four bits equal a nibble<br />
and eight bits equal a byte.With MIDI, each digital word consists of a total of 10 bits: 8 bits (1 byte) plus<br />
one start bit. (The MIDI messages in this pro<strong>gr</strong>am will not display the start and stop bits.)<br />
When we look as a digital word, 10010110, the bit at the far left is considered the Most Significant Bit.<br />
The remaining seven bits, 10010110, are considered the Least Significant Bits. Most MIDI messages<br />
consist of one, two or three bytes. Each byte may be classified as a status or data byte.<br />
A MIDI processor will look at the Most Significant Bit to see if it is a 1 or a 0. Status bytes start with a<br />
1, while data bytes start with a 0. A status byte is the first word in a digital MIDI message, and it is used<br />
as an identifier or an instruction.<br />
Channel messages are composed of status bytes that are followed by one or more data bytes. The data<br />
bytes are information that is pertinent to the status byte. Because a data byte starts with a 0 in the binary<br />
number, 01101100, there are 128 possible values. In hexadecimal, the values range from 00 to 7F. You<br />
may want to download the MAXplay pro<strong>gr</strong>am, Conversion of Numbers, to better understand the<br />
relationship of a MIDI slider with binary and hexadecimal information.<br />
You may download a document,Conversion of Numbers, that was created using the pro<strong>gr</strong>am Max. This<br />
document compares the similarities between the decimal, binary and hexadecimal counting systems.By<br />
clicking on the document your browser should download the file. The document may be changed back to<br />
its original version by using the pro<strong>gr</strong>am StuffIt Expander. If your browser is set up to recognize StuffIt<br />
Expander, it may have already unstuffed the document. If not, you will need to obtain a copy of the<br />
pro<strong>gr</strong>am StuffIt Expander from Aladdin.<br />
The pro<strong>gr</strong>am MAXplay is needed to run the document Conversion of Numbers. If you would like<br />
information about the application Max, please contact Opcode Systems, Inc.. You may download a free<br />
copy of this application by clicking on the MAXplay icon below. This is a run-time only version of the<br />
application Max; it may not be used to create new Max documents. MAXplay will work only on a<br />
Macintosh computer.<br />
• Conversion of Numbers(MAXplay document) (17k)<br />
• MAXplay 3.0 (Application) (644k)
To look at some specific examples of MIDI binary information, you may want to download two more<br />
MAXplay pro<strong>gr</strong>ams that demonstrate what occurs when a note is turned on and the relationship of the<br />
keyboard notes to hexadecimal, decimal and binary information.<br />
• MIDI Note On(MAXplay document) (17k)<br />
• MIDI Note Conversion (MAXplay document) (17k)<br />
Specific examples of MIDI data structures<br />
Turning on a MIDI Note<br />
Binary code 10010000 00111100 01110010<br />
Hexadecimal 9 0 3 C 7 2<br />
9 0 Status Byte Note On with MIDI channel 1.<br />
3 C<br />
Data Byte, that is the actual note which is the 60th note on a range of 0 to 127, which is<br />
Middle C.<br />
7 2<br />
The key velocity information on how fast the note was pressed. This data byte also has a<br />
range of 0 to 127. A higher velocity will create more volume with the sound.<br />
Creating a Pro<strong>gr</strong>am Change<br />
Binary code 11001111 00011010<br />
Hexadecimal C F 1 A<br />
C F Status Byte Pro<strong>gr</strong>am Change on MIDI channel 16.<br />
1 A<br />
Data Byte that is the actual pro<strong>gr</strong>am number that was pressed on the synthesizer. The<br />
pro<strong>gr</strong>am would be the 26th pro<strong>gr</strong>am setting. That is (1 x 16) + (A, which is 10)<br />
Using the Sustain Pedal<br />
Binary code 10110111 01000000 01111111<br />
Hexadecimal B 7 4 0 7 F<br />
B 7 Status Byte Control Change on MIDI channel 8.<br />
4 0 Data Byte that selects sustain pedal as a controller.<br />
7 F Data Byte that turns on the sustain pedal.
Using the Volume Pedal<br />
Binary code 10111010 01000000 00000101 00000110 ......<br />
Hexadecimal B A 0 7 0 5 0 6 ......<br />
B A Status Byte Control Change on MIDI channel 11.<br />
0 7 Data Byte that selects volume as a controller.<br />
0 5, 0 6, ..... Data Bytes that increase the volume.<br />
There are four main categories of MIDI data. The following charts represent information on the current<br />
hexadecimal numbers that are used in MIDI transmission. Each MIDI message includes a Status Byte. If<br />
they are required, Data Bytes will follow each Status Byte. Some of the example below have links that<br />
may be clicked for more detail about the MIDI event.<br />
MIDI Message<br />
• Channel<br />
Messages<br />
• System<br />
Exclusive<br />
Status<br />
Byte<br />
• System<br />
Common<br />
• System Real-<br />
Time<br />
Channel Messages<br />
Data Byte Data Byte<br />
Note Off 8n Note Number Velocity<br />
Note On 9n Note Number Velocity<br />
Polyphonic<br />
Aftertouch<br />
An Note Number Pressure<br />
Control Change Bn Control Number Data Information<br />
Control Change Bn 01 Modulation Wheel Data<br />
Control Change Bn 02 Breath Controller Data<br />
Control Change Bn 04 Foot Controller Data<br />
Control Change Bn 05 Portamento Time Data<br />
Control Change Bn 06 Data Entry Slider Data<br />
Control Change Bn 07 Main Volume Data
Control Change Bn 08 Balance Controller Data<br />
Control Change Bn 0A Pan Controller Data<br />
Control Change Bn 0B Expression Controller Data<br />
Control Change Bn<br />
40 Sustain Pedal<br />
(Damper)<br />
00: Off 7F: On<br />
Control Change Bn 41 Portamento 00: Off 7F: On<br />
Control Change Bn 42 Sostenuto 00: Off 7F: On<br />
Control Change Bn 43 Soft Pedal 00: Off 7F: On<br />
Control Change Bn 45 <strong>Hol</strong>d 2 00: Off 7F: On<br />
Control Change Bn<br />
5B External Effects<br />
Depth<br />
00: Off 7F: On<br />
Control Change Bn 5C Tremelo Depth 00: Off 7F: On<br />
Control Change Bn 5D Chorus Depth 00: Off 7F: On<br />
Control Change Bn<br />
5E Celeste (Detune)<br />
Depth<br />
00: Off 7F: On<br />
Control Change Bn 5F Phaser Depth 00: Off 7F: On<br />
Control Change Bn 79 Reset All Controllers Data to reinitialize<br />
Control Change Bn 7A Local Control 00: Off 7F: On<br />
Control Change Bn 7B All Note Off 00<br />
Control Change Bn 7C Omni Off 00<br />
Control Change Bn 7D Omni On 00<br />
Control Change Bn 7E Mono On 00-0A Number of Channels<br />
Control Change Bn 7F Poly On 00<br />
Pro<strong>gr</strong>am Change Cn<br />
Pro<strong>gr</strong>am Number 00 to<br />
7F<br />
No second data byte<br />
needed.<br />
Channel Aftertouch Dn Note Number Pressure Value<br />
Pitch Wheel En Least Significant Bit Most Significant Bit<br />
n=MIDI Channel Number [ Hexadecimal numbers 0 to F = 1 to 16 MIDI channel number)<br />
Return to Types of Data Menu
MIDI Message<br />
System Exclusive F0<br />
System Exclusive<br />
Universal<br />
System Exclusive<br />
Universal<br />
System Exclusive<br />
Universal<br />
System Exclusive<br />
Universal<br />
System Exclusive<br />
Universal<br />
Status<br />
Byte<br />
System Exclusive<br />
Data Byte Data Byte<br />
Manufacture ID<br />
Code<br />
F0 7E Sample Dump<br />
Manufacture Data<br />
Data on sample, bits, length, rate,<br />
and loop points<br />
F0 7F MIDI Time Code Data on Complete Message<br />
F0<br />
MIDI Machine<br />
Control<br />
Data commands<br />
F0 MIDI Show Control Data commands<br />
F0<br />
Return to Types of Data Menu<br />
MIDI Message Status<br />
Byte<br />
MIDI Time Code<br />
Quarter Frame<br />
Song Position<br />
Pointer<br />
Standard MIDI<br />
Song File<br />
System Common<br />
F1 Frame Number Data<br />
F2<br />
Data for Song File<br />
Data Byte Data Byte<br />
Data on number of SSP 6<br />
Bytes everyQuarterNote<br />
No second data byte. F1 status<br />
byte is repeated with data byte.<br />
Data on number of SSP 6 Bytes<br />
everyQuarterNote<br />
Song Select F3 Song Number No second data byte.<br />
Tune Request F6 Data to change tuning Data to change tuning<br />
End of Exclusive F7 No data bytes No data bytes<br />
Return to Types of Data Menu
System Real-Time<br />
MIDI Message Status Byte Data Byte Data Byte<br />
TimingClock MIDISync F8 No data bytes<br />
No data bytes. 24<br />
Status bytes per<br />
quarter note.<br />
Start FA No data bytes No data bytes<br />
Continue FB No data bytes No data bytes<br />
Stop FC No data bytes No data bytes<br />
Active Sensing FE No data bytes No data bytes<br />
System Reset FF<br />
Sets instrument to<br />
default<br />
• MIDI Channels<br />
• MIDI Reception Modes<br />
• Multi-Timbral <strong>Instrument</strong>s<br />
MIDI Channels<br />
No data bytes<br />
All MIDI devices receive MIDI information at the MIDI In port. All MIDI channel message information<br />
has an identification of a specific MIDI channel. The second nibble of a MIDI byte has sixteen<br />
possibilities that identify the MIDI channel. In the example below, the first four digits (1100) represent a<br />
pro<strong>gr</strong>am change and the last four digits (1111), refer to MIDI channel 16.<br />
Binary code 11001111<br />
Hexadecimal C F<br />
Consider the analogy of a television set that has sixteen channels. All sixteen may be viewed, but only one<br />
channel may be on the screen at any given moment. A MIDI device may be set-up to respond in a similar<br />
fashion. It may receive information on all sixteen channels, but it only responds to one MIDI channel at<br />
time. The MIDI device will ignore all channel messages that do not correspond to the same MIDI channel.<br />
This type of reception mode is called Omni-Off Poly. Now, let's look at the four types of MIDI reception<br />
modes.<br />
Return to MIDI Channels & Modes Menu<br />
MIDI Reception Modes<br />
Mode 1 - Omni-On Poly - The receiving device listens and responds<br />
to all incoming MIDI channel data. The device will ignore the channel<br />
destination of each status byte and attempt to play all MIDI messages.
Poly, is dependent on the number of voices that a MIDI device can play<br />
at any given moment in time. Some devices may only have eight note<br />
polyphonic capabilities, while other devices may play up to sixty-four<br />
voices simultaneously.<br />
Mode 2 - Omni-On Mono - The receiving device listens and responds<br />
to all incoming MIDI channel data in the same fashion as Mode 1,<br />
though the instrument will only play one note at a time. The mode is not<br />
very practical and has little use in most MIDI applications.<br />
Mode 3 - Omni-Off Poly - This is the most frequently used mode. The<br />
MIDI device will listen to all incoming channel data but only responds<br />
to information set to one particular channel. Poly is dependent on the<br />
number of voices that a MIDI device can play at any given moment in<br />
time. Some devices may only have eight note polyphonic capabilities,<br />
while other devices may play up to sixty-four voices simultaneously. If<br />
a device is multi-timbral, then it may be set-up to have more than one<br />
instrument playing simultaneously, and each instrument will play the<br />
notes polyphonically up to the device's limit.<br />
Mode 4 - Omni-Off Mono - The MIDI device will listen to all<br />
incoming channel data but only responds to information set to one<br />
particular channel. It will only play one note at any given moment. A<br />
typical use for this mode is a MIDI Guitar Controller, where each string<br />
of the guitar is assigned to a separate MIDI channel and each string will<br />
play only one note at a time.<br />
Return to MIDI Channels & Modes Menu<br />
Multi-Timbral <strong>Instrument</strong>s<br />
A multi-timbral MIDI device is able to respond to two or more different sounds simultaneously. It is like<br />
having two or more synthesizers combined into one device. A multi-timbral instrument can be set-up to<br />
play a piano sound on channel 1, a bass sound on channel two, a string sound on channel 3, and a solo<br />
instrument sound on channel 4. This type of device works well with a sequencer pro<strong>gr</strong>am that has specific<br />
information assigned to separate tracks, because each timbre ( pro<strong>gr</strong>am) will only respond to a specific<br />
MIDI channel.<br />
In the example on<br />
the left, a sequencer<br />
application in the<br />
computer can send<br />
multiple tracks of<br />
MIDI notes on<br />
channels 1 through<br />
10. The keyboard is<br />
set-up to respond to<br />
MIDI information on<br />
channels 1 through<br />
3, while the multitimbral<br />
device on the<br />
right is responding to<br />
MIDI information on
A MIDI controller is a device that is<br />
able to transmit performance related<br />
MIDI events. The most common type<br />
of controller is a MIDI device with a<br />
keyboard. There are keyboard<br />
controllers without sound modules.<br />
The instrument produces no sound of<br />
it own, rather it generates MIDI<br />
events from the keyboard. A<br />
keyboard controller usually will have<br />
weighted keys that have the "feel"<br />
and "response" of a piano. Keyboard<br />
controllers usually have 76 or 88<br />
keys.<br />
channels 4 through<br />
10.<br />
Listed below is an overview<br />
of different MIDI controllers.<br />
• Synthesizers<br />
• Percussion<br />
Controllers<br />
• Guitar Controllers<br />
• MIDI Pedal<br />
Controller<br />
• Wind Controllers<br />
• Disklavier Piano<br />
• MID Grand Piano<br />
Using a keyboard is not the only way to control a MIDI device.<br />
There are alternate controllers than include drumpads, keyboard<br />
mallets, wind controllers, guitar and bass controllers, and MIDI<br />
pedals. Experimentation with MIDI controllers has led to the<br />
development of muscle controllers that are attached to the body,<br />
glass plate harps, violin controllers, and many other imaginative<br />
devices.<br />
Many synthesizers include keyboard<br />
controllers. Tone Generators are synthesizer<br />
modules without the keyboard.<br />
pictures from Alesis Studio Electronics and Yamaha Corporation of America<br />
Return to MIDI Controllers Menu
The picture on the right is a MIDI<br />
Percussion Controller. It resembles<br />
a vibraphone but has the added<br />
flexibility of MIDI.<br />
Return to MIDI Controllers Menu<br />
A MIDI Guitar<br />
Controller may either<br />
resemble a guitar in<br />
appearance (as in the<br />
upper picture) or may<br />
be an actual guitar<br />
with a special MIDI<br />
pickup installed (as in<br />
the lower example).<br />
MIDI Drum-Pad Controllers give the<br />
percussionist added flexibility. Each pad<br />
may be assigned to a certain drum<br />
sound, special effect or other MIDI<br />
parameters.<br />
pictures from KaT, Inc.<br />
Guitar Controllers may be set-up to<br />
control a different MIDI device on<br />
each string. The ability to combine the<br />
guitar's expressiveness with MIDI<br />
controls gives the user unlimited<br />
potential.<br />
pictures from Yamaha Corporation of America and Roland Corporation<br />
Return to MIDI Controllers Menu
Below is a MIDI<br />
footpedal board,<br />
which is often used<br />
as an auxiliary<br />
controller to switch<br />
between patches or<br />
effects.<br />
MIDI Wind<br />
Controllers are<br />
designed to mimic<br />
the expressive<br />
articulation of a<br />
woodwind or brass<br />
instrument. They<br />
usually have a very<br />
dynamic feel and<br />
may have a more<br />
humanistic effect on<br />
the sounds or<br />
samples.<br />
pictures from Yamaha Corporation of America and Music Industries Corporation<br />
Return to MIDI Controllers Menu<br />
Inside the<br />
disklavier<br />
are optical<br />
sensors<br />
and key<br />
solenoids<br />
for<br />
recording<br />
and<br />
playback.<br />
The Yamaha Disklavier is an acoustic<br />
piano which also functions as a MIDI<br />
controller and player piano.<br />
pictures from Yamaha Corporation of America
Return to MIDI Controllers Menu<br />
The Yamaha MIDI Grand is the ultimate MIDI<br />
controller.<br />
It gives the performer the feel and<br />
sound of a <strong>gr</strong>and piano with the<br />
control of multiple MIDI devices.<br />
pictures from Yamaha Corporation of America<br />
The following files are QuickTime Movie clips of concert footage that incorporates a Yamaha MIDI<br />
Grand Piano in a few compositions. The performances were presented by the faculty and students of the<br />
Electronic Music Class at Santa Barbara Community College in Santa Barbara, California.<br />
Excerpt from: Animus Vivére (Will to<br />
Live) by Peter Raschke<br />
Music for Vocal Chant, MIDI Grand<br />
Piano, Synthesizer, and Percussion<br />
Ensemble.<br />
Text is from "The Liturgy of the Hours".<br />
Performance from Santa Barbara City<br />
College Sonic Sequences Concert, May 26, Excerpt from: Animus<br />
1995.<br />
Vivére QTM (6.8MB)<br />
@1995 Copyright Protected<br />
Excerpt from: Tone Poem<br />
Mov.I QTM (9.7MB)<br />
Excerpt from: Tone Poem<br />
Mov.II QTM (9.2MB)<br />
Excerpts from: Tone Poem by Peter<br />
Raschke<br />
[ Spiritual - Mystical - Enchanted -<br />
Tempestuous ]<br />
Music for MIDI Grand Piano,<br />
Synthesizer, Timpani, Wind Chimes,<br />
Cymbals, Gong and Tubular Chimes.<br />
Performance from Santa Barbara City<br />
College Sonic Sequences Concert,<br />
December 17, 1993. @1993 Copyright<br />
Protected
Excerpt from: Building Blocks by Peter<br />
Raschke<br />
Music for Soprano Saxophone, two<br />
Flutes, MIDI Grand Piano, Synthesizer,<br />
and Timpani.<br />
Performance from Santa Barbara City<br />
College Sonic Sequences Concert, May<br />
28, 1993.<br />
Performance from Santa Barbara City<br />
College Faculty Concert, October 24,<br />
1993.<br />
@1993 Copyright Protected<br />
Excerpt from: Building<br />
Blocks QTM (11.7MB)<br />
General MIDI is an addition to the original MIDI specification. It follows a standard that assigns 128<br />
instrument sounds that are assigned to specific numbers. There are sixteen specific families or types of<br />
instruments and eight instruments within each <strong>gr</strong>oup. A separate <strong>gr</strong>oup of percussion sounds is usually<br />
available on MIDI channel ten, and they are assigned to specific notes on a MIDI keyboard.<br />
Piano Bass Reed Synth F/X<br />
Chromatic Perc. Strings Pipe Ethnic<br />
Organ Ensemble Synth Lead Percussive<br />
Guitar Brass Synth Pad Sound F/X<br />
Any MIDI device that conforms to the General MIDI Standard will assign each instrument to a specific<br />
number and will allocate at least a 24 note polyphonic capability. The General MIDI Standard was created<br />
so that generic Standard MIDI Files created on a sequencer or notation application may be played back<br />
on another device while preserving the inte<strong>gr</strong>ity of the original selection.<br />
This Standard has also been inte<strong>gr</strong>ated into the Quick-Time Movie format in the form of the <strong>Musical</strong><br />
<strong>Instrument</strong>s Extension. This pro<strong>gr</strong>am allows the tracks from a Standard MIDI File to be loaded as a<br />
Quick-Time movie that may be played back without a MIDI module. Plug-ins on a web browser will use<br />
the same extension to play MIDI files on the web. Quick-Time 3.0 now supports all 128 voices. Listed<br />
below is the complete list of the General MIDI <strong>Instrument</strong>s. Some of the voices below are pro<strong>gr</strong>ammed to<br />
play a MIDI file with the selected sound by pressing on the link.<br />
1.Acoustic Piano<br />
General MIDI <strong>Instrument</strong> List<br />
Piano return to the top<br />
2.BrtAcou Piano 3.ElecGrand Piano 4.Honky Tonk Piano<br />
5.Elec.Piano 1 6.Elec.Piano 2 7.Harsichord 8.Clavichord<br />
Chromatic Percussion return to the top<br />
9.Celesta 10.Glockenspiel 11.Music Box 12.Vibraphone
13.Marimba 14.Xylophone 15.Tubular Bells 16.Dulcimer<br />
Organ return to the top<br />
17.Drawbar Organ 18.Perc. Organ 19.Rock Organ 20.Church Organ<br />
21.Reed Organ 22.Accordian 23.Harmonica 24.Tango Accordian<br />
Guitar return to the top<br />
25.Acoustic Guitar 26.SteelAcous. Guitar 27.El.Jazz Guitar 28.Electric Guitar<br />
29.El. Muted Guitar 30.Overdriven Guitar 31.Distortion Guitar 32.Guitar Harmonic<br />
Bass return to the top<br />
33.Acoustic Bass 34.El.Bass Finger 35.El.Bass Pick 36.Fretless Bass<br />
37.Slap Bass 1 38.Slap Bass 2 39.Synth Bass 1 40.Synth Bass 2<br />
41.Violin<br />
Strings return to the top<br />
45.Tremelo Strings<br />
42. Viola 43.Cello 44.Contra Bass<br />
46.Pizz. Strings<br />
47.Orch. Strings 48.Timpani<br />
Ensemble return to the top<br />
49.String Ens.1 50.String Ens.2 51.Synth.Strings 1 52.Synth.Strings 2<br />
53.Choir Aahs 54. Voice Oohs 55. Synth Voice 56.Orchestra Hit<br />
Brass return to the top<br />
57.Trumpet 58.Trombone 59.Tuba 60.Muted Trumpet<br />
61.French Horn 62.Brass Section 63.Synth Brass 1 64.Synth Brass 2<br />
Reed return to the top<br />
65.Soprano Sax 66.Alto Sax 67.Tenor Sax 68.Baritone Sax<br />
69. Oboe 70.English Horn 71.Bassoon<br />
72.Clarinet<br />
Pipe return to the top<br />
73.Piccolo 74.Flute 75.Recorder 76.Pan Flute<br />
77.Blown Bottle 78.Shakuhachi 79.Whistle 80.Ocarina<br />
Synth Lead return to the top<br />
81.Lead1 Square 82.Lead2 Sawtooth 83.Lead3 Calliope 84.Lead4 Chiff<br />
85.Lead5 Charang 86.Lead6 Voice 87.Lead7 Fifths 88.Lead8 Bass Ld<br />
Synth Pad return to the top<br />
89.Pad1 New Age<br />
90.Pad2 Warm 91.Pad3 Polysynth 92.Pad4 Choir<br />
93.Pad5 Bowed 94.Pad6 Metallic 95.Pad7 Halo 96.Pad8 Sweep<br />
Synth F/X return to the top<br />
97.FX1 Rain 98.FX2 Soundtrack 99.FX3 Crystal 100.FX4 Atmosphere<br />
101.FX5 Brightness 102.FX6 Goblins 103.FX7 Echoes 104.FX8 Sci-Fi
105.Sitar<br />
Ethnic return to the top<br />
106.Banjo 107.Shamisen 108.Koto<br />
109.Kalimba 110. Bagpipe 111. Fiddle 112. Shanai<br />
Percussive return to the top<br />
113.TinkerBell 114.Agogo 115.SteelDrums 116.Woodblock<br />
117.TaikoDrum 118.Melodic Tom 119.SynthDrum 120.Reverse Cymbal<br />
Sound F/X return to the top<br />
121.Guitar Fret Noise 122. Breath Noise 123.Seashore 124.BirdTweet<br />
125.Telephone 126.Helicopter 127.Applause 128.Gunshot<br />
Standard MIDI File is the protocol that is used to transfer MIDI information from one type of device to<br />
another. A MIDI sequencer file could be transferred to another sequencer or to a notation pro<strong>gr</strong>am. In the<br />
example below a MIDI sequence file is converted to a Standard MIDI file and then imported into a<br />
notation pro<strong>gr</strong>am.<br />
This standard was added to the MIDI specification in 1988. It is a universal language that saves all MIDI<br />
notes, velocities, and controller codes as a generic file that may be interpreted by any pro<strong>gr</strong>am that<br />
supports the Standard MIDI File. In music applications that support Standard MIDI Files, the user may<br />
access and create Standard MIDI Files with the import and export commands. Standard MIDI files have<br />
the extension .mid added to the end of the document name.
There are three types of Standard MIDI Files, that include:<br />
• Type 0 - which combines all the tracks or staves in to a single track.<br />
• Type 1 - saves the files as separate tracks or staves for a complete score with the tempo and time<br />
signature information only included in the first track.<br />
• Type 2 - saves the file as separate tracks or staves and also includes the tempo and time signatures<br />
for each track.<br />
The internet is an excellent source for Standard MIDI Files. Because the files are MIDI information, they<br />
are usually fairly compact is size and they may also be compressed before they are sent over the internet. I<br />
have listed a few sites that have Standard MIDI Files available for the user. Please use the comment area<br />
in Pro<strong>gr</strong>am Information and Comments page for more sources that should be added to this page.<br />
Links to some sites that have Standard MIDI Files available on the WWW<br />
• Classical MIDI Archives<br />
• The Internet Piano Page<br />
• Monster MIDI Links<br />
• Twin Cities MIDI Home Page<br />
• Harmony Central<br />
• MIDI File Central<br />
• Abundant Legal MIDI Files<br />
• The MIDI Farm<br />
• The Ultimate TV & Movie MIDI Page<br />
• The Music Room<br />
• The Cool Crescendo Site of the Day<br />
• My Mega Midi Archive<br />
• Complete MIDI File Directory<br />
• Standard MIDI Files on the Net<br />
Once you have downloaded some MIDI files, they may be played back with any sequencer or music<br />
notation software. Usually you have to use the Import command to bring up the MIDI File on you<br />
computer pro<strong>gr</strong>am. If you are interested in playing MIDI Files on a Web site, go to Using MIDI on a Web<br />
Site for more information on MIDI Files and MIDI Plug-ins.
Over the past few years the use of MIDI on the internet has gone through many changes. To make things<br />
even more complicated, all browsers do not process MIDI files the same way. There are different HTML<br />
tags that are needed for specific browsers. For an overview of a brief history of the use of MIDI options on<br />
a web site, I recommend "MIDI Options for Web Authors", at the Crescendo web site. Currently, the best<br />
support for playing MIDI files over the internet is to use a plug-in. There are many different companies<br />
that have created plug-ins and I am not recommending any specific plug-in.Currently this page is using the<br />
html embed tag that brings up a Quicktime movie file. The Quicktime movie file is a MIDI file that is<br />
saved as a movie file with the (.mov) extension.<br />
On the Standard MIDI Files page is a list of recommended web sites that have MIDI files. Some of the<br />
sites have links to more MIDI file sites and by no means does this list cover all MIDI files on the web. A<br />
MIDI file will contain note and performance information as well as instructions for the type of sound for<br />
each track of the MIDI file. The actual sound is not included in the MIDI file, instead a pro<strong>gr</strong>am change<br />
recommending a certain type of sound in the General MIDI format. If your browser is set up properly with<br />
a MIDI enhanced plug-in, then the sounds that you are hearing on this web site are from your computer.<br />
Below are examples of "Solfeggio", by Carl Philipp Emanuel Bach . Each MIDI file is exactly the same in<br />
notes and performance instructions. The only event that is different is the pro<strong>gr</strong>am change to play various<br />
sounds from your computer.<br />
Solfeggio, with piano<br />
Solfeggio, with<br />
Harpsichord<br />
Solfeggio, with sitar<br />
Solfeggio, with<br />
Orchestral Harp<br />
Here are examples of a "Walt in Ab" by Johannes Brahms, first with a piano sound and then with a<br />
vibraphone sound.<br />
Waltz in Ab with piano.<br />
Waltz in Ab, with a vibraphone<br />
sound.<br />
Finally, the Prelude in e minor by Frederic Chopin played as the original solo piano composition. A<br />
synthesizer voice is used in the MIDI file immediately below and the two arrangements on the right take<br />
the upper piano voice and double the part with one of the following instruments.<br />
Prelude in e minor, solo piano<br />
Prelude in e minor, synth piano<br />
version<br />
Prelude in e minor, piano with<br />
violin<br />
Prelude in e minor, piano with<br />
clarinet<br />
The sound quality of these MIDI Files is limited by the sound set-up that you have on your computer.<br />
Transferring the MIDI Files to a sequencer and a favorite synthesizer may enhance the sound quality. The<br />
purpose of this exercise is to show you the possibilities of using MIDI Files on a web page. The nice thing<br />
about MIDI Files is that they take up very little memory in the computer and they download relatively fast<br />
compared to digital sound files (Audio vs. MIDI Files).<br />
Plug-ins, such as QuickTime Movie(MoviePlayer) from Apple, LiveAudio by Netscape, Beatnik by<br />
Headspace, Crescendo Plus by LiveUpdate, MacZilla by Knowledge Engineering and MIDIPLUG, by<br />
Yamaha are located at Netscape Products for free downloads.
On this page we will look at computer software applications that use MIDI. This page in no way<br />
encompasses the vast use of MIDI in computer pro<strong>gr</strong>ams. Included are examples of some pro<strong>gr</strong>ams that<br />
demonstrate the wide variety of uses with the MIDI specification. Different types of software include:<br />
Sequencers Music Patch Editors and Librarians<br />
<strong>Digital</strong> Audio with MIDI<br />
Object-Oriented Pro<strong>gr</strong>amming<br />
sequencers<br />
Music Notation MIDI in Multimedia Applications<br />
Computer Aided Instruction for<br />
Music<br />
Sequencers<br />
When you first glance at an interface of a MIDI sequencer, it has the<br />
similar look of a tape recorder. You have the typical transport controls as<br />
well as tracks of music information. The big difference is the actual<br />
information that is recorded. With an analog tape recorder the acoustic<br />
waveform is recorded on a magnetic tape. With a digital tape recorder<br />
digital numbers are recorded to represent the acoustic signal. A MIDI<br />
sequencer records MIDI events. There are MIDI sequencers that also<br />
have the capability of recording digital audio and they will be discussed<br />
later.<br />
The dia<strong>gr</strong>am below displays eight MIDI tracks of information with each<br />
track sending notes, pro<strong>gr</strong>am changes, controller parameters to the<br />
individual instruments. The sequencer does not playback the actual<br />
sounds, but sends MIDI information to the synthesizers that generate the<br />
sounds. Once the MIDI information is stored in a sequencer there are<br />
many ways to manipulate the data. The dia<strong>gr</strong>am below is an overview,<br />
but the user can get a more detailed look at the information by clicking on<br />
certain icons.
The picture to the right<br />
represent about ten<br />
measures of MIDI notes for<br />
one track. The analogy of a<br />
player piano roll is used in<br />
that the sequencer is<br />
sending note information to<br />
a synthesizer in the same<br />
way that a piano roll sends<br />
note information to the<br />
player piano. An attractive<br />
feature about a MIDI<br />
sequencer is that if the<br />
performance has a few<br />
mistakes the notes may be<br />
moved, made shorter or<br />
stretched instead of having<br />
to re-record the entire<br />
section.<br />
To the right is an<br />
example of an<br />
event listing of<br />
note information.<br />
Here the notes are<br />
listed with their<br />
location in each<br />
measure as well<br />
as position in<br />
absolute time.<br />
MIDI sequencers<br />
include timing<br />
information on<br />
the tempo of the<br />
composition.<br />
MIDI events may<br />
Another attractive feature of a<br />
MIDI sequencer is the ability to<br />
add control changes after the<br />
recording. In the example to the<br />
left the key velocity for each note<br />
is represented in a <strong>gr</strong>aph. The user<br />
may change the velocities with the<br />
stroke of a pencil using a mouse.<br />
Other control options include<br />
pro<strong>gr</strong>am changes, pitch bend,<br />
fader controls, modulation wheel,<br />
panning, and many more.<br />
Piano roll editing and <strong>gr</strong>aphic<br />
editing is one way to manipulate<br />
the MIDI data. It is possible to<br />
view the same information in<br />
notation form or in an event<br />
listing.
e recorded at a<br />
slow tempo and<br />
then played back<br />
at a faster speed.<br />
To get a better<br />
understanding of<br />
time and tempo<br />
features I<br />
recommend MIDI<br />
Timing Concepts<br />
Another important feature of MIDI<br />
sequencers is the input options.<br />
Advanced sequencers will give the<br />
user three options for inputting data.<br />
Real Time Recording - Incoming<br />
data is recorded as the performer<br />
plays on a MIDI controller.<br />
So far this<br />
demonstration<br />
has centered<br />
on Computer<br />
Based MIDI<br />
sequencers<br />
(right image).<br />
Other types of<br />
MIDI<br />
sequencers<br />
include:<br />
Step Time Recording - Allows<br />
the performer to input notes of<br />
events one step at a time from the<br />
controller, or with the computer<br />
keyboard or mouse.<br />
Loop Recording - Allows the<br />
user to decide on a specific<br />
amount of measures with a repeat<br />
mode to enter data. It is very<br />
similar to a drum machine tap<br />
mode.<br />
Dedicated<br />
Sequencers -<br />
are multitrack<br />
recorders of<br />
MIDI digital<br />
information.<br />
They are<br />
called<br />
dedicated<br />
because their<br />
only<br />
function is to record MIDI information. An excellent choice for a sequencer if<br />
you move your equipment around a lot for "gigs", and they usually cost less<br />
than a computer.<br />
Workstation, On Board Sequencers - Many work stations (synthesizers,<br />
drum machine, sequencer), now have small sequencers built in that allow<br />
multi-track recording of MIDI information.
eturn to the menu<br />
<strong>Digital</strong> Audio with MIDI sequencers<br />
A powerful<br />
combination is MIDI<br />
sequencing and digital<br />
audio. This allows the<br />
user to have MIDI<br />
files playing<br />
synthesizers in sync<br />
with digital audio<br />
tracks. The pro<strong>gr</strong>ams<br />
are more expensive<br />
than a MIDI sequencer<br />
and the computer need<br />
to have fast<br />
microprocessors as<br />
well as large amounts<br />
of memory to store the<br />
digital files.<br />
To the right and below<br />
are examples from the<br />
pro<strong>gr</strong>am ProTools by<br />
digidesign.<br />
Highlighted in yellow<br />
are digital audio tracks<br />
as well as MIDI tracks.
eturn to the menu<br />
Music Notation<br />
It was during the mid-<br />
1980's that music<br />
notation became<br />
accessible to anyone<br />
that had a computer<br />
and quality printer<br />
with the beginning of<br />
desktop music<br />
publishing. Laser<br />
Printers with<br />
PostScript music fonts<br />
are able to create highquality<br />
music<br />
manuscript.<br />
There is a wide range of<br />
notation pro<strong>gr</strong>ams<br />
available depending on<br />
the price range. Most<br />
pro<strong>gr</strong>ams allow the user<br />
to input data in step time<br />
or real time. Incoming<br />
data is recorded as the<br />
performer plays on a<br />
MIDI controller in Real<br />
Time Mode. Step Time<br />
Mode allows the<br />
performer to input notes<br />
of events one step at a<br />
time from the controller,<br />
or with the computer<br />
keyboard or mouse.<br />
There is usually a <strong>gr</strong>aphic interface that gives the user many options on<br />
note and rest values as well as musical marking symbols, text, musical<br />
expressions, etc.<br />
Files may be saved as a document file or exported as a Standard MIDI<br />
file that could then be read by another notation pro<strong>gr</strong>am or a MIDI<br />
sequencer pro<strong>gr</strong>am. Some pro<strong>gr</strong>ams will allow the user to create a full<br />
score of a composition as well as extracting the individual parts with<br />
transposition for individual instruments. The <strong>gr</strong>aphic interface is usually<br />
very intuitive and in little time a composition can appear as a<br />
professional copy.
eturn to the menu<br />
Computer Aided Instruction for Music<br />
Computer pro<strong>gr</strong>ams that involve music instruction have advanced to new levels in recent years. There are<br />
four main categories of software and the range is from the very beginning user to the advanced user. The<br />
categories include:<br />
Flexible Practice - works on music<br />
aural skills and music theory<br />
applications as well as<br />
performance skills. This type of<br />
pro<strong>gr</strong>am allows the student and<br />
teacher to customize the pro<strong>gr</strong>am<br />
by entering new material.<br />
Drill and Practice - work on music<br />
aural skills and music theory<br />
applications. The software is<br />
customized for specific tasks and<br />
instructional support but new<br />
material may not be added to the<br />
pro<strong>gr</strong>am.<br />
Simulation - exciting because they<br />
allow the user to interact with the<br />
computer pro<strong>gr</strong>am. The user may<br />
play practice a melody or<br />
improvise with an accompaniment<br />
pattern.<br />
Multimedia - offer a combination<br />
of sound, <strong>gr</strong>aphics, text, and<br />
hypertext in a learning<br />
environment. There are many<br />
pro<strong>gr</strong>ams available, but most of<br />
them do not use MIDI support.<br />
Most Web Browsers and some<br />
HyperCard pro<strong>gr</strong>ams do have<br />
MIDI support.<br />
The pro<strong>gr</strong>ams that are listed below have MIDI capabilities. There are many excellent CAI music pro<strong>gr</strong>ams<br />
that do not use MIDI, but they are not discussed on this page. I recommend the book Experiencing<br />
MUSIC TECHNOLOGY for a complete review of CAI music software pro<strong>gr</strong>ams.<br />
Flexible Practice<br />
Practica Musica is an in depth Flexible Practice pro<strong>gr</strong>am that teaches music<br />
theory and aural skills. When the software is connected with a MIDI<br />
interface the pro<strong>gr</strong>am becomes very powerful with input from a MIDI<br />
controller. If the user doe not want to use MIDI sounds the internal sounds<br />
in the pro<strong>gr</strong>am are also an excellent option. For a college level aural skills<br />
course an instructor may enter their own melodies with the an editor<br />
selection.
Simulation<br />
Vivace is simulation CAI music<br />
pro<strong>gr</strong>am that provides Intelligent<br />
Accompaniment for vocalists,<br />
winds and brass instruments.<br />
Vivace is an interactive system<br />
that is able to listen to and follow<br />
the musician by responding to the<br />
sound source through a<br />
microphone. As the musician plays<br />
or sings their melody line, Vivace<br />
will respond with an<br />
picture from Coda Music<br />
accompaniment that reacts<br />
musically to the soloist's tempo<br />
interpretations.<br />
The company Coda provides over 4,200 titles with a wide range of<br />
ability levels and a repertoire that includes selections from classical, jazz<br />
and current pop and rock tunes. This pro<strong>gr</strong>am has been very successful<br />
in educational pro<strong>gr</strong>ams from <strong>gr</strong>ade school through college. There are<br />
now band method accompaniments that offer an exciting new approach<br />
in encouraging the beginning student to practice their music lessons.<br />
Vivace is a way for a student to practice with an accompaniment that<br />
would not be available on a regular basis.<br />
Simulation<br />
Band in a Box is another simulation CAI music pro<strong>gr</strong>am that works as an<br />
accompaniment for the musician. The pro<strong>gr</strong>am allows the user to pro<strong>gr</strong>am<br />
in a wide variety of chords and rhythm style accompaniment. The<br />
accompaniment may range from the standard piano, bass, and drums to a<br />
more elaborate ensemble with guitar, strings, horns and a melody line. The<br />
keyboard above will display the piano accompaniment and the bass line.<br />
The user can adjust the tempo, transpose the key signature, and set up the<br />
song to repeat a specific number of times to rehearse a selection. This<br />
pro<strong>gr</strong>am is very helpful for the rehearsal of a jazz improvisation solo<br />
without the jazz band, saving valuable time in a jazz band rehearsal.<br />
return to the menu<br />
Music Patch Editors and Librarians<br />
The pro<strong>gr</strong>ams that are described here are applications that deal with MIDI. There are many Sound Editing<br />
Pro<strong>gr</strong>ams that work with digital audio sound files. Examples would include Sound Edit 16, Alchemy,
Sound Designer, and Pro Tools. These pro<strong>gr</strong>ams allow the user to manipulate sound file samples, but they<br />
do not use MIDI techniques to edit the sound file.<br />
Music Patch Editors work directly with the sound patches within a synthesizer. Patch editors are<br />
designed specifically for individual synthesizers because each company uses their own system exclusive<br />
information to create their pro<strong>gr</strong>ams. First the hexadecimal code F0 is used to identify the status byte of<br />
system exclusive. The status byte is followed by a data byte that identifies the manufacturer. All data bytes<br />
that follow pertain to MIDI information created by that particular manufacturer. At the end of the system<br />
exclusive message will be the hexadecimal code F7 end of exclusive command.<br />
Patch Editors allow the user to change the size of envelopes, types of filters, samples, waveforms, panning<br />
information, modulation effects and basically anything that changes the parameters of the patch. Each<br />
manufacturer uses different techniques to create sounds for the synthesizer so each Patch Editor must be<br />
designed for the specific synthesizer. Universal Patch Editors are pro<strong>gr</strong>ams that support many different<br />
MIDI devices. That way a user may by one pro<strong>gr</strong>am that will support their studio that has products from<br />
Roland, Yamaha, Korg or other manufactures.<br />
The example on the left is the Universal<br />
Patch Editor Galaxy. Here the user is able to<br />
make changes to the envelopes, original<br />
oscillators, filters and other effects.<br />
Image from the book Experiencing MUSIC<br />
TECHNOLOGY<br />
Patch Librarian software allows the user to organize their sounds, but<br />
they may not edit the sounds. Librarians are a <strong>gr</strong>eat way to create a bank<br />
of sounds for a specific composition or creating your top 64 or 128<br />
sounds.<br />
Sometimes a sound<br />
from one synthesizer<br />
may be layered with<br />
MIDI to another sound<br />
in a different<br />
synthesizer to create a<br />
new combined sound.<br />
The librarian will<br />
allow the user to move<br />
patches so the<br />
combination is on the<br />
same number.<br />
return to the menu<br />
Image from the book<br />
Experiencing MUSIC<br />
TECHNOLOGY
The computer pro<strong>gr</strong>am<br />
Max allows the musician to<br />
use a <strong>gr</strong>aphical<br />
environment to represent<br />
musical events. This<br />
pro<strong>gr</strong>am allows the user to<br />
manipulate and control<br />
MIDI events in new ways<br />
that are not limited by the<br />
conventions of a music<br />
sequencer or notation<br />
software.<br />
The pro<strong>gr</strong>am can send<br />
MIDI event information to<br />
synthesizers as well as<br />
performance event<br />
information to a compact<br />
disc or CD-ROM.<br />
Object-Oriented Pro<strong>gr</strong>amming<br />
Max creates a flexible design of<br />
manipulating any type of MIDI<br />
event in a random or structured<br />
order. You may send commands<br />
to a synthesizer, or create a<br />
system exclusive parameter<br />
change in a sound patch. Any<br />
type of MIDI event may be<br />
altered or changed with the<br />
pro<strong>gr</strong>am. Max is an excellent<br />
composition tool as well as an<br />
excellent source for music<br />
instruction. Go to Understanding<br />
Decimal Binary & Hexadecimal,<br />
or The MIDI Language to see<br />
examples of Max using MIDI<br />
data.<br />
return to the menu
MIDI in Multimedia Applications<br />
MIDI takes up less space than digital audio files which makes it a valuable option in many Multimedia<br />
pro<strong>gr</strong>ams. Some pro<strong>gr</strong>ams use a combination of MIDI and digital audio files. MIDI may be used in the<br />
HyperCard and SuperCard pro<strong>gr</strong>ams. It may be imported into the audio tracks of a QuickTime Movie and<br />
sophisticated Multimedia pro<strong>gr</strong>am like Director may use MIDI files as well as sound files. The new<br />
internet browsers have plug-in capabilities that allow MIDI files to played over a web site (see Using<br />
MIDI on a Web Site).<br />
Sometimes, this subject is a little confusing because both formats are referred to as digital information.<br />
This page will try to explain the content of both signals and clear up some misconceptions about the two<br />
formats.<br />
• <strong>Digital</strong> Signal<br />
Files<br />
• Computation of <strong>Digital</strong><br />
Signals<br />
<strong>Digital</strong> Signals<br />
• MIDI Files<br />
First let us start by describing an analog signal. The word analog implies a resemblance or similar<br />
comparison of one thing representing another. An analog signal is a transformation of an acoustic signal,<br />
movement of molecules in a medium such as air, to a voltage signal that travels down an electrical wire.<br />
The voltage in the wire is an analog or representation of the acoustic signal. A typical set-up may be a<br />
musical instrument that creates a tone. This tone energy creates a disturbance in the air particles by<br />
pushing air molecules that condense and cause a rarefaction of the air when it returns. This movement is<br />
happening at a fast rate that equals the initial source of the soundwave. This tone is then received by a<br />
microphone that has a sensitive diaphragm that responds to the movement of air. At this point we use a<br />
term called transducer, because the energy is converted from an acoustic signal to an electrical signal than<br />
represents the same waveform. This voltage signal is then carried down a wire to an amplifier, where the<br />
signal is amplified and then sent down another wire to a loudspeaker, which transforms the signal back to<br />
acoustic energy that is received by the auditory system.<br />
Another example of analog signals are the use of the older modular type synthesizers that use voltage to<br />
carry the musical signal down a wire. Alterations to the signal, such as filters, ring modulators, simple<br />
frequency modulation, sample and hold are modifiers that are used to alter the analog signal.<br />
In the digital world, numbers are used to represent a digital waveform. An audio signal is represented in<br />
digital memory with a binary code that stores a massive amount of numbers that are used to represent a<br />
signal. An ADC (Analog to <strong>Digital</strong> Converter) is a computer chip that is used to convert an analog signal
into digital information. This process is called sampling and has changed the world of sound in a dramatic<br />
fashion.<br />
Once the signal is represented as binary numbers, it may be manipulated with processes like combining<br />
sounds, splicing, truncation, looping, and reversing a sound and other digital signal processing. The signal<br />
is then converted back to an analog signal through a DAC (<strong>Digital</strong> to Analog Converter).<br />
In order to sample a sound event we must understand the process that is used to convert the acoustic<br />
waveform to a digital sample.<br />
The user has to determine the sampling period or rate and must also decide on the bit resolution. Let's use<br />
a time period of one second for a sample. During that second of time, the sampling rate determines the<br />
number of samples that will be taken during that one second. The bit resolution determines where to<br />
represent the signal during that discrete moment in time. If the resolution is at 16 bits, then there would be<br />
65536 locations to represent the waveform at each given sample. That would be a range from -32768 to 0<br />
to 32767. If the resolution is 8 bits, there would be 256 possible locations. The term quantizing is when<br />
the actual sample is shifted to one of the bit locations that best represents the signal at that discrete<br />
moment in time. If we changed the sampling rate, the period of time or space between each sample is<br />
changed. In the dia<strong>gr</strong>am below are four examples of different quantization and sampling rates.
Different Quantization and Sampling Rates<br />
In dia<strong>gr</strong>am (A) and (B) the sampling rate is the same, but the quantization resolution is better in dia<strong>gr</strong>am<br />
(B). In dia<strong>gr</strong>am (C) & (D), the sampling rate has been doubled and the bit resolution has been increased in<br />
dia<strong>gr</strong>am (D). What a dramatic difference the sampling rate and bit resolution can make on recreating an<br />
acoustic waveform.<br />
The Nyquist Theorem determines that the bandwidth of any digital sampling length will always be onehalf<br />
of the sampling rate. This means that a sample taken at a rate of 44k would have 22k (22,000)<br />
pictures or snap shots of the waveform in one second of time. A higher rate will have more samples per<br />
second and will also take up more computer memory. The Nyquist Frequency is the frequency of the<br />
highest component of a sound and the Nyquist Rate is twice the Nyquist Frequency.<br />
More computer memory is also used when the bit resolution is higher (16 bits to represent a number<br />
verses 8 bits). Computer memory and the content that is being sampled will determine the sampling rate<br />
and bit resolution to use. For example, sounds that do not have a high frequency content could be sampled<br />
at a lower rate and still imitate most of the same fidelity as the original sound.<br />
It is important that the signal that is being sampled does not have frequencies above the Nyquist<br />
Frequency. Every time that a sample is made, there is also duplicates of the signal that are also created that<br />
are called Folding Components.
When a sample goes beyond the sampling rate, the duplicate of the signal crosses over into the sampling<br />
range and is considered the Folding Frequency. We use the term aliasing to describe the folding<br />
frequencies which are doubles of the frequencies. In the sampling process filters are used before the ADC<br />
to make sure that the folding frequency will not happen when the signal is sampled.<br />
In digital sampling, the number<br />
of bits per sample also determines<br />
the signal to noise ratio. The<br />
signal to noise ratio depends on<br />
how loud the signal is. The<br />
following ratio is used to<br />
determine the decibel ratio.<br />
Return to Audio vs. MIDI Menu<br />
dB = 20 log 2 N / 1 or 2 N - 1 /<br />
0.5<br />
# Bits dB<br />
2 12<br />
4 24<br />
8 48<br />
12 72<br />
16 96<br />
24 144<br />
Computation of <strong>Digital</strong> Signals<br />
Clearly, digital sampling is a very complicated concept<br />
and in order to truly capture an acoustic waveform, a<br />
quality sample will need a large amount of computer<br />
memory. Use the following formula to get a better idea<br />
of how large the file size is of a sampled audio sound.<br />
(# seconds) * (# channels) * (sampling rate) * (bit resolution) / 8 =<br />
file size<br />
Take the number of seconds and times it by the number of channels (mono or stereo). Times that by the<br />
sampling rate and the bit resolution. Then divide the total by eight to get the file size.<br />
Example 1- Sampling a four second sound of a speaking voice.<br />
Because the voice is in the lower range of the audio spectrum we could sample the sound at 11kHz with<br />
one mono channel and 8 bit resolution.<br />
(4 secs.) * (1 chan.) * (11kHz) * (8 bits) / 8 = 44k<br />
Example 2 - Sampling a four second sound of a musical selection.<br />
First we need to change the sampling rate to 44kHZ to capture the spectrum of the complex musical sound<br />
and we will record a stereo sample with 16 bit resolution.<br />
(4 secs.) * (2 chan.) * (44kHz) * (16 bits) / 8 = 704k<br />
Both examples are four seconds of sound, but the final output is very different in size (44k vs. 704k). If<br />
we tried to take example 2 and record a minutes worth of sound, the sound file would expand to 10,560k<br />
or 10.6megabytes, while a minutes worth of sound from example 1 would be 660k. Both examples are<br />
one minute long, but the difference in the size of the files is 9900k or 9.9 megabytes.<br />
Return to Audio vs. MIDI Menu
MIDI Files<br />
It is important to understand that MIDI contains performance data or instructions for creating music. The<br />
actual analog audio signal or digital audio signal, are not moving through a MIDI cable.<br />
The type of performance data that is communicated by MIDI includes:<br />
1. turning on and off notes<br />
2. expressing the velocity of each note<br />
3. sending pro<strong>gr</strong>am changes<br />
4. use of the sustain pedal and other controller, such as pitch bend or modulation wheel<br />
5. timing relationships of all MIDI notes and events<br />
6. for others, go to Types of Data Transmitted through MIDI page<br />
If we look at the hexadecimal and binary code of a MIDI file, we will discover that the amount of<br />
information is drastically reduced in comparison with a digital audio file. A one second digital audio file<br />
may be around 700k, while a one second MIDI file might contain 1 to 3k of information. With MIDI we<br />
are not recording or sampling the actual note. Instead, we are sending information to turn on a MIDI<br />
devices sound. Go to the MIDI Language for more detail.<br />
Return to Audio vs. MIDI Menu<br />
Explanation of Absolute and Examples of MIDI Time Code in a<br />
Relative Time<br />
Sequence<br />
MIDI Timing Clock Studio design using SMPTE/MIDI<br />
Time Code<br />
Different types of Time Code Related Terms<br />
• SMPTE Time Code<br />
• MIDI Time Code<br />
The first concept that needs to be understood is the difference between absolute and relative time. MIDI<br />
Time Code and SMPTE Time Code are representations of absolute time in that they follow hours, minutes<br />
and seconds just like your watch. Absolute time is always the same and you cannot speed it up or slow it<br />
down. Relative time is a reference to a musical piece that has an inner tempo. A composition may take<br />
three minutes to perform at a tempo of 80 bpm (beats per minute), but would take only a minute and a half<br />
if the tempo was increased to 160 bpm. An advanced MIDI sequencer is able to work with both absolute<br />
time and relative time and make adjustments when there are changes in the relative time of a composition.<br />
In the chart below the upper line represents absolute time and includes an example of 17 seconds of time.<br />
Both MIDI Time Code and SMPTE Time Code may be used to represent absolute time which is fixed and<br />
may not be moved. Following the absolute time line are examples of repeated quarter notes at 3 different<br />
tempos (relative time). Notice that 2 measures have passed at 4 seconds with a tempo of 120 bps, but it<br />
would take 8 seconds for the same two measures at a tempo of 60 bpm and 16 seconds for the same two
measures at a tempo of 30 bpm.<br />
return to the menu<br />
MIDI Timing Clock (MIDI Sync) is a status byte (F8) that is sent 24 times per quarter note for note<br />
resolution. Advanced sequencers will also subdivided each MIDI clock twenty times for a resolution of<br />
480 times per quarter note. Standard - 24 PPQ. Professional - 480 PPQ. If the tempo changes, the speed of<br />
the MIDI Timing Clock will pass at a faster rate, but the number of status bytes (F8) per quarter note will<br />
stay the same.<br />
An F8 status byte is a system real time message that is<br />
used in a MIDI sequence to connect all the different<br />
rhythm values. The image above is a simple sequence<br />
consisting of quarter notes in the 1st measure, half notes<br />
in the 2nd measure, a whole note in the 3rd measure,<br />
followed by eighth-notes and sixteenth notes in the 4th<br />
and 5th measure, and finally a whole note in the last<br />
measure.<br />
To the left is a <strong>gr</strong>aph depicting the same information in an<br />
event listing. Notice that the first number represents the<br />
measure, followed by the beat and finally the F8 timing<br />
clock resolution. In the first three measures each note<br />
starts exactly on the beat which corresponds to a timing<br />
clock reference of 0. Notice at the 4th measure that the<br />
timing clock has changed to values of 240. Remember<br />
that 480 times is the total for each quarter note and the<br />
240 value is an eight note. In measure 5, the value<br />
changes to 120 which now represents the sixteenth note.<br />
If the tempo of this sequence was changed to a different<br />
number, the numbers and values on these two charts
would not change. What would change is the location of<br />
the notes in respect to absolute time. The value of the new<br />
tempo would map out a new chart for placement along<br />
the MIDI Time Code.<br />
Now we will look at what MIDI Time Code and SMPTE<br />
Time Code have in common (absolute time) and how it is<br />
used in conjunction with MIDI Timing Clock (relative<br />
time).<br />
return to the menu<br />
A Time Code is an electrical or digital signal that gives a common timing reference for syncing MIDI<br />
devices with other electronic devices. The evolution of timing references has changed dramatically since<br />
the beginning of MIDI, from the use of click track, PPQ Clocks, FSK Clocks, to the more sophisticated<br />
use of SMPTE Time Code and MIDI Time Code.<br />
SMPTE Time Code (Society of Motion Picture and Television Engineers) Was originally developed<br />
by NASA to sync computers together. SMPTE is a digitally encoded labeling system that strips a tape<br />
with an exact timing reference. It is a 1200 Hz modulated square wave that uses a biphase modulation to<br />
encode the signal on a tape. SMPTE is used to sync video with music, audio and sound effects. It may be<br />
used with a multi-track tape recorder and a synchronizer to sync a MIDI sequence with the tape or to sync<br />
two multi-track tape recorders. It is important to remember that a SMPTE Time Code signal is made up of<br />
digital words that contain 80 bits. These bits are used to represent the type of SMPTE signal, the actual<br />
location which includes hours, minutes, seconds, and frames, as well as user bits for dates and reel<br />
numbers. This digital number is converted to an audio tone so that it may be recorded on to an analog<br />
tape.<br />
There are two different ways to record a SMPTE Time Code on to a tape. LTC Time Code<br />
(Longitudinal Time Code) is SMPTE Time Code encoded on one of the audio tracks or in-between the<br />
audio tracks of a video tape. This type of time code needs to be running in order to be read. A window<br />
burn is used on a working copy of a tape with LTC in order to address the code in slow or paused position.<br />
VITC Time Code (Vertical Interval Time Code) is SMPTE Time Code encoded on the Video signal in<br />
the Interval between frames. This allows for the use of SMPTE at very slow speeds without the need of a<br />
window burn or the loss of an audio track.<br />
There are four different SMPTE formats in the standard. Each format refers to the number of frames per<br />
second. In film there are 24 frames which corresponds to the number of pictures per second. In European<br />
film and video the number of frames per second is 25. In the United States the original black and white<br />
TV pro<strong>gr</strong>ams ran at exactly 30 frames per second. This changed with the advent of color to run at 29.97<br />
frames per second. In order to compensate for this discrepancy, there is a SMPTE format called "drop<br />
frame" at 30 frames per second. There are exactly 30 frames for every second, except two frames are<br />
dropped at the beginning of every minute, except at minutes 0, 10, 20, 30, 40 and 50. A total of 108
frames are dropped for each minute to adjust to the 29.97 frames per second. The standard that is used for<br />
most applications is "30 drop frame" and listed below are some examples.<br />
The number to the right<br />
represents 23 hours, 59<br />
minutes, 59 seconds, 29<br />
frames, and 79 bits. By<br />
adding one more bit to<br />
this number would<br />
change the number to 24<br />
hours.<br />
The number to the left<br />
represents a specific<br />
moment in time. The<br />
number represents 1 hour,<br />
6 minutes, 12 seconds, 9<br />
frames and 6 bits. There<br />
are 80 bits for every<br />
frame.<br />
When MIDI was invented there was no specific data for synchronizing with SMPTE Time Code. If a<br />
musician was trying to use MIDI sequences to synchronize with a video tape they needed a sync device.<br />
Song Position Pointer is a System Common status byte F2, that is generated every six MIDI clocks. It is<br />
used as a reference to find a location in a song by counting the Song Position Pointer total and diving by<br />
16 (4 per quarter note in a 4/4 time signature) to find the measure. A Tempo Map is used by a sequencer<br />
to change tempo at certain locations in a sequence. In order to synchronize with Song Position Pointer, a<br />
sync device is used to decide tempo and tempo changes in a song and the amount of measures in a song,<br />
using SPP and tempo map. The sync device can then figure out the amount of SMPTE time that passes at<br />
certain "hits". This was a very complicated way of synchronizing a MIDI sequence to a video tape, so in<br />
1987, MIDI Time Code, was added to the MIDI specification in order to have a direct link of MIDI with<br />
SMPTE Time Code.<br />
return to the menu<br />
MIDI Time Code is a digital conversion of the SMPTE Time Code that allows MIDI devices to lock to<br />
the SMPTE Time Code in real time. Every frame of the SMPTE Time Code is broken down into 4 frames<br />
of MIDI Time Code with an average of 120 times a second. There are System Common Quarter - Frame<br />
messages which are used when the system is running and System Exclusive Full Messages to address any<br />
location.<br />
MIDI Time Code Quarter Frame Messages (QFM) are used when a system is running. It takes a total<br />
of 8 QFM to address one SMPTE Frame. That means that SMPTE is updated every two frames. Each<br />
QFM starts with the F1 Status byte, followed by a Data byte were the first nibble will be 0 through 7<br />
followed by a nibble that is the actual number.<br />
F1 - MIDI Time Code Quarter Frame Address - Status<br />
Byte<br />
nx - Data Byte
n= First nibble - 0 - Frame count LS nibble<br />
n= First nibble - 1 - Frame count MS nibble<br />
n= First nibble - 2 - Seconds count LS nibble<br />
n= First nibble - 3 - Seconds count MS nibble<br />
n= First nibble - 4 - Minutes count LS nibble<br />
n= First nibble - 5 - Minutes count MS nibble<br />
n= First nibble - 6 - Hours count LS nibble<br />
n= First nibble - 7 - Hours count MS nibble and SMPTE<br />
Type<br />
x= Second nibble - Actual number of the Time Code 0<br />
through 9<br />
The<br />
relationship<br />
between the<br />
SMPTE time<br />
code numbers<br />
and MIDI time<br />
code quarter<br />
frame message<br />
is listed in the<br />
example below.<br />
0 1 1 6 2 5 1 2<br />
F1<br />
70<br />
F1<br />
61<br />
F1<br />
51<br />
F1<br />
46<br />
Example of MIDI Time Code in a MIDI Sequencer<br />
In the example to the right<br />
are red arrows pointing to<br />
specific MIDI time code data<br />
in a sequencer track. The<br />
upper right arrow is pointing<br />
to a specific absolute time<br />
number of 1 hour, 3 minutes,<br />
7 seconds and 8 frames.<br />
Below this arrow is an arrow<br />
pointing to the music that is<br />
being played at this location.<br />
The arrow on the left is<br />
pointing to an offset number.<br />
Offset is a way of setting the<br />
MTC time at a certain<br />
number to begin a sequence<br />
or cue.<br />
F1<br />
32<br />
F1<br />
25<br />
F1<br />
11<br />
F1<br />
02
There are red<br />
arrows in the<br />
dia<strong>gr</strong>am to the<br />
right that are<br />
locating a<br />
highlighted<br />
note in this<br />
MIDI<br />
sequence at<br />
measure 5,<br />
beat 2. The<br />
tempo for this<br />
sequence is set<br />
at 220 bpm<br />
and the time<br />
code (upper<br />
right arrow<br />
indicates that<br />
the note will<br />
start at 4<br />
seconds, 19<br />
frames and 74<br />
Here is an event listing of the<br />
notes and the arrows are<br />
pointing to an exact moment in<br />
time. In the top arrows the note<br />
D2 is played in measure 39,<br />
beat 1, with a MIDI clock<br />
resolution of 70. This note<br />
occurs at 1 hour, 1 minute, 22<br />
seconds, 6 frames and 51 bit<br />
resolution.<br />
In the lower arrows the note C2<br />
is played in measure 48, beat 1,<br />
with a MIDI clock resolution of<br />
220. The time reference of this<br />
note is 1 hour, 1 minute, 38<br />
seconds, 29 frames, and 34 bit<br />
resolution.<br />
It is important to remember that<br />
if the tempo of the music<br />
changed, the time code<br />
numbers would change, but the<br />
value and placement of the<br />
notes would stay the same. The<br />
next two example clearly show<br />
the relationship of the MIDI<br />
time code with the MIDI timing<br />
clock.
its and will<br />
end at 5<br />
seconds, 13<br />
frames and 79<br />
bits.<br />
This example is<br />
the exact same<br />
sequence as<br />
above with the<br />
tempo slowed<br />
down to 110<br />
bps. Again the<br />
same note at<br />
measure 5, beat 2<br />
is highlighted,<br />
but with the<br />
slower tempo the<br />
time code<br />
numbers have<br />
changed. The<br />
note will first<br />
start at 9<br />
seconds, 9<br />
frames and 66<br />
bits and end at<br />
10 seconds, 27<br />
frames and 78<br />
bits.<br />
The highlighted note would start 4 seconds, 19 frames, and 72 bits later in<br />
the second example with the tempo cut in half. The duration of the<br />
highlighted note in the second example would be for 1 second, 18 frames<br />
and 12 bits, while the duration of the highlighted note in the first example<br />
would only be 0 seconds, 24 frames and 5 bits. The use of MIDI Time<br />
Code in a sequencer allows the user to make changes with the tempo of a<br />
composition and all the timing information is automatically updated to<br />
follow the new tempo marking. With the use of MIDI Time Code to sync<br />
up to SMPTE Time Code, there is no need for a sync device and<br />
synchronization with Song Position Pointer<br />
This pro<strong>gr</strong>am, Exploring MIDI was<br />
designed and created by Peter J.<br />
Raschke.He is currently at Northwestern<br />
University pursuing a Ph.D. in Music<br />
Technology. He completed the Masters of<br />
Music Technology de<strong>gr</strong>ee in June, 1997.<br />
As a member of the Northwestern<br />
University School of Music Web design<br />
team, Mr. Raschke helped to create its<br />
Web pages.<br />
He has taught a multimedia software<br />
Email address is:<br />
raschke@northwestern.edu
development class, Web Authoring, and<br />
an Introductory to Technology class in the<br />
Music Technology pro<strong>gr</strong>am at<br />
Northwestern University, and he was an<br />
instructor and music laboratory technician<br />
at Santa Barbara City College prior to<br />
beginning his <strong>gr</strong>aduate studies. Web sites<br />
created by Peter Raschke are located at the<br />
Northwestern University School of Music<br />
projects Web page.<br />
Publications and Papers Music Theory Online, The Online Journal of<br />
the Society for Music Theory Volume 5, Number 2, March 1999.<br />
"Review of Music-Theory Web Sites for the Beginner."<br />
International Computer Music Conference, 1998, Paper Session, "Music<br />
Technology as a Tool for Exploring the Creative Aspects of Music."<br />
Other Web Sites created by Peter Raschke:<br />
An interactive music theory web site, "Score Scan," provides practice in<br />
reading the "tonal profile" of a music selection. Based on the 1989<br />
HyperCard document created by Northwestern music theory professor<br />
John Buccheri, the current version is a Java applet and Java application<br />
that was created by the collaborative efforts of Michael Overman and<br />
Peter Raschke.<br />
3D Sound at Northwestern University, is an educational site covering<br />
concepts and applications in 3-D Sound & Spatial Audio.<br />
Current Web site for the Introduction to Technology class at<br />
Northwestern University, School of Music. (Fall 1999)<br />
Web Authoring course in Multi Media Software Development at<br />
Northwestern University, School of Music.<br />
Collaborated on the Web site 3D Sound at Northwestern University, an<br />
educational site to help you learn more about 3-D Sound & Spatial<br />
Audio.<br />
The Web site, Gregorian Chant, Christmas Mass is a site for discovering<br />
the sounds of Gregorian Chant by listening to a recording of selections<br />
from the Proper and Ordinary of a Roman Catholic Mass.<br />
• Link to Home page<br />
• Philosophy of Music Education<br />
(paper based on using technology as a tool in Music Education)<br />
This web site, "Exploring MIDI" was recognized in the May 1999 issue of<br />
Electronic Musician, in the article "Music Sites for Web Surfers"and in the May<br />
1998 issue of Electronic Musician, in the article "Back to School Online." It is<br />
also mentioned in the latest edition of How MIDI Works, Alexander Publishing,<br />
and the 2nd Edition of Experiencing Music Techmology, Schirmer Books.
"Exploring MIDI" is<br />
included in the<br />
WannaLearn<br />
directory, a directory<br />
of the best free,<br />
family-safe, online<br />
tutorials, guides and<br />
instructionally<br />
oriented Websites on<br />
the Net!<br />
"Exploring MIDI"<br />
received the Golden<br />
Crane Creativity<br />
Award (GCCA). This<br />
award is given to<br />
sites that provide free<br />
instructional<br />
information in arts,<br />
crafts, music, and<br />
other creative<br />
activities.