
You also want an ePaper? Increase the reach of your titles
YUMPU automatically turns print PDFs into web optimized ePapers that Google loves.
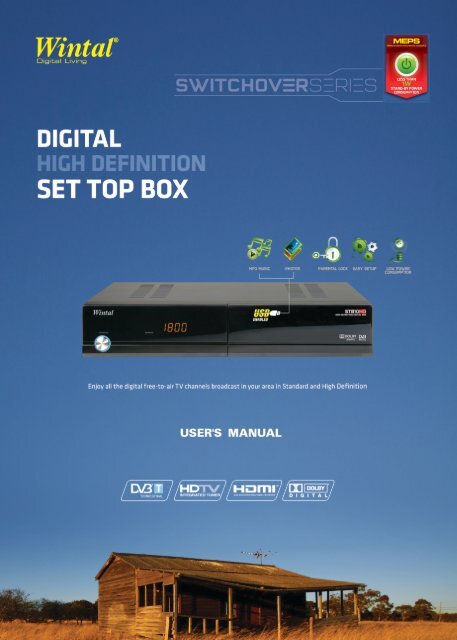
Thank you for purchasing STB10HD Digital High Definition Set Top Box.<br />
This manual will help you to install, use and maintain the receiver. Please read this manual<br />
carefully before operating your unit and keep it for future reference.<br />
Warning & Note<br />
In this manual, pay special attention to the following marks that indicate hazardous situations.<br />
Warning: Alert user to the operation which could result in device damage or data loss, and<br />
the presence of a hazardous situation which could result in serious injury.<br />
Note: Remind user of presence of possible problems and information of any importance to<br />
help understand, use and maintain the installation.<br />
Note: The information in this user’s manual is subject to change without notice. The<br />
photos and function explanations in the manual are for reference. If any discrepancy<br />
exists, please refer to the entity.
Safety Instruction<br />
User’s Manual<br />
Read following items carefully before operating this receiver.<br />
Installation<br />
This receiver should be installed horizontally. Unbalanced installation may cause damage.<br />
Install the receiver in a place with:<br />
good ventilation (leave space not less than 10cm around this receiver)<br />
no heat source (burning candle, radiator, heater, fireplace, amplifier, etc)<br />
suitable temperature<br />
against humidity (especially bathroom, kitchen, etc)<br />
no direct sunlight<br />
low vibration<br />
Maintenance<br />
Unplug this receiver from wall outlet before changing connections between this unit and<br />
other related equipments.<br />
Don’t unplug or insert signal, audio and video cables when this receiver is turned on.<br />
To avoid the risk of lightning strike, unplug power cord of the receiver from wall outlet in<br />
lightning storm.<br />
Unplug power cord from wall outlet when the unit is not used for a long time or damaged<br />
accidentally.<br />
Turn off this unit first, after 1 to 2 hours turn it on when move this receiver from a cold<br />
environment to a hot environment, vice versa.<br />
To avoid the risk of fire or electric shock, don’t expose this receiver to rain, splashing and<br />
don’t put object with liquid on this unit.<br />
Do not <strong>cover</strong> vents of this receiver with newspaper, table cloth, curtain, etc.<br />
Don’t put heavy objects on this receiver.<br />
Unplug power cord of this receiver from wall outlet before cleaning. To reduce damage,<br />
clean this unit with dry cloth. Do not let liquid and spray flow into this device to avoid<br />
serious damage.<br />
There is dangerous voltage in product enclosure. Do not remove the <strong>cover</strong> (or back) to<br />
avoid the risk of fire or electric shock.<br />
Power Socket and Power Cord<br />
The power socket should be available near the receiver and well grounded.<br />
Do not insert or pull out the power cord with wet hands to avoid electric shock or fire.<br />
Do not use damaged power cord. If power cord is damaged, contact your local operator for<br />
replacement to avoid risk of fire or electric shock.<br />
Do not excessively bend the power cord, and do not place heavy objects on it, which could<br />
cause damage, electric shock or fire.<br />
I
RCU Battery<br />
User’s Manual<br />
Batteries should be installed in accordance with the (+/-) markings on battery compartment.<br />
Remove batteries if RCU not be used for a long time.<br />
Replace batteries if there is no enough power and dispose battery waste properly for<br />
environmental protection.<br />
Others<br />
The all-pole power switch of this receiver is on rear panel. Switch it to “I”, related equipment<br />
will connect with power supply. Switch it to “o”, related equipment will disconnect with<br />
power supply completely.<br />
Only use accessories specified by the manufacturer, as other unsupported accessories<br />
may cause damage to the receiver.<br />
Symbols on the Receiver<br />
Part 1: Warning Mark<br />
This mark appears on rear panel of this receiver, painted prominently in contrasting color to<br />
background. It consists of two graphical symbols and warning messages. The detailed<br />
specifications are as follows:<br />
Part 2: CE Mark<br />
Warning: To reduce the risk of electric shock, don’t remove the <strong>cover</strong> (or<br />
back). Equipment service and maintenance should be undertaken by<br />
qualified personnel.<br />
This symbol alerts user to the presence of uninsulated “dangerous voltage”<br />
in product enclosure that sufficient magnitude will constitute risk to person.<br />
This symbol reminds user of presence of important operation and<br />
maintenance instructions in literature accompanying this receiver.<br />
This mark appears on rear panel of this receiver, painted prominently in contrasting color to<br />
background.<br />
This mark tells you that the receiver is following the provisions of Council<br />
Directive 89/336/EEC on the approximation of the laws of the Member<br />
States relating to the electromagnetic compatibility and the provisions of<br />
Council Directive 73/23/EEC and 93/68/EEC on the approximation of the<br />
laws of the Member States relating to low voltage and electrical safety.<br />
II
Contents<br />
User’s Manual<br />
1. Before Using the Receiver .................................................................................................. 2<br />
1.1 Main Feature................................................................................................................. 2<br />
1.2 Front Panel ................................................................................................................... 3<br />
1.3 Rear Panel .................................................................................................................... 4<br />
1.4 Remote Control Unit (RCU) .......................................................................................... 5<br />
2. Installation ............................................................................................................................ 7<br />
2.1 Connect TV ................................................................................................................... 7<br />
2.2 Connect other Device ................................................................................................... 9<br />
2.3 Power on..................................................................................................................... 10<br />
2.4 Scan Channel ............................................................................................................. 10<br />
3. Basic Operation.................................................................................................................. 11<br />
3.1 Channel Switch ........................................................................................................... 11<br />
3.2 Volume Control ........................................................................................................... 11<br />
3.3 Channel Information Bar ............................................................................................. 11<br />
3.4 Channel List ................................................................................................................ 12<br />
3.5 Favorite Channel List .................................................................................................. 12<br />
3.6 Teletext........................................................................................................................ 12<br />
3.7 Subtitle ........................................................................................................................ 12<br />
4. Electronic Program Guide (EPG)...................................................................................... 13<br />
4.1 Full Guide.................................................................................................................... 13<br />
4.2 Simple Guide .............................................................................................................. 13<br />
4.3 Remind List ................................................................................................................. 14<br />
5. USB Application ................................................................................................................. 14<br />
5.1 MP3 Play..................................................................................................................... 14<br />
5.2 Picture Browse............................................................................................................ 14<br />
6. Channel Scan...................................................................................................................... 15<br />
6.1 Auto Scan.................................................................................................................... 15<br />
6.2 Manual Scan ............................................................................................................... 15<br />
7. Channel Edit ....................................................................................................................... 16<br />
7.1 Set Favorite Channel .................................................................................................. 16<br />
7.2 Rename Channel ........................................................................................................ 16<br />
7.3 Sort Channel ............................................................................................................... 16<br />
7.4 Add/Delete Channel .................................................................................................... 17<br />
7.5 Move Channel............................................................................................................. 17<br />
7.6 Search Channel .......................................................................................................... 17<br />
8. Setup ................................................................................................................................... 18<br />
8.1 System Setting............................................................................................................ 18<br />
8.2 Screen Setting ............................................................................................................ 18<br />
8.3 Parental Control .......................................................................................................... 18<br />
8.4 Region Setting ............................................................................................................ 20<br />
8.5 Factory Default............................................................................................................ 20<br />
9. System Information............................................................................................................ 20<br />
10. Software Upgrade by USB............................................................................................... 21<br />
11. Appendix........................................................................................................................... 22<br />
11.1 Trouble Shooting ....................................................................................................... 22<br />
11.2 Specification .............................................................................................................. 23<br />
11.3 Acronym .................................................................................................................... 24<br />
1
1. Before Using the Receiver<br />
1.1 Main Feature<br />
Dolby 5.1 supported<br />
MP3 play and picture browse<br />
Teletext/subtitle supported<br />
EPG supported<br />
16 favorite channel groups<br />
User’s Manual<br />
Memory space up to 1000 channels<br />
Support automatic, manual scan<br />
Powerful channel edit function<br />
Parental control supported<br />
Software upgrade supported<br />
Standby with low power consumption<br />
HDMI output: support 1080i/720p/576p/576i<br />
YPbPr output: support 1080i/720p/576p/576i<br />
COAXIAL & S/P DIF audio supported<br />
USB 2.0 interface supported<br />
2
1.2 Front Panel<br />
1. STAND BY<br />
User’s Manual<br />
Name Function<br />
Switch between operation and standby modes (In standby<br />
mode, the receiver is disconnected with power supply.)<br />
2. SENSOR Receive infrared remote control signal<br />
3. DISPLAY Display status<br />
4. USB slot Open the <strong>cover</strong> to insert specific USB device<br />
5. CH+/- Switch channels or move cursor up/down<br />
6. VOL+/- Adjust volume or move cursor right/left<br />
7. OK Display channel list or confirm operation<br />
8. MENU Display/exit from main menu<br />
3
1.3 Rear Panel<br />
User’s Manual<br />
Name Function<br />
1. VIDEO Output CVBS video signal to TV<br />
2. S-VIDEO Output Y/C video signal to TV<br />
3. Y/Pb/Pr Output Y/Pb/Pr video signal to TV (support high definition output)<br />
4/5. L/R-AUDIO Output left/right audio signal to TV or amplifier<br />
6. COAXIAL Output digital audio signal to amplifier<br />
7. S/P DIF Output digital audio signal to amplifier<br />
8. HDMI Output high definition video and audio signal to TV<br />
9. RS-232<br />
Serial port used for software upgrade (authorized for qualified<br />
personnel)<br />
10. ANT IN Connect to terrestrial antenna<br />
11. LOOP OUT Loop output RF signal to another receiver<br />
12. 100-240V~ AC power supply<br />
13. ON/OFF Power switch<br />
4
1.4 Remote Control Unit (RCU)<br />
Notes:<br />
• The keys mentioned in the<br />
manual refer to that on<br />
RCU except for special<br />
explanations.<br />
• Please operate according<br />
to key instructions on<br />
screen.<br />
User’s Manual<br />
Name Function<br />
5<br />
1. Learning keys<br />
Please refer to Learning Key.<br />
2. The keys of the receiver<br />
Switch between operation and standby<br />
modes (In standby mode, the receiver is<br />
disconnected with power supply.)<br />
Mute/restore sound<br />
TV/RADIO Switch between TV and radio modes<br />
0-9 Switch channels or input numbers<br />
FORMAT Switch video resolutions<br />
BACK Back to previously viewed channel<br />
PAGE / Page down/up<br />
MENU Display/exit from main menu<br />
EXIT<br />
Back to previous menu or exit from<br />
operation<br />
Switch channels or move cursor up/down<br />
Adjust volume or move cursor left/right<br />
OK Display channel list or confirm operation<br />
CH+/- Switch channels<br />
VOL+/- Adjust volume<br />
FREEZE Pause/restore play<br />
AUDIO Switch audio languages<br />
A.RATIO Switch screen formats<br />
FAV Display favorite channel list<br />
TXT Display teletext type window<br />
SUB.T Display subtitle list<br />
GUIDE Display EPG<br />
INFO Display channel information bar<br />
USB Display USB partition
Learning Key<br />
User’s Manual<br />
The receiver RCU has some learning keys at the lower part. The keys (except SET key) can be<br />
used to memorize corresponding key values of TV RCU. After learning, you can realize remote<br />
control for TV with the receiver RCU.<br />
The recommended keys are POWER, TV/AV, VOL+ and VOL- of TV RCU. The TV/AV<br />
identifier varies with different types of TV RCU.<br />
Instruction:<br />
1. Keep pressing SET key on the receiver RCU for 3<br />
seconds or more, the indicator status changes<br />
from low light to high light, then stop pressing SET<br />
key.<br />
2. Press a learning key on the receiver RCU (such as<br />
POWER key), indicator flashes quickly.<br />
3. Aim the TV RCU at “receiving window” of the<br />
receiver RCU, and press the corresponding key on<br />
the TV RCU (such as POWER key) to learn. The<br />
indicator status changes from flashing to always<br />
bright, which means the learning is successful.<br />
4. Repeat steps 2 and 3 to set other learning keys in<br />
the same way.<br />
5. After setting, press SET key to exit, and indicator<br />
is off.<br />
6. If the operation fails, please try again according to<br />
above steps.<br />
Notes:<br />
• During setting, put the two RCUs on same<br />
horizontal surface and the space between<br />
them should be within 5cm.<br />
• If there is no operation in 20 seconds, the<br />
receiver RCU will exit from learning mode<br />
automatically.<br />
• You can operate the learning for times, but<br />
only the last one can be saved.<br />
• Some TV RCUs may not support this function.<br />
6
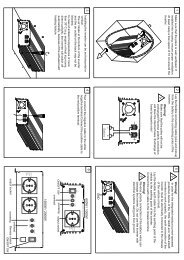
2. Installation<br />
User’s Manual<br />
Connect TV and other devices, then you can power on the receiver and scan channels.<br />
2.1 Connect TV<br />
Please choose one of following 4 ways to connect TV.<br />
1. Connect TV Using RCA Cable<br />
1. Connect ANT IN port on the receiver to terrestrial antenna with an RF cable.<br />
2. Connect VIDEO port on the receiver to corresponding port on TV.<br />
3. Connect R/L-AUDIO ports on the receiver to corresponding ports on TV.<br />
2. Connect TV Using S-VIDEO Cable<br />
1. Connect ANT IN port on the receiver to terrestrial antenna with an RF cable.<br />
2. Connect S-VIDEO port on the receiver to S-VIDEO port on TV.<br />
3. Connect R/L-AUDIO ports on the receiver to corresponding ports on TV.<br />
7
3. Connect TV Using YPbPr Cable<br />
User’s Manual<br />
1. Connect ANT IN port on the receiver to terrestrial antenna with an RF cable.<br />
2. Connect Y/Pb/Pr ports on the receiver to Y/Pb/Pr ports on TV.<br />
3. Connect R/L-AUDIO ports on the receiver to corresponding ports on TV.<br />
8
4. Connect TV Using HDMI Cable<br />
User’s Manual<br />
1. Connect ANT IN port on the receiver to terrestrial antenna with an RF cable.<br />
2. Connect HDMI port on the receiver to HDMI port on TV.<br />
2.2 Connect other Device<br />
For connection of other devices, please refer to following figure:<br />
Connect LOOP OUT port on the receiver to ANT IN port on another receiver.<br />
Connect COAXIAL port on the receiver to corresponding port on amplifier with a COAXIAL<br />
cable, or connect S/P DIF port on the receiver to corresponding port on amplifier with an<br />
S/P DIF cable, or connect R/L-AUDIO ports on the receiver to corresponding ports on<br />
amplifier.<br />
Please note:<br />
Due to the integrated MEPS standard, your STB10HD outputs no power while in stand-by.<br />
Therefore the loop out connection will not output a signal when this unit is in stand-by. It is<br />
recommended that you use a dedicated antenna point for your set top box or purchase a 2 way<br />
splitter to separate the signal before it enters the set top box. Should you require further<br />
information please call 1800 337 366.<br />
9
User’s Manual<br />
Note: If you encounter any problem during the connections, please contact your local<br />
operator.<br />
2.3 Power on<br />
1. Connect the power cord of the receiver to wall outlet.<br />
2. Turn on the receiver, and system initializes. If you<br />
turn on the receiver for the first time, an installation<br />
guide appears on screen. You can set region, TV<br />
type and resolution suitable for your conditions.<br />
Notes:<br />
• The installation guide will also run after<br />
restoring factory default.<br />
• Please turn on your TV and switch it to AV mode.<br />
2.4 Scan Channel<br />
After above setting, press OK key to switch to scan<br />
window. System will scan channels automatically.<br />
After scanning, setup result will be displayed on<br />
screen. Press OK key to complete setup and exit to<br />
watch TV.<br />
If there are some channels stored in the receiver,<br />
program will be played automatically, and the channel<br />
number is shown on <strong>front</strong> panel DISPLAY.<br />
Note: For more scan details, please refer to 6.<br />
Channel Scan.<br />
10
3. Basic Operation<br />
User’s Manual<br />
This part describes operations such as channel switch, volume control and other basic<br />
operations when playing program.<br />
3.1 Channel Switch<br />
You can switch channels using the following methods:<br />
A. Press or CH+/- keys to switch channels.<br />
B. Input channel number with number keys.<br />
C. Select channel in channel list.<br />
For detailed operations, please refer to 3.4 Channel<br />
List.<br />
D. Select channel in favorite channel list.<br />
For detailed operations, please refer to 3.5 Favorite<br />
Channel List.<br />
3.2 Volume Control<br />
Press or VOL-/+ keys to adjust volume.<br />
Press key to mute/restore sound.<br />
3.3 Channel Information Bar<br />
Press INFO key or press keys to display channel information bar.<br />
1. Channel number and name<br />
2. Current and next program information<br />
3. Current date and time<br />
4. Icons<br />
Bright if the channel is a favorite channel<br />
Bright if any program in the channel is scheduled<br />
Current video resolution<br />
Current audio language<br />
Bright if the channel has subtitle<br />
Bright if the channel has teletext<br />
Current parental control rating<br />
5. TV/radio mode icon<br />
11
3.4 Channel List<br />
User’s Manual<br />
Channel list is available for you to browse channels<br />
easily and quickly.<br />
1. Press OK key to display channel list.<br />
2. Press TV/RADIO key to switch between TV and<br />
radio modes.<br />
3. Press keys to select a channel.<br />
4. Press OK key to play it in full screen.<br />
3.5 Favorite Channel List<br />
1. Press FAV key to display favorite channel list.<br />
2. Press keys to select a group.<br />
3. Press keys to select a channel.<br />
4. Press OK key to play it in full screen.<br />
3.6 Teletext<br />
An electronic newspaper in which you can browse<br />
multiple pages of information, such as news, traffic,<br />
stock, weather, etc.<br />
1. Press TXT key to display teletext type window.<br />
2. Press keys to select Digital Teletext or VBI<br />
Teletext and press OK key to display teletext list.<br />
3. Press keys to select a language and press<br />
OK key to display teletext information. You can<br />
operate according to operation help information<br />
and key instructions on screen.<br />
4. Press EXIT key to hide the teletext information.<br />
Note: This function needs your local operator<br />
support.<br />
3.7 Subtitle<br />
1. Press SUB.T key to display subtitle list.<br />
2. Press keys to select a language and press<br />
OK key to confirm. The subtitle is displayed at the<br />
bottom of screen.<br />
If you want to switch subtitle off, select “1 Off” in<br />
subtitle list and press OK key to confirm.<br />
Note: This function needs your local operator<br />
support.<br />
12
User’s Manual<br />
4. Electronic Program Guide (EPG)<br />
In this guide, you can view program information based on date and time. In addition, the guide<br />
can help to schedule future programs.<br />
4.1 Full Guide<br />
The full guide displays detailed EPG information.<br />
Select Main Menu → Guide → Full Guide and press OK key to enter. If “Guide Default” is set to<br />
“Full” in 8.1 System Setting, press GUIDE key to enter directly in non-menu mode.<br />
keys: Select channel<br />
keys: Select program<br />
Green key: Switch to previous day<br />
Blue key: Switch to next day<br />
Yellow key: Switch pages of program information<br />
INFO key: Switch between brief and detailed program information<br />
Red key: Switch to simple guide<br />
OK key: Schedule future program<br />
4.2 Simple Guide<br />
The mini guide displays brief EPG information.<br />
Select Main Menu → Guide → Simple Guide and<br />
press OK key to enter. If “Guide Default” is set to<br />
“Simple” in 8.1 System Setting, press GUIDE key to<br />
enter directly in non-menu mode.<br />
keys: Select program<br />
Green key: Switch to previous day<br />
Blue key: Switch to next day<br />
Red key: Switch to full guide<br />
OK key: Schedule future program<br />
13<br />
1. Channel list<br />
2. Program list<br />
3. Current date and time<br />
4. Date table<br />
5. Preview window<br />
6. Detailed information of the<br />
selected program<br />
7. Operation help information
4.3 Remind List<br />
User’s Manual<br />
All the scheduled programs are displayed in this<br />
window. You can cancel or restore schedules.<br />
Select Main Menu → Guide → Remind List and press<br />
OK key to enter.<br />
1. Press keys to select a schedule.<br />
2. Press OK key to cancel or restore it.<br />
3. Press EXIT key to save and exit.<br />
Note: System will remind you near the play time of<br />
the scheduled programs.<br />
5. USB Application<br />
You can play MP3 files and browse pictures.<br />
Press USB key to display USB partition in non-menu mode.<br />
Notes:<br />
• USB device should be connected to USB port on <strong>front</strong> panel before operation.<br />
• During operation, do not unplug the USB device.<br />
• To enter a folder, highlight it and press OK key. If you want to exit from the folder,<br />
highlight “ ” and press OK key.<br />
5.1 MP3 Play<br />
1. Press keys to select an MP3 file.<br />
2. Press OK key to play it, and you can operate as follows:<br />
VOL-/+ keys: Adjust volume<br />
Blue key: Pause/resume play<br />
Red key: Stop play<br />
keys: Play previous/next MP3 file<br />
OK key: Switch among Repeat, Repeat All and<br />
Play Once<br />
Repeat: Play the selected file repeatedly.<br />
Repeat All: Play all files circularly.<br />
Play Once: Play the selected file once.<br />
3. Press EXIT key to exit.<br />
5.2 Picture Browse<br />
1. Press keys to select a picture.<br />
2. Press OK key to display it in full screen, and you<br />
can operate as follows:<br />
Red key: Zoom in/out picture<br />
Blue key: Rotate picture<br />
keys: Display previous/next picture<br />
INFO key: Display operation help information<br />
OK key: Slide show<br />
3. Press EXIT key to exit.<br />
14
6. Channel Scan<br />
User’s Manual<br />
Note: Don’t turn off the receiver during scanning.<br />
6.1 Auto Scan<br />
For beginners, auto scan is the best choice. System<br />
will scan channels according to default frequency<br />
parameters.<br />
Select Main Menu → Scan → Auto Scan and press<br />
OK key to enter.<br />
Press OK key to scan channels.<br />
6.2 Manual Scan<br />
If you are familiar with relevant channel or frequency<br />
parameters, you can choose manual scan.<br />
1. Manual Scan by Frequency<br />
Select Main Menu → Scan → Manual Scan → Manual<br />
Scan by Frequency and press OK key to enter.<br />
1. Set parameters as follows:<br />
Frequency: Press number keys to input correct<br />
frequency.<br />
Bandwidth: Select 6, 7 or 8MHz.<br />
2. Press OK key to scan channels.<br />
2. Manual Scan by Channel<br />
Select Main Menu → Scan → Manual Scan → Manual<br />
Scan by Channel and press OK key to enter.<br />
1. Press keys to select a channel.<br />
2. Press OK key to scan this channel.<br />
15
7. Channel Edit<br />
User’s Manual<br />
You can set favorite channels. In addition, you can rename, sort, add, delete, move and search<br />
channels.<br />
Select Main Menu → Channel → TV/Radio Channel List and press OK key to enter.<br />
7.1 Set Favorite Channel<br />
1. Press number key 1 to enter favorite mode.<br />
2. Press keys to select a favorite channel<br />
group.<br />
3. Press keys to select a channel.<br />
4. Press OK key to add the selected channel to this<br />
group, and mark this channel with “ ”. If you want<br />
to cancel this setting, press OK key again.<br />
5. Press EXIT key to save and exit.<br />
7.2 Rename Channel<br />
1. Press keys to select a channel.<br />
2. Press number key 2 to pop up a keyboard.<br />
3. Input the name of channel. Please refer to<br />
following operations:<br />
Select characters on the keyboard with arrow keys<br />
and press OK key to input.<br />
Select “” and press OK key to move cursor<br />
rightward on title bar.<br />
Select “SP” and press OK key to leave a space on<br />
title bar.<br />
Select “CLR” and press OK key to delete all characters on title bar.<br />
Select “OK” and press OK key to confirm renaming.<br />
Select “Exit” and press OK key to cancel renaming.<br />
4. After renaming, the new channel name appears in channel list.<br />
7.3 Sort Channel<br />
1. Press number key 3 to enter sort mode.<br />
2. Press keys to select a sort command.<br />
By Frequency: Sort by frequency<br />
By LCN: Sort by logical channel number<br />
By Name: Sort alphabetically<br />
3. Press OK key to confirm, and all channels are<br />
sorted accordingly.<br />
4. Press EXIT key to save and exit.<br />
16
7.4 Add/Delete Channel<br />
User’s Manual<br />
1. Press number key 4 to enter add/delete mode.<br />
2. Press keys to select a channel.<br />
3. Press OK key to delete this channel, and “CH<br />
Deleted” is displayed in top left corner of screen. If<br />
you want to resume this channel, press OK key<br />
again.<br />
4. Press EXIT key to save and exit.<br />
Note: When you switch channels, the deleted<br />
channels will be skipped.<br />
7.5 Move Channel<br />
1. Press number key 5 to enter move mode.<br />
2. Press keys to select a channel, and press<br />
OK key to confirm.<br />
3. Press keys to move it to a new position and<br />
press OK key to confirm.<br />
4. Press EXIT key to save and exit.<br />
7.6 Search Channel<br />
1. Press number key 6 to display search window.<br />
2. Input the name of channel you want to search on<br />
title bar. Please refer to following operations:<br />
Select characters on the keyboard with arrow keys<br />
and press OK key to input.<br />
Select “” and press OK key to move cursor<br />
rightward on title bar.<br />
Select “SP” and press OK key to leave a space on<br />
title bar.<br />
Select “CLR” and press OK key to delete all<br />
characters on title bar.<br />
Select “OK” and press OK key to confirm<br />
searching.<br />
Select “Exit” and press OK key to cancel<br />
searching.<br />
3. After searching, related channel list is displayed.<br />
4. Press keys to select a channel in the channel<br />
list.<br />
5. Press OK key to play it in full screen.<br />
17
8. Setup<br />
8.1 System Setting<br />
User’s Manual<br />
Select Main Menu → Setup → System Setting and press OK key to enter.<br />
1. Set parameters as follows:<br />
OSD Language: The default is “English”.<br />
OSD Theme: Press keys to select a color for<br />
menu.<br />
Audio Track: Press keys to select Stereo,<br />
Left or Right.<br />
Optical Output: The receiver can output two<br />
types of digital audio signal via S/P DIF port. If<br />
your digital amplifier has Dolby digital decoder, set<br />
it to “AC3 Bypass” to output encoded signal.<br />
Otherwise, set it to “PCM” to output decoded<br />
signal.<br />
Note: If there is no Dolby digital provided in the program, even though you set it to<br />
“AC3 Bypass”, program cannot be played with Dolby sound.<br />
Guide Default: Press keys to select Full or Simple.<br />
Transparency: Press keys to select a transparency level.<br />
Sleep Timer: You can press keys to set a sleep timer, so that the receiver will switch<br />
to standby mode automatically.<br />
2. Press EXIT key to save and exit.<br />
8.2 Screen Setting<br />
Select Main Menu → Setup → Screen Setting and press OK key to enter.<br />
1. Set parameters as follows:<br />
TV Type: Press keys to select 4:3 or 16:9.<br />
Resolution: Press keys to select a proper<br />
video resolution.<br />
Note: If your TV does not support the selected<br />
resolution, there is no video output on screen.<br />
In this case, press FORMAT key repeatedly<br />
until the video appears again.<br />
Screen Format: Press keys to select a<br />
proper screen format.<br />
2. After pressing EXIT key, a message box pops up<br />
for confirmation.<br />
3. Select “YES” and press OK key to confirm or<br />
select “NO” and press OK key to cancel the<br />
operation.<br />
8.3 Parental Control<br />
Select Main Menu → Setup → Parental Control and<br />
press OK key to enter. The system lock password is<br />
required to activate the setting. The default is “1234”.<br />
18
1. Lock Channel<br />
User’s Manual<br />
You can set channel lock to restrict viewing of some channels.<br />
Highlight “Lock Channel” and press OK key to display lock channel window.<br />
Lock a Channel<br />
1. Press keys to select a channel.<br />
2. Press OK key to lock this channel, and mark it with<br />
“ ”. If you want to cancel this setting, press OK<br />
key again.<br />
3. Press EXIT key to save and exit.<br />
Lock all Channels<br />
1. Press arrow keys to highlight “Lock All”.<br />
2. Press OK key to confirm, and all channels are<br />
locked with “ ”.<br />
3. Press EXIT key to save and exit.<br />
Unlock all Channels<br />
1. Press arrow keys to highlight “Allow All”.<br />
2. Press OK key to confirm, and all channels are<br />
unlocked.<br />
3. Press EXIT key to save and exit.<br />
Notes:<br />
• The system lock password is required to view<br />
programs of the locked channels.<br />
• If any channel is locked, the system lock password is required to enter some menus,<br />
such as Auto Scan, etc.<br />
2. Lock Rating<br />
You can set parental control rating to restrict viewing of<br />
some programs set by your local operator.<br />
Highlight “Lock Rating” and press OK key to display<br />
lock rating window.<br />
Block by Rating<br />
1. Press keys to select a rating.<br />
2. Press OK key to confirm, and this rating along with<br />
all ratings beyond this rating are blocked with “ ”.<br />
3. Press EXIT key to save and exit.<br />
Block all Programs<br />
1. Press arrow keys to highlight “Block All”.<br />
2. Press OK key to confirm, and all ratings are<br />
blocked with “ ”.<br />
3. Press EXIT key to save and exit.<br />
19
User’s Manual<br />
Allow all Programs<br />
1. Press arrow keys to highlight “Allow All”.<br />
2. Press OK key to confirm, and all ratings are unblocked.<br />
3. Press EXIT key to save and exit.<br />
Note: The system lock password is required to view programs beyond set rating.<br />
3. Change Password<br />
The default system lock password is “1234”. You can<br />
change this password if necessary.<br />
1. Highlight “Change Password” and press OK<br />
display change password window.<br />
2. Press number keys to input new password.<br />
3. Press number keys to input new password again<br />
for confirmation.<br />
Note: Don’t forget the password. Once forget it,<br />
please ask you local operator for help.<br />
8.4 Region Setting<br />
Select Main Menu → Setup → Region Setting and<br />
press OK key to enter.<br />
1. Set parameters as follows:<br />
Daylight Savings: Press keys to select Yes<br />
or No.<br />
Region: Press keys to select a region.<br />
2. Press EXIT key to save and exit.<br />
8.5 Factory Default<br />
Warning: This function will restore system<br />
settings to factory default.<br />
Select Main Menu → Setup → Factory Default and<br />
press OK key. After inputting correct system lock<br />
password, a warning box pops up for confirmation.<br />
Select “YES” and press OK key to confirm or select<br />
“NO” and press OK key to cancel the operation.<br />
Note: The installation guide will run after restoring<br />
factory default.<br />
9. System Information<br />
This window displays information about the receiver, such as hardware version, software<br />
version, etc.<br />
Select Main Menu → Info → System Information and press OK key to enter.<br />
20
User’s Manual<br />
10. Software Upgrade by USB<br />
Warning: Don’t turn off the receivers during software upgrade.<br />
Select Main Menu → Setup → Upgrade by USB and<br />
press OK key to display upgrade by USB window.<br />
Note: USB device should be connected to USB<br />
port on <strong>front</strong> panel before operation.<br />
1. Highlight “Upgrade File” and press keys to<br />
select an upgrade software.<br />
2. Highlight “Start” and press OK key to upgrade.<br />
During software upgrade, upgrade progress bar is<br />
displayed on screen.<br />
3. After upgrade, the receiver restarts automatically.<br />
21
11. Appendix<br />
11.1 Trouble Shooting<br />
User’s Manual<br />
DISPLAY on <strong>front</strong> panel is off<br />
1. Power cord is disconnected. Make sure power cord is plugged into a proper power<br />
socket.<br />
2. The receiver is turned off. Turn it on.<br />
DISPLAY on <strong>front</strong> panel is on, but no sound and picture on TV screen<br />
The receiver is in standby mode. Press key to switch it to operation mode.<br />
No signal<br />
1. Signal cable is disconnected. Connect signal cable correctly.<br />
2. Program parameters are set wrongly. Set correct parameters.<br />
No sound<br />
1. Audio cable is disconnected or incorrectly connected. Connect audio cable correctly.<br />
2. The receiver is in mute mode. Press key to restore sound.<br />
3. Volume is set to minimum. Increase volume to a proper level.<br />
4. Audio parameter is set wrongly. Set a proper audio parameter.<br />
No picture<br />
1. Video cable is disconnected or incorrectly connected. Connect video cable correctly.<br />
2. The receiver is in radio mode. Switch it to TV mode if you need.<br />
Video and audio mismatch, or absonant sound<br />
Audio parameter is set wrongly. Select a proper audio parameter.<br />
Poor quality picture<br />
Weak signal. Connect signal cable securely.<br />
RCU doesn’t work<br />
1. No enough power in batteries. Replace the batteries.<br />
2. RCU is not aimed at the receiver. Aim RCU at the receiver.<br />
Note: If you cannot solve the problems after referring to this trouble shooting, please<br />
contact your local operator.<br />
22
11.2 Specification<br />
Tuner<br />
User’s Manual<br />
Frequency 174 ~ 860MHz UHF & VHF<br />
Bandwidth 7 or 8MHz<br />
Level -72 ~ -20dBm<br />
Impedance 75Ω<br />
Channel Decoding<br />
Demodulation QPSK, 16QAM, 64QAM<br />
FEC 1/2, 2/3, 3/4, 5/6, 7/8<br />
Mode 8K or 2K<br />
Guard Band 1/4, 1/8, 1/16, 1/32<br />
Demultiplexer<br />
Standard ISO/IEC 13818-1<br />
Input Max. Bit Stream Rate 60Mbps (Serial)/7.5Mbps (Parallel)<br />
Audio Decoding<br />
Standard ISO/IEC 13818-3<br />
Channel Mute, Left, Right and Stereo<br />
Sampling Frequency 32, 44.1, 48KHz<br />
Video Decoding<br />
Standard ISO/IEC 13818-2<br />
Aspect Ratio 4:3 Full, 4:3 Letter, 4:3 Zoom, 16:9 Full, 16:9 Letter<br />
Resolution 1080i/720p/576p/576i<br />
AV Output<br />
Video De-emphasis CCIR REC.405-1, 625LINES<br />
Video Bandwidth 5.5MHz<br />
Video Output Impedance 75Ω<br />
Video Output Level 1.0V peak to peak<br />
Audio Output Frequency 20Hz ~ 20KHz<br />
Audio Output Impedance Low<br />
Power Supply<br />
Input Voltage 100-240V~ 50/60Hz<br />
Power Consumption 20W max.<br />
Standby Power Consumption 0.4W approx.<br />
Physical<br />
Operation Temperature 0℃ ~ 40℃<br />
Storage Temperature -40℃ ~ +60℃<br />
Storage Humidity ≤93%<br />
23
11.3 Acronym<br />
User’s Manual<br />
CVBS Composite Video Broadcast Signal<br />
DVB Digital Video Broadcasting<br />
EPG Electronic Program Guide<br />
FTA Free to Air<br />
HDMI High Definition Multimedia Interface<br />
HDTV High Definition Television<br />
LCN Logical Channel Number<br />
LNB Low Noise Block<br />
MUX Multiplexer<br />
NIT Network Information Table<br />
OSD On Screen Display<br />
PID Packet Identifier<br />
RCA Radio Corporation of America<br />
RF Radio Frequency<br />
SDTV Standard Definition Television<br />
S/P DIF Sony/Philips Digital Interface Format<br />
S-VIDEO Separate Video<br />
USB Universal Serial Bus<br />
24