Installation and Maintenance Instructions - ETO Doors
Installation and Maintenance Instructions - ETO Doors
Installation and Maintenance Instructions - ETO Doors

Create successful ePaper yourself
Turn your PDF publications into a flip-book with our unique Google optimized e-Paper software.
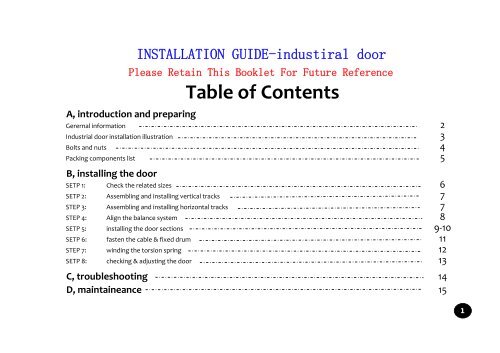
INSTALLATION GUIDE-industiral door<br />
Please Retain This Booklet For Future Reference<br />
Table of Contents<br />
A, introduction <strong>and</strong> preparing<br />
Gerernal information 2<br />
Industrial door installation illustration 3<br />
Bolts <strong>and</strong> nuts 4<br />
Packing components list<br />
B, installing the door<br />
5<br />
SETP 1: Check the related sizes 6<br />
SETP 2: Assembling <strong>and</strong> installing vertical tracks 7<br />
STEP 3: Assembling <strong>and</strong> installing horizontal tracks 7<br />
STEP 4: Align the balance system 8<br />
SETP 5: installing the door sections 9‐10<br />
SETP 6: fasten the cable & fixed drum 11<br />
STEP 7: winding the torsion spring 12<br />
SETP 8: checking & adjusting the door 13<br />
C, troubleshooting 14<br />
D, maintaineance 15<br />
1
A, Read the instructions completely before starting the installation of the door. Becoming familiar with the components<br />
before assembling the door will reduce the installation time.<br />
B, The installation of a garage door is a considerable job which requires knowledge <strong>and</strong> preparation. This is why we highly<br />
recommend you hire someone specialized to do the job. A professional door installer will adjust the door perfectly <strong>and</strong> he<br />
generally guarantees his work.<br />
C, You can obviously do the installation of your garage door yourself as long as:<br />
‐ you have a good deal of experience in do‐it‐yourself projects;<br />
‐ you have the right tools;<br />
‐ you will have help in h<strong>and</strong>ling the panels <strong>and</strong> the pieces of hardware;<br />
‐ you read the instructions in this manual BEFORE starting the installation of the door,not after.<br />
D, The manufacturer cannot be held liable in the event of any damage which could result before while <strong>and</strong> after installing a<br />
garage door. The illustrations in this guide are as precise as possible, slight differences in detail may appear.<br />
E, Make sure the whole door installation process using the original,factory‐supplied sections, parts, <strong>and</strong> hardware installed<br />
in strict accordance with these instructions.<br />
LIST OF TOOLS THAT YOU WILL NEED:<br />
General Information<br />
‐ clamps or locking pliers ‐ a stepladder<br />
‐ screwdrivers ‐ a level<br />
‐ a hammer ‐ a tape measure ‐ a square<br />
‐ a hacksaw ‐ a wood saw ‐ saw horses (with carpet or other soft material on top surface)<br />
‐ drill (1/4", 3/16", & 3/8" bit for optional end stile locks)<br />
‐ a set of socket wrenches, 3/8, 7/16, 1/2 <strong>and</strong> 9/16 socket bits<br />
‐ T‐Square<br />
‐ two steel winding rods<br />
2
Garage door installation:<br />
NO. DESCRIPTION:<br />
A‐G: door panel<br />
H: passing door(optional)<br />
protection vertical<br />
I:<br />
track(L+R)<br />
J: vertical track(L+R)<br />
horizontal double<br />
K: track(L+R)<br />
L: bottom alumium sealing<br />
M: torsion spring<br />
safety device for spring<br />
N: break(optioinal)<br />
O: cable drum (L+R)<br />
safety device for cable<br />
P:<br />
break<br />
Q: adjustable hinges<br />
R: top bracket<br />
S: center hinges<br />
T: spring shaft<br />
3
olts <strong>and</strong> nuts: expansion bolts:<br />
U: nylon roller<br />
V: cable<br />
Y: multi‐hole angles<br />
Z: drum bracket<br />
4
Packing components list:<br />
torsion<br />
springs<br />
panel carton<br />
small<br />
hardwares<br />
carton<br />
tracks<br />
(vertical+<br />
horizontal)<br />
motor carton<br />
optional<br />
5
The backroom distance is<br />
measured from the back<br />
of the door into the<br />
site, <strong>and</strong> should be at<br />
least 18" more than the<br />
height of the industrial<br />
door.<br />
step one:<br />
A minimum side room of 4" should be available on each side of the<br />
door on the interior wall surface to allow for attachment of the<br />
vertical track assembly. The rough opening should be the same size<br />
as the door.<br />
Headroom is the space needed above the top of the<br />
door for the door, the overhead tracks, <strong>and</strong> the<br />
springs. Measure to check that there are no<br />
obstructions within that space,20" headroom<br />
required at least for industiral door.<br />
vertical tracks<br />
Please keep in mind that the clearance<br />
between the door edge <strong>and</strong> the vertical<br />
track inside edge is 20mm-25mm<br />
(each side,grey part).<br />
On the inside of the opening should be framed with wood<br />
jambs, 2" x 6" if possible. The side<br />
jambs should extend to approximately the same height as<br />
the headroom required.<br />
6
I<br />
J<br />
K<br />
step two:<br />
I&J: After checked the aboved<br />
sizes,then install the protection track<br />
I <strong>and</strong> vertical track J accordingly: THE<br />
VERTICAL PROTECTION TRACKS MUST BE<br />
PARRLLEL.In other words,the distance<br />
between the track must be the same at<br />
the top <strong>and</strong> at the bottom. The top of<br />
the vertical tracks must be level as<br />
compared to each other.If possible<br />
please use the gravity dropper to test.<br />
The tops of the vertical tracks must be level with each other.If two vertical<br />
tracks are not level,cut the bottom of one of the tracks or lift the other.<br />
J<br />
I<br />
step three:<br />
K:Align the horizontal trac ks<br />
K with the door header <strong>and</strong><br />
keep exactly the same distance<br />
between the tracks. This<br />
particular point can be<br />
checked by measuring the<br />
diagonals(a=b).<br />
Fasten the curved part of the<br />
horizontal track to the<br />
vertical track J.<br />
b<br />
a<br />
I<br />
K<br />
J<br />
7
step four:<br />
locating the torsion spring M,safety device for spring<br />
break N <strong>and</strong> cable drums O on the spring shaft T as the<br />
picture,the spring shaft T has to be straight <strong>and</strong><br />
level.<br />
K<br />
I<br />
O<br />
Z<br />
T<br />
Z:only locate the cable drum O<br />
between the drum bracket Z above<br />
the vertical track;tighten one<br />
side of spring onto the drum<br />
bracket as the picture<br />
showed.This is the base for the<br />
tension of the springs.<br />
M<br />
M<br />
N(optional):install the safety<br />
device for spring break N with<br />
the torsion spring,this is the<br />
base for the tension of the<br />
winding spring please<br />
check the step seven<br />
below.<br />
N T<br />
8
Keep h<strong>and</strong>s <strong>and</strong> fingers clear of section joints,tracks <strong>and</strong> other door partswhen the door is opening <strong>and</strong> closing to avoid injury.<br />
a<br />
b<br />
Q<br />
P<br />
step five:<br />
P&Q:secure the left bottom<br />
bracket P,adjustable hinge<br />
Q <strong>and</strong> center hinge S with<br />
self drilling screws no.1.<br />
V<br />
U&P:Put the roller U<br />
into the bottom<br />
bracket P of the<br />
bottom panel.hook the<br />
cable V at the same<br />
time.<br />
P<br />
L<br />
U<br />
J<br />
S<br />
d<br />
V<br />
Q<br />
P<br />
U<br />
J<br />
use the balance tools you have to make<br />
sure the bottom panel is balanced.<br />
If necessary, place a wooden<br />
wedge to keep the bottom<br />
panel level<br />
c<br />
after screwed the<br />
adjustable hinge on the<br />
bottom panel,Lift the<br />
bottom panel, ease the<br />
roller U into the<br />
vertical track J.<br />
Please keep in mind that the<br />
clearance between the door edge<br />
<strong>and</strong> the vertical track inside edge<br />
is 20mm-25mm.<br />
9
e<br />
Q<br />
P<br />
W<br />
Always make sure you are<br />
using the proper hinge<br />
for the panel.<br />
Be careful about which<br />
screws you are using.<br />
(See: Where to use<br />
screws <strong>and</strong> nuts)<br />
Repeat the same steps for<br />
the remaining panels.<br />
P<br />
J<br />
I<br />
W(optional): install<br />
safety edge W at the<br />
right or left bottom<br />
corner as you<br />
required position.you<br />
can find the guide in<br />
our packing.<br />
f<br />
P<br />
S<br />
S<br />
S<br />
2 arraies: 3601-4500mm<br />
3 arraies: 4501-5800mm<br />
4 arraies: 5801-7050mm<br />
S:assembling center hinge<br />
with screw no.1(one array<br />
center hing only if the door<br />
width within 3600mm).<br />
make sure the position is in<br />
the center of the door.<br />
X(optional): install the<br />
reinforcement(strut) X if the<br />
door width over 5500mm.<br />
L<br />
X<br />
10
make the cable V go through<br />
between the door <strong>and</strong> the track<br />
J up to the cable drum O. Hook<br />
the end of the cable with a<br />
stop sleeve to the special<br />
notch on the drum O.<br />
O<br />
step six:<br />
Fasten the loop of the<br />
steel cable to its<br />
fastening point on the<br />
bottom panel corner<br />
bracket<br />
a,<br />
b,<br />
V<br />
turn the drum O manually until there<br />
is tension in the cable V, lock them<br />
with the specially designed pressure<br />
screws on the cable drum O.<br />
Repeat this step for the other<br />
cable.<br />
The two sides of the lift cables<br />
must be set equally taut.<br />
O<br />
V<br />
U<br />
K<br />
c,<br />
11
WARNING: WINDING THE TORSION SPRING CALLS<br />
FOR EXTREME CAUTION : CARELESSNESS COULD<br />
LEAD TO SERIOUS INJURIES.<br />
WARNING:THIS PART REQUIRES THE MOST<br />
ATTENTION ON SAFETY.<br />
Loosen the set screws one the<br />
winding cone of the spring,<strong>and</strong> then<br />
using the winding bar(not included)<br />
to wind the spring by truning the<br />
winding cone TOWARD THE CEILING.<br />
The wire must point in the same<br />
direction as you are winding.<br />
N.: Always wind toward the ceiling.<br />
Note: wind the spring 2 ~ 3 turns<br />
first, then make the complete<br />
turns as recommended:<br />
door height 2100mm 6turns<br />
door height 2400mm 7turns<br />
door height 2700mm 8turns<br />
Then tighten the set screws of the<br />
winding cone(add half a turn after<br />
feeling a pressure on the shaft.Do<br />
not forget to tighten the pressure<br />
screw before taking out the winding<br />
bars ).<br />
The winding bars must have the same<br />
diameter as the holes on the<br />
winding cone <strong>and</strong> must be pushed in<br />
as depth as possible into it.<br />
NEVER USE SCREWDRIVERS FOR THIS<br />
STEP.<br />
step seven:<br />
PLEASE MAKE SURE THE DOOR IS IN<br />
CLOSED POSITION.<br />
Remember that each hole on the winding cone is one quarter of a<br />
turn. The number of turns are indicated on the red line affixed<br />
on the spring.<br />
NEVER REMOVE A WINDING BAR OF ITS HOLE UNTIL THE OTHER WINDING<br />
BAR IS IN PLACE AND THAT YOU ARE HOLDING IT FIRMLY. YOU MUST BE<br />
VERY CAREFUL AT THIS POINT.<br />
Once this operation is completed, remove the locking pliers from<br />
the shaft,then only unlock the door, open <strong>and</strong> close the door<br />
slowly manually.You can now check if the door is well-balanced;<br />
ideally, it should stabilize where you stop pushing it up or<br />
pulling it down.<br />
If the door is heavy to lift, increase the torsion spring<br />
tension. If the door goes up too fast, decrease the torsion<br />
spring tension. Add or delete 1/4 turn at a time, alternating<br />
torsion springs. Recheck the balance. Repeat this procedure<br />
until the door rolls smoothly with a satisfactory balance.<br />
12
final checkings:<br />
a,re-adjust torsion spring if necessary,always close the door <strong>and</strong><br />
latch before adjusting.<br />
b,lubricate all moving parts.<br />
step eight:<br />
c,if door doesnot work<br />
easily,double-check the<br />
installation process<br />
especially the step ten &<br />
eleven.<br />
d, make sure spacing of<br />
track is correct <strong>and</strong> that<br />
door is not binding any<br />
place.<br />
balance the door<br />
with the level<br />
13
1, the door becomes very heavy <strong>and</strong> only goes up harfway.<br />
The torsion spring(s) has been installed backwards<br />
2, the door opens very fast <strong>and</strong> is hard to bring back down.<br />
The spring has been wound too much,it is too tight.Adjust the tension according to the type of spring.<br />
3, the door closes fast <strong>and</strong> is hard to lift.<br />
The spring has not been wound enough,it is too loose.Adjust the tension according to the type of spring.<br />
4, the door works well but it goes back up 2 to 3 inches.<br />
The spring is a little too tight.Adjust the tension according to the type of spring.<br />
5, the door is hard to open at first.<br />
The weatherstripping is too tight.Loosen it <strong>and</strong> place it a little farther from the door(the base of the<br />
weatherstripping should be at about 1/2” from the door)<br />
6, the door is hard to open at the end.<br />
The horizontal tracks are not perpendicular with the axis of the door.Use a tape measure to check this.<br />
7, the top panel does not close completely.<br />
Adjust the position of the upper brackets.<br />
Troubleshooting<br />
8, The door slanting as it moves:<br />
The cable tightness of the two sides of the door is not the same --- Readjust the winding drum<br />
9, louder noise as door moving:<br />
a, Hardware is not fully tightened --- Fully tighten them<br />
b, The curved power arm of the motor is not aligned with the door center --- Adjust the arm to align it with<br />
the door center line<br />
c, The two side tracks are not parallel to each other --- Adjust level, vertical tracks to keep them<br />
d, Didn’t lubricate the hinges <strong>and</strong> the winding drum --- Lubricate the hinges <strong>and</strong> the winding drum<br />
14
Maintaineance<br />
A, The door - clean door surface with a mild household detergent(as you would use for your car) with the brush.<br />
Thoroughly rinse the surface with a garden hose. Avoid abrasive cleaners(ex.:Spic’n’ Span) or strong liquid soaps.<br />
B, Weatherstripping – The weatherstripping is make of quality P.V.C. rubber <strong>and</strong> therefore should be cleaned with an<br />
all-purpose vinyl cleanser,Lubricate the weatherstripping every 2 months(more frequently for high usage door) with a<br />
silicon-based oil. Don’t use petroleum-based oils as this will cause loss of elasticity.Petroleum attacks the<br />
rubber <strong>and</strong> decreases its flexibility.<br />
C, Track,hinges,rollers – Lubricated the rollers(Do not lubricate nylon rollers) <strong>and</strong> hinges with a small amount of<br />
light household oil.For the track,use a small amount of grease (as you would use for your car).removing the old grease<br />
with a rag.Apply this grease primarily in the curve of the track.Using grease will result in the quieter operation<br />
of your door(as both the rollers <strong>and</strong> track are steel). To replace bent hinge(s) or broken roller(s). No more than<br />
1 hinge is to be removed from the door at any given time.<br />
D, Automatic door opener – Lightly lubricate with the light household oil.Carefully read the instructions<br />
provided by the manufacturer.<br />
E, Open <strong>and</strong> close the door manually once a month to check the balance system <strong>and</strong> if non-smooth move occurs.<br />
Please invite the qualified maintenance staff to repair it immediately when you find any problem.<br />
F, Warning – Every 3months disconnect the opener(pull the cord) <strong>and</strong> open the door by h<strong>and</strong> several times.If you have<br />
dificulty opening the door,your opener will have the same difficulty. We suggest don't attempt to make repaires on<br />
your garage door without the assistance of a qualified professional door techinican.<br />
G, For your security – The spring assembly,the hardware attached to it <strong>and</strong> the cables are under extreme tension.<br />
Never attempt to loosen them unless all tension is first removed from springs. Always call your door dealer.<br />
15