Magnetventile ACHEM - ACG Automation Center Germany GmbH ...
Magnetventile ACHEM - ACG Automation Center Germany GmbH ...
Magnetventile ACHEM - ACG Automation Center Germany GmbH ...

You also want an ePaper? Increase the reach of your titles
YUMPU automatically turns print PDFs into web optimized ePapers that Google loves.
© DiskArt 1988<br />
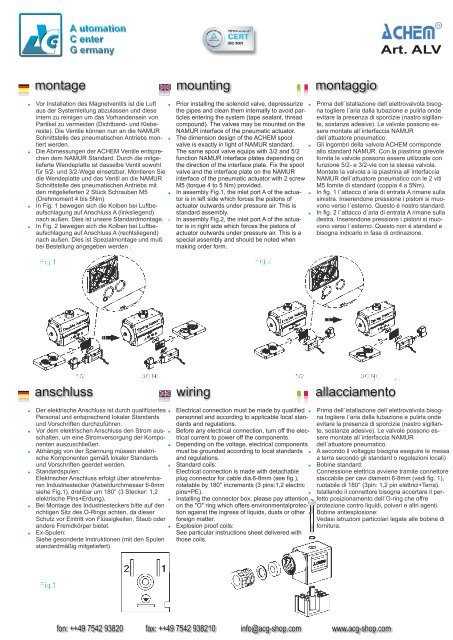
montage mounting montaggio<br />
© DiskArt<br />
© DiskArt 1988<br />
! Vor Installation des Magnetventils ist die Luft<br />
aus der Systemleitung abzulassen und diese<br />
intern zu reinigen um das Vorhandensein von<br />
Partikel zu vermeiden (Dichtband- und Klebereste).<br />
Die Ventile können nun an die NAMUR<br />
Schnittstelle des pneumatischen Antriebs mon-<br />
!<br />
!<br />
!<br />
!<br />
!<br />
!<br />
!<br />
!<br />
!<br />
tiert werden.<br />
Die Abmessungen der <strong>ACHEM</strong> Ventile entsprechen<br />
dem NAMUR Standard. Durch die mitgelieferte<br />
Wendeplatte ist dasselbe Ventil sowohl<br />
für 5/2- und 3/2-Wege einsetzbar. Montieren Sie<br />
die Wendeplatte und das Ventil an die NAMUR<br />
Schnittstelle des pneumatischen Antriebs mit<br />
den mitgelieferten 2 Stück Schrauben M5<br />
(Drehmoment 4 bis 5Nm)<br />
In Fig. 1 bewegen sich die Kolben bei Luftbeaufschlagung<br />
auf Anschluss A (linksliegend)<br />
nach außen. Dies ist unsere Standardmontage.<br />
In Fig. 2 bewegen sich die Kolben bei Luftbeaufschlagung<br />
auf Anschluss A (rechtsliegend)<br />
nach außen. Dies ist Spezialmontage und muß<br />
bei Bestellung angegeben werden .<br />
© DiskArt<br />
!<br />
!<br />
!<br />
!<br />
Prior installing the solenoid valve, depressurize<br />
the pipes and clean them internally to avoid particles<br />
entering the system (tape sealant, thread<br />
compound). The valves may be mounted on the<br />
NAMUR interface of the pneumatic actuator.<br />
The dimension design of the <strong>ACHEM</strong> spool<br />
valve is exactly in light of NAMUR standard.<br />
The same spool valve equips with 3/2 and 5/2<br />
function NAMUR interface plates depending on<br />
the direction of the interface plate. Fix the spool<br />
valve and the interface plate on the NAMUR<br />
interface of the pneumatic actuator with 2 screw<br />
M5 (torque 4 to 5 Nm) provided.<br />
In assembly Fig.1, the inlet port A of the actuator<br />
is in left side which forces the pistons of<br />
actuator outwards under pressure air. This is<br />
standard assembly.<br />
In assembly Fig.2, the inlet port A of the actuator<br />
is in right side which forces the pistons of<br />
actuator outwards under pressure air. This is a<br />
special assembly and should be noted when<br />
making order form.<br />
fon: ++49 7542 93820 fax: ++49 7542 938210 info@acg-shop.com www.acg-shop.com<br />
Art. ALV<br />
! Prima dell´istallazione dell´elettrovalvola bisogna<br />
togliere l´aria dalla tubazione e pulirla onde<br />
evitare la presenza di sporcizie (nastro sigillante,<br />
sostanze adesive). Le valvole possono essere<br />
montate all´interfaccia NAMUR<br />
!<br />
!<br />
!<br />
dell´attuatore pneumatico.<br />
Gli ingombri della valvola <strong>ACHEM</strong> corrisponde<br />
allo standard NAMUR. Con la piastrina girevole<br />
fornita le valvole possono essere utilizzate con<br />
funzione 5/2- e 3/2-vie con la stessa valvola.<br />
Montate la valvola a la piastrina all´interfaccia<br />
NAMUR dell´attuatore pneumatico con le 2 viti<br />
M5 fornite di standard (coppia 4 a 5Nm).<br />
In fig. 1 l´attacco d´aria di entrata A rimane sulla<br />
sinistra. Inserendone pressione i pistoni si muovono<br />
verso l´esterno. Questo é nostro standard.<br />
In fig. 2 l´attacco d´aria di entrata A rimane sulla<br />
destra. Inserendone pressione i pistoni si muovono<br />
verso l´esterno. Questo non é standard e<br />
bisogna indicarlo in fase di ordinazione.<br />
© DiskArt 1988<br />
anschluss wiring allacciamento<br />
© DiskArt<br />
© DiskArt 1988<br />
Der elektrische Anschluss ist durch qualifiziertes<br />
Personal und entsprechend lokaler Standards<br />
und Vorschriften durchzuführen.<br />
Vor dem elektrischen Anschluss den Strom ausschalten,<br />
um eine Stromversorgung der Kompo-<br />
nenten auszuschließen.<br />
Abhängig von der Spannung müssen elektrische<br />
Komponenten gemäß lokaler Standards<br />
und Vorschriften geerdet werden.<br />
Standardspulen:<br />
Elektrischer Anschluss erfolgt über abnehmbaren<br />
Industriestecker (Kabeldurchmesser 6-8mm<br />
siehe Fig.1), drehbar um 180° (3 Stecker: 1,2<br />
elektrische Pins+Erdung).<br />
Bei Montage des Industriesteckers bitte auf den<br />
richtigen Sitz des O-Rings achten, da dieser<br />
Schutz vor Eintritt von Flüssigkeiten, Staub oder<br />
andere Fremdkörper bietet.<br />
Ex-Spulen:<br />
Siehe gesonderte Instruktionen (mit den Spulen<br />
standardmäßig mitgeliefert)<br />
© DiskArt<br />
! Electrical connection must be made by qualified<br />
!<br />
!<br />
!<br />
!<br />
!<br />
personnel and according to applicable local standards<br />
and regulations.<br />
Before any electrical connection, turn off the electrical<br />
current to power off the components.<br />
Depending on the voltage, electrical components<br />
must be grounded according to local standards<br />
and regulations.<br />
Standard coils:<br />
Electrical connection is made with detachable<br />
plug connector for cable dia.6-8mm (see fig.),<br />
rotatable by 180° increments (3 pins:1,2 electric<br />
pins+PE).<br />
!<br />
Installing the connector box, please pay attention<br />
on the "O" ring which offers environmentalprotection<br />
against the ingress of liquids, dusts or other !<br />
foreign matter.<br />
Explosion proof coils:<br />
See particular instructions sheet delivered with<br />
those coils.<br />
! Prima dell´istallazione dell´elettrovalvola bisogna<br />
togliere l´aria dalla tubazione e pulirla onde<br />
!<br />
!<br />
evitare la presenza di sporcizie (nastro sigillante,<br />
sostanze adesive). Le valvole possono essere<br />
montate all´interfaccia NAMUR<br />
dell´attuatore pneumatico.<br />
A secondo il voltaggio bisogna eseguire le messa<br />
a terra secondo gli standard o regolazioni locali)<br />
Bobine standard:<br />
Connessione elettrica avviene tramite connettore<br />
staccabile per cavi diametri 6-8mm (vedi fig. 1),<br />
ruotabile di 180° (3pin: 1,2 pin elettrici+Terra).<br />
Istallando il connettore bisogna accertare il perfetto<br />
posizionamento dell´O-ring che offre<br />
protezione contro liquidi, polveri e altri agenti.<br />
Bobine antiesplosione:<br />
Vedasi istruzioni particolari legate alle bobine di<br />
fornitura.